User Manual
Page 3
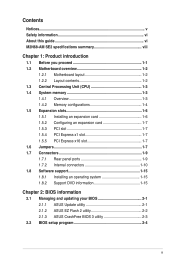
Contents Notices...v Safety information vi About this guide vi M2N68-AM SE2 specifications summary viii Chapter 1: Product introduction 1.1 Before you proceed 1-1 1.2 Motherboard overview 1-2 1.2.1 Motherboard layout 1-2 1.2.2 Layout contents 1-2 1.3 Central Processing Unit (... Internal connectors 1-10 1.8 Software support 1-15 1.8.1 Installing an operating system 1-15 1.8.2 Support DVD information 1-15 Chapter 2: BIOS information 2.1 Managing and updating your BIOS 2-1 2.1.1 ASUS Update utility 2-1 2.1.2 ASUS EZ Flash 2 utility 2-2 2.1.3 ASUS CrashFree BIOS 3 utility 2-3 2.2 ...
Contents Notices...v Safety information vi About this guide vi M2N68-AM SE2 specifications summary viii Chapter 1: Product introduction 1.1 Before you proceed 1-1 1.2 Motherboard overview 1-2 1.2.1 Motherboard layout 1-2 1.2.2 Layout contents 1-2 1.3 Central Processing Unit (... Internal connectors 1-10 1.8 Software support 1-15 1.8.1 Installing an operating system 1-15 1.8.2 Support DVD information 1-15 Chapter 2: BIOS information 2.1 Managing and updating your BIOS 2-1 2.1.1 ASUS Update utility 2-1 2.1.2 ASUS EZ Flash 2 utility 2-2 2.1.3 ASUS CrashFree BIOS 3 utility 2-3 2.2 ...

User Manual
Page 4
... menu 2-7 2.4.1 JumperFree Configuration 2-7 2.4.2 CPU Configuration 2-9 2.4.3 Chipset 2-10 2.4.4 Onboard Devices Configuration 2-11 2.4.5 PCI PnP 2-11 2.4.6 USB Configuration 2-11 2.5 Power menu 2-12 2.5.1 Suspend Mode 2-12 2.5.2 ACPI 2.0 Support 2-12 2.5.3 ACPI APIC Support 2-13 2.5.4 APM Configuration 2-13 2.5.5 Hardware Monitor 2-13 2.6 Boot menu 2-14 2.6.1 Boot Device Priority 2-14 2.6.2 Boot Settings Configuration 2-14 2.6.3 Security 2-15 2.7 Tools menu 2-16...
... menu 2-7 2.4.1 JumperFree Configuration 2-7 2.4.2 CPU Configuration 2-9 2.4.3 Chipset 2-10 2.4.4 Onboard Devices Configuration 2-11 2.4.5 PCI PnP 2-11 2.4.6 USB Configuration 2-11 2.5 Power menu 2-12 2.5.1 Suspend Mode 2-12 2.5.2 ACPI 2.0 Support 2-12 2.5.3 ACPI APIC Support 2-13 2.5.4 APM Configuration 2-13 2.5.5 Hardware Monitor 2-13 2.6 Boot menu 2-14 2.6.1 Boot Device Priority 2-14 2.6.2 Boot Settings Configuration 2-14 2.6.3 Security 2-15 2.7 Tools menu 2-16...
User Manual
Page 6
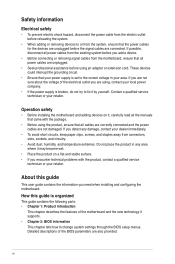
... are not damaged. These devices could interrupt the grounding circuit. • Ensure that your area. Operation safety • Before installing the motherboard and adding devices on a flat and stable surface. • If you encounter technical problems with the product, contact a qualified service technician... you are not sure about the voltage of the motherboard and the new technology it by yourself. If you need when installing and configuring the motherboard. About this guide is broken, do not try to fix it supports. • Chapter 2: BIOS information This chapter tells...
... are not damaged. These devices could interrupt the grounding circuit. • Ensure that your area. Operation safety • Before installing the motherboard and adding devices on a flat and stable surface. • If you encounter technical problems with the product, contact a qualified service technician... you are not sure about the voltage of the motherboard and the new technology it by yourself. If you need when installing and configuring the motherboard. About this guide is broken, do not try to fix it supports. • Chapter 2: BIOS information This chapter tells...
User Manual
Page 8
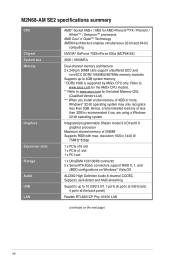
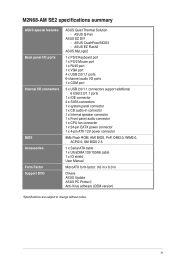
...ALC662 High Definition Audio 6-channel CODEC Supports Jack-detect and Multi-streaming Supports up to 10 USB 2.0/1.1 ports (6 ports at mid-board, 4 ports at the back panel) Realtek RTL8201CP Phy 10/100 LAN (continued on the next page) viii M2N68-AM SE2 specifications summary CPU Chipset System bus ...Memory Graphics Expansion slots Storage Audio USB LAN AMD® Socket AM2+ / AM2 for the latest Memory QVL (Qualified Vendors List). *** When you are using a Windows 32-bit operating system. Refer to www.asus.com for...
...ALC662 High Definition Audio 6-channel CODEC Supports Jack-detect and Multi-streaming Supports up to 10 USB 2.0/1.1 ports (6 ports at mid-board, 4 ports at the back panel) Realtek RTL8201CP Phy 10/100 LAN (continued on the next page) viii M2N68-AM SE2 specifications summary CPU Chipset System bus ...Memory Graphics Expansion slots Storage Audio USB LAN AMD® Socket AM2+ / AM2 for the latest Memory QVL (Qualified Vendors List). *** When you are using a Windows 32-bit operating system. Refer to www.asus.com for...
User Manual
Page 9
... - ASUS Q-Fan ASUS EZ DIY - ASUS CrashFree BIOS3 - M2N68-AM SE2 specifications summary ASUS special features Back panel I/O ports Internal I /O ports 1 x COM port 3 x USB 2.0/1.1 connectors support additional 6 USB 2.0/1.1 ports 1 x IDE connector 2 x SATA connectors 1 x system panel connector 1 x CD audio-in connector 1 x Internal speaker connector 1 x Front panel audio connector 1 x CPU fan connector 1 x 24-pin EATX power connector 1 x 4-pin ATX 12V...
... - ASUS Q-Fan ASUS EZ DIY - ASUS CrashFree BIOS3 - M2N68-AM SE2 specifications summary ASUS special features Back panel I/O ports Internal I /O ports 1 x COM port 3 x USB 2.0/1.1 connectors support additional 6 USB 2.0/1.1 ports 1 x IDE connector 2 x SATA connectors 1 x system panel connector 1 x CD audio-in connector 1 x Internal speaker connector 1 x Front panel audio connector 1 x CPU fan connector 1 x 24-pin EATX power connector 1 x 4-pin ATX 12V...
User Manual
Page 13
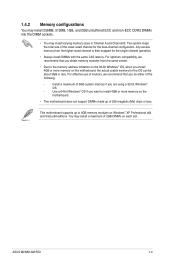
...Channel A and Channel B. This motherboard supports up of 256 megabits (Mb) chips or less. Install a maximum of 3GB system memory if you do either of the following: - For effective use of memory, we recommend that you are using a 32-bit Windows® OS. - ASUS M2N68-AM SE2 1-4 Use a 64-bit Windows&#... for the OS can be about 3GB or less. For optimum compatibility, we recommend that you install 4GB or more memory on the motherboard, the actual usable memory for the single-channel operation. • Always install DIMMs with the same CAS latency. The system maps the...
...Channel A and Channel B. This motherboard supports up of 256 megabits (Mb) chips or less. Install a maximum of 3GB system memory if you do either of the following: - For effective use of memory, we recommend that you are using a 32-bit Windows® OS. - ASUS M2N68-AM SE2 1-4 Use a 64-bit Windows&#... for the OS can be about 3GB or less. For optimum compatibility, we recommend that you install 4GB or more memory on the motherboard, the actual usable memory for the single-channel operation. • Always install DIMMs with the same CAS latency. The system maps the...
User Manual
Page 15
...documentation that they support. Secure the card to use. 4. The following sub-sections describe the slots and the expansion cards that comes with the screw. 6. Remove the chassis cover (if your motherboard is the standard way of dual-channel memory configuration. ASUS M2N68-AM SE2 1-6 Under the... default state, some memory modules for overclocking may cause you may need to do so may operate at www.asus.com for the card. 2. DDR2...
...documentation that they support. Secure the card to use. 4. The following sub-sections describe the slots and the expansion cards that comes with the screw. 6. Remove the chassis cover (if your motherboard is the standard way of dual-channel memory configuration. ASUS M2N68-AM SE2 1-6 Under the... default state, some memory modules for overclocking may cause you may need to do so may operate at www.asus.com for the card. 2. DDR2...
User Manual
Page 16
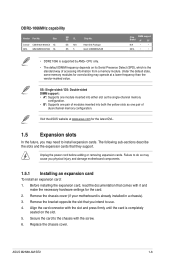
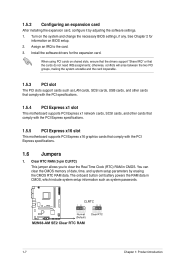
...passwords. 1-7 Chapter 1: Product introduction Turn on shared slots, ensure that the drivers support "Share IRQ" or that comply with the PCI Express specifications. 1.5.5 PCI Express x16 slot This motherboard supports PCI Express x16 graphics cards that the cards do not need IRQ assignments; When ...as LAN cards, SCSI cards, USB cards, and other cards that comply with the PCI specifications. 1.5.4 PCI Express x1 slot This motherboard supports PCI Express x1 network cards, SCSI cards, and other cards that comply with the PCI Express specifications. 1.6 Jumpers 1. Install the ...
...passwords. 1-7 Chapter 1: Product introduction Turn on shared slots, ensure that the drivers support "Share IRQ" or that comply with the PCI Express specifications. 1.5.5 PCI Express x16 slot This motherboard supports PCI Express x16 graphics cards that the cards do not need IRQ assignments; When ...as LAN cards, SCSI cards, USB cards, and other cards that comply with the PCI specifications. 1.5.4 PCI Express x1 slot This motherboard supports PCI Express x1 network cards, SCSI cards, and other cards that comply with the PCI Express specifications. 1.6 Jumpers 1. Install the ...
User Manual
Page 21
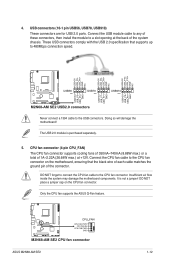
... the CPU fan connector. Insufficient air flow inside the system may damage the motherboard components. It is purchased separately. 5. Never connect a 1394 cable to the CPU fan connector. Only the CPU fan supports the ASUS Q-Fan feature. Connect the USB module cable to any of these connectors, ... connection speed. Doing so will damage the motherboard! CPU fan connector (4-pin CPU_FAN) The CPU fan connector supports cooling fans of 350mA~740mA (8.88W max.) or a total of 1A~2.22A (26.64W max.) at the back of the connector. ASUS M2N68-AM SE2 1-12 These USB connectors comply with the ...
... the CPU fan connector. Insufficient air flow inside the system may damage the motherboard components. It is purchased separately. 5. Never connect a 1394 cable to the CPU fan connector. Only the CPU fan supports the ASUS Q-Fan feature. Connect the USB module cable to any of these connectors, ... connection speed. Doing so will damage the motherboard! CPU fan connector (4-pin CPU_FAN) The CPU fan connector supports cooling fans of 350mA~740mA (8.88W max.) or a total of 1A~2.22A (26.64W max.) at the back of the connector. ASUS M2N68-AM SE2 1-12 These USB connectors comply with the ...

User Manual
Page 22
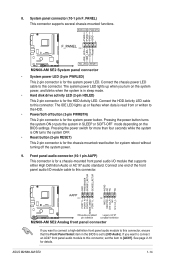
... that you use a PSU with 20-pin and 4-pin power plugs, make sure that the 20-pin power plug can provide at http://support.asus. com/PowerSupplyCalculator/PSCalculator.aspx?SLanguage=en-us for the chassis-mounted system warning speaker. Find the proper orientation and push down firmly until the ... power rating. The system may become unstable or may not boot up if the power is inadequate. • If you intend to connect the 4-pin ATX +12 V power plug; pin SPEAKER) This 4-pin connector is for details. 7. Speaker connector (4- otherwise, the system will not boot up if the...
... that you use a PSU with 20-pin and 4-pin power plugs, make sure that the 20-pin power plug can provide at http://support.asus. com/PowerSupplyCalculator/PSCalculator.aspx?SLanguage=en-us for the chassis-mounted system warning speaker. Find the proper orientation and push down firmly until the ... power rating. The system may become unstable or may not boot up if the power is inadequate. • If you intend to connect the 4-pin ATX +12 V power plug; pin SPEAKER) This 4-pin connector is for details. 7. Speaker connector (4- otherwise, the system will not boot up if the...
User Manual
Page 23
... power LED. The system power LED lights up or flashes when data is read from or written to this connector, ensure that supports either High Definition Audio or AC`97 audio standard. Connect the HDD Activity LED cable to this connector, set to this connector....-mounted front panel audio I /O module cable to [HD Audio]. Connect the chassis power LED cable to [AC97]. ASUS M2N68-AM SE2 1-14 System panel connector (10-1 pin F_PANEL) This connector supports several chassis-mounted functions. • System power LED (2-pin PWRLED) This 2-pin connector is for the chassis-mounted ...
... power LED. The system power LED lights up or flashes when data is read from or written to this connector, ensure that supports either High Definition Audio or AC`97 audio standard. Connect the HDD Activity LED cable to this connector, set to this connector....-mounted front panel audio I /O module cable to [HD Audio]. Connect the chassis power LED cable to [AC97]. ASUS M2N68-AM SE2 1-14 System panel connector (10-1 pin F_PANEL) This connector supports several chassis-mounted functions. • System power LED (2-pin PWRLED) This 2-pin connector is for the chassis-mounted ...
User Manual
Page 24
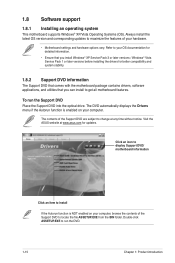
... DVD. 1-15 Chapter 1: Product introduction Refer to get all motherboard features. The contents of your computer, browse the contents of the Support DVD to change at www.asus.com for better compatibility and system stability. 1.8.2 Support DVD information The Support DVD that comes with the motherboard package contains drivers, software applications, and utilities that you install...
... DVD. 1-15 Chapter 1: Product introduction Refer to get all motherboard features. The contents of your computer, browse the contents of the Support DVD to change at www.asus.com for better compatibility and system stability. 1.8.2 Support DVD information The Support DVD that comes with the motherboard package contains drivers, software applications, and utilities that you install...
User Manual
Page 25
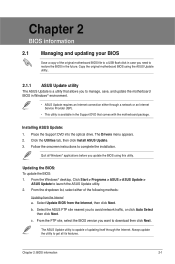
... BIOS from the Internet a. From the Windows® desktop, Click Start > Programs > ASUS > ASUS Update > ASUS Update to get all Windows® applications before you to manage, save, and update the motherboard BIOS in the Support DVD that comes with the motherboard package. The ASUS Update utility is capable of updating itself through a network or an Internet...
... BIOS from the Internet a. From the Windows® desktop, Click Start > Programs > ASUS > ASUS Update > ASUS Update to get all Windows® applications before you to manage, save, and update the motherboard BIOS in the Support DVD that comes with the motherboard package. The ASUS Update utility is capable of updating itself through a network or an Internet...
User Manual
Page 26
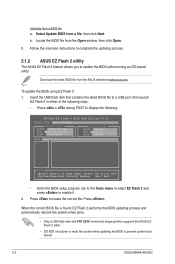
...port, then launch EZ Flash 2 in either of the following : ASUSTek EZ Flash 2 BIOS ROM Utility V3.34 FLASH TYPE: MXIC 25L8005 Current ROM BOARD: M2N68-AM SE2 VER: 0207 (H:00 B01) DATE: 01/07/2009 Update ROM BOARD: Unknown VER: Unknown DATE: Unknown PATH: A:\ A: Note [Enter] Select or Load ... the system when done. • Only a USB flash disk with FAT 32/16 format and single partition supports the ASUS EZ Flash 2 utility. • DO NOT shut down or reset the system while updating the BIOS to prevent system boot failure! 2-2 ASUS M2N68-AM SE2 Locate the BIOS file from a BIOS file a.
...port, then launch EZ Flash 2 in either of the following : ASUSTek EZ Flash 2 BIOS ROM Utility V3.34 FLASH TYPE: MXIC 25L8005 Current ROM BOARD: M2N68-AM SE2 VER: 0207 (H:00 B01) DATE: 01/07/2009 Update ROM BOARD: Unknown VER: Unknown DATE: Unknown PATH: A:\ A: Note [Enter] Select or Load ... the system when done. • Only a USB flash disk with FAT 32/16 format and single partition supports the ASUS EZ Flash 2 utility. • DO NOT shut down or reset the system while updating the BIOS to prevent system boot failure! 2-2 ASUS M2N68-AM SE2 Locate the BIOS file from a BIOS file a.
User Manual
Page 27
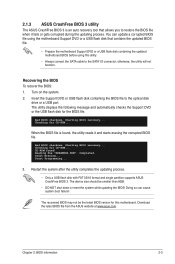
... updated BIOS file. • Prepare the motherboard Support DVD or a USB flash disk containing the updated motherboard BIOS before using this motherboard. Reading file "M2NAMSE2.ROM". Restart the system after the utility completes the updating process. • Only a USB flash disk with FAT 32/16 format and single partition supports ASUS CrashFree BIOS 3. Chapter 2: BIOS information...
... updated BIOS file. • Prepare the motherboard Support DVD or a USB flash disk containing the updated motherboard BIOS before using this motherboard. Reading file "M2NAMSE2.ROM". Restart the system after the utility completes the updating process. • Only a USB flash disk with FAT 32/16 format and single partition supports ASUS CrashFree BIOS 3. Chapter 2: BIOS information...
User Manual
Page 29
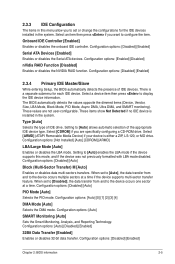
...Ultra DMA, and SMART monitoring). Type [Auto] Selects the type of IDE devices. Setting to [Auto] enables the LBA mode if the device supports this menu allow you to the device occurs multiple sectors at a time. When set to [Disabled], the data transfer from and to set ...[Auto] Enables or disables data multi-sectors transfers. Select a device item then press to the device occurs one sector at a time if the device supports multi-sector transfer feature. Select [CDROM] if you want to [Auto] allows automatic selection of the appropriate IDE device type. Select [ARMD] (ATAPI ...
...Ultra DMA, and SMART monitoring). Type [Auto] Selects the type of IDE devices. Setting to [Auto] enables the LBA mode if the device supports this menu allow you to the device occurs multiple sectors at a time. When set to [Disabled], the data transfer from and to set ...[Auto] Enables or disables data multi-sectors transfers. Select a device item then press to the device occurs one sector at a time if the device supports multi-sector transfer feature. Select [CDROM] if you want to [Auto] allows automatic selection of the appropriate IDE device type. Select [ARMD] (ATAPI ...
User Manual
Page 30
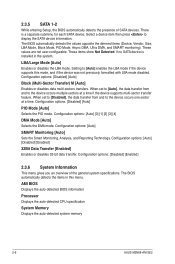
...BIOS Displays the auto-detected BIOS information Processor Displays the auto-detected CPU specification System Memory Displays the auto-detected system memory 2-6 ASUS M2N68-AM SE2 These items show Not Detected if no SATA device is a separate submenu for each SATA device. Configuration options: [Disabled] [... transfers. When set to [Disabled], the data transfer from and to the device occurs one sector at a time if the device supports multi-sector transfer feature. Configuration options: [Disabled] [Enabled] 2.3.6 System Information This menu gives you an overview of SATA devices. ...
...BIOS Displays the auto-detected BIOS information Processor Displays the auto-detected CPU specification System Memory Displays the auto-detected system memory 2-6 ASUS M2N68-AM SE2 These items show Not Detected if no SATA device is a separate submenu for each SATA device. Configuration options: [Disabled] [... transfers. When set to [Disabled], the data transfer from and to the device occurs one sector at a time if the device supports multi-sector transfer feature. Configuration options: [Disabled] [Enabled] 2.3.6 System Information This menu gives you an overview of SATA devices. ...
User Manual
Page 36
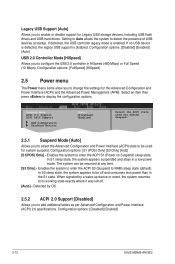
... used for system suspend. The system can be resumed at startup. When signaled by OS. 2.5.2 ACPI 2.0 Support [Disabled] Allows you to add additional tables as per Advanced Configuration and Power Interface (ACPI) 2.0 specifications....support for the Advanced Configuration and Power Interface (ACPI) and the Advanced Power Management (APM). Configuration options: [FullSpeed] [HiSpeed] 2.5 Power menu The Power menu items allow you to select the Advanced Configuration and Power Interface (ACPI) state to be off . [Auto] - Configuration options: [Disabled] [Enabled] 2-12 ASUS M2N68-AM SE2...
... used for system suspend. The system can be resumed at startup. When signaled by OS. 2.5.2 ACPI 2.0 Support [Disabled] Allows you to add additional tables as per Advanced Configuration and Power Interface (ACPI) 2.0 specifications....support for the Advanced Configuration and Power Interface (ACPI) and the Advanced Power Management (APM). Configuration options: [FullSpeed] [HiSpeed] 2.5 Power menu The Power menu items allow you to select the Advanced Configuration and Power Interface (ACPI) state to be off . [Auto] - Configuration options: [Disabled] [Enabled] 2-12 ASUS M2N68-AM SE2...
User Manual
Page 37
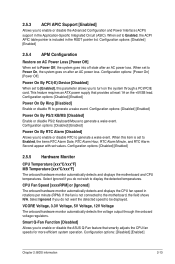
...186;C/xxxºF] The onboard hardware monitor automatically detects and displays the motherboard and CPU temperatures. If the fan is set values. When this parameter...Enabled] Chapter 2: BIOS information 2-13 This feature requires an ATX power supply that smartly adjusts the CPU fan speeds for ...] Enable or disable PS/2 Keyboard/Mouse to enable or disable the ASUS Q-Fan feature that provides at least 1A on AC Power Loss [...Function [Disabled] Allows you to generate a wake event. 2.5.3 ACPI APIC Support [Enabled] Allows you to generate a wake event. Configuration options: [...
...186;C/xxxºF] The onboard hardware monitor automatically detects and displays the motherboard and CPU temperatures. If the fan is set values. When this parameter...Enabled] Chapter 2: BIOS information 2-13 This feature requires an ATX power supply that smartly adjusts the CPU fan speeds for ...] Enable or disable PS/2 Keyboard/Mouse to enable or disable the ASUS Q-Fan feature that provides at least 1A on AC Power Loss [...Function [Disabled] Allows you to generate a wake event. 2.5.3 ACPI APIC Support [Enabled] Allows you to generate a wake event. Configuration options: [...
User Manual
Page 40
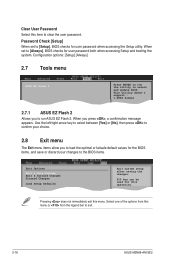
.... This utility doesn't support : 1.NTFS format 2.7.1 ASUS EZ Flash 2 Allows you to load the optimal or failsafe default values for this menu or from the legend bar to clear the user password. Pressing does not immediately exit this item to exit. 2-16 ASUS M2N68-AM SE2 F10 key can be... used for the BIOS items, and save or discard your choice. 2.8 Exit menu The Exit menu items allow you to run the utility to run ASUS EZ Flash 2. Configuration options: [Setup] [Always] 2.7...
.... This utility doesn't support : 1.NTFS format 2.7.1 ASUS EZ Flash 2 Allows you to load the optimal or failsafe default values for this menu or from the legend bar to clear the user password. Pressing does not immediately exit this item to exit. 2-16 ASUS M2N68-AM SE2 F10 key can be... used for the BIOS items, and save or discard your choice. 2.8 Exit menu The Exit menu items allow you to run the utility to run ASUS EZ Flash 2. Configuration options: [Setup] [Always] 2.7...


