
User Manual
Page 4
... 2.4.5 PCI PnP 2-11 2.4.6 USB Configuration 2-11 2.5 Power menu 2-12 2.5.1 Suspend Mode 2-12 2.5.2 ACPI 2.0 Support 2-12 2.5.3 ACPI APIC Support 2-13 2.5.4 APM Configuration 2-13 2.5.5 Hardware Monitor 2-13 2.6 Boot menu 2-14 2.6.1 Boot Device Priority 2-14 2.6.2 Boot Settings Configuration 2-14 2.6.3 Security 2-15 2.7 Tools menu 2-16 2.7.1 ASUS EZ Flash 2 2-16 2.8 Exit menu 2-16 iv
... 2.4.5 PCI PnP 2-11 2.4.6 USB Configuration 2-11 2.5 Power menu 2-12 2.5.1 Suspend Mode 2-12 2.5.2 ACPI 2.0 Support 2-12 2.5.3 ACPI APIC Support 2-13 2.5.4 APM Configuration 2-13 2.5.5 Hardware Monitor 2-13 2.6 Boot menu 2-14 2.6.1 Boot Device Priority 2-14 2.6.2 Boot Settings Configuration 2-14 2.6.3 Security 2-15 2.7 Tools menu 2-16 2.7.1 ASUS EZ Flash 2 2-16 2.8 Exit menu 2-16 iv
User Manual
Page 17
...8226; You do not help, remove the onboard battery and move the cap back to additional USB ports. For system failure due to pins 2-3. ASUS M2N68-AM SE2 1-8 Move the jumper cap from S1 sleep mode (CPU stopped, DRAM refreshed, system running in reduced power mode). Removing the cap will cause system...RTC when the system hangs due to reenter data. Turn OFF the computer and unplug the power cord. 2. Shut down the key during the boot process and enter BIOS setup to overclocking. Except when clearing the RTC RAM, never remove the cap on pins 2-3 for the internal USB ...
...8226; You do not help, remove the onboard battery and move the cap back to additional USB ports. For system failure due to pins 2-3. ASUS M2N68-AM SE2 1-8 Move the jumper cap from S1 sleep mode (CPU stopped, DRAM refreshed, system running in reduced power mode). Removing the cap will cause system...RTC when the system hangs due to reenter data. Turn OFF the computer and unplug the power cord. 2. Shut down the key during the boot process and enter BIOS setup to overclocking. Except when clearing the RTC RAM, never remove the cap on pins 2-3 for the internal USB ...

User Manual
Page 22
...;compliant power supply unit (PSU) with 20-pin and 4-pin power plugs, make sure that the 20-pin power plug can provide at http://support.asus. This PSU type has 24-pin and 4-pin power plugs. • If you intend to the Recommended Power Supply Wattage Calculator at least 15 A... beeps and warnings. 1-13 Chapter 1: Product introduction The speaker allows you are uncertain about the minimum power supply requirement for an ATX power supply. The system may become unstable or may not boot up if the power is inadequate. • DO NOT forget to fit these connectors in only one orientation...
...;compliant power supply unit (PSU) with 20-pin and 4-pin power plugs, make sure that the 20-pin power plug can provide at http://support.asus. This PSU type has 24-pin and 4-pin power plugs. • If you intend to the Recommended Power Supply Wattage Calculator at least 15 A... beeps and warnings. 1-13 Chapter 1: Product introduction The speaker allows you are uncertain about the minimum power supply requirement for an ATX power supply. The system may become unstable or may not boot up if the power is inadequate. • DO NOT forget to fit these connectors in only one orientation...
User Manual
Page 26
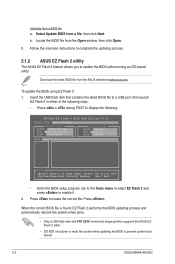
...allows you to update the BIOS without using EZ Flash 2: 1. Go to the Tools menu to select EZ Flash 2 and press to prevent system boot failure! 2-2 ASUS M2N68-AM SE2 Press . b. Updating from a file, then click Next. Select Update BIOS from a BIOS file a. To update the BIOS using an OS‑... to locate the correct file. Press to display the following: ASUSTek EZ Flash 2 BIOS ROM Utility V3.34 FLASH TYPE: MXIC 25L8005 Current ROM BOARD: M2N68-AM SE2 VER: 0207 (H:00 B01) DATE: 01/07/2009 Update ROM BOARD: Unknown VER: Unknown DATE: Unknown PATH: A:\ A: Note [Enter] Select or...
...allows you to update the BIOS without using EZ Flash 2: 1. Go to the Tools menu to select EZ Flash 2 and press to prevent system boot failure! 2-2 ASUS M2N68-AM SE2 Press . b. Updating from a file, then click Next. Select Update BIOS from a BIOS file a. To update the BIOS using an OS‑... to locate the correct file. Press to display the following: ASUSTek EZ Flash 2 BIOS ROM Utility V3.34 FLASH TYPE: MXIC 25L8005 Current ROM BOARD: M2N68-AM SE2 VER: 0207 (H:00 B01) DATE: 01/07/2009 Update ROM BOARD: Unknown VER: Unknown DATE: Unknown PATH: A:\ A: Note [Enter] Select or...
User Manual
Page 27
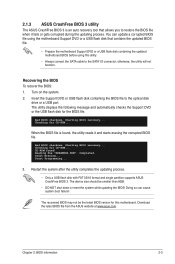
...flash disk containing the updated motherboard BIOS before using this motherboard. Starting BIOS recovery... CD-ROM found , the utility reads it fails or gets corrupted during the updating process. Start Programming... 3. Download the latest BIOS file from the ASUS website at www.asus.com. otherwise, the utility... will not function. Checking for CD-ROM... Start Erasing... The device size should be the latest BIOS version for the BIOS file. You can cause system boot failure! Insert the Support DVD...
...flash disk containing the updated motherboard BIOS before using this motherboard. Starting BIOS recovery... CD-ROM found , the utility reads it fails or gets corrupted during the updating process. Start Programming... 3. Download the latest BIOS file from the ASUS website at www.asus.com. otherwise, the utility... will not function. Checking for CD-ROM... Start Erasing... The device size should be the latest BIOS version for the BIOS file. You can cause system boot failure! Insert the Support DVD...
User Manual
Page 28
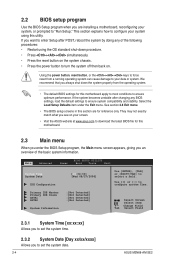
...system chassis. • Press the power button to turn the system off then back on your data or system. Main Advanced Power BIOS SETUP UTILITY Boot Tools Exit System Time 19:34:30] System Date [Wed 08/27/2008] IDE Configuration Use [ENTER], [TAB] or [SHIFT-TAB] to ...to your screen. • Visit the ASUS website at www.asus.com to download the latest BIOS file for this motherboard. 2.3 Main menu When you enter the BIOS Setup program, the Main menu screen appears, giving you want to set the system date. 2-4 ASUS M2N68-AM SE2 They may not exactly match what you...
...system chassis. • Press the power button to turn the system off then back on your data or system. Main Advanced Power BIOS SETUP UTILITY Boot Tools Exit System Time 19:34:30] System Date [Wed 08/27/2008] IDE Configuration Use [ENTER], [TAB] or [SHIFT-TAB] to ...to your screen. • Visit the ASUS website at www.asus.com to download the latest BIOS file for this motherboard. 2.3 Main menu When you enter the BIOS Setup program, the Main menu screen appears, giving you want to set the system date. 2-4 ASUS M2N68-AM SE2 They may not exactly match what you...
User Manual
Page 31
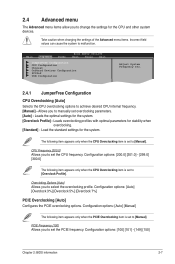
... when the CPU Overclocking item is set the CPU frequency. Configuration options: [100] [101] - [149] [150] Chapter 2: BIOS information 2-7 Main Advanced Power BIOS SETUP UTILITY Boot Tools Exit JumperFree Configuration CPU Configuration Chipset Onboard Devices Configuration PCIPnP USB Configuration Adjust System Frequency etc. 2.4.1 JumperFree Configuration CPU Overclocking [Auto] Selects the CPU...
... when the CPU Overclocking item is set the CPU frequency. Configuration options: [100] [101] - [149] [150] Chapter 2: BIOS information 2-7 Main Advanced Power BIOS SETUP UTILITY Boot Tools Exit JumperFree Configuration CPU Configuration Chipset Onboard Devices Configuration PCIPnP USB Configuration Adjust System Frequency etc. 2.4.1 JumperFree Configuration CPU Overclocking [Auto] Selects the CPU...
User Manual
Page 35
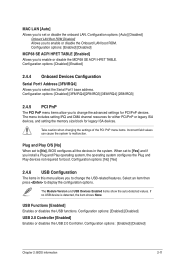
...Configuration options: [Enabled] [Disabled] USB 2.0 Controller [Enabled] Enables or disables the USB 2.0 Controller. Configuration options: [Auto] [Disabled] Onboard LAN Boot ROM [Disabled] Allows you to [No], BIOS configures all the devices in this menu allows you install a Plug and Play operating system, the operating ...system configures the Plug and Play devices not required for boot. Configuration options: [Disabled] [3F8/IRQ4][2F8/IRQ3] [3E8/IRQ4] [2E8/IRQ3] 2.4.5 PCI PnP The PCI PnP menu items allow...
...Configuration options: [Enabled] [Disabled] USB 2.0 Controller [Enabled] Enables or disables the USB 2.0 Controller. Configuration options: [Auto] [Disabled] Onboard LAN Boot ROM [Disabled] Allows you to [No], BIOS configures all the devices in this menu allows you install a Plug and Play operating system, the operating ...system configures the Plug and Play devices not required for boot. Configuration options: [Disabled] [3F8/IRQ4][2F8/IRQ3] [3E8/IRQ4] [2E8/IRQ3] 2.4.5 PCI PnP The PCI PnP menu items allow...
User Manual
Page 38
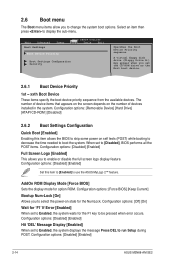
...] Wait for the F1 key to be pressed when error occurs. Configuration options: [Disabled] [Enabled] 2-14 ASUS M2N68-AM SE2 Main Advanced Boot Settings Power Boot Device Priority BIOS SETUP UTILITY Boot Tools Exit Boot Settings Configuration Security Specifies the Boot Device Priority sequence. When set to Enabled, the system waits for 'F1' If Error [Enabled] When set...
...] Wait for the F1 key to be pressed when error occurs. Configuration options: [Disabled] [Enabled] 2-14 ASUS M2N68-AM SE2 Main Advanced Boot Settings Power Boot Device Priority BIOS SETUP UTILITY Boot Tools Exit Boot Settings Configuration Security Specifies the Boot Device Priority sequence. When set to Enabled, the system waits for 'F1' If Error [Enabled] When set...
User Manual
Page 40
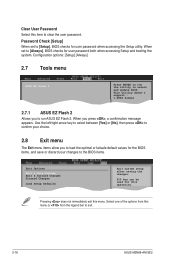
Clear User Password Select this menu or from the legend bar to exit. 2-16 ASUS M2N68-AM SE2 When you to load the optimal or failsafe default values for user password both when accessing Setup and booting the system. F10 key can be used for user password when accessing the Setup utility. Configuration options: [Setup...
Clear User Password Select this menu or from the legend bar to exit. 2-16 ASUS M2N68-AM SE2 When you to load the optimal or failsafe default values for user password both when accessing Setup and booting the system. F10 key can be used for user password when accessing the Setup utility. Configuration options: [Setup...


