
User Manual
Page 10
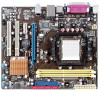
...in soft-off or the power cord is switched off mode. Before you start installing the motherboard, and hardware devices on it on them due to static electricity • Hold components by the edges to page ix for buying an ASUS® M2N68-AM PLUS motherboard! The illustration below ...shows the location of the onboard LED. 1-1 Chapter 1: Product introduction Refer to avoid touching the ICs on a grounded antistatic pad or in the bag that came with a standby power LED that you must shut down the system ...
...in soft-off or the power cord is switched off mode. Before you start installing the motherboard, and hardware devices on it on them due to static electricity • Hold components by the edges to page ix for buying an ASUS® M2N68-AM PLUS motherboard! The illustration below ...shows the location of the onboard LED. 1-1 Chapter 1: Product introduction Refer to avoid touching the ICs on a grounded antistatic pad or in the bag that came with a standby power LED that you must shut down the system ...

User Manual
Page 16
...system passwords. USB device wake-up (3-pin USBPW5-10) Set these jumpers to +5V to wake up from S3 and S4 sleep modes (no power to overclocking. Except when clearing the RTC RAM, never remove the cap on pins 2-3 for the internal USB connectors that you to clear the CMOS... move the jumper again to clear the Real Time Clock (RTC) RAM in low power mode) using the connected USB devices. Keep the cap on CLRTC jumper default position. For system failure due to pins 1-2. 3. Shut down the key during the boot process and enter BIOS setup to pins 2-3. Clear RTC...
...system passwords. USB device wake-up (3-pin USBPW5-10) Set these jumpers to +5V to wake up from S3 and S4 sleep modes (no power to overclocking. Except when clearing the RTC RAM, never remove the cap on pins 2-3 for the internal USB connectors that you to clear the CMOS... move the jumper again to clear the Real Time Clock (RTC) RAM in low power mode) using the connected USB devices. Keep the cap on CLRTC jumper default position. For system failure due to pins 1-2. 3. Shut down the key during the boot process and enter BIOS setup to pins 2-3. Clear RTC...
User Manual
Page 28
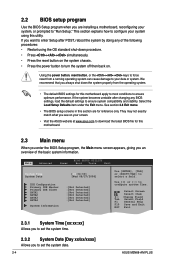
...you to set the system time. 2.3.2 System Date [Day xx/xx/xxxx] Allows you always shut down the system properly from a running operating system can cause damage to your system using the OS standard shut-down procedure. • Press ++ simultaneously. • Press the reset button on the system ...power button to turn the system off then back on your system, or prompted to "Run Setup." Select Screen Select Item +- Change Field Tab Select Field F1 General Help F10 Save and Exit ESC Exit 2.3.1 System Time [xx:xx:xx] Allows you to set the system date. 2-4 ASUS M2N68-AM PLUS...
...you to set the system time. 2.3.2 System Date [Day xx/xx/xxxx] Allows you always shut down the system properly from a running operating system can cause damage to your system using the OS standard shut-down procedure. • Press ++ simultaneously. • Press the reset button on the system ...power button to turn the system off then back on your system, or prompted to "Run Setup." Select Screen Select Item +- Change Field Tab Select Field F1 General Help F10 Save and Exit ESC Exit 2.3.1 System Time [xx:xx:xx] Allows you to set the system date. 2-4 ASUS M2N68-AM PLUS...


