
User Manual
Page 9
... parts: • Chapter 1: Product introduction This chapter describes the features of the motherboard and the new technology it supports. • Chapter 2: Hardware information This chapter lists the hardware setup procedures that comes with the motherboard package. • Chapter 6: NVIDIA® SLI™ technology support This chapter tells how to perform when installing system components.
... parts: • Chapter 1: Product introduction This chapter describes the features of the motherboard and the new technology it supports. • Chapter 2: Hardware information This chapter lists the hardware setup procedures that comes with the motherboard package. • Chapter 6: NVIDIA® SLI™ technology support This chapter tells how to perform when installing system components.

User Manual
Page 13
This chapter describes the motherboard features and the new technologies it supports. 1Product introduction
This chapter describes the motherboard features and the new technologies it supports. 1Product introduction

User Manual
Page 15
... ASUS SLI™ bridge 1 x ASUS Q-Connector Kit (USB, System panel; 1.1 Welcome! Retail version only) Application CDs ASUS motherboard support CD Documentation User guide If any of ASUS quality motherboards! Before you for the following items. Motherboard ASUS M2N-SLI motherboard Cables 2 x Serial ATA signal cables 1 x Serial ATA power cable with the list below. 1.2 Package contents Check your retailer. The motherboard delivers a host of new...
... ASUS SLI™ bridge 1 x ASUS Q-Connector Kit (USB, System panel; 1.1 Welcome! Retail version only) Application CDs ASUS motherboard support CD Documentation User guide If any of ASUS quality motherboards! Before you for the following items. Motherboard ASUS M2N-SLI motherboard Cables 2 x Serial ATA signal cables 1 x Serial ATA power cable with the list below. 1.2 Package contents Check your retailer. The motherboard delivers a host of new...

User Manual
Page 18
... details. ASUS MyLogo2™ This new feature present in airflow between the PCI Express x16 slots allowing an increase in the motherboard allows you to easily connect or disconnect the chassis front panel cables to the motherboard. 1.3.2 ASUS Special features ASUS Two-slot thermal design The motherboard is a user-friendly BIOS update utility. ASUS CrashFree BIOS 3 The ASUS CrashFree...
... details. ASUS MyLogo2™ This new feature present in airflow between the PCI Express x16 slots allowing an increase in the motherboard allows you to easily connect or disconnect the chassis front panel cables to the motherboard. 1.3.2 ASUS Special features ASUS Two-slot thermal design The motherboard is a user-friendly BIOS update utility. ASUS CrashFree BIOS 3 The ASUS CrashFree...
User Manual
Page 62
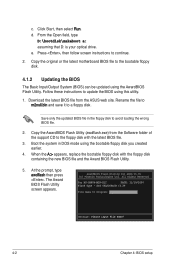
...ASUS V1.01 (C) Phoenix Technologies Ltd. c. Rename the file to m2nsli.bin and save it to continue. 2. When the A:> appears, replace the bootable floppy disk with the latest BIOS file. 3. All Rights Reserved For NF-CK804-M2N-SLI... DATE: 11/18/2004 Flash Type - d. Follow these instructions to update the BIOS using the bootable floppy disk you created earlier. 4. Boot the system in the floppy disk to the floppy disk with the floppy disk containing the new... Flash Utility. Copy the original or the latest motherboard BIOS file to Program: Message: Please input File...
...ASUS V1.01 (C) Phoenix Technologies Ltd. c. Rename the file to m2nsli.bin and save it to continue. 2. When the A:> appears, replace the bootable floppy disk with the latest BIOS file. 3. All Rights Reserved For NF-CK804-M2N-SLI... DATE: 11/18/2004 Flash Type - d. Follow these instructions to update the BIOS using the bootable floppy disk you created earlier. 4. Boot the system in the floppy disk to the floppy disk with the floppy disk containing the new... Flash Utility. Copy the original or the latest motherboard BIOS file to Program: Message: Please input File...

User Manual
Page 77
... Primary IDE hard disk drives to active. Configuration options: [Disabled] [Auto] Transfer Mode Shows the Transfer mode. Make sure to partition and format new IDE hard disk drives. ASUS M2N-SLI 4-17 This item is not configurable. Sector Shows the number of the hard disk cylinders. This item is not configurable. After entering the...
... Primary IDE hard disk drives to active. Configuration options: [Disabled] [Auto] Transfer Mode Shows the Transfer mode. Make sure to partition and format new IDE hard disk drives. ASUS M2N-SLI 4-17 This item is not configurable. Sector Shows the number of the hard disk cylinders. This item is not configurable. After entering the...

User Manual
Page 79
... size of installed memory. This item is necessary so that you to partition and format new IDE hard disk drives. After entering the IDE hard disk drive information into BIOS, use a disk utility, such as FDISK, to enable or disable the HDD Self-Monitoring Analysis and Reporting Technology (SMART) feature. ASUS M2N-SLI 4-19
... size of installed memory. This item is necessary so that you to partition and format new IDE hard disk drives. After entering the IDE hard disk drive information into BIOS, use a disk utility, such as FDISK, to enable or disable the HDD Self-Monitoring Analysis and Reporting Technology (SMART) feature. ASUS M2N-SLI 4-19

User Manual
Page 128
...configure IDE and Serial ATA hard disk drives as a RAID set. Fault tolerance is a striped configuration with the NVIDIA® SLI Southbridge RAID controllers that allow you get all applications to read and write data in the other drive. Two hard disks perform the... is provided through mirroring while adding performance through striping. Among the advantages of two new identical hard disk drives is required for this setup. JBOD (Spanning) stands for this setup. 5.4 RAID configurations The motherboard comes with each stripe a RAID 1 array of drives. Use of RAID 5 ...
...configure IDE and Serial ATA hard disk drives as a RAID set. Fault tolerance is a striped configuration with the NVIDIA® SLI Southbridge RAID controllers that allow you get all applications to read and write data in the other drive. Two hard disks perform the... is provided through mirroring while adding performance through striping. Among the advantages of two new identical hard disk drives is required for this setup. JBOD (Spanning) stands for this setup. 5.4 RAID configurations The motherboard comes with each stripe a RAID 1 array of drives. Use of RAID 5 ...

User Manual
Page 131
..., and may not exactly match the items on your computer. 2. Mirroring Striping Stripe Mirroring Spanning ASUS M2N-SLI 5-23 From the NVIDIA® RAID utility Define a New Array menu, select RAID Mode then press . During POST, press to move through and select ...keys to select a RAID mode then press . The RAID BIOS setup screens shown in this section are the navigation keys. Define a New Array - RAID Mode: Striping Free Disks Loc Disk Model Name 1.0.M XXXXXXXXXXXXXXXXXX 1.1.M XXXXXXXXXXXXXXXXXX 2.0.M XXXXXXXXXXXXXXXXXX 2.1.M XXXXXXXXXXXXXXXXXX Striping Block: Optimal Array ...
..., and may not exactly match the items on your computer. 2. Mirroring Striping Stripe Mirroring Spanning ASUS M2N-SLI 5-23 From the NVIDIA® RAID utility Define a New Array menu, select RAID Mode then press . During POST, press to move through and select ...keys to select a RAID mode then press . The RAID BIOS setup screens shown in this section are the navigation keys. Define a New Array - RAID Mode: Striping Free Disks Loc Disk Model Name 1.0.M XXXXXXXXXXXXXXXXXX 1.1.M XXXXXXXXXXXXXXXXXX 2.0.M XXXXXXXXXXXXXXXXXX 2.1.M XXXXXXXXXXXXXXXXXX Striping Block: Optimal Array ...

User Manual
Page 133
... Width: 1 Striping Block: 64K Adapt Channel M/S 2 1 1 0 Master Master Index Disk Model Name 0 XXXXXXXXXXXXXXXXX 1 XXXXXXXXXXXXXXXXX Capacity XXX.XXGB XXX.XXGB [R] Rebuild [D] Delete [C] Clear Disk [ENTER] Return ASUS M2N-SLI 5-25 Array 1 : NVIDIA MIRROR XXX.XXG - Array List - The RAID Array details appear. Boot No Id Status 4 Healthy Vendor NVIDIA Array Model Name MIRROR XXX...
... Width: 1 Striping Block: 64K Adapt Channel M/S 2 1 1 0 Master Master Index Disk Model Name 0 XXXXXXXXXXXXXXXXX 1 XXXXXXXXXXXXXXXXX Capacity XXX.XXGB XXX.XXGB [R] Rebuild [D] Delete [C] Clear Disk [ENTER] Return ASUS M2N-SLI 5-25 Array 1 : NVIDIA MIRROR XXX.XXG - Array List - The RAID Array details appear. Boot No Id Status 4 Healthy Vendor NVIDIA Array Model Name MIRROR XXX...

User Manual
Page 134
Use the up or down arrow keys to select a RAID array to rebuild a RAID array. Select Disk Inside Array - A new set of navigation keys is displayed on the bottom of the screen. 2. The following confirmation message appears. Rebuild array? [ENTER] OK [ESC] Cancel 4. After the ...
Use the up or down arrow keys to select a RAID array to rebuild a RAID array. Select Disk Inside Array - A new set of navigation keys is displayed on the bottom of the screen. 2. The following confirmation message appears. Rebuild array? [ENTER] OK [ESC] Cancel 4. After the ...

User Manual
Page 135
Deleting a RAID array To delete a RAID array: 1. The following confirmation message appears. Press to select a RAID array then press . ASUS M2N-SLI 5-27 From the Array List menu, use the up or down arrow keys to delete a RAID array. Press to delete array or...: 64K Adapt Channel M/S 2 1 1 0 Master Master Index Disk Model Name 0 XXXXXXXXXXXXXXXXX 1 XXXXXXXXXXXXXXXXX Capacity XXX.XXGB XXX.XXGB [R] Rebuild [D] Delete [C] Clear Disk [ENTER] Return A new set of navigation keys is displayed on the RAID drives will be lost! 4. If you selected Yes, the Define...
Deleting a RAID array To delete a RAID array: 1. The following confirmation message appears. Press to select a RAID array then press . ASUS M2N-SLI 5-27 From the Array List menu, use the up or down arrow keys to delete a RAID array. Press to delete array or...: 64K Adapt Channel M/S 2 1 1 0 Master Master Index Disk Model Name 0 XXXXXXXXXXXXXXXXX 1 XXXXXXXXXXXXXXXXX Capacity XXX.XXGB XXX.XXGB [R] Rebuild [D] Delete [C] Clear Disk [ENTER] Return A new set of navigation keys is displayed on the RAID drives will be lost! 4. If you selected Yes, the Define...

User Manual
Page 136
... Width: 1 Striping Block: 64K Adapt Channel M/S 2 1 1 0 Master Master Index Disk Model Name 0 XXXXXXXXXXXXXXXXX 1 XXXXXXXXXXXXXXXXX Capacity XXX.XXGB XXX.XXGB [R] Rebuild [D] Delete [C] Clear Disk [ENTER] Return A new set of the screen. 2. The RAID Array details appear. Take caution in using this option. Clearing a disk data To clear disk data: 1.
... Width: 1 Striping Block: 64K Adapt Channel M/S 2 1 1 0 Master Master Index Disk Model Name 0 XXXXXXXXXXXXXXXXX 1 XXXXXXXXXXXXXXXXX Capacity XXX.XXGB XXX.XXGB [R] Rebuild [D] Delete [C] Clear Disk [ENTER] Return A new set of the screen. 2. The RAID Array details appear. Take caution in using this option. Clearing a disk data To clear disk data: 1.


