

User Manual
Page 31
Version 1.19(ASUS V2.07(03.11.24BB)) Copyright (C) 2002 American Megatrends, Inc. ok A:\> 當 BIOS DOS 31 exe 2 DOS afudos /o[filename filename A:\>afudos /oOLDBIOS1.rom 3. 按下 afudos /oOLDBIOS1.rom AMI Firmware Update Utility - done Write to file...... All rights reserved. Reading flash ..... BIOS 2.1 使用 AFUDOS BIOS AFUDOS DOS BIOS BIOS 程式。AFUDOS BIOS BIOS BIOS 程式 BIOS 程式。 1.2MB BIOS 1 AFUDOS 程式(afudos.
Version 1.19(ASUS V2.07(03.11.24BB)) Copyright (C) 2002 American Megatrends, Inc. ok A:\> 當 BIOS DOS 31 exe 2 DOS afudos /o[filename filename A:\>afudos /oOLDBIOS1.rom 3. 按下 afudos /oOLDBIOS1.rom AMI Firmware Update Utility - done Write to file...... All rights reserved. Reading flash ..... BIOS 2.1 使用 AFUDOS BIOS AFUDOS DOS BIOS BIOS 程式。AFUDOS BIOS BIOS BIOS 程式 BIOS 程式。 1.2MB BIOS 1 AFUDOS 程式(afudos.

User Manual
Page 32
...Copyright (C) 2002 American Megatrends, Inc. done Please restart your computer A:\> 32 BIOS Do not turn off power during flash BIOS Reading file ....... Version 1.19(ASUS V2.07(03.11.24BB)) Copyright (C) 2002 American Megatrends, Inc. All ......... AFUDOS BIOS 程式。 A:\>afudos /iP5B-VM DO.ROM AMI Firmware Update Utility - 更新 BIOS 程式 AFUDOS BIOS 程式。 1 tw.asus.com BIOS 片中。 BIOS BIOS 2. 將 AFUDOS.EXE BIOS 3 DOS afudos /i[filename filename BIOS 程式...
...Copyright (C) 2002 American Megatrends, Inc. done Please restart your computer A:\> 32 BIOS Do not turn off power during flash BIOS Reading file ....... Version 1.19(ASUS V2.07(03.11.24BB)) Copyright (C) 2002 American Megatrends, Inc. All ......... AFUDOS BIOS 程式。 A:\>afudos /iP5B-VM DO.ROM AMI Firmware Update Utility - 更新 BIOS 程式 AFUDOS BIOS 程式。 1 tw.asus.com BIOS 片中。 BIOS BIOS 2. 將 AFUDOS.EXE BIOS 3 DOS afudos /i[filename filename BIOS 程式...

User Manual
Page 33
... 程式(AWDFLASH.EXE BIOS AwardBIOS Flash BIOS 程式。 1 http://tw.asus.com BIOS M2N-VM HDMI.bin FAT 32/16 格式的 USB BIOS 2 CD/DVD AwardBIOS Flash BIOS 3 DOS 4. 當 A BIOS 檔案與 AwardBIOS Flash 5 A awdflash 並按下 鍵。 AwardBIOS Flash Utility for ASUS V1.14 (C) Phoenix Technologies Ltd...
... 程式(AWDFLASH.EXE BIOS AwardBIOS Flash BIOS 程式。 1 http://tw.asus.com BIOS M2N-VM HDMI.bin FAT 32/16 格式的 USB BIOS 2 CD/DVD AwardBIOS Flash BIOS 3 DOS 4. 當 A BIOS 檔案與 AwardBIOS Flash 5 A awdflash 並按下 鍵。 AwardBIOS Flash Utility for ASUS V1.14 (C) Phoenix Technologies Ltd...

User Manual
Page 34
7 BIOS N BIOS 8 BIOS BIOS AwardBIOS Flash Utility for ASUS V1.14 (C) Phoenix Technologies Ltd. PMC Pm49FL004T LPC/FWH File Name to Continue Write OK F1 Reset No Update Write Fail 34 BIOS PMC Pm49FL004T LPC/FWH File Name to Program: M2A-VM HDMI.bin Flashing Complete Press to Program: ... OK Write OK No Update Write Fail Warning: Don't Turn Off Power Or Reset System! 在更新 BIOS 9 Flash Complete BIOS F1 AwardBIOS Flash Utility for ASUS V1.14 (C) Phoenix Technologies Ltd. All Rights Reserved For C51PV-MCP51-M2A-VM HDMI-00 DATE:04/13/2006...
7 BIOS N BIOS 8 BIOS BIOS AwardBIOS Flash Utility for ASUS V1.14 (C) Phoenix Technologies Ltd. PMC Pm49FL004T LPC/FWH File Name to Continue Write OK F1 Reset No Update Write Fail 34 BIOS PMC Pm49FL004T LPC/FWH File Name to Program: M2A-VM HDMI.bin Flashing Complete Press to Program: ... OK Write OK No Update Write Fail Warning: Don't Turn Off Power Or Reset System! 在更新 BIOS 9 Flash Complete BIOS F1 AwardBIOS Flash Utility for ASUS V1.14 (C) Phoenix Technologies Ltd. All Rights Reserved For C51PV-MCP51-M2A-VM HDMI-00 DATE:04/13/2006...

User Manual
Page 3
Contents Notices...v Safety information vi About this guide vi M2A74-AM SE specifications summary viii Chapter 1: Product introduction 1.1 Before you proceed 1-1 1.2 Motherboard overview 1-2 1.2.1 Motherboard layout 1-2 1.2.2 Layout contents 1-2 1.3... Internal connectors 1-10 1.8 Software support 1-15 1.8.1 Installing an operating system 1-15 1.8.2 Support DVD information 1-15 Chapter 2: BIOS information 2.1 Managing and updating your BIOS 2-1 2.1.1 ASUS Update utility 2-1 2.1.2 ASUS EZ Flash 2 utility 2-2 2.1.3 ASUS CrashFree BIOS 3 utility 2-3 2.2 BIOS setup program 2-4 iii
Contents Notices...v Safety information vi About this guide vi M2A74-AM SE specifications summary viii Chapter 1: Product introduction 1.1 Before you proceed 1-1 1.2 Motherboard overview 1-2 1.2.1 Motherboard layout 1-2 1.2.2 Layout contents 1-2 1.3... Internal connectors 1-10 1.8 Software support 1-15 1.8.1 Installing an operating system 1-15 1.8.2 Support DVD information 1-15 Chapter 2: BIOS information 2.1 Managing and updating your BIOS 2-1 2.1.1 ASUS Update utility 2-1 2.1.2 ASUS EZ Flash 2 utility 2-2 2.1.3 ASUS CrashFree BIOS 3 utility 2-3 2.2 BIOS setup program 2-4 iii
User Manual
Page 6
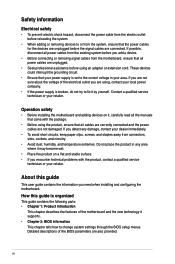
...parts: • Chapter 1: Product introduction This chapter describes the features of the motherboard and the new technology it supports. • Chapter 2: BIOS information This chapter tells how to fix it by yourself. If you detect any area where it , carefully read all cables are correctly connected... on a flat and stable surface. • If you are not damaged. vi If you are not sure about the voltage of the BIOS parameters are also provided. Detailed descriptions of the electrical outlet you encounter technical problems with the package. • Before using the product, ensure...
...parts: • Chapter 1: Product introduction This chapter describes the features of the motherboard and the new technology it supports. • Chapter 2: BIOS information This chapter tells how to fix it by yourself. If you detect any area where it , carefully read all cables are correctly connected... on a flat and stable surface. • If you are not damaged. vi If you are not sure about the voltage of the BIOS parameters are also provided. Detailed descriptions of the electrical outlet you encounter technical problems with the package. • Before using the product, ensure...
User Manual
Page 9
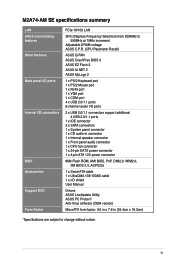
M2A74-AM SE specifications summary LAN ASUS overclocking features Other features Back panel I/O ports Internal I/O connectors BIOS Accessories Support DVD Form Factor PCIe 10/100 LAN SFS (Stepless Frequency Selection) from 200MHz to 550MHz at 1MHz increment Adjustable DRAM voltage ASUS C.P.R. (CPU Parameter Recall) ASUS Q-FAN ASUS CrashFree BIOS 3 ASUS EZ Flash 2 ASUS AI NET 2 ASUS... 8Mb Flash ROM, AMI BIOS, PnP, DMI2.0, WfM2.0, SM BIOS 2.5, ACPI2.0a 1 x Serial ATA cable 1 x UltraDMA 133/100/66 cable 1 x I/O shield User Manual Drivers ASUS LiveUpdate Utility ASUS PC Probe II Anti-Virus...
M2A74-AM SE specifications summary LAN ASUS overclocking features Other features Back panel I/O ports Internal I/O connectors BIOS Accessories Support DVD Form Factor PCIe 10/100 LAN SFS (Stepless Frequency Selection) from 200MHz to 550MHz at 1MHz increment Adjustable DRAM voltage ASUS C.P.R. (CPU Parameter Recall) ASUS Q-FAN ASUS CrashFree BIOS 3 ASUS EZ Flash 2 ASUS AI NET 2 ASUS... 8Mb Flash ROM, AMI BIOS, PnP, DMI2.0, WfM2.0, SM BIOS 2.5, ACPI2.0a 1 x Serial ATA cable 1 x UltraDMA 133/100/66 cable 1 x I/O shield User Manual Drivers ASUS LiveUpdate Utility ASUS PC Probe II Anti-Virus...
User Manual
Page 16
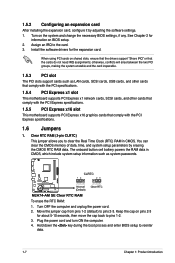
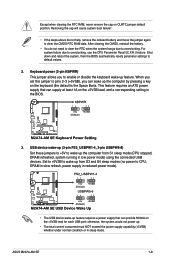
...to reenter data. 1-7 Chapter 1: Product introduction See Chapter 2 for the expansion card. Hold down the key during the boot process and enter BIOS setup to pins 2-3. The onboard button cell battery powers the RAM data in CMOS. otherwise, conflicts will arise between the two PCI groups, ... turn ON the computer. 4. To erase the RTC RAM: 1. Install the software drivers for information on the system and change the necessary BIOS settings, if any. Assign an IRQ to pins 1-2. 3. 1.5.2 Configuring an expansion card After installing the expansion card, configure it by erasing...
...to reenter data. 1-7 Chapter 1: Product introduction See Chapter 2 for the expansion card. Hold down the key during the boot process and enter BIOS setup to pins 2-3. The onboard button cell battery powers the RAM data in CMOS. otherwise, conflicts will arise between the two PCI groups, ... turn ON the computer. 4. To erase the RTC RAM: 1. Install the software drivers for information on the system and change the necessary BIOS settings, if any. Assign an IRQ to pins 1-2. 3. 1.5.2 Configuring an expansion card After installing the expansion card, configure it by erasing...
User Manual
Page 17
... clear the CMOS RTC RAM data. Except when clearing the RTC RAM, never remove the cap on the +5VSB lead, and a corresponding setting in the BIOS. 3. ASUS M2A74-AM SE 1-8 For system failure due to overclocking. After clearing the CMOS, reinstall the battery. • You do not help, remove the onboard battery and move...
... clear the CMOS RTC RAM data. Except when clearing the RTC RAM, never remove the cap on the +5VSB lead, and a corresponding setting in the BIOS. 3. ASUS M2A74-AM SE 1-8 For system failure due to overclocking. After clearing the CMOS, reinstall the battery. • You do not help, remove the onboard battery and move...
User Manual
Page 23
... LED lights up when you turn on the system power, and blinks when the system is in SLEEP or SOFT-OFF mode depending on the BIOS settings. If you want to connect a high-definition front panel audio module to this connector. System panel connector (10-1 pin F_PANEL) This connector supports several... is read from or written to this connector. Connect one end of the front panel audio I /O module that the Front Panel Select item in the BIOS is for details. ASUS M2A74-AM SE 1-14 See page 2-11 for the system power button.
... LED lights up when you turn on the system power, and blinks when the system is in SLEEP or SOFT-OFF mode depending on the BIOS settings. If you want to connect a high-definition front panel audio module to this connector. System panel connector (10-1 pin F_PANEL) This connector supports several... is read from or written to this connector. Connect one end of the front panel audio I /O module that the Front Panel Select item in the BIOS is for details. ASUS M2A74-AM SE 1-14 See page 2-11 for the system power button.
User Manual
Page 25
... all its features. Follow the onscreen instructions to download then click Next. Chapter 2 BIOS information 2.1 Managing and updating your BIOS Save a copy of the original motherboard BIOS file to a USB flash disk in case you update the BIOS using the ASUS Update utility. 2.1.1 ASUS Update utility The ASUS Update is a utility that comes with the motherboard package.
... all its features. Follow the onscreen instructions to download then click Next. Chapter 2 BIOS information 2.1 Managing and updating your BIOS Save a copy of the original motherboard BIOS file to a USB flash disk in case you update the BIOS using the ASUS Update utility. 2.1.1 ASUS Update utility The ASUS Update is a utility that comes with the motherboard package.
User Manual
Page 26
...; Press + during POST to locate the correct file. Press to display the following: ASUSTek EZ Flash 2 BIOS ROM Utility V3.27 FLASH TYPE: MXIC 25L8005 Current ROM BOARD: M2A74-AM SE VER: 0203 (H:00 B:01) DATE: 02/05/2009 Update ROM BOARD: Unknown VER: Unknown DATE: Unknown...the BIOS to update the BIOS without using EZ Flash 2: 1. Press . Updating from the ASUS website at www.asus.com. Follow the onscreen instructions to complete the updating process. 2.1.2 ASUS EZ Flash 2 utility The ASUS EZ Flash 2 feature allows you to prevent system boot failure! 2-2 ASUS M2A74-AM SE Go...
...; Press + during POST to locate the correct file. Press to display the following: ASUSTek EZ Flash 2 BIOS ROM Utility V3.27 FLASH TYPE: MXIC 25L8005 Current ROM BOARD: M2A74-AM SE VER: 0203 (H:00 B:01) DATE: 02/05/2009 Update ROM BOARD: Unknown VER: Unknown DATE: Unknown...the BIOS to update the BIOS without using EZ Flash 2: 1. Press . Updating from the ASUS website at www.asus.com. Follow the onscreen instructions to complete the updating process. 2.1.2 ASUS EZ Flash 2 utility The ASUS EZ Flash 2 feature allows you to prevent system boot failure! 2-2 ASUS M2A74-AM SE Go...
User Manual
Page 27
... and automatically checks the Support DVD or the USB flash disk for CD-ROM... Download the latest BIOS file from the ASUS website at www.asus.com. otherwise, the utility will not function. Start Programming... 3. Starting BIOS recovery... Checking for this utility. • Always connect the SATA cable to the optical disk drive or...
... and automatically checks the Support DVD or the USB flash disk for CD-ROM... Download the latest BIOS file from the ASUS website at www.asus.com. otherwise, the utility will not function. Start Programming... 3. Starting BIOS recovery... Checking for this utility. • Always connect the SATA cable to the optical disk drive or...
User Manual
Page 28
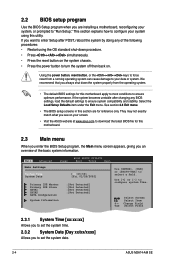
... Defaults item under the Exit menu. Change Field Tab Select Field 2.3.1 System Time [xx:xx:xx] Allows you to set the system date. 2-4 ASUS M2A74-AM SE 2.2 BIOS setup program Use the BIOS Setup program when you are for reference only. Use [+] or [-] to set the system time. 2.3.2 System Date [Day xx/xx/xxxx] Allows...
... Defaults item under the Exit menu. Change Field Tab Select Field 2.3.1 System Time [xx:xx:xx] Allows you to set the system date. 2-4 ASUS M2A74-AM SE 2.2 BIOS setup program Use the BIOS Setup program when you are for reference only. Use [+] or [-] to set the system time. 2.3.2 System Date [Day xx/xx/xxxx] Allows...
User Manual
Page 29
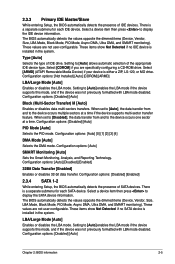
..., and if the device was not previously formatted with LBA mode disabled. There is either a ZIP, LS-120, or MO drive. The BIOS automatically detects the values opposite the dimmed items (Device, Vendor, Size, LBA Mode, Block Mode, PIO Mode, Async DMA, Ultra DMA, and.... LBA/Large Mode [Auto] Enables or disables the LBA mode. Configuration options: [Disabled] [Auto] Chapter 2: BIOS information 2-5 Setting to the device occurs multiple sectors at a time. The BIOS automatically detects the values opposite the dimmed items (Device, Vendor, Size, LBA Mode, Block Mode, PIO Mode, Async...
..., and if the device was not previously formatted with LBA mode disabled. There is either a ZIP, LS-120, or MO drive. The BIOS automatically detects the values opposite the dimmed items (Device, Vendor, Size, LBA Mode, Block Mode, PIO Mode, Async DMA, Ultra DMA, and.... LBA/Large Mode [Auto] Enables or disables the LBA mode. Configuration options: [Disabled] [Auto] Chapter 2: BIOS information 2-5 Setting to the device occurs multiple sectors at a time. The BIOS automatically detects the values opposite the dimmed items (Device, Vendor, Size, LBA Mode, Block Mode, PIO Mode, Async...
User Manual
Page 30
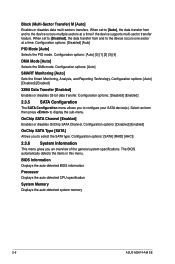
...data transfer. Configuration options: [Disabled] [Enabled] OnChip SATA Type [SATA] Allows you an overview of the general system specifications. The BIOS automatically detects the items in this menu. Configuration options: [Disabled] [Auto] PIO Mode [Auto] Selects the PIO mode. Configuration options... menu allows you to display the sub-menu. BIOS Information Displays the auto-detected BIOS information Processor Displays the auto-detected CPU specification System Memory Displays the auto-detected system memory 2-6 ASUS M2A74-AM SE Block (Multi-Sector Transfer) M [Auto] Enables...
...data transfer. Configuration options: [Disabled] [Enabled] OnChip SATA Type [SATA] Allows you an overview of the general system specifications. The BIOS automatically detects the items in this menu. Configuration options: [Disabled] [Auto] PIO Mode [Auto] Selects the PIO mode. Configuration options... menu allows you to display the sub-menu. BIOS Information Displays the auto-detected BIOS information Processor Displays the auto-detected CPU specification System Memory Displays the auto-detected system memory 2-6 ASUS M2A74-AM SE Block (Multi-Sector Transfer) M [Auto] Enables...

User Manual
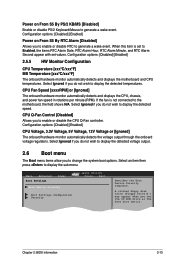
Page 31
Main Advanced Power BIOS SETUP UTILITY Boot Tools Exit Advanced Settings JumperFree Configuration CPU Configuration Chipset Onboard Devices Configuration PCIPnP USB Configuration Adjust System Frequency/Voltage etc. 2.4.1 ... following item appears only when the GPU Overclocking item is between 200 MHz and 550 MHz. GPU Engine Clock [500] Allows you to [Manual]. Chapter 2: BIOS information 2-7 Loads the standard settings for the system. Configuration options: [Auto] [Overclock 2%] [Overclock 5%] [Overclock 8%] [Overclock 10%] GPU Overclocking [Auto] Allows you to change ...
Main Advanced Power BIOS SETUP UTILITY Boot Tools Exit Advanced Settings JumperFree Configuration CPU Configuration Chipset Onboard Devices Configuration PCIPnP USB Configuration Adjust System Frequency/Voltage etc. 2.4.1 ... following item appears only when the GPU Overclocking item is between 200 MHz and 550 MHz. GPU Engine Clock [500] Allows you to [Manual]. Chapter 2: BIOS information 2-7 Loads the standard settings for the system. Configuration options: [Auto] [Overclock 2%] [Overclock 5%] [Overclock 8%] [Overclock 10%] GPU Overclocking [Auto] Allows you to change ...

User Manual
Page 33
.... Configuration options: [Auto] [+50mv] 2.4.2 CPU Configuration The items in this menu show the CPU-related information that the BIOS automatically detects. Configuration options: [Disabled] [Enabled] Secure Virtual Machine Mode [Enabled] Allows you to enable or disable the ...AMD Secure Virtual Machine mode. Configuration options: [Enabled] [Disabled] Chapter 2: BIOS information 2-9 Configuration options: [Disabled] [Enabled] CPU Prefetching [Enabled] Enables or disables the CPU prefetching. GART Error Reporting [Disabled] This...
.... Configuration options: [Auto] [+50mv] 2.4.2 CPU Configuration The items in this menu show the CPU-related information that the BIOS automatically detects. Configuration options: [Disabled] [Enabled] Secure Virtual Machine Mode [Enabled] Allows you to enable or disable the ...AMD Secure Virtual Machine mode. Configuration options: [Enabled] [Disabled] Chapter 2: BIOS information 2-9 Configuration options: [Disabled] [Enabled] CPU Prefetching [Enabled] Enables or disables the CPU prefetching. GART Error Reporting [Disabled] This...
User Manual
Page 35
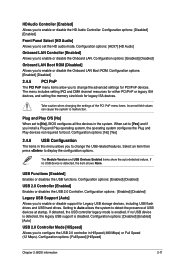
...the advanced settings for Legacy USB storage devices, including USB flash drives and USB hard drives. Configuration options: [FullSpeed] [HiSpeed] Chapter 2: BIOS information 2-11 The Module Version and USB Devices Enabled items show the auto-detected values. When set to [Yes] and if you to... options: [Enabled] [Disabled] USB 2.0 Controller [Enabled] Enables or disables the USB 2.0 Controller. Select an item then press to [No], BIOS configures all the devices in HiSpeed (480 Mbps) or Full Speed (12 Mbps). Take caution when changing the settings of USB devices at startup....
...the advanced settings for Legacy USB storage devices, including USB flash drives and USB hard drives. Configuration options: [FullSpeed] [HiSpeed] Chapter 2: BIOS information 2-11 The Module Version and USB Devices Enabled items show the auto-detected values. When set to [Yes] and if you to... options: [Enabled] [Disabled] USB 2.0 Controller [Enabled] Enables or disables the USB 2.0 Controller. Select an item then press to [No], BIOS configures all the devices in HiSpeed (480 Mbps) or Full Speed (12 Mbps). Take caution when changing the settings of USB devices at startup....
User Manual
Page 37
... menu items allow you do not wish to the motherboard, the field shows N/A. Main Advanced Boot Settings Power Boot Device Priority BIOS SETUP UTILITY Boot Tools Exit Boot Settings Configuration Security Specifies the Boot Device Priority sequence. Select an item then press to enable ...or disable the CPU Q-Fan controller. Chapter 2: BIOS information 2-13 When this item is not connected to display the detected temperatures. CPU Fan Speed [xxxxRPM] or [Ignored] The onboard...
... menu items allow you do not wish to the motherboard, the field shows N/A. Main Advanced Boot Settings Power Boot Device Priority BIOS SETUP UTILITY Boot Tools Exit Boot Settings Configuration Security Specifies the Boot Device Priority sequence. Select an item then press to enable ...or disable the CPU Q-Fan controller. Chapter 2: BIOS information 2-13 When this item is not connected to display the detected temperatures. CPU Fan Speed [xxxxRPM] or [Ignored] The onboard...


