K8V-MX User's Manual for English Edition
Page 4
... a bootable floppy disk 2-2 2.1.2 Using AFUDOS to copy the current BIOS 2-2 2.1.3 Using AFUDOS to update the BIOS 2-3 2.1.4 Using ASUS EZ Flash to update the BIOS 2-5 2.2 BIOS Setup program 2-6 2.2.1 BIOS menu screen 2-7 2.2.2 Menu bar 2-7 2.2.3 Navigation keys 2-7 2.2.4 Menu items 2-8 2.2.5 Sub-menu items 2-8 2.2.6 Configuration fields 2-8 2.2.7 Pop-up window 2-8 2.2.8 Scroll bar 2-8 2.2.9 General help 2-8 2.3 Main menu 2-9 2.3.1 ...
... a bootable floppy disk 2-2 2.1.2 Using AFUDOS to copy the current BIOS 2-2 2.1.3 Using AFUDOS to update the BIOS 2-3 2.1.4 Using ASUS EZ Flash to update the BIOS 2-5 2.2 BIOS Setup program 2-6 2.2.1 BIOS menu screen 2-7 2.2.2 Menu bar 2-7 2.2.3 Navigation keys 2-7 2.2.4 Menu items 2-8 2.2.5 Sub-menu items 2-8 2.2.6 Configuration fields 2-8 2.2.7 Pop-up window 2-8 2.2.8 Scroll bar 2-8 2.2.9 General help 2-8 2.3 Main menu 2-9 2.3.1 ...
K8V-MX User's Manual for English Edition
Page 10
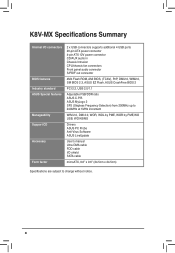
...K8V-MX Specifications Summary Internal I /O shield SATA cable microATX, 9.6" x 9.6" (24.5cm x 24.5cm) Specifications are subject to 240MHz at 1MHz increment WfM 2.0, DMI 2.0, WOR, WOL by PME, WOR by PME,WO USB, WO KB/MS Drivers ASUS PC Probe Anti-Virus Software ASUS... fan connectors Front panel audio connector S/PDIF out connector 4Mb Flash ROM, AMI BIOS, (TCAV), PnP, DMI2.0, WfM2.0, SM BIOS 2.3, ASUS EZ Flash, ASUS CrashFree BIOS 2 PCI 2.2, USB 2.0/1.1 Adjustable FSB/DDR ratio ASUS C.P.R. ASUS MyLogo 2 SFS (Stepless Frequency Selection) from 200MHz up to change without notice....
...K8V-MX Specifications Summary Internal I /O shield SATA cable microATX, 9.6" x 9.6" (24.5cm x 24.5cm) Specifications are subject to 240MHz at 1MHz increment WfM 2.0, DMI 2.0, WOR, WOL by PME, WOR by PME,WO USB, WO KB/MS Drivers ASUS PC Probe Anti-Virus Software ASUS... fan connectors Front panel audio connector S/PDIF out connector 4Mb Flash ROM, AMI BIOS, (TCAV), PnP, DMI2.0, WfM2.0, SM BIOS 2.3, ASUS EZ Flash, ASUS CrashFree BIOS 2 PCI 2.2, USB 2.0/1.1 Adjustable FSB/DDR ratio ASUS C.P.R. ASUS MyLogo 2 SFS (Stepless Frequency Selection) from 200MHz up to change without notice....
K8V-MX User's Manual for English Edition
Page 14
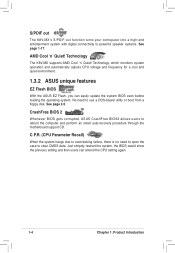
... overclocking failure, there is no need to clear CMOS data. Technology The K8V-MX supports AMD Cool ʻnʼ Quiet! See page 2-5. CrashFree BIOS 2 Whenever BIOS gets corrupted, ASUS CrashFree BIOS2 allows users to powerful speaker systems. See page 1-17. S/PDIF out The K8V-MXʼs S/PDIF-out function turns your comoputer into a high-end entertainment system...
... overclocking failure, there is no need to clear CMOS data. Technology The K8V-MX supports AMD Cool ʻnʼ Quiet! See page 2-5. CrashFree BIOS 2 Whenever BIOS gets corrupted, ASUS CrashFree BIOS2 allows users to powerful speaker systems. See page 1-17. S/PDIF out The K8V-MXʼs S/PDIF-out function turns your comoputer into a high-end entertainment system...
K8V-MX User's Manual for English Edition
Page 16
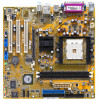
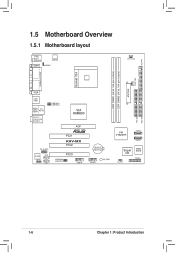
FLOPPY 1.5 Motherboard Overview 1.5.1 Motherboard layout PS/2 T: Mouse B: Keyboard ATX12V COM1 KBPWR CPU_FAN ATXPWR CHA_FAN DDR DIMM1 (64 bit, 184-pin module) DDR DIMM2 (64 bit, 184-pin module) PARALLEL PORT Socket 754 VGA USB1 USB2 Bottom: USB3 USB4 Top: RJ-45 Top:Line In Center:Line Out Below:Mic In USBPW12 USBPW34 VIA K8M800 AGP R FP_AUDIO AD1888 SPDIF AUX CD PCI1 K8V-MX PCI2 PCI3 USBPW56 USBPW78 USB78 CR2032 3V Lithium Cell CMOS Power USB56 SB_PWR VIA VT8237R SATA2 SATA1 Super I/O CLRTC 4Mbit BIOS PANEL PRI_IDE SEC_IDE 1-6 Chapter 1: Product Introduction
FLOPPY 1.5 Motherboard Overview 1.5.1 Motherboard layout PS/2 T: Mouse B: Keyboard ATX12V COM1 KBPWR CPU_FAN ATXPWR CHA_FAN DDR DIMM1 (64 bit, 184-pin module) DDR DIMM2 (64 bit, 184-pin module) PARALLEL PORT Socket 754 VGA USB1 USB2 Bottom: USB3 USB4 Top: RJ-45 Top:Line In Center:Line Out Below:Mic In USBPW12 USBPW34 VIA K8M800 AGP R FP_AUDIO AD1888 SPDIF AUX CD PCI1 K8V-MX PCI2 PCI3 USBPW56 USBPW78 USB78 CR2032 3V Lithium Cell CMOS Power USB56 SB_PWR VIA VT8237R SATA2 SATA1 Super I/O CLRTC 4Mbit BIOS PANEL PRI_IDE SEC_IDE 1-6 Chapter 1: Product Introduction

K8V-MX User's Manual for English Edition
Page 24
...settings. 1. See Chapter 2 for the card. 2. Remove the bracket opposite the slot that you may cause you removed earlier. 6. Turn on BIOS setup. 2. Install the software drivers for later use . Assign an IRQ to unplug the power cord before adding or removing expansion cards. Before installing...use . 4. Align the card connector with it and make the necessary hardware settings for information on the system and change the necessary BIOS settings, if any. The following sub-sections describe the motherboard slots and the expansion cards that came with the slot and press firmly...
...settings. 1. See Chapter 2 for the card. 2. Remove the bracket opposite the slot that you may cause you removed earlier. 6. Turn on BIOS setup. 2. Install the software drivers for later use . Assign an IRQ to unplug the power cord before adding or removing expansion cards. Before installing...use . 4. Align the card connector with it and make the necessary hardware settings for information on the system and change the necessary BIOS settings, if any. The following sub-sections describe the motherboard slots and the expansion cards that came with the slot and press firmly...
K8V-MX User's Manual for English Edition
Page 27
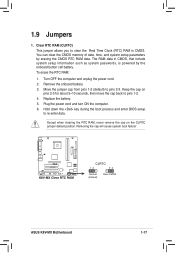
... cap back to re-enter data. Removing the cap will cause system boot failure! R K8V-MX K8V-MX Clear RTC RAM CLRTC 12 23 Normal (Default) Clear CMOS ASUS K8V-MX Motherboard 1-17 Hold down the key during the boot process and enter BIOS setup to pins 1-2. 4. Move the jumper cap from pins 1-2 (default) to clear the Real...
... cap back to re-enter data. Removing the cap will cause system boot failure! R K8V-MX K8V-MX Clear RTC RAM CLRTC 12 23 Normal (Default) Clear CMOS ASUS K8V-MX Motherboard 1-17 Hold down the key during the boot process and enter BIOS setup to pins 1-2. 4. Move the jumper cap from pins 1-2 (default) to clear the Real...
K8V-MX User's Manual for English Edition
Page 28
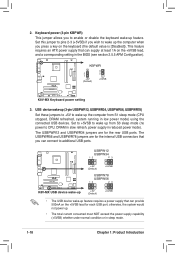
..., DRAM refreshed, system running in the BIOS (see section 2.5.5 APM Configuration). This feature requires an ATX power supply that can supply at least 1A on the +5VSB lead for the rear USB ports. R K8V-MX KBPWR 2 1 +5V (Default) 3 2 +5VSB K8V-MX Keyboard power setting 3. USB device wake...CPU, DRAM in slow refresh, power supply in sleep mode. 1-18 Chapter 1: Product Introduction USBPW12 USBPW34 12 23 R K8V-MX +5V (Default) +5VSB USBPW78 USBPW56 12 23 K8V-MX USB device wake-up +5V (Default) +5VSB • The USB device wake-up the computer from S3 sleep mode...
..., DRAM refreshed, system running in the BIOS (see section 2.5.5 APM Configuration). This feature requires an ATX power supply that can supply at least 1A on the +5VSB lead for the rear USB ports. R K8V-MX KBPWR 2 1 +5V (Default) 3 2 +5VSB K8V-MX Keyboard power setting 3. USB device wake...CPU, DRAM in slow refresh, power supply in sleep mode. 1-18 Chapter 1: Product Introduction USBPW12 USBPW34 12 23 R K8V-MX +5V (Default) +5VSB USBPW78 USBPW56 12 23 K8V-MX USB device wake-up +5V (Default) +5VSB • The USB device wake-up the computer from S3 sleep mode...

K8V-MX User's Manual for English Edition
Page 36
... lights up when you turn on the BIOS settings. Connect the chassis power LED cable to this connector. The speaker allows you to the HDD. 1-26 Chapter 1: Product Introduction PLED SPEAKER PLED+ PLED+5V Ground Ground Speaker PANEL IDELED+ IDELED PWR Ground Reset Ground R K8V-MX K8V-MX System panel connector IDE_LED RESET PWRSW * Requires...
... lights up when you turn on the BIOS settings. Connect the chassis power LED cable to this connector. The speaker allows you to the HDD. 1-26 Chapter 1: Product Introduction PLED SPEAKER PLED+ PLED+5V Ground Ground Speaker PANEL IDELED+ IDELED PWR Ground Reset Ground R K8V-MX K8V-MX System panel connector IDE_LED RESET PWRSW * Requires...
K8V-MX User's Manual for English Edition
Page 37
BIOS Information Chapter 2 This chapter tells how to change system settings through the BIOS Setup menus, and provides detailed descriptions of the BIOS parameters.
BIOS Information Chapter 2 This chapter tells how to change system settings through the BIOS Setup menus, and provides detailed descriptions of the BIOS parameters.
K8V-MX User's Manual for English Edition
Page 38
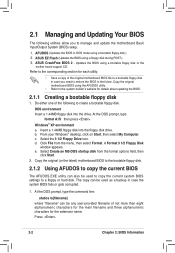
...Start, then select My Computer. d. Click File from the format options field, then click Start. 2. e. ASUS EZ Flash (Updates the BIOS using a bootable floppy disk.) 2. Insert a 1.44MB floppy disk into the drive. Copy the original (or...oppy disk during POST.) 3. 2.1 Managing and Updating Your BIOS The following to create a bootable floppy disk. c. AFUDOS (Updates the BIOS in case the system BIOS fails or gets corrupted. 1. ASUS CrashFree BIOS 2 - Press . 2-2 Chapter 2: BIOS Information At the DOS prompt, type: format A:/S then ...
...Start, then select My Computer. d. Click File from the format options field, then click Start. 2. e. ASUS EZ Flash (Updates the BIOS using a bootable floppy disk.) 2. Insert a 1.44MB floppy disk into the drive. Copy the original (or...oppy disk during POST.) 3. 2.1 Managing and Updating Your BIOS The following to create a bootable floppy disk. c. AFUDOS (Updates the BIOS in case the system BIOS fails or gets corrupted. 1. ASUS CrashFree BIOS 2 - Press . 2-2 Chapter 2: BIOS Information At the DOS prompt, type: format A:/S then ...
K8V-MX User's Manual for English Edition
Page 39
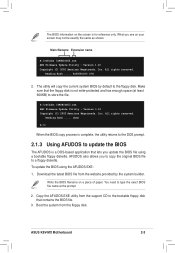
...;le. 3. Reading flash ..... 0x0008CC00 (9%) 2. A:\>afudos /oMYBIOS03.rom AMI Firmware Update Utility - To update the BIOS using a bootable floppy diskette. Write the BIOS filename on the screen is for reference only. ASUS K8V-MX Motherboard 2-3 Reading flash ..... Boot the system from the support CD to the floppy disk. All rights reserved...
...;le. 3. Reading flash ..... 0x0008CC00 (9%) 2. A:\>afudos /oMYBIOS03.rom AMI Firmware Update Utility - To update the BIOS using a bootable floppy diskette. Write the BIOS filename on the screen is for reference only. ASUS K8V-MX Motherboard 2-3 Reading flash ..... Boot the system from the support CD to the floppy disk. All rights reserved...
K8V-MX User's Manual for English Edition
Page 40
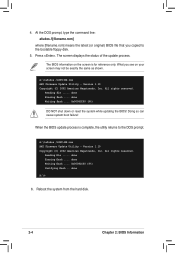
...;ash .... 0x0008CC00 (9%) Verifying flash .. Doing so can cause system boot failure! All rights reserved. A:\>afudos /iK8V-MX.rom AMI Firmware Update Utility - A:\>afudos /iK8V-MX.rom AMI Firmware Update Utility - Reading file ..... The BIOS information on your screen may not be exactly the same as shown. done Erasing flash .... Reboot...
...;ash .... 0x0008CC00 (9%) Verifying flash .. Doing so can cause system boot failure! All rights reserved. A:\>afudos /iK8V-MX.rom AMI Firmware Update Utility - A:\>afudos /iK8V-MX.rom AMI Firmware Update Utility - Reading file ..... The BIOS information on your screen may not be exactly the same as shown. done Erasing flash .... Reboot...
K8V-MX User's Manual for English Edition
Page 41
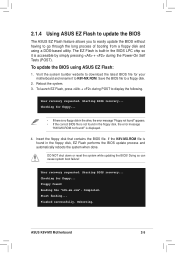
.... User recovery requested. Flashed successfully. If the K8V-MX.ROM file is displayed. 4. Save the BIOS file to display the following. Starting BIOS recovery... Completed. Rebooting. To update the BIOS using a DOS-based utility. Start flashing... ASUS K8V-MX Motherboard 2-5 2.1.4 Using ASUS EZ Flash to update the BIOS The ASUS EZ Flash feature allows you to easily update...
.... User recovery requested. Flashed successfully. If the K8V-MX.ROM file is displayed. 4. Save the BIOS file to display the following. Starting BIOS recovery... Completed. Rebooting. To update the BIOS using a DOS-based utility. Start flashing... ASUS K8V-MX Motherboard 2-5 2.1.4 Using ASUS EZ Flash to update the BIOS The ASUS EZ Flash feature allows you to easily update...
K8V-MX User's Manual for English Edition
Page 42
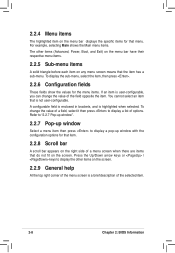
...figure your system using the provided utility described in section "2.1 Managing and updating your screen. Do this utility. 2.2 BIOS Setup Program The BIOS software is designed to make it lets you scroll through the various sub-menus and make changes to the power management settings...., the system provides you can enable the security password feature or make your selections among the predetermined choices. 2-6 Chapter 2: BIOS Information Use the BIOS Setup program when you can update using this last option only if the first two fail. The LPC chip on ...
...figure your system using the provided utility described in section "2.1 Managing and updating your screen. Do this utility. 2.2 BIOS Setup Program The BIOS software is designed to make it lets you scroll through the various sub-menus and make changes to the power management settings...., the system provides you can enable the security password feature or make your selections among the predetermined choices. 2-6 Chapter 2: BIOS Information Use the BIOS Setup program when you can update using this last option only if the first two fail. The LPC chip on ...

K8V-MX User's Manual for English Edition
Page 43
... to configure System Time. Use the navigation keys to select items in .] [Disabled] [ST340014A] [Not Detected] [ASUS DVD-E616P2] [Not Detected] Use [ENTER], [TAB] or [SHIFT-TAB] to another. ASUS K8V-MX Motherboard 2-7 2.2.1 BIOS menu screen Menu items Menu bar Configuration fields General help System Time System Date Legacy Diskette...
... to configure System Time. Use the navigation keys to select items in .] [Disabled] [ST340014A] [Not Detected] [ASUS DVD-E616P2] [Not Detected] Use [ENTER], [TAB] or [SHIFT-TAB] to another. ASUS K8V-MX Motherboard 2-7 2.2.1 BIOS menu screen Menu items Menu bar Configuration fields General help System Time System Date Legacy Diskette...
K8V-MX User's Manual for English Edition
Page 44
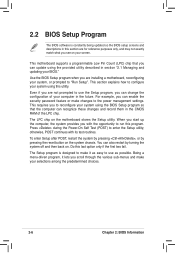
... item that menu. Press the Up/Down arrow keys or / keys to display a list of options. To change the value of the selected item. 2-8 Chapter 2: BIOS Information To display the sub-menu, select the item, then press . 2.2.6 Configuration fields These fields show the values for the menu...
... item that menu. Press the Up/Down arrow keys or / keys to display a list of options. To change the value of the selected item. 2-8 Chapter 2: BIOS Information To display the sub-menu, select the item, then press . 2.2.6 Configuration fields These fields show the values for the menu...

K8V-MX User's Manual for English Edition
Page 45
...system time. 2.3.2 System Date [Day xx/xx/xxxx] Allows you to navigate through them. 2.3 Main Menu When you enter the BIOS Setup program, the Main menu screen appears, giving you an overview of floppy drive installed. Change Field Tab Select Field F1... [xx:xx:xxxx] Allows you to set the system date. 2.3.3 Legacy Diskette A [1.44M, 3.5 in .] [Disabled] [ST340014A] [Not Detected] [ASUS DVD-E616P2] [Not Detected] Use [ENTER], [TAB] or [SHIFT-TAB] to [Disabled], the floppy disk is write-protected.Configuration options: [Disabled] [Enabled] ASUS K8V-MX Motherboard 2-9
...system time. 2.3.2 System Date [Day xx/xx/xxxx] Allows you to navigate through them. 2.3 Main Menu When you enter the BIOS Setup program, the Main menu screen appears, giving you an overview of floppy drive installed. Change Field Tab Select Field F1... [xx:xx:xxxx] Allows you to set the system date. 2.3.3 Legacy Diskette A [1.44M, 3.5 in .] [Disabled] [ST340014A] [Not Detected] [ASUS DVD-E616P2] [Not Detected] Use [ENTER], [TAB] or [SHIFT-TAB] to [Disabled], the floppy disk is write-protected.Configuration options: [Disabled] [Enabled] ASUS K8V-MX Motherboard 2-9
K8V-MX User's Manual for English Edition
Page 46
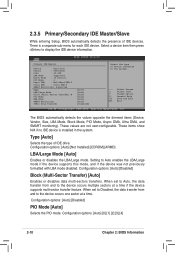
... information. Configuration options: [Auto] [Disabled] Block (Multi-Sector Transfer) [Auto] Enables or disables data multi-sectors transfers. The BIOS automatically detects the values opposite the dimmed items (Device, Vendor, Size, LBA Mode, Block Mode, PIO Mode, Async DMA, Ultra DMA, ...and SMART monitoring). 2.3.5 Primary/Secondary IDE Master/Slave While entering Setup, BIOS automatically detects the presence of device connected to the system. ←→ Select Screen ↑↓ Select Item +- When set to Auto...
... information. Configuration options: [Auto] [Disabled] Block (Multi-Sector Transfer) [Auto] Enables or disables data multi-sectors transfers. The BIOS automatically detects the values opposite the dimmed items (Device, Vendor, Size, LBA Mode, Block Mode, PIO Mode, Async DMA, Ultra DMA, ...and SMART monitoring). 2.3.5 Primary/Secondary IDE Master/Slave While entering Setup, BIOS automatically detects the presence of device connected to the system. ←→ Select Screen ↑↓ Select Item +- When set to Auto...
K8V-MX User's Manual for English Edition
Page 47
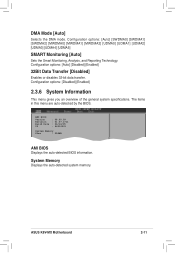
... data transfer. The items in this menu are auto-detected by the BIOS. Configuration options: [Auto] [SWDMA0] [SWDMA1] [SWDMA2] [MWDMA0] [MWDMA1] [MWDMA2] [UDMA0] [UDMA1] [UDMA2] [UDMA3] [UDMA4] [UDMA5] SMART Monitoring [Auto] Sets the Smart Monitoring, Analysis, and Reporting Technology. ASUS K8V-MX Motherboard 2-11 Configuration options: [Disabled] [Enabled] 2.3.6 System Information This menu...
... data transfer. The items in this menu are auto-detected by the BIOS. Configuration options: [Auto] [SWDMA0] [SWDMA1] [SWDMA2] [MWDMA0] [MWDMA1] [MWDMA2] [UDMA0] [UDMA1] [UDMA2] [UDMA3] [UDMA4] [UDMA5] SMART Monitoring [Auto] Sets the Smart Monitoring, Analysis, and Reporting Technology. ASUS K8V-MX Motherboard 2-11 Configuration options: [Disabled] [Enabled] 2.3.6 System Information This menu...
K8V-MX User's Manual for English Edition
Page 48
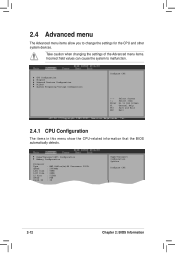
...(tm)64 Processor 3000+ : 2000MHz : 64KB : 64KB : 512KB : F48 : 39 HyperTransport Configuration Options Configure CPU. 2-12 Chapter 2: BIOS Information 2.4 Advanced menu The Advanced menu items allow you to Sub Screen General Help Save and Exit Exit v02.54 (C)Copyright 1985-2003, American Megatrends..., Inc. 2.4.1 CPU Configuration The items in this menu show the CPU-related information that the BIOS automatically detects. Enter F1 F10 ESC Select Screen Select Item Go to change the settings for the CPU and other system devices. CPU ...
...(tm)64 Processor 3000+ : 2000MHz : 64KB : 64KB : 512KB : F48 : 39 HyperTransport Configuration Options Configure CPU. 2-12 Chapter 2: BIOS Information 2.4 Advanced menu The Advanced menu items allow you to Sub Screen General Help Save and Exit Exit v02.54 (C)Copyright 1985-2003, American Megatrends..., Inc. 2.4.1 CPU Configuration The items in this menu show the CPU-related information that the BIOS automatically detects. Enter F1 F10 ESC Select Screen Select Item Go to change the settings for the CPU and other system devices. CPU ...


