

K8N4-E User's Manual for English Edition
Page 1
K8N4-E Motherboard
K8N4-E Motherboard
K8N4-E User's Manual for English Edition
Page 3
... to find more information viii Conventions used in this guide ix Typography ix K8N4-E specifications summary x Chapter 1: Product introduction 1.1 Welcome 1-2 1.2 Package contents 1-2 1.3 Special features 1-3 1.3.1 Product highlights 1-3 1.3.2 ASUS Proactive features 1-5 1.3.3 Innovative ASUS features 1-5 1.4 Before you proceed 1-7 1.5 Motherboard overview 1-8 1.5.1 Placement direction 1-8 1.5.2 Screw holes 1-8 1.5.3 Motherboard layout 1-9 1.6 Central Processing Unit (CPU 1-10 1.6.1 Overview 1-10 1.6.2 Installling the CPU 1-10 1.6.3 Installing...
... to find more information viii Conventions used in this guide ix Typography ix K8N4-E specifications summary x Chapter 1: Product introduction 1.1 Welcome 1-2 1.2 Package contents 1-2 1.3 Special features 1-3 1.3.1 Product highlights 1-3 1.3.2 ASUS Proactive features 1-5 1.3.3 Innovative ASUS features 1-5 1.4 Before you proceed 1-7 1.5 Motherboard overview 1-8 1.5.1 Placement direction 1-8 1.5.2 Screw holes 1-8 1.5.3 Motherboard layout 1-9 1.6 Central Processing Unit (CPU 1-10 1.6.1 Overview 1-10 1.6.2 Installling the CPU 1-10 1.6.3 Installing...

K8N4-E User's Manual for English Edition
Page 7
... screws, and staples away from connectors, slots, sockets and circuitry. • Avoid dust, humidity, and temperature extremes. Operation safety • Before installing the motherboard and adding devices on it may become wet. • Place the product on a stable surface. • If you are using the product, make sure all...Before connecting or removing signal cables from the existing system before you detect any area where it , carefully read all power cables from the motherboard, ensure that the power cables for the devices are unplugged before using an adapter or extension cord.
... screws, and staples away from connectors, slots, sockets and circuitry. • Avoid dust, humidity, and temperature extremes. Operation safety • Before installing the motherboard and adding devices on it may become wet. • Place the product on a stable surface. • If you are using the product, make sure all...Before connecting or removing signal cables from the existing system before you detect any area where it , carefully read all power cables from the motherboard, ensure that the power cables for the devices are unplugged before using an adapter or extension cord.

K8N4-E User's Manual for English Edition
Page 8
...standard package. Refer to the following parts: • Chapter 1: Product introduction This chapter describes the features of the motherboard and the new technology it supports. About this guide is organized This manual contains the following sources for additional information...1. Where to find more information Refer to the ASUS contact information. 2. viii It includes description of the jumpers and connectors on ASUS hardware and software products. ASUS websites The ASUS website provides updated information on the motherboard. • Chapter 2: BIOS setup This chapter ...
...standard package. Refer to the following parts: • Chapter 1: Product introduction This chapter describes the features of the motherboard and the new technology it supports. About this guide is organized This manual contains the following sources for additional information...1. Where to find more information Refer to the ASUS contact information. 2. viii It includes description of the jumpers and connectors on ASUS hardware and software products. ASUS websites The ASUS website provides updated information on the motherboard. • Chapter 2: BIOS setup This chapter ...

K8N4-E User's Manual for English Edition
Page 13
This chapter describes the motherboard features and the new technologies it supports. 1Product introduction ASUS K8N4-E 1-1
This chapter describes the motherboard features and the new technologies it supports. 1Product introduction ASUS K8N4-E 1-1

K8N4-E User's Manual for English Edition
Page 14
... your package with the list below. 1.2 Package contents Check your motherboard package for buying an ASUS® K8N4-E motherboard! Thank you start installing the motherboard, and hardware devices on it another standout in -1 FDD/IDE(/ATA) cable 1 x Serial ATA kit I /O module Cables Accessory Application CD Documentation ASUS K8N4-E motherboard 1 x 2-port USB 2.0/Game module 1 x 2-port USB 2.0 module 1 x 2-in the...
... your package with the list below. 1.2 Package contents Check your motherboard package for buying an ASUS® K8N4-E motherboard! Thank you start installing the motherboard, and hardware devices on it another standout in -1 FDD/IDE(/ATA) cable 1 x Serial ATA kit I /O module Cables Accessory Application CD Documentation ASUS K8N4-E motherboard 1 x 2-port USB 2.0/Game module 1 x 2-port USB 2.0 module 1 x 2-in the...

K8N4-E User's Manual for English Edition
Page 15
...low-latency high-bandwidth memory controller and a highly-scalable HyperTransport™ technology-based system bus, the motherboard provides a powerful platform for details. ASUS K8N4-E 1-3 NVIDIA® nForce™4-4X chipset The NVIDIA® nForce™4-4X chipset supports the..., and a user-friendly setup wizard that improves overall system security. 1.3 Special features 1.3.1 Product highlights Latest processor technology The motherboard comes with a 754-pin surface mount, Zero Insertion Force (ZIF) socket that protects your diverse computing needs, increased office ...
...low-latency high-bandwidth memory controller and a highly-scalable HyperTransport™ technology-based system bus, the motherboard provides a powerful platform for details. ASUS K8N4-E 1-3 NVIDIA® nForce™4-4X chipset The NVIDIA® nForce™4-4X chipset supports the..., and a user-friendly setup wizard that improves overall system security. 1.3 Special features 1.3.1 Product highlights Latest processor technology The motherboard comes with a 754-pin surface mount, Zero Insertion Force (ZIF) socket that protects your diverse computing needs, increased office ...

K8N4-E User's Manual for English Edition
Page 16
...audio Onboard is software compatible with 6-channel CODEC, featuring Audio Sensing and Enumeration Technology support. S/PDIF digital sound ready The motherboard supports the S/PDIF Out function through the Serial ATA interfaces and the NVIDIA® nForce™4-4X chipset. With the ...High Definition Audio solution with existing PCI specifications. See page 1-26 for details. 1-4 Chapter 1: Product introduction Gigabit LAN The motherboard comes with a Gigabit LAN controller built into a high-end entertainment system with a software application that speeds up to powerful audio...
...audio Onboard is software compatible with 6-channel CODEC, featuring Audio Sensing and Enumeration Technology support. S/PDIF digital sound ready The motherboard supports the S/PDIF Out function through the Serial ATA interfaces and the NVIDIA® nForce™4-4X chipset. With the ...High Definition Audio solution with existing PCI specifications. See page 1-26 for details. 1-4 Chapter 1: Product introduction Gigabit LAN The motherboard comes with a Gigabit LAN controller built into a high-end entertainment system with a software application that speeds up to powerful audio...

K8N4-E User's Manual for English Edition
Page 17
...the original BIOS data from the 12 Mbps bandwidth on USB 1.1 to a fast 480 Mbps on USB 2.0. AI Audio technology The motherboard supports 6-channel audio through the onboard ALC850 CODEC with USB 1.1. During the bootup process, AI NET 2 immediately diagnoses the LAN ... Realtek® proprietary UAJ® (Universal Audio Jack) technology. See pages 1-25 and 1-26 for details. ASUS K8N4-E 1-5 See page 1-25 for details. 1.3.3 Innovative ASUS features ASUS CrashFree BIOS 2 This feature allows you can easily monitor the condition of the Ethernet cable(s) connected to 100 meters...
...the original BIOS data from the 12 Mbps bandwidth on USB 1.1 to a fast 480 Mbps on USB 2.0. AI Audio technology The motherboard supports 6-channel audio through the onboard ALC850 CODEC with USB 1.1. During the bootup process, AI NET 2 immediately diagnoses the LAN ... Realtek® proprietary UAJ® (Universal Audio Jack) technology. See pages 1-25 and 1-26 for details. ASUS K8N4-E 1-5 See page 1-25 for details. 1.3.3 Innovative ASUS features ASUS CrashFree BIOS 2 This feature allows you can easily monitor the condition of the Ethernet cable(s) connected to 100 meters...

K8N4-E User's Manual for English Edition
Page 19
Onboard LEDs The motherboard comes with the component. • Before you install or remove any component, ensure that the ATX power supply is switched off mode. K8N4-E ® K8N4-E Onboard LED SB_PWR ON Standby Power OFF Powered Off ASUS K8N4-E 1-7 This is a reminder that you should shut down the ...power LED that lights up to indicate that the system is ON, in sleep mode, or in any motherboard component. Failure to do so may cause severe damage to the motherboard, peripherals, and/or components. 1.4 Before you proceed Take note of the following precautions before you install...
Onboard LEDs The motherboard comes with the component. • Before you install or remove any component, ensure that the ATX power supply is switched off mode. K8N4-E ® K8N4-E Onboard LED SB_PWR ON Standby Power OFF Powered Off ASUS K8N4-E 1-7 This is a reminder that you should shut down the ...power LED that lights up to indicate that the system is ON, in sleep mode, or in any motherboard component. Failure to do so may cause severe damage to the motherboard, peripherals, and/or components. 1.4 Before you proceed Take note of the following precautions before you install...

K8N4-E User's Manual for English Edition
Page 20
... ports goes to the rear part of the chassis as indicated in the correct orientation. Place this side towards the rear of the chassis K8N4-E ® 1-8 Chapter 1: Product introduction Do not overtighten the screws! Doing so can cause you place it . Make sure to unplug... the power cord before installing or removing the motherboard. Failure to do so can damage the motherboard. 1.5 Motherboard overview Before you install the motherboard, study the configuration of your chassis to ensure that you physical injury and damage...
... ports goes to the rear part of the chassis as indicated in the correct orientation. Place this side towards the rear of the chassis K8N4-E ® 1-8 Chapter 1: Product introduction Do not overtighten the screws! Doing so can cause you place it . Make sure to unplug... the power cord before installing or removing the motherboard. Failure to do so can damage the motherboard. 1.5 Motherboard overview Before you install the motherboard, study the configuration of your chassis to ensure that you physical injury and damage...

K8N4-E User's Manual for English Edition
Page 22
1.6 Central Processing Unit (CPU) 1.6.1 Overview The motherboard comes with gold triangle) on the CPU. Locate the CPU socket on the socket to ensure correct installation. Gold triangle 1.6.2 Installling the CPU To install a ... Insertion Force (ZIF) socket designed for the AMD Athlon™ 64/ AMD Sempron™ processor. This mark should match a specific corner on the motherboard. USB 2.0 connectors K8N4-E ® K8N4-E CPU Socket 754 Gold Arrow Before installing the CPU, make sure that the socket box is facing towards you and the load lever is...
1.6 Central Processing Unit (CPU) 1.6.1 Overview The motherboard comes with gold triangle) on the CPU. Locate the CPU socket on the socket to ensure correct installation. Gold triangle 1.6.2 Installling the CPU To install a ... Insertion Force (ZIF) socket designed for the AMD Athlon™ 64/ AMD Sempron™ processor. This mark should match a specific corner on the motherboard. USB 2.0 connectors K8N4-E ® K8N4-E CPU Socket 754 Gold Arrow Before installing the CPU, make sure that the socket box is facing towards you and the load lever is...

K8N4-E User's Manual for English Edition
Page 23
..., push down the socket lever to a 90°-100° angle. Make sure that came with a small triangle. 4. The lever clicks on the motherboard. Gold triangle 5. Install a CPU heatsink and fan following the instructions that the socket lever is lifted up to secure the CPU. Position the CPU above... 7. Connect the CPU fan cable to the CPU_FAN connector on the side tab to 90°-100° angle; When the CPU is locked. 6. ASUS K8N4-E 1-11 otherwise the CPU does not fit in completely. Unlock the socket by pressing the lever sideways, then lift it is in place.
..., push down the socket lever to a 90°-100° angle. Make sure that came with a small triangle. 4. The lever clicks on the motherboard. Gold triangle 5. Install a CPU heatsink and fan following the instructions that the socket lever is lifted up to secure the CPU. Position the CPU above... 7. Connect the CPU fan cable to the CPU_FAN connector on the side tab to 90°-100° angle; When the CPU is locked. 6. ASUS K8N4-E 1-11 otherwise the CPU does not fit in completely. Unlock the socket by pressing the lever sideways, then lift it is in place.

K8N4-E User's Manual for English Edition
Page 24
... the heatsink and fan assembly. Place the heatsink on top of the installed CPU, making sure that a Thermal Interface Material is already installed on the motherboard upon purchase. • You do not match the CPU documentation, follow the latter. 1-12 Chapter 1: Product introduction 1.6.3 Installing the heatsink and fan The AMD Athlon... condition and performance. If the instructions in this section do not have to remove the retention module base when installing the CPU or installing other motherboard components. • If you use only qualified heatsink and fan assembly.
... the heatsink and fan assembly. Place the heatsink on top of the installed CPU, making sure that a Thermal Interface Material is already installed on the motherboard upon purchase. • You do not match the CPU documentation, follow the latter. 1-12 Chapter 1: Product introduction 1.6.3 Installing the heatsink and fan The AMD Athlon... condition and performance. If the instructions in this section do not have to remove the retention module base when installing the CPU or installing other motherboard components. • If you use only qualified heatsink and fan assembly.

K8N4-E User's Manual for English Edition
Page 26
Rotation +12V GND 3. When the fan and heatsink assembly is in place, connect the CPU fan cable to connect the CPU fan connector! CPU_FAN K8N4-E ® K8N4-E CPU fan connector Do not forget to the connector on the motherboard labeled CPU_FAN. Hardware monitoring errors can occur if you fail to plug this connector. 1-14 Chapter 1: Product introduction
Rotation +12V GND 3. When the fan and heatsink assembly is in place, connect the CPU fan cable to connect the CPU fan connector! CPU_FAN K8N4-E ® K8N4-E CPU fan connector Do not forget to the connector on the motherboard labeled CPU_FAN. Hardware monitoring errors can occur if you fail to plug this connector. 1-14 Chapter 1: Product introduction

K8N4-E User's Manual for English Edition
Page 27
DIMM1 DIMM2 DIMM3 104 Pins 80 Pins 1.7 System memory 1.7.1 Overview The motherboard comes with the same CAS latency. Use any of the sockets: K8N4-E ® K8N4-E 184-pin DDR DIMM sockets 1.7.2 Memory Configurations You may install 256 MB, 512 MB, and 1 GB unbuffered non-ECC DDR DIMMs into the DIMM ... Data Rate (DDR) Dual Inline Memory Modules (DIMM) sockets. For optimum compatibility, we recommend that you installed three 1 GB DDR memory modules. • This motherboard does not support memory modules made up of 128 Mb chips or double sided x16 memory modules. ASUS K8N4-E 1-15
DIMM1 DIMM2 DIMM3 104 Pins 80 Pins 1.7 System memory 1.7.1 Overview The motherboard comes with the same CAS latency. Use any of the sockets: K8N4-E ® K8N4-E 184-pin DDR DIMM sockets 1.7.2 Memory Configurations You may install 256 MB, 512 MB, and 1 GB unbuffered non-ECC DDR DIMMs into the DIMM ... Data Rate (DDR) Dual Inline Memory Modules (DIMM) sockets. For optimum compatibility, we recommend that you installed three 1 GB DDR memory modules. • This motherboard does not support memory modules made up of 128 Mb chips or double sided x16 memory modules. ASUS K8N4-E 1-15

K8N4-E User's Manual for English Edition
Page 31
.... 2 1. Remove the DIMM from the socket. ASUS K8N4-E 1-19 DO NOT force a DIMM into the socket until the retaining clips snap back in only one direction. 1.7.3 Installing a DIMM Make sure to avoid damaging the DIMM. 3. Failure to do so may cause severe damage to both the motherboard and the components. 1. The DIMM might...
.... 2 1. Remove the DIMM from the socket. ASUS K8N4-E 1-19 DO NOT force a DIMM into the socket until the retaining clips snap back in only one direction. 1.7.3 Installing a DIMM Make sure to avoid damaging the DIMM. 3. Failure to do so may cause severe damage to both the motherboard and the components. 1. The DIMM might...

K8N4-E User's Manual for English Edition
Page 32
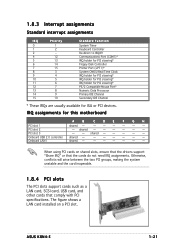
1.8 Expansion slots In the future, you may cause you physical injury and damage motherboard components. We recommended to install expansion cards. Before installing the expansion card, read the documentation that came with the slot and press firmly until the ... card After installing the expansion card, configure the it and make the necessary hardware settings for later use . Remove the system unit cover (if your motherboard is completely seated on the next page. 3. Align the card connector with it by adjusting the software settings. 1. See Chapter 2 for the expansion card. 1-20...
1.8 Expansion slots In the future, you may cause you physical injury and damage motherboard components. We recommended to install expansion cards. Before installing the expansion card, read the documentation that came with the slot and press firmly until the ... card After installing the expansion card, configure the it and make the necessary hardware settings for later use . Remove the system unit cover (if your motherboard is completely seated on the next page. 3. Align the card connector with it by adjusting the software settings. 1. See Chapter 2 for the expansion card. 1-20...
K8N4-E User's Manual for English Edition
Page 33
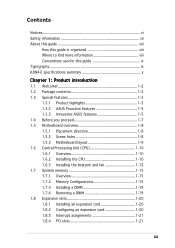
...* IRQ holder for PCI steering* PS/2 Compatible Mouse Port* Numeric Data Processor Primary IDE Channel Secondary IDE Channel * These IRQs are usually available for this motherboard A B C D E F G H PCI slot 1 shared - - -- - - - Onboard LAN1 shared - - -- - - - ASUS K8N4-E 1-21 Onboard USB 2.0 controller shared - - -- - - - PCI slot 2 -
...* IRQ holder for PCI steering* PS/2 Compatible Mouse Port* Numeric Data Processor Primary IDE Channel Secondary IDE Channel * These IRQs are usually available for this motherboard A B C D E F G H PCI slot 1 shared - - -- - - - Onboard LAN1 shared - - -- - - - ASUS K8N4-E 1-21 Onboard USB 2.0 controller shared - - -- - - - PCI slot 2 -
K8N4-E User's Manual for English Edition
Page 34
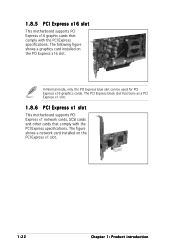
... PCI Express x1 network cards, SCSI cards and other cards that comply with the PCI Express specifications. 1.8.5 PCI Express x16 slot This motherboard supports PCI Express x16 graphic cards that comply with the PCI Express specifications. The figure shows a network card installed on the PCI Express x16 slot. ...
... PCI Express x1 network cards, SCSI cards and other cards that comply with the PCI Express specifications. 1.8.5 PCI Express x16 slot This motherboard supports PCI Express x16 graphic cards that comply with the PCI Express specifications. The figure shows a network card installed on the PCI Express x16 slot. ...


