Motherboard DIY Troubleshooting Guide
Page 4
...figuration 2-27 2.4.6 PCI PnP 2-28 2.4.7 USB Configuration 2-29 iv Contents Chapter 2: BIOS setup 2.1 Managing and updating your BIOS 2-2 2.1.1 Creating a bootable floppy disk 2-2 2.1.2 ASUS EZ Flash utility 2-3 2.1.3 AFUDOS utility 2-4 2.1.4 ASUS CrashFree BIOS 2 utility 2-6 2.1.5 ASUS Update utility 2-8 2.2 BIOS setup program 2-11 2.2.1 BIOS menu screen 2-12 2.2.2 Menu bar 2-12 2.2.3 Navigation keys 2-12 2.2.4 Menu items 2-13 2.2.5 Sub-menu...
...figuration 2-27 2.4.6 PCI PnP 2-28 2.4.7 USB Configuration 2-29 iv Contents Chapter 2: BIOS setup 2.1 Managing and updating your BIOS 2-2 2.1.1 Creating a bootable floppy disk 2-2 2.1.2 ASUS EZ Flash utility 2-3 2.1.3 AFUDOS utility 2-4 2.1.4 ASUS CrashFree BIOS 2 utility 2-6 2.1.5 ASUS Update utility 2-8 2.2 BIOS setup program 2-11 2.2.1 BIOS menu screen 2-12 2.2.2 Menu bar 2-12 2.2.3 Navigation keys 2-12 2.2.4 Menu items 2-13 2.2.5 Sub-menu...

Motherboard DIY Troubleshooting Guide
Page 8
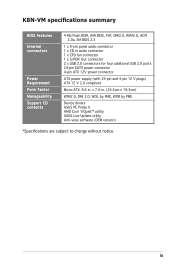
K8N-VM specifications summary CPU Chipset Front Side Bus Memory Expansion slots Graphics Storage High Definition Audio LAN USB Special features Rear panel Socket 754 ... CODEC Supports Jack Sensing technology S/PDIF out interface Integrated 10/100 Mb MAC with Realtek® ALC8201CL external PHY Supports up to 8 USB 2.0 ports ASUS CrashFree BIOS 2 ASUS EZ Flash ASUS MyLogo2™ 1 x Parallel port 1 x LAN (RJ-45) port 4 x USB 2.0 ports 1 x VGA port 1 x PS/2 keyboard port 1 x PS/2 mouse port 1 x Serial port 5.1 channel audio I/O ports...
K8N-VM specifications summary CPU Chipset Front Side Bus Memory Expansion slots Graphics Storage High Definition Audio LAN USB Special features Rear panel Socket 754 ... CODEC Supports Jack Sensing technology S/PDIF out interface Integrated 10/100 Mb MAC with Realtek® ALC8201CL external PHY Supports up to 8 USB 2.0 ports ASUS CrashFree BIOS 2 ASUS EZ Flash ASUS MyLogo2™ 1 x Parallel port 1 x LAN (RJ-45) port 4 x USB 2.0 ports 1 x VGA port 1 x PS/2 keyboard port 1 x PS/2 mouse port 1 x Serial port 5.1 channel audio I/O ports...
Motherboard DIY Troubleshooting Guide
Page 9
x 7.6 in . ix K8N-VM specifications summary BIOS features Internal connectors Power Requirement Form Factor Manageability Support CD contents 4 Mb Flash ROM, AMI BIOS, PnP, DMI2.0, WfM2.0, ACPI 2.0a, SM BIOS 2.3 1 x Front panel audio connector 1 x CD in audio connector 1 x CPU fan connector 1 x S/PDIF Out connector 2 x ...: 9.6 in . (24.5cm x 19.3cm) WfM2.0, DMI 2.0, WOL by PME, WOR by PME Device drivers ASUS PC Probe II AMD Cool ʻnʼQuiet™ utility ASUS Live Update utility Anti-virus software (OEM version) *Specifications are subject to change without notice.
x 7.6 in . ix K8N-VM specifications summary BIOS features Internal connectors Power Requirement Form Factor Manageability Support CD contents 4 Mb Flash ROM, AMI BIOS, PnP, DMI2.0, WfM2.0, ACPI 2.0a, SM BIOS 2.3 1 x Front panel audio connector 1 x CD in audio connector 1 x CPU fan connector 1 x S/PDIF Out connector 2 x ...: 9.6 in . (24.5cm x 19.3cm) WfM2.0, DMI 2.0, WOL by PME, WOR by PME Device drivers ASUS PC Probe II AMD Cool ʻnʼQuiet™ utility ASUS Live Update utility Anti-virus software (OEM version) *Specifications are subject to change without notice.
Motherboard DIY Troubleshooting Guide
Page 14
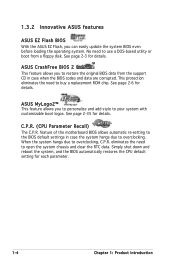
... 2-3 for each parameter. 1-4 Chapter 1: Product introduction ASUS MyLogo2™ This feature allows you can easily update the system BIOS even before loading the operating system. Simply shut down and reboot the system, and the BIOS automatically restores the CPU default setting for details. C.P.R. ... hangs due to open the system chassis and clear the RTC data. No need to overclocking. ASUS CrashFree BIOS 2 This feature allows you to restore the original BIOS data from a floppy disk. eliminates the need to overclocking, C.P.R. See page 2-6 for details.
... 2-3 for each parameter. 1-4 Chapter 1: Product introduction ASUS MyLogo2™ This feature allows you can easily update the system BIOS even before loading the operating system. Simply shut down and reboot the system, and the BIOS automatically restores the CPU default setting for details. C.P.R. ... hangs due to open the system chassis and clear the RTC data. No need to overclocking. ASUS CrashFree BIOS 2 This feature allows you to restore the original BIOS data from a floppy disk. eliminates the need to overclocking, C.P.R. See page 2-6 for details.

Motherboard DIY Troubleshooting Guide
Page 25
...the documentation that you removed earlier. 6. Turn on the slot. 5. Refer to unplug the power cord before adding or removing expansion cards. ASUS K8N-VM 1-15 Install the software drivers for information on the next page. 3. Keep the screw for the card. 2. Align the card connector with..., you physical injury and damage motherboard components. 1.8.1 Installing an expansion card To install an expansion card: 1. Make sure to the tables on BIOS setup. 2. Secure the card to the chassis with the slot and press firmly until the card is already installed in a chassis)....
...the documentation that you removed earlier. 6. Turn on the slot. 5. Refer to unplug the power cord before adding or removing expansion cards. ASUS K8N-VM 1-15 Install the software drivers for information on the next page. 3. Keep the screw for the card. 2. Align the card connector with..., you physical injury and damage motherboard components. 1.8.1 Installing an expansion card To install an expansion card: 1. Make sure to the tables on BIOS setup. 2. Secure the card to the chassis with the slot and press firmly until the card is already installed in a chassis)....
Motherboard DIY Troubleshooting Guide
Page 28
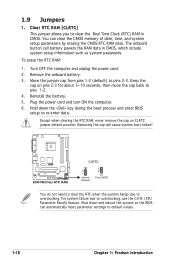
The onboard button cell battery powers the RAM data in CMOS. Reinstall the battery. 5. Hold down and reboot the system so the BIOS can clear the CMOS memory of date, time, and system setup parameters by erasing the CMOS RTC RAM data. Except when clearing the RTC...which include system setup information such as system passwords. To erase the RTC RAM: 1. 1.9 Jumpers 1. Turn OFF the computer and unplug the power cord. 2. R K8N-VM K8N-VM Clear RTC RAM CLRTC 2 1 Normal (Default) 3 2 Clear CMOS You do not need to clear the RTC when the system hangs due to pins 2-3. For system...
The onboard button cell battery powers the RAM data in CMOS. Reinstall the battery. 5. Hold down and reboot the system so the BIOS can clear the CMOS memory of date, time, and system setup parameters by erasing the CMOS RTC RAM data. Except when clearing the RTC...which include system setup information such as system passwords. To erase the RTC RAM: 1. 1.9 Jumpers 1. Turn OFF the computer and unplug the power cord. 2. R K8N-VM K8N-VM Clear RTC RAM CLRTC 2 1 Normal (Default) 3 2 Clear CMOS You do not need to clear the RTC when the system hangs due to pins 2-3. For system...
Motherboard DIY Troubleshooting Guide
Page 30
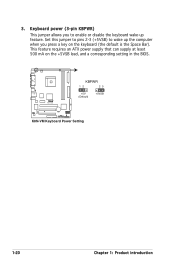
R K8N-VM KBPWR 12 23 +5V (Default) +5VSB K8N-VM Keyboard Power Setting 1-20 Chapter 1: Product introduction Keyboard power (3-pin KBPWR) This jumper allows you press a key on the +5VSB lead, and a corresponding setting in the BIOS. Set this jumper to pins 2-3 (+5VSB) to wake up the computer when you to enable or disable the keyboard wake-up feature. 3. This feature requires an ATX power supply that can supply at least 500 mA on the keyboard (the default is the Space Bar).
R K8N-VM KBPWR 12 23 +5V (Default) +5VSB K8N-VM Keyboard Power Setting 1-20 Chapter 1: Product introduction Keyboard power (3-pin KBPWR) This jumper allows you press a key on the +5VSB lead, and a corresponding setting in the BIOS. Set this jumper to pins 2-3 (+5VSB) to wake up the computer when you to enable or disable the keyboard wake-up feature. 3. This feature requires an ATX power supply that can supply at least 500 mA on the keyboard (the default is the Space Bar).
Motherboard DIY Troubleshooting Guide
Page 36
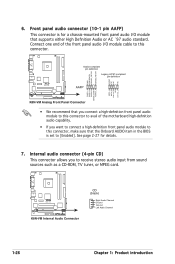
...Legacy AC'97-compliant pin definition AAFP AGND NC NC NC MIC2_L MIC2_R Line out_R NC Line out_L PORT1 L PORT1 R PORT2 R SENSE_SEND PORT2 L K8N-VM Analog Front Panel Connector • We recommend that you connect a high-definition front panel audio module to this connector to avail of the... front panel audio I /O module that the Onboard AUDIO item in the BIOS is for details. 7. See page 2-27 for a chassis-mounted front panel audio I /O module cable to this connector. Internal audio connector (4-pin CD)...
...Legacy AC'97-compliant pin definition AAFP AGND NC NC NC MIC2_L MIC2_R Line out_R NC Line out_L PORT1 L PORT1 R PORT2 R SENSE_SEND PORT2 L K8N-VM Analog Front Panel Connector • We recommend that you connect a high-definition front panel audio module to this connector to avail of the... front panel audio I /O module that the Onboard AUDIO item in the BIOS is for details. 7. See page 2-27 for a chassis-mounted front panel audio I /O module cable to this connector. Internal audio connector (4-pin CD)...
Motherboard DIY Troubleshooting Guide
Page 38
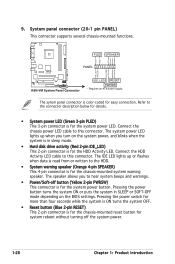
PWR Ground Reset Ground R K8N-VM PANEL K8N-VM System Panel Connector IDE_LED RESET PWRSW * Requires an ATX power supply. Pressing the power button turns the system ON or puts the system in sleep ... introduction The speaker allows you turn on the system power, and blinks when the system is in SLEEP or SOFT-OFF mode depending on the BIOS settings. Pressing the power switch for more than four seconds while the system is ON turns the system OFF. • Reset button (Blue 2-pin RESET...
PWR Ground Reset Ground R K8N-VM PANEL K8N-VM System Panel Connector IDE_LED RESET PWRSW * Requires an ATX power supply. Pressing the power button turns the system ON or puts the system in sleep ... introduction The speaker allows you turn on the system power, and blinks when the system is in SLEEP or SOFT-OFF mode depending on the BIOS settings. Pressing the power switch for more than four seconds while the system is ON turns the system OFF. • Reset button (Blue 2-pin RESET...
Motherboard DIY Troubleshooting Guide
Page 39
This chapter tells how to change the system settings through the BIOS Setup menus. Detailed descriptions of the BIOS parameters are also provided. 2 BIOS setup
This chapter tells how to change the system settings through the BIOS Setup menus. Detailed descriptions of the BIOS parameters are also provided. 2 BIOS setup
Motherboard DIY Troubleshooting Guide
Page 40
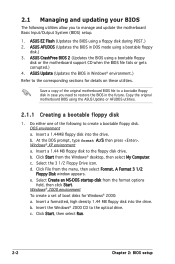
...prompt, type format A:/S then press . Insert a formatted, high density 1.44 MB floppy disk into the drive. b. ASUS Update (Updates the BIOS in DOS mode using the ASUS Update or AFUDOS utilities. 2.1.1 Creating a bootable floppy disk 1. DOS environment a. Insert a 1.44MB floppy disk into the... drive. b. Insert a 1.44 MB floppy disk to the optical drive. A Format 3 1/2 Floppy Disk window appears. ASUS AFUDOS (Updates the BIOS in Windows® environment.) Refer to the corresponding sections for Windows® 2000: a. Save a copy of boot disks for details on...
...prompt, type format A:/S then press . Insert a formatted, high density 1.44 MB floppy disk into the drive. b. ASUS Update (Updates the BIOS in DOS mode using the ASUS Update or AFUDOS utilities. 2.1.1 Creating a bootable floppy disk 1. DOS environment a. Insert a 1.44MB floppy disk into the... drive. b. Insert a 1.44 MB floppy disk to the optical drive. A Format 3 1/2 Floppy Disk window appears. ASUS AFUDOS (Updates the BIOS in Windows® environment.) Refer to the corresponding sections for Windows® 2000: a. Save a copy of boot disks for details on...
Motherboard DIY Troubleshooting Guide
Page 41
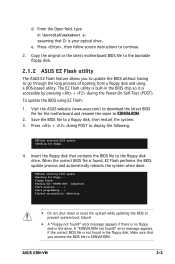
...;le to prevent system boot failure! • A "Floppy not found !" Visit the ASUS website (www.asus.com) to display the following. EZFlash starting BIOS update Checking for floppy... ASUS K8N-VM 2-3 To update the BIOS using a DOS-based utility. Reading file "K8NVM.ROM". Start erasing.......| Start programming...| Flashed successfully. error message appears if the correct...
...;le to prevent system boot failure! • A "Floppy not found !" Visit the ASUS website (www.asus.com) to display the following. EZFlash starting BIOS update Checking for floppy... ASUS K8N-VM 2-3 To update the BIOS using a DOS-based utility. Reading file "K8NVM.ROM". Start erasing.......| Start programming...| Flashed successfully. error message appears if the correct...
Motherboard DIY Troubleshooting Guide
Page 42
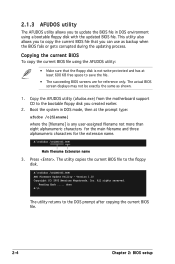
... created earlier. 2. A:\>afudos /oOLDBIOS1.ROM Main filename Extension name 3. The utility copies the current BIOS file to the DOS prompt after copying the current BIOS file. 2-4 Chapter 2: BIOS setup Version 1.10 Copyright (C) 2002 American Megatrends, Inc. A:\>afudos /oOLDBIOS1.ROM AMI Firmware Update ...Utility - This utility also allows you to copy the current BIOS file that the floppy disk is not write-protected and has at the prompt type: afudos /o[filename] where...
... created earlier. 2. A:\>afudos /oOLDBIOS1.ROM Main filename Extension name 3. The utility copies the current BIOS file to the DOS prompt after copying the current BIOS file. 2-4 Chapter 2: BIOS setup Version 1.10 Copyright (C) 2002 American Megatrends, Inc. A:\>afudos /oOLDBIOS1.ROM AMI Firmware Update ...Utility - This utility also allows you to copy the current BIOS file that the floppy disk is not write-protected and has at the prompt type: afudos /o[filename] where...
Motherboard DIY Troubleshooting Guide
Page 43
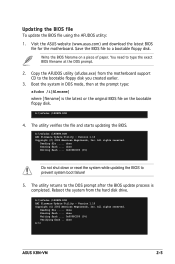
... system boot failure! 5. All rights reserved. A:\>afudos /iK8NVM.ROM AMI Firmware Update Utility - Reading file ..... Updating the BIOS file To update the BIOS file using the AFUDOS utility: 1. A:\>afudos /iK8NVM.ROM 4. done A:\> ASUS K8N-VM 2-5 Boot the system in DOS mode, then at the DOS prompt. 2. The utility returns to type the exact...
... system boot failure! 5. All rights reserved. A:\>afudos /iK8NVM.ROM AMI Firmware Update Utility - Reading file ..... Updating the BIOS file To update the BIOS file using the AFUDOS utility: 1. A:\>afudos /iK8NVM.ROM 4. done A:\> ASUS K8N-VM 2-5 Boot the system in DOS mode, then at the DOS prompt. 2. The utility returns to type the exact...
Motherboard DIY Troubleshooting Guide
Page 44
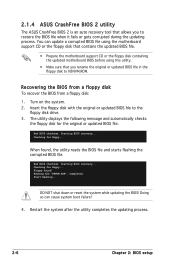
...ASUS CrashFree BIOS 2 utility The ASUS CrashFree BIOS 2 is an auto recovery tool that you to restore the BIOS file when it fails or gets corrupted during the updating process. When found ! Completed. Restart the system after the utility completes the updating process. 2-6 Chapter 2: BIOS setup You can cause system boot failure! 4. Starting BIOS... reset the system while updating the BIOS! Turn on the system. 2. Checking for the original or updated BIOS file. Recovering the BIOS from a floppy disk To recover the BIOS from a floppy disk: ...
...ASUS CrashFree BIOS 2 utility The ASUS CrashFree BIOS 2 is an auto recovery tool that you to restore the BIOS file when it fails or gets corrupted during the updating process. When found ! Completed. Restart the system after the utility completes the updating process. 2-6 Chapter 2: BIOS setup You can cause system boot failure! 4. Starting BIOS... reset the system while updating the BIOS! Turn on the system. 2. Checking for the original or updated BIOS file. Recovering the BIOS from a floppy disk To recover the BIOS from a floppy disk: ...

Motherboard DIY Troubleshooting Guide
Page 45
... so can cause system boot failure! 4. Visit the ASUS website (www.asus.com) to the optical drive. 3. The utility then updates the corrupted BIOS file. Start flashing... ASUS K8N-VM 2-7 Bad BIOS checksum. The recovered BIOS may not be the latest BIOS version for the original or updated BIOS file. Remove any floppy disk from the...
... so can cause system boot failure! 4. Visit the ASUS website (www.asus.com) to the optical drive. 3. The utility then updates the corrupted BIOS file. Start flashing... ASUS K8N-VM 2-7 Bad BIOS checksum. The recovered BIOS may not be the latest BIOS version for the original or updated BIOS file. Remove any floppy disk from the...
Motherboard DIY Troubleshooting Guide
Page 46
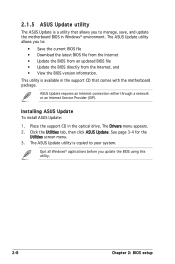
... in the support CD that allows you to manage, save, and update the motherboard BIOS in the optical drive. The Drivers menu appears. 2. Click the Utilities tab, then click ASUS Update. Installing ASUS Update To install ASUS Update: 1. 2.1.5 ASUS Update utility The ASUS Update is a utility that comes with the motherboard package. Quit all Windows®...
... in the support CD that allows you to manage, save, and update the motherboard BIOS in the optical drive. The Drivers menu appears. 2. Click the Utilities tab, then click ASUS Update. Installing ASUS Update To install ASUS Update: 1. 2.1.5 ASUS Update utility The ASUS Update is a utility that comes with the motherboard package. Quit all Windows®...
Motherboard DIY Troubleshooting Guide
Page 47
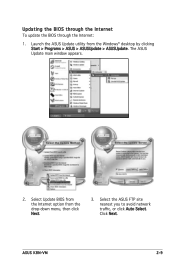
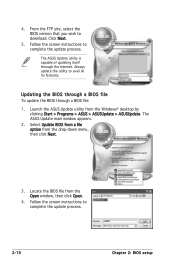
Select the ASUS FTP site nearest you to avoid network traffic, or click Auto Select. Select Update BIOS from the Internet option from the Windows® desktop by clicking Start > Programs > ASUS > ASUSUpdate > ASUSUpdate. Click Next. Launch the ASUS Update utility from the drop-down menu, then click Next. 3. ASUS K8N-VM 2-9 Updating the BIOS through the Internet To update the BIOS through the Internet: 1. The ASUS Update main window appears. 2.
Select the ASUS FTP site nearest you to avoid network traffic, or click Auto Select. Select Update BIOS from the Internet option from the Windows® desktop by clicking Start > Programs > ASUS > ASUSUpdate > ASUSUpdate. Click Next. Launch the ASUS Update utility from the drop-down menu, then click Next. 3. ASUS K8N-VM 2-9 Updating the BIOS through the Internet To update the BIOS through the Internet: 1. The ASUS Update main window appears. 2.
Motherboard DIY Troubleshooting Guide
Page 48
.... Always update the utility to complete the update process. 2-10 Chapter 2: BIOS setup From the FTP site, select the BIOS version that you wish to complete the update process. The ASUS Update utility is capable of updating itself through a BIOS file: 1. The ASUS Update main window appears. 2. Follow the screen instructions to download. Launch...
.... Always update the utility to complete the update process. 2-10 Chapter 2: BIOS setup From the FTP site, select the BIOS version that you wish to complete the update process. The ASUS Update utility is capable of updating itself through a BIOS file: 1. The ASUS Update main window appears. 2. Follow the screen instructions to download. Launch...
Motherboard DIY Troubleshooting Guide
Page 49
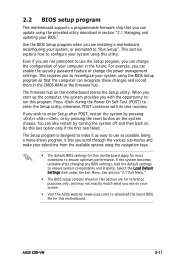
... prompted to ensure optimum performance. ASUS K8N-VM 2-11 Even if you see on . Press during the Power-On Self-Test (POST) to use as possible. Do this motherboard. Select the Load Default Settings item under the Exit Menu. For example, you wish to enter Setup after changing any BIOS settings, load the default...
... prompted to ensure optimum performance. ASUS K8N-VM 2-11 Even if you see on . Press during the Power-On Self-Test (POST) to use as possible. Do this motherboard. Select the Load Default Settings item under the Exit Menu. For example, you wish to enter Setup after changing any BIOS settings, load the default...


