User Guide for English Edition
Page 16
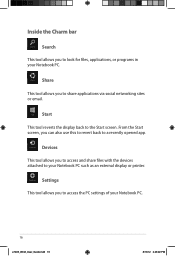
Devices This tool allows you to look for files, applications, or programs in your Notebook PC. Start This tool reverts the display back to access the PC settings of your Notebook PC. 16 e7495_Win8_User_Guide.indd 16 8/13/12 2:48:02 PM Inside the Charm bar Search This ...tool allows you to access and share files with the devices attached to your Notebook PC such as an external display or printer. Share This tool allows you can also use this to revert back to share applications via social networking sites or email. From the...
Devices This tool allows you to look for files, applications, or programs in your Notebook PC. Start This tool reverts the display back to access the PC settings of your Notebook PC. 16 e7495_Win8_User_Guide.indd 16 8/13/12 2:48:02 PM Inside the Charm bar Search This ...tool allows you to access and share files with the devices attached to your Notebook PC such as an external display or printer. Share This tool allows you can also use this to revert back to share applications via social networking sites or email. From the...
User Guide for English Edition
Page 17
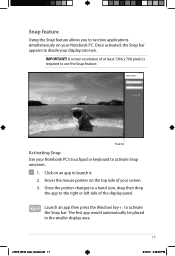
Click on an app to activate the Snap bar. Snap feature Using the Snap feature allows you to run two applications simultaneously on your display into two. IMPORTANT! to launch it. 2. Once activated, the Snap bar appears to activate Snap onscreen. 1. Snap bar Activating Snap Use your screen.... 3. Hover the mouse pointer on the top side of the display panel. The first app would automatically be placed in the smaller display area. Once the pointer changes to a hand icon, drag then drop the app to use the Snap feature....
Click on an app to activate the Snap bar. Snap feature Using the Snap feature allows you to run two applications simultaneously on your display into two. IMPORTANT! to launch it. 2. Once activated, the Snap bar appears to activate Snap onscreen. 1. Snap bar Activating Snap Use your screen.... 3. Hover the mouse pointer on the top side of the display panel. The first app would automatically be placed in the smaller display area. Once the pointer changes to a hand icon, drag then drop the app to use the Snap feature....
User Guide for English Edition
Page 20
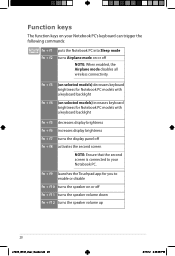
... Notebook PC. fn + f3 (on selected models) decreases keyboard brightness for Notebook PC models with a keyboard backlight fn + f5 decreases display brightness fn + f6 increases display brightness fn + f7 turns the display panel off fn + f8 activates the second screen NOTE: Ensure that the second screen is connected to enable or disable fn...
... Notebook PC. fn + f3 (on selected models) decreases keyboard brightness for Notebook PC models with a keyboard backlight fn + f5 decreases display brightness fn + f6 increases display brightness fn + f7 turns the display panel off fn + f8 activates the second screen NOTE: Ensure that the second screen is connected to enable or disable fn...
User Guide for English Edition
Page 21
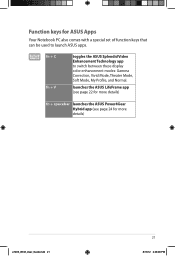
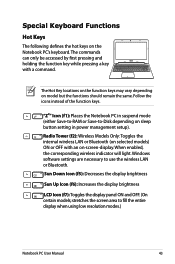
fn + C fn + V toggles the ASUS Splendid Video Enhancement Technology app to launch ASUS apps. Function keys for more details) fn + spacebar launches the ASUS Power4Gear Hybrid app (see page 22 for more details) e7495_Win8_User_Guide.indd 21 21 8/13/12 2:48:09 PM launches the ASUS LifeFrame app (see page 24 for ASUS Apps Your Notebook PC also comes with a special set of function keys that can be used to switch between these display color enhancement modes: Gamma Correction, Vivid Mode, Theater Mode, Soft Mode, My Profile, and Normal.
fn + C fn + V toggles the ASUS Splendid Video Enhancement Technology app to launch ASUS apps. Function keys for more details) fn + spacebar launches the ASUS Power4Gear Hybrid app (see page 22 for more details) e7495_Win8_User_Guide.indd 21 21 8/13/12 2:48:09 PM launches the ASUS LifeFrame app (see page 24 for ASUS Apps Your Notebook PC also comes with a special set of function keys that can be used to switch between these display color enhancement modes: Gamma Correction, Vivid Mode, Theater Mode, Soft Mode, My Profile, and Normal.
User's Manual for English Edition
Page 7
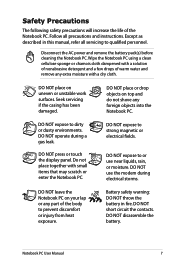
... use the modem during a gas leak. Do not place together with a dry cloth. DO NOT short circuit the contacts. DO NOT press or touch the display panel. Follow all servicing to strong magnetic or electrical fields. Disconnect the AC power and remove the battery pack(s) before cleaning the Notebook PC. DO...
... use the modem during a gas leak. Do not place together with a dry cloth. DO NOT short circuit the contacts. DO NOT press or touch the display panel. Follow all servicing to strong magnetic or electrical fields. Disconnect the AC power and remove the battery pack(s) before cleaning the Notebook PC. DO...

User's Manual for English Edition
Page 9
... the center position may cause DANGER. Be careful not to the connectors. Transportation Precautions To prepare the Notebook PC for . Close the display panel and check that it OFF and disconnect all external peripherals to prevent damage to rub or scrape the Notebook PC surfaces. Ensure to... protect the keyboard and display panel. The Notebook PC's surface is latched securely in the closed position to keep your body from earphones or headphones can cause hearing...
... the center position may cause DANGER. Be careful not to the connectors. Transportation Precautions To prepare the Notebook PC for . Close the display panel and check that it OFF and disconnect all external peripherals to prevent damage to rub or scrape the Notebook PC surfaces. Ensure to... protect the keyboard and display panel. The Notebook PC's surface is latched securely in the closed position to keep your body from earphones or headphones can cause hearing...

User's Manual for English Edition
Page 12
Slowly tilt the display panel forward or backward to a comfortable viewing angle. Turning the power on Press the power button. 12 Notebook PC User Manual Opening the display panel A. Hold the base of your Notebook PC then lift up the display panel with your thumb. B.
Slowly tilt the display panel forward or backward to a comfortable viewing angle. Turning the power on Press the power button. 12 Notebook PC User Manual Opening the display panel A. Hold the base of your Notebook PC then lift up the display panel with your thumb. B.

User's Manual for English Edition
Page 16
Use a soft cloth without chemical liquids (use . 4 �D��is in use plain water if necessary) to clean the display panel. 16 Notebook PC User Manual 1 Microphone (Built-in) The built-in mono microphone can be used for video conferencing, voice...selected models) The camera indicator lights up when the built-in camera is �p�l�a�y�P��a�n�e�l The display panel functions the same as a desktop monitor. Unlike desktop monitors, the LCD panel does not produce any radiation or flickering. The Notebook PC ...
Use a soft cloth without chemical liquids (use . 4 �D��is in use plain water if necessary) to clean the display panel. 16 Notebook PC User Manual 1 Microphone (Built-in) The built-in mono microphone can be used for video conferencing, voice...selected models) The camera indicator lights up when the built-in camera is �p�l�a�y�P��a�n�e�l The display panel functions the same as a desktop monitor. Unlike desktop monitors, the LCD panel does not produce any radiation or flickering. The Notebook PC ...
User's Manual for English Edition
Page 17
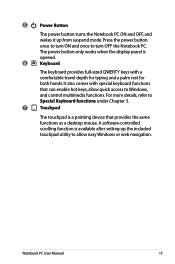
The power button only works when the display panel is opened. 6 Keyboard The keyboard provides full-sized QWERTY keys with special keyboard functions that provides the same functions as a desktop mouse. Press the ...
The power button only works when the display panel is opened. 6 Keyboard The keyboard provides full-sized QWERTY keys with special keyboard functions that provides the same functions as a desktop mouse. Press the ...
User's Manual for English Edition
Page 25
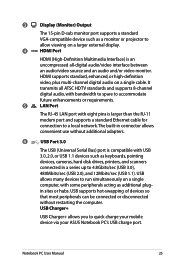
...plus multi-channel digital audio on a single computer, with some peripherals acting as a monitor or projector to allow viewing on a larger external display. 4 HDMI HDMI Port HDMI (High-Definition Multimedia Interface) is larger than the RJ-11 modem port and supports a standard Ethernet cable for ...simultaneously on a single cable. The built-in a series up to quick charge your mobile device via your ASUS Notebook PC's USB charge port. Notebook PC User Manual 25 3 Display (Monitor) Output The 15-pin D-sub monitor port supports a standard VGA-compatible device such as additional plugin...
...plus multi-channel digital audio on a single computer, with some peripherals acting as a monitor or projector to allow viewing on a larger external display. 4 HDMI HDMI Port HDMI (High-Definition Multimedia Interface) is larger than the RJ-11 modem port and supports a standard Ethernet cable for ...simultaneously on a single cable. The built-in a series up to quick charge your mobile device via your ASUS Notebook PC's USB charge port. Notebook PC User Manual 25 3 Display (Monitor) Output The 15-pin D-sub monitor port supports a standard VGA-compatible device such as additional plugin...
User's Manual for English Edition
Page 34
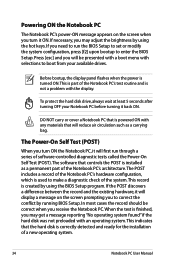
... run the BIOS Setup to set or modify the system configuration, press [f2] upon bootup to enter the BIOS Setup. Before bootup, the display panel flashes when the power is turned ON.This is part of the Notebook PC's hardware configuration, which is finished, you will be correct ...as a permanent part of the Notebook PC's architecture.The POST includes a record of the Notebook PC's test routine and is powered ON with the display. This indicates that controls the POST is installed as a carrying bag. This record is correctly detected and ready for the installation of the system....
... run the BIOS Setup to set or modify the system configuration, press [f2] upon bootup to enter the BIOS Setup. Before bootup, the display panel flashes when the power is turned ON.This is part of the Notebook PC's hardware configuration, which is finished, you will be correct ...as a permanent part of the Notebook PC's architecture.The POST includes a record of the Notebook PC's test routine and is powered ON with the display. This indicates that controls the POST is installed as a carrying bag. This record is correctly detected and ready for the installation of the system....
User's Manual for English Edition
Page 36
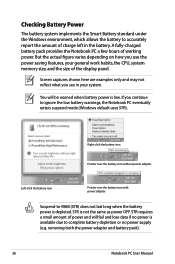
... the battery to accurately report the amount of charge left in your general work habits, the CPU, system memory size, and the size of the display panel. But the actual figure varies depending on how you see in the battery. Screen captures shown here are examples only and may not reflect...
... the battery to accurately report the amount of charge left in your general work habits, the CPU, system memory size, and the size of the display panel. But the actual figure varies depending on how you see in the battery. Screen captures shown here are examples only and may not reflect...

User's Manual for English Edition
Page 40
... if you want to maximize battery life and lower Total Cost of Ownership (TCO).You can define Sleep/Hibernate or Shut Down for closing the display panel or pressing the power button. When you resume your work if any are made through the Power menu in the Windows > Control Panel > Hardware...
... if you want to maximize battery life and lower Total Cost of Ownership (TCO).You can define Sleep/Hibernate or Shut Down for closing the display panel or pressing the power button. When you resume your work if any are made through the Power menu in the Windows > Control Panel > Hardware...
User's Manual for English Edition
Page 43
...the screen area to -Disk depending on sleep button setting in suspend mode (either Save-to-RAM or Save-to fill the entire display when using low resolution modes.) Notebook PC User Manual 43 The Hot Key locations on the function keys may vary depending on the...Tower (f2): Wireless Models Only:Toggles the internal wireless LAN or Bluetooth (on -screen-display. Sun Down Icon (f5): Decreases the display brightness Sun Up Icon (f6): Increases the display brightness LCD Icon (f7): Toggles the display panel ON and OFF. (On certain models; When enabled, the corresponding wireless indicator ...
...the screen area to -Disk depending on sleep button setting in suspend mode (either Save-to-RAM or Save-to fill the entire display when using low resolution modes.) Notebook PC User Manual 43 The Hot Key locations on the function keys may vary depending on the...Tower (f2): Wireless Models Only:Toggles the internal wireless LAN or Bluetooth (on -screen-display. Sun Down Icon (f5): Decreases the display brightness Sun Up Icon (f6): Increases the display brightness LCD Icon (f7): Toggles the display panel ON and OFF. (On certain models; When enabled, the corresponding wireless indicator ...
User's Manual for English Edition
Page 44
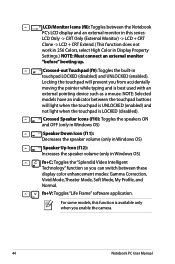
...External Monitor) -> LCD + CRT Clone -> LCD + CRT Extend. (This function does not work in 256 Colors, select High Color in Display Property Settings.) NOTE: Must connect an external monitor "before" booting up. fn+V: Toggles "Life Frame" software application. LCD/Monitor Icons (f8): Toggles... between these display color enhancement modes: Gamma Correction, Vivid Mode, Theater Mode, Soft Mode, My Profile, and Normal. Crossed Speaker Icons (f10): Toggles ...
...External Monitor) -> LCD + CRT Clone -> LCD + CRT Extend. (This function does not work in 256 Colors, select High Color in Display Property Settings.) NOTE: Must connect an external monitor "before" booting up. fn+V: Toggles "Life Frame" software application. LCD/Monitor Icons (f8): Toggles... between these display color enhancement modes: Gamma Correction, Vivid Mode, Theater Mode, Soft Mode, My Profile, and Normal. Crossed Speaker Icons (f10): Toggles ...

User's Manual for English Edition
Page 45
....You can see the current mode through the on selected models): Toggles the numeric keypad (number lock) ON and OFF. insert/num lk (on -screen display (OSD). Notebook PC User Manual 45 Microsoft Windows Keys There are two special Windows keys on selected models): Toggles Windows "Calculator" application. fn+enter (on...
....You can see the current mode through the on selected models): Toggles the numeric keypad (number lock) ON and OFF. insert/num lk (on -screen display (OSD). Notebook PC User Manual 45 Microsoft Windows Keys There are two special Windows keys on selected models): Toggles Windows "Calculator" application. fn+enter (on...
User's Manual for English Edition
Page 90
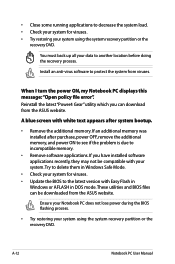
...• Try restoring your system using the system recovery partition or the recovery DVD. When I turn the power ON, my Notebook PC displays this message:"Open policy file error". Reinstall the latest "Power4 Gear" utility which you have installed software applications recently, they may not be ... purchase, power OFF, remove the additional memory, and power ON to see if the problem is due to protect the system from the ASUS website. If an additional memory was installed after system bootup. • Remove the additional memory. Install an anti-virus software to incompatible ...
...• Try restoring your system using the system recovery partition or the recovery DVD. When I turn the power ON, my Notebook PC displays this message:"Open policy file error". Reinstall the latest "Power4 Gear" utility which you have installed software applications recently, they may not be ... purchase, power OFF, remove the additional memory, and power ON to see if the problem is due to protect the system from the ASUS website. If an additional memory was installed after system bootup. • Remove the additional memory. Install an anti-virus software to incompatible ...


