H87M-PRO User's Manual
Page 13
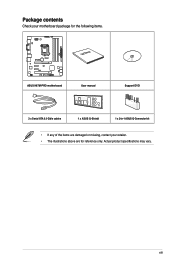
Actual product specifications may vary. xiii Package contents Check your motherboard package for the following items. H87M-PRO User Manual ASUS H87M-PRO motherboard User manual Support DVD 3 x Serial ATA 6.0 Gb/s cables 1 x ASUS Q-Shield 1 x 2-in-1 ASUS Q-Connector kit • If any of the items are damaged or missing, contact your retailer. • The illustrations above are for reference only.
Actual product specifications may vary. xiii Package contents Check your motherboard package for the following items. H87M-PRO User Manual ASUS H87M-PRO motherboard User manual Support DVD 3 x Serial ATA 6.0 Gb/s cables 1 x ASUS Q-Shield 1 x 2-in-1 ASUS Q-Connector kit • If any of the items are damaged or missing, contact your retailer. • The illustrations above are for reference only.
H87M-PRO User's Manual
Page 15
... PCIe 1.0/2.0 devices. S/PDIF out connector at the back I /O. It utilizes the serial point-to-point links, which increases bandwidth and enhances the system's performance. Chapter 1 ASUS H87M-PRO 1-1 Chapter 1: Product Introduction Product introduction 1.1 Special features 1 1.1.1 Product highlights LGA1150 socket for up to 6.0 Gb/s data transfer rates. It provides great graphics and system performance...
... PCIe 1.0/2.0 devices. S/PDIF out connector at the back I /O. It utilizes the serial point-to-point links, which increases bandwidth and enhances the system's performance. Chapter 1 ASUS H87M-PRO 1-1 Chapter 1: Product Introduction Product introduction 1.1 Special features 1 1.1.1 Product highlights LGA1150 socket for up to 6.0 Gb/s data transfer rates. It provides great graphics and system performance...
H87M-PRO User's Manual
Page 17
...settings, and dramatically improve the systemís bootup. ASUS ESD Guards clamp the ESD voltage and shunt the majority of the chipset and power phase area through high efficient heat-exchange. Chapter 1 ASUS H87M-PRO 1-3 MemOK! Electrostatic discharge (ESD) conditions can happen... while plugging or unplugging any user interaction. ASUS Anti-Surge Protection This special design protects expensive devices and the motherboard ...
...settings, and dramatically improve the systemís bootup. ASUS ESD Guards clamp the ESD voltage and shunt the majority of the chipset and power phase area through high efficient heat-exchange. Chapter 1 ASUS H87M-PRO 1-3 MemOK! Electrostatic discharge (ESD) conditions can happen... while plugging or unplugging any user interaction. ASUS Anti-Surge Protection This special design protects expensive devices and the motherboard ...

H87M-PRO User's Manual
Page 19
... can sit back and enjoy a perfect 3D animation experience. Simply output 3D signals through the connected DisplayPort cable with your 3D display, then you with ASUS vision of creating environment-friendly and energy-efficient products through product design and innovation to reduce carbon footprint of the product and thus mitigate environmental...'s Energy-related Products (ErP) ready, and ErP requires products to meet certain energy efficiency requirement in line with the highest quality home theater experience. Chapter 1 ASUS H87M-PRO 1-5
... can sit back and enjoy a perfect 3D animation experience. Simply output 3D signals through the connected DisplayPort cable with your 3D display, then you with ASUS vision of creating environment-friendly and energy-efficient products through product design and innovation to reduce carbon footprint of the product and thus mitigate environmental...'s Energy-related Products (ErP) ready, and ErP requires products to meet certain energy efficiency requirement in line with the highest quality home theater experience. Chapter 1 ASUS H87M-PRO 1-5
H87M-PRO User's Manual
Page 21
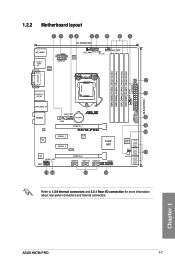
Chapter 1 ASUS H87M-PRO 1-7 1.2.2 Motherboard layout 12 34 35 3 21.3cm(8.4in) 6 3 KB_USB78 SPDIFO _HDMI _DP ASM 1442 EATX12V DIGI +VRM CPU_FAN GPU_Boost GPU_LED CHA_FAN2 DDR3 DIMM_A1 (64bit, 240... (64bit, 240-pin module) CHA_FAN3 EATXPWR DVI_VGA E56_E12 _U3_56 LGA1150 MemOK! 7 DRAM_LED 2 24.4cm(9.6in) LAN_USB3_34 AUDIO RTL 8111G Super I/O CHA_FAN1 BATTERY COM PCIEX16_1 H87M-PRO PCIEX1_1 Marvell 9172 PCIEX1_2 ASM1440 ALC 892 SPDIF_OUT AAFP PCIEX16_2 USB910 USB1112 USB1314 Intel® H87 PANEL 128Mb BIOS CLRTC SB_PWR SATA6G_1 SATA6G_3 SATA6G_5 SATA6G_2...
Chapter 1 ASUS H87M-PRO 1-7 1.2.2 Motherboard layout 12 34 35 3 21.3cm(8.4in) 6 3 KB_USB78 SPDIFO _HDMI _DP ASM 1442 EATX12V DIGI +VRM CPU_FAN GPU_Boost GPU_LED CHA_FAN2 DDR3 DIMM_A1 (64bit, 240... (64bit, 240-pin module) CHA_FAN3 EATXPWR DVI_VGA E56_E12 _U3_56 LGA1150 MemOK! 7 DRAM_LED 2 24.4cm(9.6in) LAN_USB3_34 AUDIO RTL 8111G Super I/O CHA_FAN1 BATTERY COM PCIEX16_1 H87M-PRO PCIEX1_1 Marvell 9172 PCIEX1_2 ASM1440 ALC 892 SPDIF_OUT AAFP PCIEX16_2 USB910 USB1112 USB1314 Intel® H87 PANEL 128Mb BIOS CLRTC SB_PWR SATA6G_1 SATA6G_3 SATA6G_5 SATA6G_2...
H87M-PRO User's Manual
Page 23
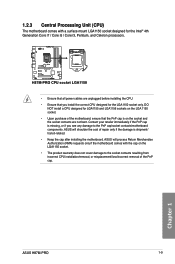
... mount LGA1150 socket designed for the Intel® 4th Generation Core i7 / Core i5 / Core i3, Pentium, and Celeron processors. Chapter 1 ASUS H87M-PRO 1-9 H87M-PRO H87M-PRO CPU socket LGA1150 • Ensure that all power cables are not bent. Contact your retailer immediately if the PnP cap is missing, or if ... Upon purchase of the motherboard, ensure that the PnP cap is shipment/ transit-related. • Keep the cap after installing the motherboard. ASUS will shoulder the cost of repair only if the damage is on the LGA1150 socket. • The product warranty does not cover damage to...
... mount LGA1150 socket designed for the Intel® 4th Generation Core i7 / Core i5 / Core i3, Pentium, and Celeron processors. Chapter 1 ASUS H87M-PRO 1-9 H87M-PRO H87M-PRO CPU socket LGA1150 • Ensure that all power cables are not bent. Contact your retailer immediately if the PnP cap is missing, or if ... Upon purchase of the motherboard, ensure that the PnP cap is shipment/ transit-related. • Keep the cap after installing the motherboard. ASUS will shoulder the cost of repair only if the damage is on the LGA1150 socket. • The product warranty does not cover damage to...
H87M-PRO User's Manual
Page 25
... for the latest QVL. com/kb/929605/en-us. • This motherboard does not support DIMMs made up of individual CPUs. Chapter 1 ASUS H87M-PRO 1-11 Load the X.M.P. For optimal compatibility, we recommend that you are using a 32-bit Windows OS. For effective use a more efficient... memory cooling system to support a full memory load (4 DIMMs) or overclocking condition. • ASUS exclusively provides hyper DIMM support function. • Hyper DIMM support is recommended to protect the CPU. • Due to Intel® chipset limitation,...
... for the latest QVL. com/kb/929605/en-us. • This motherboard does not support DIMMs made up of individual CPUs. Chapter 1 ASUS H87M-PRO 1-11 Load the X.M.P. For optimal compatibility, we recommend that you are using a 32-bit Windows OS. For effective use a more efficient... memory cooling system to support a full memory load (4 DIMMs) or overclocking condition. • ASUS exclusively provides hyper DIMM support function. • Hyper DIMM support is recommended to protect the CPU. • Due to Intel® chipset limitation,...

H87M-PRO User's Manual
Page 27
... x16_2 slot shares bandwidth with PCIe x1_1 and PCIe x2 slots. shared - - - - - - - - The default setting is x2 mode. shared - - - - - - - - shared - - - - shared - - shared - - - - - - - - - shared - - - - - - - - shared - - - - - - - Chapter 1 ASUS H87M-PRO 1-13 shared - - - - shared - - - - - - - shared - - - - - - - -
... x16_2 slot shares bandwidth with PCIe x1_1 and PCIe x2 slots. shared - - - - - - - - The default setting is x2 mode. shared - - - - - - - - shared - - - - shared - - shared - - - - - - - - - shared - - - - - - - - shared - - - - - - - Chapter 1 ASUS H87M-PRO 1-13 shared - - - - shared - - - - - - - shared - - - - - - - -
H87M-PRO User's Manual
Page 29
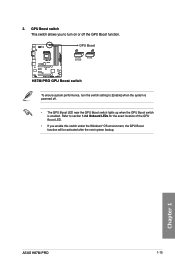
Refer to [Enable] when the system is powered off the GPU Boost function. Chapter 1 ASUS H87M-PRO 1-15 GPU Boost switch This switch allows you to turn the switch setting to section 1.2.8 Onboard LEDs for the exact location of the GPU Boost LED. • If you enable this switch under the Windows® OS environment, the GPU Boost function will be activated after the next system bootup. GPU Boost H87M-PRO H87M-PRO GPU Boost switch To ensure system performance, turn on or off . • The GPU Boost LED near the GPU Boost switch lights up when the GPU Boost switch is enabled. 2.
Refer to [Enable] when the system is powered off the GPU Boost function. Chapter 1 ASUS H87M-PRO 1-15 GPU Boost switch This switch allows you to turn the switch setting to section 1.2.8 Onboard LEDs for the exact location of the GPU Boost LED. • If you enable this switch under the Windows® OS environment, the GPU Boost function will be activated after the next system bootup. GPU Boost H87M-PRO H87M-PRO GPU Boost switch To ensure system performance, turn on or off . • The GPU Boost LED near the GPU Boost switch lights up when the GPU Boost switch is enabled. 2.

H87M-PRO User's Manual
Page 31
... device will remain lit until the problem is ON, in sleep mode, or in sequence during the motherboard boot process. DRAM LED H87M-PRO H87M-PRO DRAM LED Chapter 1 ASUS H87M-PRO 1-17 GPU Boost LED The GPU Boost LED lights up to indicate that you should shut down the system and unplug the power ...error is found, the LED next to the DRAM. DRAM LED The DRAM LED checks the DRAM in soft-off mode. SB_PWR H87M-PRO ON OFF Standby Power Powered Off H87M-PRO Onboard LED 2. Standby Power LED The motherboard comes with a standby power LED that lights up when the GPU Boost switch is a...
... device will remain lit until the problem is ON, in sleep mode, or in sequence during the motherboard boot process. DRAM LED H87M-PRO H87M-PRO DRAM LED Chapter 1 ASUS H87M-PRO 1-17 GPU Boost LED The GPU Boost LED lights up to indicate that you should shut down the system and unplug the power ...error is found, the LED next to the DRAM. DRAM LED The DRAM LED checks the DRAM in soft-off mode. SB_PWR H87M-PRO ON OFF Standby Power Powered Off H87M-PRO Onboard LED 2. Standby Power LED The motherboard comes with a standby power LED that lights up when the GPU Boost switch is a...
H87M-PRO User's Manual
Page 33
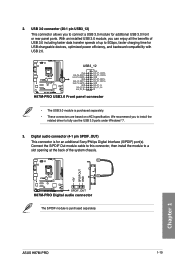
..., optimized power efficiency, and backward compatibility with USB 2.0. USB3_12 H87M-PRO H87M-PRO USB3.0 Front panel connector • The USB 3.0 module is for additional USB 3.0 front or rear panel ports. 2. H87M-PRO SPDIF_OUT H87M-PRO Digital audio connector The S/PDIF module is purchased separately. +5V SPDIFOUT GND Chapter 1 ASUS H87M-PRO 1-19 We recommend you to fully use the USB 3.0 ports...
..., optimized power efficiency, and backward compatibility with USB 2.0. USB3_12 H87M-PRO H87M-PRO USB3.0 Front panel connector • The USB 3.0 module is for additional USB 3.0 front or rear panel ports. 2. H87M-PRO SPDIF_OUT H87M-PRO Digital audio connector The S/PDIF module is purchased separately. +5V SPDIFOUT GND Chapter 1 ASUS H87M-PRO 1-19 We recommend you to fully use the USB 3.0 ports...
H87M-PRO User's Manual
Page 35
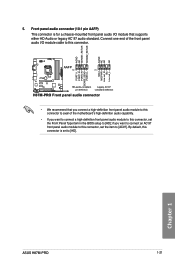
...pin AAFP) This connector is set to this connector, set the Front Panel Type item in the BIOS setup to [AC97]. Chapter 1 ASUS H87M-PRO 1-21 AGND NC SENSE1_RETUR SENSE2_RETUR AGND NC NC NC AAFP PIN 1 PIN 1 MIC2 MICPWR Line out_R NC Line out_L PORT1 L PORT1 R PORT2... R SENSE_SEND PORT2 L H87M-PRO HD-audio-compliant Legacy AC'97 pin definition compliant definition H87M-PRO Front panel audio connector • We recommend that supports either HD Audio or legacy AC`97 audio standard. 5....
...pin AAFP) This connector is set to this connector, set the Front Panel Type item in the BIOS setup to [AC97]. Chapter 1 ASUS H87M-PRO 1-21 AGND NC SENSE1_RETUR SENSE2_RETUR AGND NC NC NC AAFP PIN 1 PIN 1 MIC2 MICPWR Line out_R NC Line out_L PORT1 L PORT1 R PORT2... R SENSE_SEND PORT2 L H87M-PRO HD-audio-compliant Legacy AC'97 pin definition compliant definition H87M-PRO Front panel audio connector • We recommend that supports either HD Audio or legacy AC`97 audio standard. 5....
H87M-PRO User's Manual
Page 37
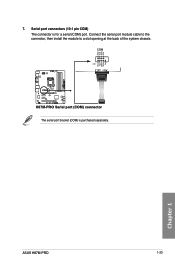
COM PIN 1 H87M-PRO H87M-PRO Serial port (COM) connector The serial port bracket (COM) is for a serial (COM) port. Serial port connectors (10-1 pin COM) The connector is purchased separately. Chapter 1 ASUS H87M-PRO 1-23 RXD DTR DSR CTS DCD TXD GND RTS RI 7. Connect the serial port module cable to the connector, then install the module to a slot opening at the back of the system chassis.
COM PIN 1 H87M-PRO H87M-PRO Serial port (COM) connector The serial port bracket (COM) is for a serial (COM) port. Serial port connectors (10-1 pin COM) The connector is purchased separately. Chapter 1 ASUS H87M-PRO 1-23 RXD DTR DSR CTS DCD TXD GND RTS RI 7. Connect the serial port module cable to the connector, then install the module to a slot opening at the back of the system chassis.
H87M-PRO User's Manual
Page 39
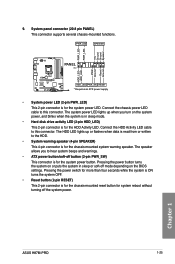
PWR Ground Reset Ground PANEL PIN 1 H87M-PRO HDD_LED PWR_SW RESET * Requires an ATX power supply H87M-PRO System panel connector • System power LED (2-pin PWR_LED) This 2-pin connector is for the system power button. The HDD LED lights up when you ... system power. Pressing the power button turns the system on the system power, and blinks when the system is for the HDD Activity LED. Chapter 1 ASUS H87M-PRO 1-25 The system power LED lights up or flashes when data is for the chassis-mounted reset button for system reboot without turning off mode...
PWR Ground Reset Ground PANEL PIN 1 H87M-PRO HDD_LED PWR_SW RESET * Requires an ATX power supply H87M-PRO System panel connector • System power LED (2-pin PWR_LED) This 2-pin connector is for the system power button. The HDD LED lights up when you ... system power. Pressing the power button turns the system on the system power, and blinks when the system is for the HDD Activity LED. Chapter 1 ASUS H87M-PRO 1-25 The system power LED lights up or flashes when data is for the chassis-mounted reset button for system reboot without turning off mode...
H87M-PRO User's Manual
Page 41
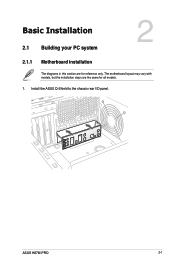
Install the ASUS Q-Shield to the chassis rear I/O panel. The motherboard layout may vary with models, but the installation steps are for all models. 1. Chapter 2: Basic Installation Basic Installation 2.1 Building your PC system 2 2.1.1 Motherboard installation The diagrams in this section are the same for reference only. Chapter 2 ASUS H87M-PRO 2-1
Install the ASUS Q-Shield to the chassis rear I/O panel. The motherboard layout may vary with models, but the installation steps are for all models. 1. Chapter 2: Basic Installation Basic Installation 2.1 Building your PC system 2 2.1.1 Motherboard installation The diagrams in this section are the same for reference only. Chapter 2 ASUS H87M-PRO 2-1
H87M-PRO User's Manual
Page 43
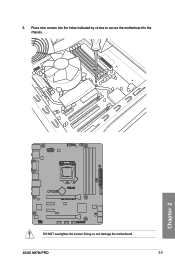
3. Place nine screws into the holes indicated by circles to secure the motherboard to the chassis. Doing so can damage the motherboard. ASUS H87M-PRO 2-3 Chapter 2 H87M-PRO DO NOT overtighten the screws!
3. Place nine screws into the holes indicated by circles to secure the motherboard to the chassis. Doing so can damage the motherboard. ASUS H87M-PRO 2-3 Chapter 2 H87M-PRO DO NOT overtighten the screws!
H87M-PRO User's Manual
Page 45
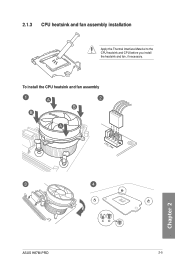
To install the CPU heatsink and fan assembly Chapter 2 ASUS H87M-PRO 2-5 2.1.3 CPU heatsink and fan assembly installation Apply the Thermal Interface Material to the CPU heatsink and CPU before you install the heatsink and fan, if necessary.
To install the CPU heatsink and fan assembly Chapter 2 ASUS H87M-PRO 2-5 2.1.3 CPU heatsink and fan assembly installation Apply the Thermal Interface Material to the CPU heatsink and CPU before you install the heatsink and fan, if necessary.
H87M-PRO User's Manual
Page 47
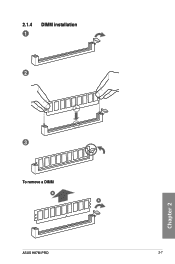
2.1.4 1 DIMM installation 2 3 To remove a DIMM B A ASUS H87M-PRO 2-7 Chapter 2
2.1.4 1 DIMM installation 2 3 To remove a DIMM B A ASUS H87M-PRO 2-7 Chapter 2
H87M-PRO User's Manual
Page 49
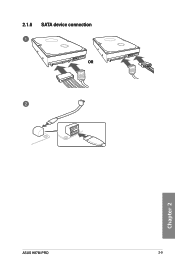
2.1.6 SATA device connection OR Chapter 2 ASUS H87M-PRO 2-9
2.1.6 SATA device connection OR Chapter 2 ASUS H87M-PRO 2-9
H87M-PRO User's Manual
Page 51
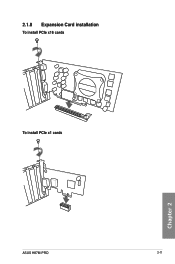
2.1.8 Expansion Card installation To install PCIe x16 cards To install PCIe x1 cards Chapter 2 ASUS H87M-PRO 2-11
2.1.8 Expansion Card installation To install PCIe x16 cards To install PCIe x1 cards Chapter 2 ASUS H87M-PRO 2-11


