H87I-PLUS User's Manual
Page 11
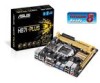
... / Core™ i3, Pentium® , Celeron® processors. Clear RTC RAM (3-pin CLRTC) ) 7. ASUS will shoulder the cost of the PnP cap. Front panel audio connector (10-1 pin AAFP) 13. H87I-PLUS H87I-PLUS CPU socket LGA1150 Unplug all power cables before installing the CPU. • Upon.../incorrect removal of repair only if the damage is missing, or if you see any damage to the PnP cap/socket contacts/motherboard components. ASUS H87I-PLUS 1-3 ATX power connectors (24-pin EATXPWR, 4-pin ATX12V) 4. DDR3 DIMM slots 8. 1.2.4 Layout contents Connectors/Jumpers/Slots/LED 1. USB ...
... / Core™ i3, Pentium® , Celeron® processors. Clear RTC RAM (3-pin CLRTC) ) 7. ASUS will shoulder the cost of the PnP cap. Front panel audio connector (10-1 pin AAFP) 13. H87I-PLUS H87I-PLUS CPU socket LGA1150 Unplug all power cables before installing the CPU. • Upon.../incorrect removal of repair only if the damage is missing, or if you see any damage to the PnP cap/socket contacts/motherboard components. ASUS H87I-PLUS 1-3 ATX power connectors (24-pin EATXPWR, 4-pin ATX12V) 4. DDR3 DIMM slots 8. 1.2.4 Layout contents Connectors/Jumpers/Slots/LED 1. USB ...
H87I-PLUS User's Manual
Page 18
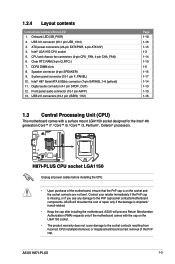
...do not need to clear the RTC when the system hangs due to pins 1-2. 3. H87I-PLUS CLRTC 12 23 Normal (Default) Clear RTC H87I-PLUS Clear RTC RAM To erase the RTC RAM: 1. Except when clearing the RTC RAM, never remove the cap on pins 2-3 for about 5-10 seconds, then move the ...jumper again to default values. 1-10 Chapter 1: Product introduction 1.6 Jumpers Clear RTC RAM (3-pin CLRTC) This jumper ...
...do not need to clear the RTC when the system hangs due to pins 1-2. 3. H87I-PLUS CLRTC 12 23 Normal (Default) Clear RTC H87I-PLUS Clear RTC RAM To erase the RTC RAM: 1. Except when clearing the RTC RAM, never remove the cap on pins 2-3 for about 5-10 seconds, then move the ...jumper again to default values. 1-10 Chapter 1: Product introduction 1.6 Jumpers Clear RTC RAM (3-pin CLRTC) This jumper ...
H87I-PLUS User's Manual
Page 33
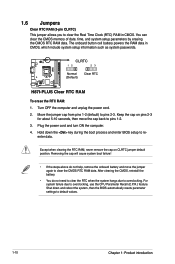
... the reset button on the system chassis. • Press the power button to turn the system off then back on your screen. • Visit the ASUS website at startup: • Press during the Power-On Self Test (POST). The default screen for details. 2-6 Chapter 2: Getting started Refer to the Setup... program. To access the Advanced Mode, click Exit/Advanced Mode, then select Advanced Mode or press F7 for information on how to erase the RTC RAM. Using the power button, reset button, or the ++ keys to force reset from the Exit/Advanced Mode button in section 2.8 Boot menu for ...
... the reset button on the system chassis. • Press the power button to turn the system off then back on your screen. • Visit the ASUS website at startup: • Press during the Power-On Self Test (POST). The default screen for details. 2-6 Chapter 2: Getting started Refer to the Setup... program. To access the Advanced Mode, click Exit/Advanced Mode, then select Advanced Mode or press F7 for information on how to erase the RTC RAM. Using the power button, reset button, or the ++ keys to force reset from the Exit/Advanced Mode button in section 2.8 Boot menu for ...

H87I-PLUS User's Manual
Page 38
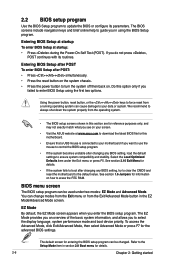
... your BIOS password, erase the CMOS Real Time Clock (RTC) RAM to erase the RTC RAM. • The Administrator or User Password items on how to clear the BIOS password. See section 1.6 Jumpers for information on top of the BIOS Setup program. ASUS H87I-PLUS 2-11 Configuration options: [English] [Español 2.4.2 System Date [Day...
... your BIOS password, erase the CMOS Real Time Clock (RTC) RAM to erase the RTC RAM. • The Administrator or User Password items on how to clear the BIOS password. See section 1.6 Jumpers for information on top of the BIOS Setup program. ASUS H87I-PLUS 2-11 Configuration options: [English] [Español 2.4.2 System Date [Day...


