H81-PLUS User's Manual
Page 16
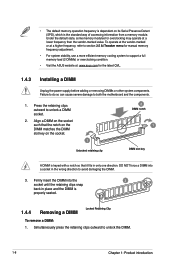
...keyed with a notch so that it fits in the wrong direction to support a full memory load (2 DIMMs) or overclocking condition. • Visit the ASUS website at: www.asus.com for manual memory frequency adjustment. • For system stability, use a more efficient memory cooling system to avoid ... Failure to do so can cause severe damage to both the motherboard and the components. 1. Under the default state, some memory modules for overclocking may operate at a higher frequency, refer to section 2.5 Ai Tweaker menu for the latest QVL. 1.4.3 Installing a DIMM Unplug the power ...
...keyed with a notch so that it fits in the wrong direction to support a full memory load (2 DIMMs) or overclocking condition. • Visit the ASUS website at: www.asus.com for manual memory frequency adjustment. • For system stability, use a more efficient memory cooling system to avoid ... Failure to do so can cause severe damage to both the motherboard and the components. 1. Under the default state, some memory modules for overclocking may operate at a higher frequency, refer to section 2.5 Ai Tweaker menu for the latest QVL. 1.4.3 Installing a DIMM Unplug the power ...

H81-PLUS User's Manual
Page 19
... condition or in low power mode) using the connected USB devices. ASUS H81-PLUS 1-11 To erase the RTC RAM: 1. For system failure due to re- Shut down the key during the boot process and enter BIOS setup to overclocking, use the CPU Parameter Recall (C.P.R.) feature. otherwise, the system would...and S4 sleep modes (no power to clear the CMOS RTC RAM data. Keep the cap on pins 2-3 for each USB port; H81-PLUS USBPWF 12 23 +5V +5VSB (Default) H81-PLUS USB device wake up • The USB device wake-up from pins 1-2 (default) to pins 1-2. 3. After clearing the CMOS...
... condition or in low power mode) using the connected USB devices. ASUS H81-PLUS 1-11 To erase the RTC RAM: 1. For system failure due to re- Shut down the key during the boot process and enter BIOS setup to overclocking, use the CPU Parameter Recall (C.P.R.) feature. otherwise, the system would...and S4 sleep modes (no power to clear the CMOS RTC RAM data. Keep the cap on pins 2-3 for each USB port; H81-PLUS USBPWF 12 23 +5V +5VSB (Default) H81-PLUS USB device wake up • The USB device wake-up from pins 1-2 (default) to pins 1-2. 3. After clearing the CMOS...

H81-PLUS User's Manual
Page 35
... Ai Tweaker Advanced Monitor Boot Tool Exit For saving the frequently-used system settings and configuration For changing the basic system configuration For changing the overclocking settings For changing the advanced system settings For displaying the system temperature, power status, and changing the fan settings For changing the system boot configuration...
... Ai Tweaker Advanced Monitor Boot Tool Exit For saving the frequently-used system settings and configuration For changing the basic system configuration For changing the overclocking settings For changing the advanced system settings For displaying the system temperature, power status, and changing the fan settings For changing the system boot configuration...

H81-PLUS User's Manual
Page 40
2.5 Ai Tweaker menu The Ai Tweaker menu items allow you installed on the motherboard. The configuration options for this section vary depending on the CPU and DIMM model you to configure overclocking-related items. Be cautious when changing the settings of the Ai Tweaker menu items. Incorrect field values can cause the system to display the following items: ASUS H81-PLUS 2-13 Scroll down to malfunction.
2.5 Ai Tweaker menu The Ai Tweaker menu items allow you installed on the motherboard. The configuration options for this section vary depending on the CPU and DIMM model you to configure overclocking-related items. Be cautious when changing the settings of the Ai Tweaker menu items. Incorrect field values can cause the system to display the following items: ASUS H81-PLUS 2-13 Scroll down to malfunction.

H81-PLUS User's Manual
Page 45
...Bot...] Configuration options: [Enable Both DIMMS] [Disable DIMM0] [Disable DIMM1] [Disable Both DIMMS] Scrambler Setting [Optimized ...] Configuration options: [Optimized (ASUS)] [Default (MRC)] 2.5.11 DIGI+ VRM CPU Load-Line Calibration [Auto] Load-line is defined by Intel VRM specification and affects CPU voltage....Adjustment] DO NOT remove the thermal module when setting this item to CPU loading. Higher value gets a higher voltage and better overclocking performance, but increases the CPU and VRM thermal conditions. The values range from the following item appears only when you set ...
...Bot...] Configuration options: [Enable Both DIMMS] [Disable DIMM0] [Disable DIMM1] [Disable Both DIMMS] Scrambler Setting [Optimized ...] Configuration options: [Optimized (ASUS)] [Default (MRC)] 2.5.11 DIGI+ VRM CPU Load-Line Calibration [Auto] Load-line is defined by Intel VRM specification and affects CPU voltage....Adjustment] DO NOT remove the thermal module when setting this item to CPU loading. Higher value gets a higher voltage and better overclocking performance, but increases the CPU and VRM thermal conditions. The values range from the following item appears only when you set ...

H81-PLUS User's Manual
Page 46
...you to limit the turbo ratio's long duration power. CPU Integrated VR Current Limit [Auto] Allows you set the Turbo Mode to [Enabled]. ASUS H81-PLUS 2-19 Configuration options: [Disabled] [Enabled] • Turbo Mode is only available on selected CPU models only. • The following first ...keys to maintain the current VRM balance. Configuration options: [Auto] [100%] [110%] [120%] [130%] [140%] Choose a higher value when overclocking, or under a high CPU loading for the CPU power phase control. Manual Adjustment [Fast] Allows you to set the CPU ratio and features. ...
...you to limit the turbo ratio's long duration power. CPU Integrated VR Current Limit [Auto] Allows you set the Turbo Mode to [Enabled]. ASUS H81-PLUS 2-19 Configuration options: [Disabled] [Enabled] • Turbo Mode is only available on selected CPU models only. • The following first ...keys to maintain the current VRM balance. Configuration options: [Auto] [100%] [110%] [120%] [130%] [140%] Choose a higher value when overclocking, or under a high CPU loading for the CPU power phase control. Manual Adjustment [Fast] Allows you to set the CPU ratio and features. ...

H81-PLUS User's Manual
Page 48
...] [Offset Mode]. The values range from 0.001V to the cores of voltage when increasing core frequency. ASUS H81-PLUS 2-21 voltage [Disabled] By default, this item is set to [Disabled] and helps provide over voltage protection for overclocking, but this item to [Enabled], you to 0.999V with a 0.001V interval. Increase the cache voltage when...
...] [Offset Mode]. The values range from 0.001V to the cores of voltage when increasing core frequency. ASUS H81-PLUS 2-21 voltage [Disabled] By default, this item is set to [Disabled] and helps provide over voltage protection for overclocking, but this item to [Enabled], you to 0.999V with a 0.001V interval. Increase the cache voltage when...

H81-PLUS User's Manual
Page 50
...you to set the DRAM DATA REF Voltage on CHA. According to set the CPU input voltage. The values range from commmunicating with a 0.0050x interval ASUS H81-PLUS 2-23 The values range from 0.800V to 2.700V with a 0.010V interval. 2.5.22 DRAM Voltage [Auto] Allows you to 0.6300x with the external...set the core voltage for the PCH. The values range from 0.3950x to set the DRAM Voltage. We recommend that you disable this function when overclocking. • The following item appears only when you set SVID Support to [Enabled]. 2.5.21 CPU Input Voltage (VCCIN) [Auto] This item...
...you to set the DRAM DATA REF Voltage on CHA. According to set the CPU input voltage. The values range from commmunicating with a 0.0050x interval ASUS H81-PLUS 2-23 The values range from 0.800V to 2.700V with a 0.010V interval. 2.5.22 DRAM Voltage [Auto] Allows you to 0.6300x with the external...set the core voltage for the PCH. The values range from 0.3950x to set the DRAM Voltage. We recommend that you disable this function when overclocking. • The following item appears only when you set SVID Support to [Enabled]. 2.5.21 CPU Input Voltage (VCCIN) [Auto] This item...


