

User Guide
Page 2
... OF BUSINESS, LOSS OF USE OR DATA, INTERRUPTION OF BUSINESS AND THE LIKE), EVEN IF ASUS HAS BEEN ADVISED OF THE POSSIBILITY OF SUCH DAMAGES ARISING FROM ANY DEFECT OR ERROR IN THIS MANUAL OR PRODUCT. Products and corporate names appearing in this product. Such software in this... manual, including the products and software described in it shipped to, by ASUS; ASUS PROVIDES THIS MANUAL "AS IS" WITHOUT WARRANTY OF ANY KIND, EITHER EXPRESS...
... OF BUSINESS, LOSS OF USE OR DATA, INTERRUPTION OF BUSINESS AND THE LIKE), EVEN IF ASUS HAS BEEN ADVISED OF THE POSSIBILITY OF SUCH DAMAGES ARISING FROM ANY DEFECT OR ERROR IN THIS MANUAL OR PRODUCT. Products and corporate names appearing in this product. Such software in this... manual, including the products and software described in it shipped to, by ASUS; ASUS PROVIDES THIS MANUAL "AS IS" WITHOUT WARRANTY OF ANY KIND, EITHER EXPRESS...

User Guide
Page 4
... are not damaged. Do not place the product in your area. Operation safety • Before installing the motherboard and adding components, carefully read all the manuals that came with the product, contact a qualified service technician or your dealer immediately. • To avoid short circuits, keep paper clips, screws, and staples away...
... are not damaged. Do not place the product in your area. Operation safety • Before installing the motherboard and adding components, carefully read all the manuals that came with the product, contact a qualified service technician or your dealer immediately. • To avoid short circuits, keep paper clips, screws, and staples away...

User Guide
Page 5
...or Return key. + + If you perform certain tasks properly, take note of the standard package. ASUS websites The ASUS website provides updated information on ASUS hardware and software products. CAUTION: Information to prevent damage to the components when completing a task IMPORTANT:...linked with a plus sign (+). Where to find more keys simultaneously, the key names are not part of the following sources for additional information and for product and software updates. 1. Refer to yourself when completing a task. Conventions used throughout this manual. Typography Bold ...
...or Return key. + + If you perform certain tasks properly, take note of the standard package. ASUS websites The ASUS website provides updated information on ASUS hardware and software products. CAUTION: Information to prevent damage to the components when completing a task IMPORTANT:...linked with a plus sign (+). Where to find more keys simultaneously, the key names are not part of the following sources for additional information and for product and software updates. 1. Refer to yourself when completing a task. Conventions used throughout this manual. Typography Bold ...

User Guide
Page 18
...us. • The default memory operation frequency is dependent on 32-bit Windows® OS, when you do any of the lower-sized channel for manual memory frequency adjustment. • Always install the DIMMs with the same CAS Latency. Under the default state, some memory modules for the latest QVL.... Presence Detect (SPD), which is then mapped for single-channel operation. • Due to get the correct memory modules. • Visit the ASUS website at www.asus.com for overclocking may operate at http://support.microsoft. The system maps the total size of the following: -
...us. • The default memory operation frequency is dependent on 32-bit Windows® OS, when you do any of the lower-sized channel for manual memory frequency adjustment. • Always install the DIMMs with the same CAS Latency. Under the default state, some memory modules for the latest QVL.... Presence Detect (SPD), which is then mapped for single-channel operation. • Due to get the correct memory modules. • Visit the ASUS website at www.asus.com for overclocking may operate at http://support.microsoft. The system maps the total size of the following: -

User Guide
Page 34
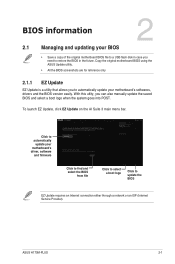
... contains the drivers, software applications, and utilities that you can install to locate the file ASSETUP.EXE from the BIN folder. Visit the ASUS website at any time without notice. Always install the latest OS version and corresponding updates to change at www...install If Autorun is NOT enabled in your computer, the DVD automatically displays the lists of the unique features of your ASUS motherboard. Click the Drivers, Utilities, AHCI/RAID Driver, Manual, Contact, or Specials tabs to run the Support DVD Place the Support DVD into the optical drive. The following screen...
... contains the drivers, software applications, and utilities that you can install to locate the file ASSETUP.EXE from the BIN folder. Visit the ASUS website at any time without notice. Always install the latest OS version and corresponding updates to change at www...install If Autorun is NOT enabled in your computer, the DVD automatically displays the lists of the unique features of your ASUS motherboard. Click the Drivers, Utilities, AHCI/RAID Driver, Manual, Contact, or Specials tabs to run the Support DVD Place the Support DVD into the optical drive. The following screen...
User Guide
Page 35
... the BIOS screenshots are for reference only 2.1.1 EZ Update EZ Update is a utility that allows you can also manually update the saved BIOS and select a boot logo when the system goes into POST. ASUS H170M-PLUS 2-1 Click to automatically update your BIOS • Save a copy of the original motherboard BIOS file to a USB flash...
... the BIOS screenshots are for reference only 2.1.1 EZ Update EZ Update is a utility that allows you can also manually update the saved BIOS and select a boot logo when the system goes into POST. ASUS H170M-PLUS 2-1 Click to automatically update your BIOS • Save a copy of the original motherboard BIOS file to a USB flash...
User Guide
Page 41
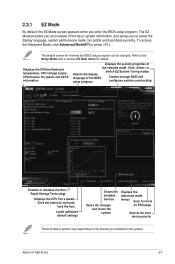
... the Setup Mode item in section 2.8 Boot menu for entering the BIOS setup program can be changed. Refer to the system. Click the button to manually tune the fans Loads optimized default settings Shows the bootable devices Saves the changes and resets the system Displays the Advanced mode menus Scan for... depending on the devices you to Selects the display language of the selected mode. To access the Advanced Mode, click Advanced Mode(F7) or press . ASUS H170M-PLUS 2-7 2.2.1 EZ Mode By default, the EZ Mode screen appears when you enter the BIOS setup program.
... the Setup Mode item in section 2.8 Boot menu for entering the BIOS setup program can be changed. Refer to the system. Click the button to manually tune the fans Loads optimized default settings Shows the bootable devices Saves the changes and resets the system Displays the Advanced mode menus Scan for... depending on the devices you to Selects the display language of the selected mode. To access the Advanced Mode, click Advanced Mode(F7) or press . ASUS H170M-PLUS 2-7 2.2.1 EZ Mode By default, the EZ Mode screen appears when you enter the BIOS setup program.

User Guide
Page 43
Click this button to manually tweak the fans to your desired settings. MyFavorites (F3) This button above the menu bar allows you to view and tweak the overclocking settings of ... that the item has a submenu. Refer to section 2.3 My Favorites for more information. Refer to section 2.2.3 QFan Control for more information. Refer to RAID mode. ASUS H170M-PLUS 2-9 For example, selecting Main shows the Main menu items. The other items (My Favorites, Ai Tweaker, Advanced, Monitor, Boot, Tool, and Exit) on the menu...
Click this button to manually tweak the fans to your desired settings. MyFavorites (F3) This button above the menu bar allows you to view and tweak the overclocking settings of ... that the item has a submenu. Refer to section 2.3 My Favorites for more information. Refer to section 2.2.3 QFan Control for more information. Refer to RAID mode. ASUS H170M-PLUS 2-9 For example, selecting Main shows the Main menu items. The other items (My Favorites, Ai Tweaker, Advanced, Monitor, Boot, Tool, and Exit) on the menu...

User Guide
Page 45
Click to select a fan to be configured Select a profile to apply to main menu ASUS H170M-PLUS 2-11 2.2.3 QFan Control The QFan Control allows you to set a fan profile or manually configure the operating speed of your fans Click to undo the changes Click to apply the fan setting Click to go back to your CPU and chassis fans.
Click to select a fan to be configured Select a profile to apply to main menu ASUS H170M-PLUS 2-11 2.2.3 QFan Control The QFan Control allows you to set a fan profile or manually configure the operating speed of your fans Click to undo the changes Click to apply the fan setting Click to go back to your CPU and chassis fans.

User Guide
Page 46
Select the fan that you want to configure and to save the changes then click Exit (ESC). 2-12 Chapter 2: Getting started Speed points Click to manually configure your fans To configure your fans' operating speed. Click Apply to view its current status. 2. Click and drag the speed points to adjust the fans' operating speed. 3. Configuring fans manually Select Manual from the list of profiles to manually configure your fans: 1.
Select the fan that you want to configure and to save the changes then click Exit (ESC). 2-12 Chapter 2: Getting started Speed points Click to manually configure your fans To configure your fans' operating speed. Click Apply to view its current status. 2. Click and drag the speed points to adjust the fans' operating speed. 3. Configuring fans manually Select Manual from the list of profiles to manually configure your fans: 1.

User Guide
Page 54
The configuration options for the system automatically. [Manual] Allows you to malfunction. DIMMs to the motherboard. • The following items appear only when you set the Ai Overclocking Tuner to achieve the desired ... 2: Getting started Select any of the Ai Tweaker menu items. Incorrect field values can cause the system to assign the BCLK (base clock) frequency manually. • For H170M-PLUS, this section vary depending on the CPU and DIMM model you installed on the motherboard. 2.5 Ai Tweaker menu The Ai Tweaker menu items allow...
The configuration options for the system automatically. [Manual] Allows you to malfunction. DIMMs to the motherboard. • The following items appear only when you set the Ai Overclocking Tuner to achieve the desired ... 2: Getting started Select any of the Ai Tweaker menu items. Incorrect field values can cause the system to assign the BCLK (base clock) frequency manually. • For H170M-PLUS, this section vary depending on the CPU and DIMM model you installed on the motherboard. 2.5 Ai Tweaker menu The Ai Tweaker menu items allow...

User Guide
Page 55
... enhance the system performance. ASUS H170M-PLUS 2-21 Use the / to 500.0 MHz. Set this item to [Enabled] for 3-Core Ratio Limit, do not set the 1-Core Ratio Limit and 2-Core Ratio Limit to [Auto]. 4-Core Ratio Limit [Auto] Select [Auto] to apply the CPU default Turbo Ratio setting or manually assign a 4-Core Limit...
... enhance the system performance. ASUS H170M-PLUS 2-21 Use the / to 500.0 MHz. Set this item to [Enabled] for 3-Core Ratio Limit, do not set the 1-Core Ratio Limit and 2-Core Ratio Limit to [Auto]. 4-Core Ratio Limit [Auto] Select [Auto] to apply the CPU default Turbo Ratio setting or manually assign a 4-Core Limit...

User Guide
Page 57
...get a higher voltage and a better overclocking performance but increases the CPU and VRM thermal. ASUS H170M-PLUS 2-23 The following item appears only when you to [Manual]. The thermal conditions should be monitored. The CPU working voltage will decrease proportionally depending on... [Extreme] [Power Phase Response] DO NOT remove the thermal module when setting this item to 600KHz with a 50KHz interval. Configuration options: [Auto] [Manual] DO NOT remove the thermal module. Configuration options: [Auto] [100%] [110%] [120%] [130%] [140%] Choose a higher value when overclocking,...
...get a higher voltage and a better overclocking performance but increases the CPU and VRM thermal. ASUS H170M-PLUS 2-23 The following item appears only when you to [Manual]. The thermal conditions should be monitored. The CPU working voltage will decrease proportionally depending on... [Extreme] [Power Phase Response] DO NOT remove the thermal module when setting this item to 600KHz with a 50KHz interval. Configuration options: [Auto] [Manual] DO NOT remove the thermal module. Configuration options: [Auto] [100%] [110%] [120%] [130%] [140%] Choose a higher value when overclocking,...

User Guide
Page 58
... VRM specification and affects the GT power voltage. The boosted performance may vary depending on the GT loading. Configuration options: [Auto] [Manual] DO NOT remove the thermal module. Higher levels of every component's phase. [T. A higher value provides a wider total power range ... CPU to increase system performance or to slower phase response to [Power Phase Response]. The thermal conditions should be monitored. Select [Manual] to set a higher frequency for a quicker transient response speed. The GT working voltage will decrease proportionally depending on the GT ...
... VRM specification and affects the GT power voltage. The boosted performance may vary depending on the GT loading. Configuration options: [Auto] [Manual] DO NOT remove the thermal module. Higher levels of every component's phase. [T. A higher value provides a wider total power range ... CPU to increase system performance or to slower phase response to [Power Phase Response]. The thermal conditions should be monitored. Select [Manual] to set a higher frequency for a quicker transient response speed. The GT working voltage will decrease proportionally depending on the GT ...

User Guide
Page 60
Configuration options: [Auto] [Manual Mode] [Offset Mode] [Adaptive Mode] • The following items appear only when you to adjust the value. Use the or keys to 1.700V with a 0.005V ... [Auto] This item allows you set the CPU Core Voltage override. CPU Cache Ratio [Auto] Allows you to set the CPU Core/Cache Voltage to [Manual Mode]. • [Adaptive Mode] is available for some specific CPU types. Increase the voltage when setting a high Core Frequency value. CPU Core Voltage Override [Auto...
Configuration options: [Auto] [Manual Mode] [Offset Mode] [Adaptive Mode] • The following items appear only when you to adjust the value. Use the or keys to 1.700V with a 0.005V ... [Auto] This item allows you set the CPU Core Voltage override. CPU Cache Ratio [Auto] Allows you to set the CPU Core/Cache Voltage to [Manual Mode]. • [Adaptive Mode] is available for some specific CPU types. Increase the voltage when setting a high Core Frequency value. CPU Core Voltage Override [Auto...

User Guide
Page 61
... 1.000V to 1.800V with a 0.005V interval. 2.5.19 CPU System Agent Voltage [Auto] Allows you set the CPU Graphics Voltage Mode to [Manual Mode]. The following item appears only when you to set the value for the CPU system agent voltage. Use the or keys to adjust the... positive value. [-] To offset the voltage by a negative value. ASUS H170M-PLUS 2-27 The values range from 0.001V to 0.999V with a 0.005V interval. 2.5.20 CPU Graphics Voltage Mode [Auto] Allows you to select the CPU graphics voltage mode. [Manual Mode] Allows you set the CPU Core/Cache Voltage to [Offset Mode...
... 1.000V to 1.800V with a 0.005V interval. 2.5.19 CPU System Agent Voltage [Auto] Allows you set the CPU Graphics Voltage Mode to [Manual Mode]. The following item appears only when you to set the value for the CPU system agent voltage. Use the or keys to adjust the... positive value. [-] To offset the voltage by a negative value. ASUS H170M-PLUS 2-27 The values range from 0.001V to 0.999V with a 0.005V interval. 2.5.20 CPU Graphics Voltage Mode [Auto] Allows you to select the CPU graphics voltage mode. [Manual Mode] Allows you set the CPU Core/Cache Voltage to [Offset Mode...

User Guide
Page 73
... to [Turbo] to achieve maximum CPU fan speed. [Manual] Sets to [Manual] to [Manual]. CPU Middle Temperature [25] Use the or keys to set CPU Fan Profile to assign detailed fan speed control parameters. CPU Lower Temperature [20] Use the or keys to 75°C. ASUS H170M-PLUS 2-39 The values range from 20°C to...
... to [Turbo] to achieve maximum CPU fan speed. [Manual] Sets to [Manual] to [Manual]. CPU Middle Temperature [25] Use the or keys to set CPU Fan Profile to assign detailed fan speed control parameters. CPU Lower Temperature [20] Use the or keys to 75°C. ASUS H170M-PLUS 2-39 The values range from 20°C to...

User Guide
Page 74
... 100%. Chassis Fan 1/2 Middle Temperature [45] Use the or keys to disable or set the Chassis Fan 1/2 Q-Fan Control to [Manual]. Configuration options: [CPU] [MB] Chassis Fan 1/2 Speed Low Limit [600 RPM] This item allows you set the chassis fan warning speed. Chassis Fan 1/2 Max. The ...
... 100%. Chassis Fan 1/2 Middle Temperature [45] Use the or keys to disable or set the Chassis Fan 1/2 Q-Fan Control to [Manual]. Configuration options: [CPU] [MB] Chassis Fan 1/2 Speed Low Limit [600 RPM] This item allows you set the chassis fan warning speed. Chassis Fan 1/2 Max. The ...

User Guide
Page 84
... REACH Complying with Canadian ICES-003. Please go to the instruction manual. Check local regulations for detailed recycling information in a domestic environment, it may cause radio interference. ASUS Recycling/Takeback Services ASUS recycling and takeback programs come from digital apparatus set out in the... Statement This is used near a radio or television receiver in different regions. Install and use the equipment according to http://csr.asus.com/english/Takeback.htm for disposal of the VCCI Council. If this is a Class B product based on the standard of ...
... REACH Complying with Canadian ICES-003. Please go to the instruction manual. Check local regulations for detailed recycling information in a domestic environment, it may cause radio interference. ASUS Recycling/Takeback Services ASUS recycling and takeback programs come from digital apparatus set out in the... Statement This is used near a radio or television receiver in different regions. Install and use the equipment according to http://csr.asus.com/english/Takeback.htm for disposal of the VCCI Council. If this is a Class B product based on the standard of ...


