
User's Manual for English Edition
Page 2
... YOUR RECORDS OR DATA; SERVICE AND SUPPORT Visit our multi-language web site at http://support.asus.com ASUS PROVIDES THIS MANUAL "AS IS"WITHOUT WARRANTY ...part of this manual may or may not be registered trademarks or copyrights of their respective companies, and are used only for identification or explanation and to the owners' benefit, without the express written permission of ASUSTeK COMPUTER INC. ("ASUS"). IN NO EVENT SHALL ASUS...infringe. ASUS ASSUMES NO RESPONSIBILITY OR LIABILITY FOR ANY ERRORS OR INACCURACIES THAT MAY APPEAR IN THIS MANUAL, INCLUDING THE PRODUCTS AND SOFTWARE DESCRIBED...
... YOUR RECORDS OR DATA; SERVICE AND SUPPORT Visit our multi-language web site at http://support.asus.com ASUS PROVIDES THIS MANUAL "AS IS"WITHOUT WARRANTY ...part of this manual may or may not be registered trademarks or copyrights of their respective companies, and are used only for identification or explanation and to the owners' benefit, without the express written permission of ASUSTeK COMPUTER INC. ("ASUS"). IN NO EVENT SHALL ASUS...infringe. ASUS ASSUMES NO RESPONSIBILITY OR LIABILITY FOR ANY ERRORS OR INACCURACIES THAT MAY APPEAR IN THIS MANUAL, INCLUDING THE PRODUCTS AND SOFTWARE DESCRIBED...
User's Manual for English Edition
Page 3
... Connecting a wired keyboard and mouse...19 Connecting a wireless keyboard and mouse 20 Powering on your All-in-One PC...21 Using the On Screen Display (OSD) Menu...22 Gestures...24 Configuring the audio output using an HDMI device 26 Chapter 3: Working with Windows® 8 System requirements...29 Starting for the first time (For Windows® 8 and Windows® 8 Professional 30 Windows® 8 lock screen...30 Windows® UI...31 Start screen...31 Windows® apps...32 Hotspots...32 Working with Windows...
... Connecting a wired keyboard and mouse...19 Connecting a wireless keyboard and mouse 20 Powering on your All-in-One PC...21 Using the On Screen Display (OSD) Menu...22 Gestures...24 Configuring the audio output using an HDMI device 26 Chapter 3: Working with Windows® 8 System requirements...29 Starting for the first time (For Windows® 8 and Windows® 8 Professional 30 Windows® 8 lock screen...30 Windows® UI...31 Start screen...31 Windows® apps...32 Hotspots...32 Working with Windows...

User's Manual for English Edition
Page 4
... network connection 50 Configuring a static IP network connection...53 Setting up a Bluetooth Wireless Connection 53 Chapter 5: Recovering your system Entering the BIOS Setup...55 Quickly enter the BIOS...55 Using the Recovery Partition in Windows® 7 56 Recovering the OS to the Factory Default Partition (F9 Recovery 56 Backing up the Factory Default Environment Data to a USB Drive (F9 Backup 56 Using the USB storage device (USB Restore 57 Resetting your All-in-One PC in Windows® 8 58 Recovering from a system image...
... network connection 50 Configuring a static IP network connection...53 Setting up a Bluetooth Wireless Connection 53 Chapter 5: Recovering your system Entering the BIOS Setup...55 Quickly enter the BIOS...55 Using the Recovery Partition in Windows® 7 56 Recovering the OS to the Factory Default Partition (F9 Recovery 56 Backing up the Factory Default Environment Data to a USB Drive (F9 Backup 56 Using the USB storage device (USB Restore 57 Resetting your All-in-One PC in Windows® 8 58 Recovering from a system image...

User's Manual for English Edition
Page 7
... the following technical problems with the product, unplug the power cord and contact a qualified service technician or your retailer. • The power cord or plug is damaged. • Liquid has been spilled into the system. • The system does not function properly even if you follow all power, modem, and network cables from the power outlets before you operate your system...
... the following technical problems with the product, unplug the power cord and contact a qualified service technician or your retailer. • The power cord or plug is damaged. • Liquid has been spilled into the system. • The system does not function properly even if you follow all power, modem, and network cables from the power outlets before you operate your system...

User's Manual for English Edition
Page 8
...default levels increases the output voltage and sound pressure produced by the earphones or headphones. Keep away from earphones or headphones can cause harm when used improperly. Adapter 1. DC Fan Warning Please note that the Coaxial cable shield be connected...models) Note to CATV System Installer-This reminder is in -One PC. It is recommended that the power socket is provided to call the CATV systems installer's attention to Section 820-93 of the National Electric Code, which provides guidelines for proper grounding and, in particular, specify that the DC fan is a moving part...
...default levels increases the output voltage and sound pressure produced by the earphones or headphones. Keep away from earphones or headphones can cause harm when used improperly. Adapter 1. DC Fan Warning Please note that the Coaxial cable shield be connected...models) Note to CATV System Installer-This reminder is in -One PC. It is recommended that the power socket is provided to call the CATV systems installer's attention to Section 820-93 of the National Electric Code, which provides guidelines for proper grounding and, in particular, specify that the DC fan is a moving part...

User's Manual for English Edition
Page 11
... allows you to HDMI Input. English Digital microphone (Built-in) The built-in -One PC. Touch-enabled models support 5-point optical touch. Remote Control Receiver The remote control receiver receives the infrared signal from PC to hear audio without additional peripherals. Audio Speakers The built-in -One PC ET2311 Series 11 HDD LED Indicates hard drive activity. All-in stereo speaker system allows you to power on your All...
... allows you to HDMI Input. English Digital microphone (Built-in) The built-in -One PC. Touch-enabled models support 5-point optical touch. Remote Control Receiver The remote control receiver receives the infrared signal from PC to hear audio without additional peripherals. Audio Speakers The built-in -One PC ET2311 Series 11 HDD LED Indicates hard drive activity. All-in stereo speaker system allows you to power on your All...

User's Manual for English Edition
Page 13
... start video chats online. Mode button Press this button display the menu. Press this button to move up the options when the Menu is displayed. Webcam LED Indicates that produces rich, vibrant sound. Remote Control Receiver The remote control receiver receives the infrared signal from PC to HDMI. HDD LED Indicates hard drive activity. The multimedia sound system features an integrated digital audio controller that the built-in webcam is displayed. Menu Down button Press this button as a standard desktop...
... start video chats online. Mode button Press this button display the menu. Press this button to move up the options when the Menu is displayed. Webcam LED Indicates that produces rich, vibrant sound. Remote Control Receiver The remote control receiver receives the infrared signal from PC to HDMI. HDD LED Indicates hard drive activity. The multimedia sound system features an integrated digital audio controller that the built-in webcam is displayed. Menu Down button Press this button as a standard desktop...

User's Manual for English Edition
Page 15
... port, such as keyboards, pointing devices, flash disk drives, external HDDs, speakers, cameras and printers. Antenna socket Connect standard indoor or outdoor male antenna connectors to a local network. USB 2.0 port This USB (Universal Serial Bus) port is compatible with USB2.0. All-in -One PC, go to quickcharge compatible devices. HDMI Output Port Connect this port with devices equipped with USB 2.0 or USB 1.1 devices such as an LCD monitor or projector. HDMI Input Port When using the HDMI-in mode, use the HDMI Input port for models...
... port, such as keyboards, pointing devices, flash disk drives, external HDDs, speakers, cameras and printers. Antenna socket Connect standard indoor or outdoor male antenna connectors to a local network. USB 2.0 port This USB (Universal Serial Bus) port is compatible with USB2.0. All-in -One PC, go to quickcharge compatible devices. HDMI Output Port Connect this port with devices equipped with USB 2.0 or USB 1.1 devices such as an LCD monitor or projector. HDMI Input Port When using the HDMI-in mode, use the HDMI Input port for models...

User's Manual for English Edition
Page 16
... used to connect to a microphone used for producing powerful bass (low frequency sounds) when playing multimedia. 16 All-in-One PC ET2311 Series Subwoofer jack This jack is designed to connect to an ASUS All-in memory card reader slot that supports MMC, SD, SDHC, SDXC, MS, MS PRO cards. Left side view English MMC.XD.SD.SDHC.MS/PRO S/PDIF USB 3.0 ports These USB (Universal Serial Bus) ports...
... used to connect to a microphone used for producing powerful bass (low frequency sounds) when playing multimedia. 16 All-in-One PC ET2311 Series Subwoofer jack This jack is designed to connect to an ASUS All-in memory card reader slot that supports MMC, SD, SDHC, SDXC, MS, MS PRO cards. Left side view English MMC.XD.SD.SDHC.MS/PRO S/PDIF USB 3.0 ports These USB (Universal Serial Bus) ports...

User's Manual for English Edition
Page 17
... optical drive. All-in optical drive may support compact discs (CD), digital video discs (DVD), and/or Blu-ray discs (BD), and recordable (R) or re-writable (RW) media. Right side view English Optical Drive The built-in -One PC ET2311 Series 17 Use the manual eject hole only when the eject button does not work . Optical disc drive manual eject hole The manual eject hole is used to eject the drive tray in case the eject button...
... optical drive. All-in optical drive may support compact discs (CD), digital video discs (DVD), and/or Blu-ray discs (BD), and recordable (R) or re-writable (RW) media. Right side view English Optical Drive The built-in -One PC ET2311 Series 17 Use the manual eject hole only when the eject button does not work . Optical disc drive manual eject hole The manual eject hole is used to eject the drive tray in case the eject button...
User's Manual for English Edition
Page 21
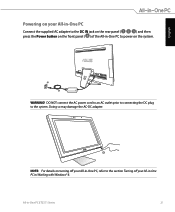
All-in Working with Windows® 8. Doing so may damage the AC-DC adapter. 4 NOTE: For details on the system. 2 3 1 WARNING! English Powering on your All-in-One PC Connect the supplied AC adapter to the DC IN jack on the rear panel ( ) and then press the Power button on the front panel ( ) of the All-in-One PC to power on turning off your All-in-One PC, refer to the system. DO NOT connect the AC power cord to an AC outlet prior to connecting the DC plug to the section Turning off your All-in-One PC in -One PC ET2311 Series 21
All-in Working with Windows® 8. Doing so may damage the AC-DC adapter. 4 NOTE: For details on the system. 2 3 1 WARNING! English Powering on your All-in-One PC Connect the supplied AC adapter to the DC IN jack on the rear panel ( ) and then press the Power button on the front panel ( ) of the All-in-One PC to power on turning off your All-in-One PC, refer to the system. DO NOT connect the AC power cord to an AC outlet prior to connecting the DC plug to the section Turning off your All-in-One PC in -One PC ET2311 Series 21
User's Manual for English Edition
Page 22
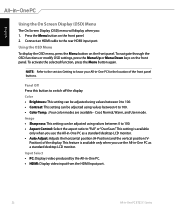
Connect an HDMI cable to switch off the display. Cool, Normal, Warm, and User mode. This setting is available only when you : 1. Position) of the front panel buttons. To navigate through the OSD functions or modify OSD settings, press the Menu Up or Menu Down keys on the front panel. NOTE: Refer to the section Getting to know your All-in-One PC for the location of...
Connect an HDMI cable to switch off the display. Cool, Normal, Warm, and User mode. This setting is available only when you : 1. Position) of the front panel buttons. To navigate through the OSD functions or modify OSD settings, press the Menu Up or Menu Down keys on the front panel. NOTE: Refer to the section Getting to know your All-in-One PC for the location of...
User's Manual for English Edition
Page 26
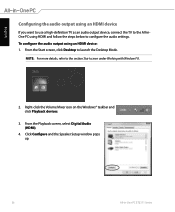
... Start screen under Working with Windows® 8. 2. Click Configure and the Speaker Setup window pops up. 26 All-in-One PC ET2311 Series NOTE: For more details, refer to configure the audio settings. From the Playback screen, select Digital Audio (HDMI). 4. English Configuring the audio output using an HDMI device If you want to use a high-definition TV as an audio output device, connect the TV to the All-inOne PC using an HDMI device: 1. From the Start screen...
... Start screen under Working with Windows® 8. 2. Click Configure and the Speaker Setup window pops up. 26 All-in-One PC ET2311 Series NOTE: For more details, refer to configure the audio settings. From the Playback screen, select Digital Audio (HDMI). 4. English Configuring the audio output using an HDMI device If you want to use a high-definition TV as an audio output device, connect the TV to the All-inOne PC using an HDMI device: 1. From the Start screen...
User's Manual for English Edition
Page 30
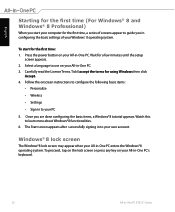
... setup screen appears. 2. Follow the onscreen instructions to configure the following basic items: • Personalize • Wireless • Settings • Sign in configuring the basic settings of screens appear to use on your All-in -One PC. Watch this to your PC 5. Wait for using Windows then click Accept. 4. Once you are done configuring the basic items, a Windows®8 tutorial appears. Select a language to guide...
... setup screen appears. 2. Follow the onscreen instructions to configure the following basic items: • Personalize • Wireless • Settings • Sign in configuring the basic settings of screens appear to use on your All-in -One PC. Watch this to your PC 5. Wait for using Windows then click Accept. 4. Once you are done configuring the basic items, a Windows®8 tutorial appears. Select a language to guide...
User's Manual for English Edition
Page 50
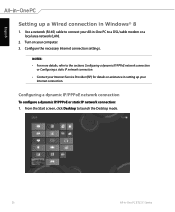
.../PPPoE network connection or Configuring a static IP network connection. • Contact your Internet Service Provider (ISP) for details or assistance in -One PC to a DSL/cable modem or a local area network (LAN). 2. Turn on your Internet connection. From the Start screen, click Desktop to connect your All-in setting up a Wired connection in -One PC ET2311 Series English Setting up your computer. 3. Configuring a dynamic IP/PPPoE network connection To configure a dynamic IP/PPPoE or static IP network connection: 1. Use a network...
.../PPPoE network connection or Configuring a static IP network connection. • Contact your Internet Service Provider (ISP) for details or assistance in -One PC to a DSL/cable modem or a local area network (LAN). 2. Turn on your Internet connection. From the Start screen, click Desktop to connect your All-in setting up a Wired connection in -One PC ET2311 Series English Setting up your computer. 3. Configuring a dynamic IP/PPPoE network connection To configure a dynamic IP/PPPoE or static IP network connection: 1. Use a network...
User's Manual for English Edition
Page 54
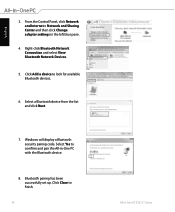
... Control Panel, click Network and Internet > Network and Sharing Center and then click Change adapter settings in -One PC with the Bluetooth device. 8. Click Add a device to finish. 54 All-in-One PC ET2311 Series English 3. Bluetooth pairing has been successfully set up. Select a Bluetooth device from the list and click Next. 7. Select Yes to comfirm and pair the All-in the left blue pane. 4. Windows will display...
... Control Panel, click Network and Internet > Network and Sharing Center and then click Change adapter settings in -One PC with the Bluetooth device. 8. Click Add a device to finish. 54 All-in-One PC ET2311 Series English 3. Bluetooth pairing has been successfully set up. Select a Bluetooth device from the list and click Next. 7. Select Yes to comfirm and pair the All-in the left blue pane. 4. Windows will display...

User's Manual for English Edition
Page 55
...'s power connector. In normal circumstances, the default BIOS settings apply to most conditions to instability or boot failure. Quickly enter the BIOS Windows® 8 boot time is quite fast, so we developed these three ways for you change the default BIOS settings except in the following circumstances: • An error message appears on the screen during POST. Reconnect the power cord and press the power button to run when you turn on...
...'s power connector. In normal circumstances, the default BIOS settings apply to most conditions to instability or boot failure. Quickly enter the BIOS Windows® 8 boot time is quite fast, so we developed these three ways for you change the default BIOS settings except in the following circumstances: • An error message appears on the screen during POST. Reconnect the power cord and press the power button to run when you turn on...
User's Manual for English Edition
Page 57
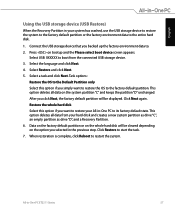
Connect the USB storage device that you click Next, the factory default partition will be displayed. Select USB: XXXXXX to boot from your system has crashed, use the USB storage device to restore the system to the factory default partition or the factory environment data to the entire hard disk. 1. Data on the factory default partition or on the whole hard disk will be cleared depending on the option you selected in -One PC to . 2. Select a task...
Connect the USB storage device that you click Next, the factory default partition will be displayed. Select USB: XXXXXX to boot from your system has crashed, use the USB storage device to restore the system to the factory default partition or the factory environment data to the entire hard disk. 1. Data on the factory default partition or on the whole hard disk will be cleared depending on the option you selected in -One PC to . 2. Select a task...
User's Manual for English Edition
Page 58
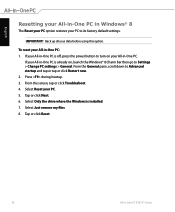
... the power button to its factory default settings. Tap or click Next. 6. From the General pane, scroll down to Settings > Change PC settings > General. Select Just remove my files. 8. Back up all your PC. 5. Press during bootup. 3. To reset your All-in -One PC: 1. Select Reset your data before using this option. Tap or click Reset. 58 All-in -One PC is installed. 7. From the screen...
... the power button to its factory default settings. Tap or click Next. 6. From the General pane, scroll down to Settings > Change PC settings > General. Select Just remove my files. 8. Back up all your PC. 5. Press during bootup. 3. To reset your All-in -One PC: 1. Select Reset your data before using this option. Tap or click Reset. 58 All-in -One PC is installed. 7. From the screen...

User's Manual for English Edition
Page 60
... use this option, click Get Started. 4. NOTE: This process may take a while to complete. 8. Removing everything and reinstalling Windows® 8 Restoring your data before using the Remove everything and reinstall Windows option. Click Settings > Change PC Settings > General. 3. Refer to the steps below to its original factory settings can be done using this option. Under this option. Launch the Charm bar. 2. Scroll down to complete the reinstallation and reset...
... use this option, click Get Started. 4. NOTE: This process may take a while to complete. 8. Removing everything and reinstalling Windows® 8 Restoring your data before using the Remove everything and reinstall Windows option. Click Settings > Change PC Settings > General. 3. Refer to the steps below to its original factory settings can be done using this option. Under this option. Launch the Charm bar. 2. Scroll down to complete the reinstallation and reset...


