
User Guide
Page 15
...2133 Memory Memory Type (O.C.)/2400(O.C.) non-ECC/ECC UDIMM *Refer to www.asus.com for North America 2 x USB 3.0 ports 2 x USB 2.0 ports 1 x Line In 1 x Line Out (continued on the next page) ASUS ESC1000 G2 1-3 Memory Size 1GB, 2GB, 4GB and 8GB (UDIMM) Total PCI... Gigabit LAN controller HDD Bays 4 x Hot-swap 3.5" HDD Bays Auxiliary Storage FDD / CD / DVD Front Panel I/O 3 x 5.25" media bays (Optional: DVD-RW)* *DVD-RW default for detailed memory AVL CPU support list. 1.3 System specifications ASUS ESC1000 G2 is a workstation that features the ASUS P9X79 WS motherboard, supports...
...2133 Memory Memory Type (O.C.)/2400(O.C.) non-ECC/ECC UDIMM *Refer to www.asus.com for North America 2 x USB 3.0 ports 2 x USB 2.0 ports 1 x Line In 1 x Line Out (continued on the next page) ASUS ESC1000 G2 1-3 Memory Size 1GB, 2GB, 4GB and 8GB (UDIMM) Total PCI... Gigabit LAN controller HDD Bays 4 x Hot-swap 3.5" HDD Bays Auxiliary Storage FDD / CD / DVD Front Panel I/O 3 x 5.25" media bays (Optional: DVD-RW)* *DVD-RW default for detailed memory AVL CPU support list. 1.3 System specifications ASUS ESC1000 G2 is a workstation that features the ASUS P9X79 WS motherboard, supports...
User Guide
Page 38
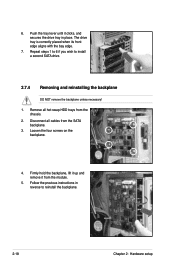
Loosen the four screws on the backplane. 4. Follow the previous instructions in place. Disconnect all hot-swap HDD trays from the chassis. 2. Repeat steps 1 to 6 if you wish to reinstall the backplane. 2-18 Chapter 2: Hardware setup Firmly hold the backplane, lift it .... 2.7.4 Removing and reinstalling the backplane DO NOT remove the backplane unless necessary! 1. The drive tray is correctly placed when its front edge aligns with the bay edge. 7. Push the tray lever until it from the SATA backplane. 3. Remove all cables from the module. 5. 6.
Loosen the four screws on the backplane. 4. Follow the previous instructions in place. Disconnect all hot-swap HDD trays from the chassis. 2. Repeat steps 1 to 6 if you wish to reinstall the backplane. 2-18 Chapter 2: Hardware setup Firmly hold the backplane, lift it .... 2.7.4 Removing and reinstalling the backplane DO NOT remove the backplane unless necessary! 1. The drive tray is correctly placed when its front edge aligns with the bay edge. 7. Push the tray lever until it from the SATA backplane. 3. Remove all cables from the module. 5. 6.