User's Manual for English Edition
Page 2
...manual are correct and up to date. English E7312 First Edition March 2012 Copyright © 2012 ASUSTeK COMPUTER INC. All trademarks are used for backup purposes, without prior notice. All Rights Reserved. Every effort has been made to make changes... without the express written permission of its contents, and reserves the right to ensure that the contents of this manual may or ...owners. No part of this manual, including the products and software described in any form or by the purchaser for identification purposes only. However, the manufacturer makes...
...manual are correct and up to date. English E7312 First Edition March 2012 Copyright © 2012 ASUSTeK COMPUTER INC. All trademarks are used for backup purposes, without prior notice. All Rights Reserved. Every effort has been made to make changes... without the express written permission of its contents, and reserves the right to ensure that the contents of this manual may or ...owners. No part of this manual, including the products and software described in any form or by the purchaser for identification purposes only. However, the manufacturer makes...
User's Manual for English Edition
Page 3
... 19 Positioning your PC 20 Installing the stand (optional 20 Installing your PC to a monitor (optional 21 Setting up your PC 22 Connecting to a display 22 Connecting to USB devices 22 Connecting to a network device 23 Connecting to LAN 23 Connecting to Wi-Fi via wireless antenna 23 Turning on the system 24 Using your PC 25 Configuring wireless connection 25 Configuring wired connection 26 ASUS Easy Update 30 Recovering your system 31 Using the recovery partition 31 Using the USB storage device (USB Restore 33 EB1007P 3
... 19 Positioning your PC 20 Installing the stand (optional 20 Installing your PC to a monitor (optional 21 Setting up your PC 22 Connecting to a display 22 Connecting to USB devices 22 Connecting to a network device 23 Connecting to LAN 23 Connecting to Wi-Fi via wireless antenna 23 Turning on the system 24 Using your PC 25 Configuring wireless connection 25 Configuring wired connection 26 ASUS Easy Update 30 Recovering your system 31 Using the recovery partition 31 Using the USB storage device (USB Restore 33 EB1007P 3
User's Manual for English Edition
Page 4
...installation.This equipment generates, uses and can be determined by turning the equipment off and on, the user is connected. • Consult the dealer or an experienced radio/TV technician for a Class B digital device, pursuant to operate the equipment. 4 EB1007P This equipment has been tested... and, if not installed and used in a particular installation. If this device could void the user's authority to Part 15 of the FCC Rules. English Notices Federal Communications Commission Statement This device complies with manufacturer's instructions, may cause undesired operation.
...installation.This equipment generates, uses and can be determined by turning the equipment off and on, the user is connected. • Consult the dealer or an experienced radio/TV technician for a Class B digital device, pursuant to operate the equipment. 4 EB1007P This equipment has been tested... and, if not installed and used in a particular installation. If this device could void the user's authority to Part 15 of the FCC Rules. English Notices Federal Communications Commission Statement This device complies with manufacturer's instructions, may cause undesired operation.
User's Manual for English Edition
Page 8
...use your wireless LAN card in our products at ASUS REACH website at http://csr.asus.com/english/REACH.htm. 8 EB1007P To maintain compliance with Canadian ICES-003. English This requirement is subject to the following two conditions: • This device may cause undesired operation of the device...satisfying RF exposure compliance. End users must accept any interference, including interference that may not cause interference and • This device must follow the specific operating instructions for the latest information (www.arcep.fr) Your WLAN Card transmits less than 10mW. ...
...use your wireless LAN card in our products at ASUS REACH website at http://csr.asus.com/english/REACH.htm. 8 EB1007P To maintain compliance with Canadian ICES-003. English This requirement is subject to the following two conditions: • This device may cause undesired operation of the device...satisfying RF exposure compliance. End users must accept any interference, including interference that may not cause interference and • This device must follow the specific operating instructions for the latest information (www.arcep.fr) Your WLAN Card transmits less than 10mW. ...
User's Manual for English Edition
Page 9
... following technical problems with the product, unplug the power cord and contact a qualified service technician or your safety, it . • Do not spill water or any kind into the ventilation openings. • Use this product near water or a heated source such as a radiator. • Set up your system • Read and follow all power, modem, and network cables from the power...
... following technical problems with the product, unplug the power cord and contact a qualified service technician or your safety, it . • Do not spill water or any kind into the ventilation openings. • Use this product near water or a heated source such as a radiator. • Set up your system • Read and follow all power, modem, and network cables from the power...
User's Manual for English Edition
Page 10
...-containing button cell battery) should not be placed in municipal waste. Check local technical support services for battery replacement. 10 EB1007P DO NOT throw the battery in municipal waste.This symbol of the crossed out wheeled bin indicates that have been disassembled by the manufacturer. LASER PRODUCT WARNING CLASS 1 LASER PRODUCT NO DISASSEMBLY The warranty does not apply to the manufacturer's instructions...
...-containing button cell battery) should not be placed in municipal waste. Check local technical support services for battery replacement. 10 EB1007P DO NOT throw the battery in municipal waste.This symbol of the crossed out wheeled bin indicates that have been disassembled by the manufacturer. LASER PRODUCT WARNING CLASS 1 LASER PRODUCT NO DISASSEMBLY The warranty does not apply to the manufacturer's instructions...
User's Manual for English Edition
Page 12
.../powermanagement for this manual To make sure that you MUST follow to yourself. ENERGY STAR is NOT supported on the keyboard. All ASUS products with the ENERGY STAR logo comply with the ENERGY STAR standard, and the power management feature is enabled by default. In addition, please visit http://www.energystar.gov for special situations. 12 EB1007P WARNING: Vital information...
.../powermanagement for this manual To make sure that you MUST follow to yourself. ENERGY STAR is NOT supported on the keyboard. All ASUS products with the ENERGY STAR logo comply with the ENERGY STAR standard, and the power management feature is enabled by default. In addition, please visit http://www.energystar.gov for special situations. 12 EB1007P WARNING: Vital information...
User's Manual for English Edition
Page 15
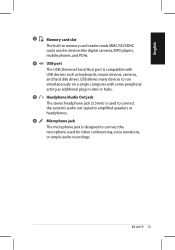
... additional plug-in devices like digital cameras, MP3 players, mobile phones, and PDAs. 4 USB port The USB (Universal Serial Bus) port is designed to connect the microphone used to connect the system's audio out signal to amplified speakers or headphones. 6 Microphone jack The microphone jack is compatible with USB devices such as keyboards, mouse devices, cameras, and hard disk drives. EB1007P 15 English 3 Memory card slot The built-in memory card reader reads MMC/SD/SDHC cards used in...
... additional plug-in devices like digital cameras, MP3 players, mobile phones, and PDAs. 4 USB port The USB (Universal Serial Bus) port is designed to connect the microphone used to connect the system's audio out signal to amplified speakers or headphones. 6 Microphone jack The microphone jack is compatible with USB devices such as keyboards, mouse devices, cameras, and hard disk drives. EB1007P 15 English 3 Memory card slot The built-in memory card reader reads MMC/SD/SDHC cards used in...
User's Manual for English Edition
Page 16
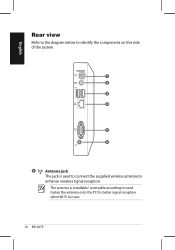
English Rear view Refer to the diagram below to identify the components on this side of the system. 1 2 3 4 5 6 1 Antenna jack The jack is used to connect the supplied wireless antenna to need. Fasten the antenna onto the PC for better signal reception when Wi-Fi is installable/ removable according to enhance wireless signal reception. The antenna is in use. 16 EB1007P
English Rear view Refer to the diagram below to identify the components on this side of the system. 1 2 3 4 5 6 1 Antenna jack The jack is used to connect the supplied wireless antenna to need. Fasten the antenna onto the PC for better signal reception when Wi-Fi is installable/ removable according to enhance wireless signal reception. The antenna is in use. 16 EB1007P
User's Manual for English Edition
Page 17
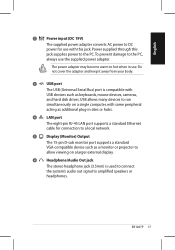
... run simultaneously on a single computer, with USB devices such as keyboards, mouse devices, cameras, and hard disk drives. To prevent damage to hot when in sites or hubs. 4 LAN port The eight-pin RJ-45 LAN port supports a standard Ethernet cable for use the supplied power adapter. The power adapter may become warm to the PC, always use with this jack supplies power to DC power for connection to a local network. 5 Display (Monitor) Output The 15-pin D-sub monitor port supports a standard VGA-compatible device such as a monitor...
... run simultaneously on a single computer, with USB devices such as keyboards, mouse devices, cameras, and hard disk drives. To prevent damage to hot when in sites or hubs. 4 LAN port The eight-pin RJ-45 LAN port supports a standard Ethernet cable for use the supplied power adapter. The power adapter may become warm to the PC, always use with this jack supplies power to DC power for connection to a local network. 5 Display (Monitor) Output The 15-pin D-sub monitor port supports a standard VGA-compatible device such as a monitor...
User's Manual for English Edition
Page 18
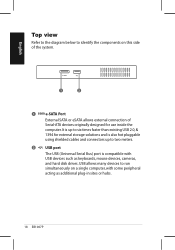
... two meters. 2 USB port The USB (Universal Serial Bus) port is up to six times faster than existing USB 2.0, & 1394 for use inside the computer. English Top view Refer to the diagram below to identify the components on a single computer, with USB devices such as additional plug-in sites or hubs. 18 EB1007P It is compatible with some peripheral acting as keyboards, mouse devices, cameras, and hard disk drives.
... two meters. 2 USB port The USB (Universal Serial Bus) port is up to six times faster than existing USB 2.0, & 1394 for use inside the computer. English Top view Refer to the diagram below to identify the components on a single computer, with USB devices such as additional plug-in sites or hubs. 18 EB1007P It is compatible with some peripheral acting as keyboards, mouse devices, cameras, and hard disk drives.
User's Manual for English Edition
Page 22
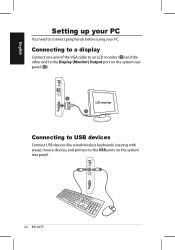
Connecting to a display Connect one end of the VGA cable to an LCD monitor ( 1 ) and the other end to the Display (Monitor) Output port on the system rear panel ( 2 ). 2 LCD monitor 1 Connecting to USB devices Connect USB devices like wired/wireless keyboards (varying with areas), mouse devices, and printers to connect peripherals before using your PC. English Setting up your PC You need to the USB ports on the system rear panel. 22 EB1007P
Connecting to a display Connect one end of the VGA cable to an LCD monitor ( 1 ) and the other end to the Display (Monitor) Output port on the system rear panel ( 2 ). 2 LCD monitor 1 Connecting to USB devices Connect USB devices like wired/wireless keyboards (varying with areas), mouse devices, and printers to connect peripherals before using your PC. English Setting up your PC You need to the USB ports on the system rear panel. 22 EB1007P
User's Manual for English Edition
Page 23
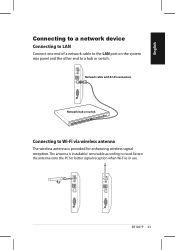
Network cable with RJ-45 connectors Network hub or switch Connecting to Wi-Fi via wireless antenna The wireless antenna is in use. EB1007P 23 English Connecting to a network device Connecting to LAN Connect one end of a network cable to the LAN port on the system rear panel and the other end to need. Fasten the antenna onto the PC for better signal reception when Wi-Fi is provided for enhancing wireless signal reception. The antenna is installable/ removable according to a hub or switch.
Network cable with RJ-45 connectors Network hub or switch Connecting to Wi-Fi via wireless antenna The wireless antenna is in use. EB1007P 23 English Connecting to a network device Connecting to LAN Connect one end of a network cable to the LAN port on the system rear panel and the other end to need. Fasten the antenna onto the PC for better signal reception when Wi-Fi is provided for enhancing wireless signal reception. The antenna is installable/ removable according to a hub or switch.
User's Manual for English Edition
Page 24
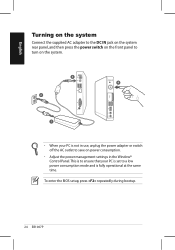
To enter the BIOS setup, press repeatedly during bootup. 24 EB1007P English Turning on the system Connect the supplied AC adapter to the DC IN jack on the system rear panel, and then press the power switch on the front panel to save on power consumption. • Adjust the power management settings in use, unplug the power adapter or switch off the AC outlet to turn on the system. 3 4 2 1 • When your PC is set to a low power consumption mode and is not in the Window® Control Panel. This is to ensure that your PC is fully operational at the same time.
To enter the BIOS setup, press repeatedly during bootup. 24 EB1007P English Turning on the system Connect the supplied AC adapter to the DC IN jack on the system rear panel, and then press the power switch on the front panel to save on power consumption. • Adjust the power management settings in use, unplug the power adapter or switch off the AC outlet to turn on the system. 3 4 2 1 • When your PC is set to a low power consumption mode and is not in the Window® Control Panel. This is to ensure that your PC is fully operational at the same time.
User's Manual for English Edition
Page 25
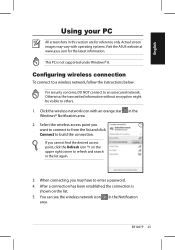
... visible to an unsecured network. Select the wireless access point you want to connect to from the list and click Connect to enter a password. 4. Actual screen images may have to build the connection. After a connection has been established, the connection is not supported under Windows® 8. Click the wireless network icon with operating systems. Visit the ASUS website at www.asus.com for reference only. English Using your PC All screenshots...
... visible to an unsecured network. Select the wireless access point you want to connect to from the list and click Connect to enter a password. 4. Actual screen images may have to build the connection. After a connection has been established, the connection is not supported under Windows® 8. Click the wireless network icon with operating systems. Visit the ASUS website at www.asus.com for reference only. English Using your PC All screenshots...
User's Manual for English Edition
Page 26
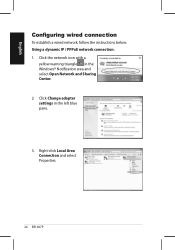
Right-click Local Area Connection and select Properties. 26 EB1007P Click the network icon with a yellow warning triangle in the left blue pane. 3. Click Change adapter settings in the Windows® Notification area and select Open Network and Sharing Center. 2. English Configuring wired connection To establish a wired network, follow the instructions below: Using a dynamic IP / PPPoE network connection: 1.
Right-click Local Area Connection and select Properties. 26 EB1007P Click the network icon with a yellow warning triangle in the left blue pane. 3. Click Change adapter settings in the Windows® Notification area and select Open Network and Sharing Center. 2. English Configuring wired connection To establish a wired network, follow the instructions below: Using a dynamic IP / PPPoE network connection: 1.
User's Manual for English Edition
Page 30
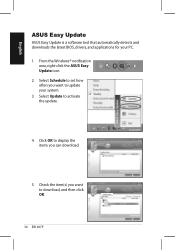
English ASUS Easy Update ASUS Easy Update is a software tool that automatically detects and downloads the latest BIOS, drivers, and applications for your system. 3. Select Schedule to set how often you want to download, and then click OK. 30 EB1007P Click OK to display the items you want to activate the update. 4. Check the item(s) you can download. 5. From the Windows® notification area, right-click the ASUS Easy Update icon. 2. Select Update to update your PC. 1.
English ASUS Easy Update ASUS Easy Update is a software tool that automatically detects and downloads the latest BIOS, drivers, and applications for your system. 3. Select Schedule to set how often you want to download, and then click OK. 30 EB1007P Click OK to display the items you want to activate the update. 4. Check the item(s) you can download. 5. From the Windows® notification area, right-click the ASUS Easy Update icon. 2. Select Update to update your PC. 1.
User's Manual for English Edition
Page 31
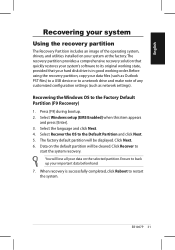
... at the factory.The recovery partition provides a comprehensive recovery solution that quickly restores your system's software to restart the system. EB1007P 31 English Recovering your system Using the recovery partition The Recovery Partition includes an image of any customized configuration settings (such as Outlook PST files) to a USB device or to start the system recovery. Select the language and click Next. 4. The factory default partition will be displayed. Click Next. 6. Select Windows setup [EMS Enabled] when...
... at the factory.The recovery partition provides a comprehensive recovery solution that quickly restores your system's software to restart the system. EB1007P 31 English Recovering your system Using the recovery partition The Recovery Partition includes an image of any customized configuration settings (such as Outlook PST files) to a USB device or to start the system recovery. Select the language and click Next. 4. The factory default partition will be displayed. Click Next. 6. Select Windows setup [EMS Enabled] when...
User's Manual for English Edition
Page 32
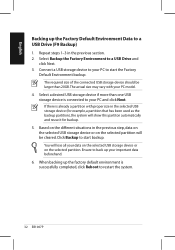
... the selected partition. When backing up the factory default environment is connected to your PC to start the Factory Default Environment backup. The required size of the connected USB storage device should be cleared. Repeat steps 1-3 in the previous step, data on the selected USB storage device or on the selected partition will be larger than one USB storage device is successfully completed, click Reboot to a USB Drive and...
... the selected partition. When backing up the factory default environment is connected to your PC to start the Factory Default Environment backup. The required size of the connected USB storage device should be cleared. Repeat steps 1-3 in the previous step, data on the selected USB storage device or on the selected partition will be larger than one USB storage device is successfully completed, click Reboot to a USB Drive and...
User's Manual for English Edition
Page 33
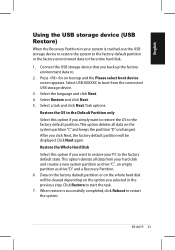
... on bootup and the Please select boot device screen appears. English Using the USB storage device (USB Restore) When the Recovery Partition in the previous step. Restore the Whole Hard Disk Select this option if you simply want to restore your PC to boot from your system is successfully completed, click Reboot to the factory default partition.This option deletes all data from the connected USB storage device. 3. EB1007P 33 Select the language and click...
... on bootup and the Please select boot device screen appears. English Using the USB storage device (USB Restore) When the Recovery Partition in the previous step. Restore the Whole Hard Disk Select this option if you simply want to restore your PC to boot from your system is successfully completed, click Reboot to the factory default partition.This option deletes all data from the connected USB storage device. 3. EB1007P 33 Select the language and click...


