

Users Manual for English Edition
Page 5
...The Power-On Self-Test (POST 66 Using POST to access BIOS and Troubleshoot 66 BIOS...66 Accessing BIOS...66 BIOS Settings...67 Recovering your system 77 Enabling a recovery option 79 Chapter 5: Upgrading your Notebook PC Installing the Hard Disk Drive 82 Tips and FAQs Useful tips for your Notebook PC 92 Hardware FAQs...93 Software FAQs...96 Appendices Internal Modem Compliancy 100 Overview...100 Network ... for Canada 106 Déclaration d'Industrie Canada relative à l'exposition aux ondes radio .... 107 Wireless Operation Channel for Different Domains 108 Notebook PC E-Manual 5
...The Power-On Self-Test (POST 66 Using POST to access BIOS and Troubleshoot 66 BIOS...66 Accessing BIOS...66 BIOS Settings...67 Recovering your system 77 Enabling a recovery option 79 Chapter 5: Upgrading your Notebook PC Installing the Hard Disk Drive 82 Tips and FAQs Useful tips for your Notebook PC 92 Hardware FAQs...93 Software FAQs...96 Appendices Internal Modem Compliancy 100 Overview...100 Network ... for Canada 106 Déclaration d'Industrie Canada relative à l'exposition aux ondes radio .... 107 Wireless Operation Channel for Different Domains 108 Notebook PC E-Manual 5
Users Manual for English Edition
Page 7
... and fixing common issues with Windows® 8.1 This chapter provides an overview of using Windows® 8.1 in your Notebook PC. Chapter 5: Upgrading your Notebook PC This chapter guides you can refer to use the different parts of your Notebook PC. About this manual This manual provides information about the hardware and software features of your Notebook PC, organized through the process of replacing and upgrading parts of your Notebook PC...
... and fixing common issues with Windows® 8.1 This chapter provides an overview of using Windows® 8.1 in your Notebook PC. Chapter 5: Upgrading your Notebook PC This chapter guides you can refer to use the different parts of your Notebook PC. About this manual This manual provides information about the hardware and software features of your Notebook PC, organized through the process of replacing and upgrading parts of your Notebook PC...

Users Manual for English Edition
Page 10
... liquids, rain, or moisture. Do not place objects on or near your Notebook PC. Do not use your Notebook PC. Caring for your Notebook PC Disconnect the AC power and remove the battery pack (if applicable) before cleaning your Notebook PC near gas leaks. 10 Notebook PC E-Manual Do not use or expose your Notebook PC to strong magnetic or electrical fields.
... liquids, rain, or moisture. Do not place objects on or near your Notebook PC. Do not use your Notebook PC. Caring for your Notebook PC Disconnect the AC power and remove the battery pack (if applicable) before cleaning your Notebook PC near gas leaks. 10 Notebook PC E-Manual Do not use or expose your Notebook PC to strong magnetic or electrical fields.

Users Manual for English Edition
Page 16
... by model or territory. Touchpad The touchpad allows the use the function keys, allows quick access to Windows®, and controls other multimedia functions. NOTE: For more details, refer to navigate onscreen, providing an intuitive user experience. It also enables you to the Using the numeric keypad section in this manual. * on selected models only 16 Notebook PC E-Manual NOTE: For more details, refer to use of a regular mouse. Keyboard The keyboard...
... by model or territory. Touchpad The touchpad allows the use the function keys, allows quick access to Windows®, and controls other multimedia functions. NOTE: For more details, refer to navigate onscreen, providing an intuitive user experience. It also enables you to the Using the numeric keypad section in this manual. * on selected models only 16 Notebook PC E-Manual NOTE: For more details, refer to use of a regular mouse. Keyboard The keyboard...

Users Manual for English Edition
Page 20
LAN port Insert the network cable into this port to connect to USB 2.0. Memory card reader This built-in memory card reader supports SD and SDHC card formats. 20 Notebook PC E-Manual USB 3.0 port This Universal Serial Bus 3.0 (USB 3.0) port provides a transfer rate of up to 5 Gbit/s and is HDCP compliant for HD DVD, Blu-ray, and other protected content playback. VGA port This port allows you to connect your Notebook PC to an external display. HDMI port This port is for a High-Definition Multimedia Interface (HDMI) connector and is backward compatible to a local area network.
LAN port Insert the network cable into this port to connect to USB 2.0. Memory card reader This built-in memory card reader supports SD and SDHC card formats. 20 Notebook PC E-Manual USB 3.0 port This Universal Serial Bus 3.0 (USB 3.0) port provides a transfer rate of up to 5 Gbit/s and is HDCP compliant for HD DVD, Blu-ray, and other protected content playback. VGA port This port allows you to connect your Notebook PC to an external display. HDMI port This port is for a High-Definition Multimedia Interface (HDMI) connector and is backward compatible to a local area network.
Users Manual for English Edition
Page 25
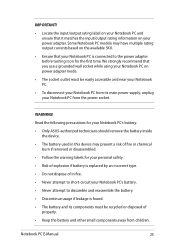
... using your Notebook PC on your Notebook PC from children. Notebook PC E-Manual 25 Read the following precautions for your Notebook PC's battery. • Only ASUS-authorized technicians should remove the battery inside the device. • The battery used in fire. • Never attempt to short-circuit your Notebook PC's battery. • Never attempt to the power adapter before turning it matches the input/output rating information on power adapter mode...
... using your Notebook PC on your Notebook PC from children. Notebook PC E-Manual 25 Read the following precautions for your Notebook PC's battery. • Only ASUS-authorized technicians should remove the battery inside the device. • The battery used in fire. • Never attempt to short-circuit your Notebook PC's battery. • Never attempt to the power adapter before turning it matches the input/output rating information on power adapter mode...

Users Manual for English Edition
Page 34
Using the keyboard Function keys The function keys on your Notebook PC. Enables or disables the touchpad Turns the speaker on or off Toggles the display mode NOTE: Ensure that the second display is connected to your Notebook PC's keyboard can trigger the following commands: Puts the Notebook PC into Sleep mode Turns Airplane mode on or off 34 Notebook PC E-Manual Decreases display brightness Increases display brightness Turns the display panel off NOTE: When enabled, the Airplane mode disables all wireless connectivity.
Using the keyboard Function keys The function keys on your Notebook PC. Enables or disables the touchpad Turns the speaker on or off Toggles the display mode NOTE: Ensure that the second display is connected to your Notebook PC's keyboard can trigger the following commands: Puts the Notebook PC into Sleep mode Turns Airplane mode on or off 34 Notebook PC E-Manual Decreases display brightness Increases display brightness Turns the display panel off NOTE: When enabled, the Airplane mode disables all wireless connectivity.

Users Manual for English Edition
Page 35
... forward Notebook PC E-Manual 35 Multimedia control keys The multimedia control keys allow you opened. Press in combination with the arrow keys on your Notebook PC's keyboard used as below . Stop Skip to previous Play or Skip to simulate the right-click functions. If you are two special Windows® keys on your Notebook PC, illustrated as audios and videos, when played in the Start screen, press this key to...
... forward Notebook PC E-Manual 35 Multimedia control keys The multimedia control keys allow you opened. Press in combination with the arrow keys on your Notebook PC's keyboard used as below . Stop Skip to previous Play or Skip to simulate the right-click functions. If you are two special Windows® keys on your Notebook PC, illustrated as audios and videos, when played in the Start screen, press this key to...

Users Manual for English Edition
Page 43
Start button on the Start screen NOTE: The actual color of your Start screen. The Start button may be accessed from the Start screen, while on Desktop mode, and on the display settings you opened app to switch between the two most recent apps that you chose for your Start screen or any app that is currently open onscreen. Notebook PC E-Manual 43 Start button Windows® 8.1 features the Start button which allows you to call out the Start button. Hover your mouse pointer over the left corner of your Start button varies depending on any opened .
Start button on the Start screen NOTE: The actual color of your Start screen. The Start button may be accessed from the Start screen, while on Desktop mode, and on the display settings you opened app to switch between the two most recent apps that you chose for your Start screen or any app that is currently open onscreen. Notebook PC E-Manual 43 Start button Windows® 8.1 features the Start button which allows you to call out the Start button. Hover your mouse pointer over the left corner of your Start button varies depending on any opened .
Users Manual for English Edition
Page 66
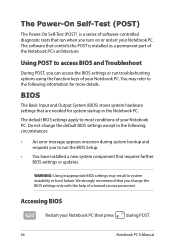
... a series of software-controlled diagnostic tests that run when you can access the BIOS settings or run the BIOS Setup. • You have installed a new system component that are needed for more details. You may result to the following information for system startup in the following circumstances: • An error message appears onscreen during POST. 66 Notebook PC E-Manual The default BIOS settings apply to run troubleshooting options using the function keys of...
... a series of software-controlled diagnostic tests that run when you can access the BIOS settings or run the BIOS Setup. • You have installed a new system component that are needed for more details. You may result to the following information for system startup in the following circumstances: • An error message appears onscreen during POST. 66 Notebook PC E-Manual The default BIOS settings apply to run troubleshooting options using the function keys of...
Users Manual for English Edition
Page 67
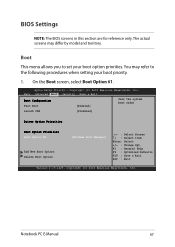
... Fast Boot [Enabled] Sets the system boot order Launch CSM [Disabled] Driver Option Priorities Boot Option Priorities Boot Option #1 Add New Boot Option Delete Boot Option [Windows Boot Manager] →← : Select Screen ↑↓ : Select Item Enter: Select +/- : Change Opt. On the Boot screen, select Boot Option #1. Copyright (C) 2012 American Megatrends, Inc. Notebook PC E-Manual 67 Aptio Setup Utility - Copyright (C) 2012 American Megatrends, Inc. F1 : General Help F9 : Optimized Defaults F10 : Save & Exit ESC : Exit Version 2.15.1226. BIOS Settings NOTE...
... Fast Boot [Enabled] Sets the system boot order Launch CSM [Disabled] Driver Option Priorities Boot Option Priorities Boot Option #1 Add New Boot Option Delete Boot Option [Windows Boot Manager] →← : Select Screen ↑↓ : Select Item Enter: Select +/- : Change Opt. On the Boot screen, select Boot Option #1. Copyright (C) 2012 American Megatrends, Inc. Notebook PC E-Manual 67 Aptio Setup Utility - Copyright (C) 2012 American Megatrends, Inc. F1 : General Help F9 : Optimized Defaults F10 : Save & Exit ESC : Exit Version 2.15.1226. BIOS Settings NOTE...
Users Manual for English Edition
Page 68
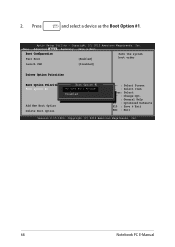
... select a device as the Boot Option #1. Main Advanced Boot Security Save & Exit Boot Configuration Fast Boot [Enabled] Sets the system boot order Launch CSM [Disabled] Driver Option Priorities Boot Option Priorities Boot Option #1 Boot Option #1 [WWiinnddoowwss BBoooott MMaannaaggeerr] Disabled Add New Boot Option Delete Boot Option →← : Select Screen ↑↓ : Select Item Enter: Select +/- : Change Opt. Copyright (C) 2012 American Megatrends, Inc. Aptio Setup Utility - Copyright (C) 2012 American Megatrends, Inc. 68 Notebook PC E-Manual F1 : General...
... select a device as the Boot Option #1. Main Advanced Boot Security Save & Exit Boot Configuration Fast Boot [Enabled] Sets the system boot order Launch CSM [Disabled] Driver Option Priorities Boot Option Priorities Boot Option #1 Boot Option #1 [WWiinnddoowwss BBoooott MMaannaaggeerr] Disabled Add New Boot Option Delete Boot Option →← : Select Screen ↑↓ : Select Item Enter: Select +/- : Change Opt. Copyright (C) 2012 American Megatrends, Inc. Aptio Setup Utility - Copyright (C) 2012 American Megatrends, Inc. 68 Notebook PC E-Manual F1 : General...

Users Manual for English Edition
Page 69
... length 3 Maximum length 20 Administrator Password User Password HDD Password Status : Set Master Password Set User Password I /O) interface, and USB interface. Security This menu allows you to set up the administrator and user password of your Notebook PC's hard disk drive, input/output (I /O Interface Security System Mode state Secure Boot state Secure Boot Control Key Management NOT INSTALLED User Enabled [Enabled] →← : Select Screen ↑↓ : Select Item Enter: Select +/- : Change Opt. F1 : General Help F9 : Optimized Defaults F10 : Save & Exit ESC...
... length 3 Maximum length 20 Administrator Password User Password HDD Password Status : Set Master Password Set User Password I /O) interface, and USB interface. Security This menu allows you to set up the administrator and user password of your Notebook PC's hard disk drive, input/output (I /O Interface Security System Mode state Secure Boot state Secure Boot Control Key Management NOT INSTALLED User Enabled [Enabled] →← : Select Screen ↑↓ : Select Item Enter: Select +/- : Change Opt. F1 : General Help F9 : Optimized Defaults F10 : Save & Exit ESC...

Users Manual for English Edition
Page 72
... Security USB Interface [UnLock] If Locked, all USB device will be disabled External Ports [UnLock] CMOS Camera [UnLock] Card Reader Lock [UnLock] USB Interface UnLock →← : Select Screen ↑↓ : Select Item Enter: Select +/- : Change Opt. To lock the USB interface: 1. Select an interface that you can also access USB Interface Security to Lock also locks and hides the External Ports and other devices included under USB Interface Security. 72 Notebook PC E-Manual NOTE: Setting the USB Interface to lock or unlock ports and devices. Aptio Setup Utility...
... Security USB Interface [UnLock] If Locked, all USB device will be disabled External Ports [UnLock] CMOS Camera [UnLock] Card Reader Lock [UnLock] USB Interface UnLock →← : Select Screen ↑↓ : Select Item Enter: Select +/- : Change Opt. To lock the USB interface: 1. Select an interface that you can also access USB Interface Security to Lock also locks and hides the External Ports and other devices included under USB Interface Security. 72 Notebook PC E-Manual NOTE: Setting the USB Interface to lock or unlock ports and devices. Aptio Setup Utility...

Users Manual for English Edition
Page 73
... INSTALLED Set Master Password Set User Password I/O Interface Security →← : Select Screen ↑↓ : Select Item Enter: Select +/- : Change Opt. Select Set User Password then repeat the previous steps to set up a password-enabled access to your hard disk drive. If ONLY the user's password is only asked for when entering Setup. In Setup, the User will have Administrator rights. F1 : General Help F9 : Optimized Defaults F10 : Save & Exit ESC : Exit Version 2.15.1226. Notebook PC E-Manual...
... INSTALLED Set Master Password Set User Password I/O Interface Security →← : Select Screen ↑↓ : Select Item Enter: Select +/- : Change Opt. Select Set User Password then repeat the previous steps to set up a password-enabled access to your hard disk drive. If ONLY the user's password is only asked for when entering Setup. In Setup, the User will have Administrator rights. F1 : General Help F9 : Optimized Defaults F10 : Save & Exit ESC : Exit Version 2.15.1226. Notebook PC E-Manual...
Users Manual for English Edition
Page 75
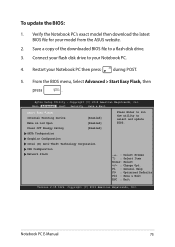
... Megatrends, Inc. Copyright (C) 2012 American Megatrends, Inc. Connect your flash disk drive to your Notebook PC then press during POST. 5. Aptio Setup Utility - Verify the Notebook PC's exact model then download the latest BIOS file for your model from the ASUS website. 2. Start Easy Flash Internal Pointing Device [Enabled] Wake on Lid Open [Enabled] Power Off Energy Saving [Enabled] SATA Configuration Graphics Configuration Intel (R) Anti-Theft Technology Corporation USB Configuration Network Stack Press Enter to run the utility to a flash disk drive. 3.
... Megatrends, Inc. Copyright (C) 2012 American Megatrends, Inc. Connect your flash disk drive to your Notebook PC then press during POST. 5. Aptio Setup Utility - Verify the Notebook PC's exact model then download the latest BIOS file for your model from the ASUS website. 2. Start Easy Flash Internal Pointing Device [Enabled] Wake on Lid Open [Enabled] Power Off Energy Saving [Enabled] SATA Configuration Graphics Configuration Intel (R) Anti-Theft Technology Corporation USB Configuration Network Stack Press Enter to run the utility to a flash disk drive. 3.

Users Manual for English Edition
Page 92
... your operating systems and other installed applications - Backup data - Product key for more details. • Use an anti-virus software to protect your data and keep this updated too. • Unless absolutely necessary, refrain from using force shutdown to turn off your Notebook PC. • Always backup your data and make it a point to create a backup data in an external storage drive. • Refrain from using the Notebook...
... your operating systems and other installed applications - Backup data - Product key for more details. • Use an anti-virus software to protect your data and keep this updated too. • Unless absolutely necessary, refrain from using force shutdown to turn off your Notebook PC. • Always backup your data and make it a point to create a backup data in an external storage drive. • Refrain from using the Notebook...
Users Manual for English Edition
Page 94
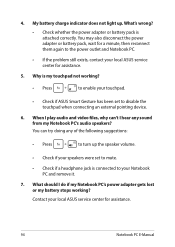
... to enable your Notebook PC and remove it. 7. When I play audio and video files, why can try doing any sound from my Notebook PC's audio speakers? My battery charge indicator does not light up the speaker volume. • Check if your speakers were set to mute. • Check if a headphone jack is attached correctly. What's wrong? • Check whether the power adapter or battery pack is connected to your touchpad...
... to enable your Notebook PC and remove it. 7. When I play audio and video files, why can try doing any sound from my Notebook PC's audio speakers? My battery charge indicator does not light up the speaker volume. • Check if your speakers were set to mute. • Check if a headphone jack is attached correctly. What's wrong? • Check whether the power adapter or battery pack is connected to your touchpad...

Users Manual for English Edition
Page 95
.... Go to Control Panel > Hardware and Sound then access Audio Manager to disable touchpad by pressing . 10. You can also disable your touchpad by connecting an external pointing device to your Notebook PC to turn off this feature and use the said keys for about two (2) seconds until the power button's LED indicator blinks five times and the camera LED indicator blinks once. Instead of the following suggestions: • Check if ASUS Smart Gesture is set to configure the settings. 9. How...
.... Go to Control Panel > Hardware and Sound then access Audio Manager to disable touchpad by pressing . 10. You can also disable your touchpad by connecting an external pointing device to your Notebook PC to turn off this feature and use the said keys for about two (2) seconds until the power button's LED indicator blinks five times and the camera LED indicator blinks once. Instead of the following suggestions: • Check if ASUS Smart Gesture is set to configure the settings. 9. How...
Users Manual for English Edition
Page 96
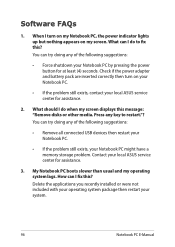
... a memory storage problem. When I do when my screen displays this message: "Remove disks or other media. You can try doing any key to fix this ? How can I turn on my screen. What can I do to restart."? Press any of the following suggestions: • Force shutdown your local ASUS service center for assistance. 3. Check if the power adapter and battery pack are inserted correctly then turn on my Notebook...
... a memory storage problem. When I do when my screen displays this message: "Remove disks or other media. You can try doing any key to fix this ? How can I turn on my screen. What can I do to restart."? Press any of the following suggestions: • Force shutdown your local ASUS service center for assistance. 3. Check if the power adapter and battery pack are inserted correctly then turn on my Notebook...


