User Manual
Page 15
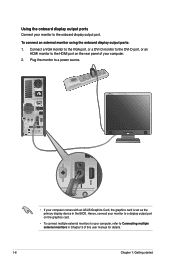
Plug the monitor to a power source. • If your computer comes with an ASUS Graphics Card, the graphics card is set as the primary display device in Chapter 3 of your monitor to a display output port on the rear panel ... your monitor to the onboard display output port. Using the onboard display output ports Connect your computer, refer to Connecting multiple external monitors in the BIOS.
Plug the monitor to a power source. • If your computer comes with an ASUS Graphics Card, the graphics card is set as the primary display device in Chapter 3 of your monitor to a display output port on the rear panel ... your monitor to the onboard display output port. Using the onboard display output ports Connect your computer, refer to Connecting multiple external monitors in the BIOS.
User Manual
Page 56
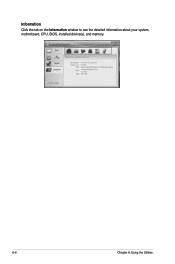
Information Click the tab on the Information window to see the detailed information about your system, motherboard, CPU, BIOS, installed device(s), and memory. 6-6 Chapter 6: Using the Utilities
Information Click the tab on the Information window to see the detailed information about your system, motherboard, CPU, BIOS, installed device(s), and memory. 6-6 Chapter 6: Using the Utilities
User Manual
Page 57
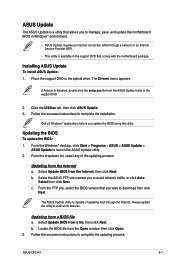
...utility to complete the installation. Follow the onscreen instructions to avail all Windows® applications before you update the BIOS using this utility. From the dropdown list, select any of updating itself through a network or an Internet Service.... Click the Utilities tab, then click ASUS Update. 3. From the Windows® desktop, click Start > Programs > ASUS > ASUS Update > ASUS Update to complete the updating process. Updating from the ASUS Update folder in the support DVD. 2. Follow the onscreen instructions to launch the ASUS Update utility. 2. ASUS CP5141 6-7
...utility to complete the installation. Follow the onscreen instructions to avail all Windows® applications before you update the BIOS using this utility. From the dropdown list, select any of updating itself through a network or an Internet Service.... Click the Utilities tab, then click ASUS Update. 3. From the Windows® desktop, click Start > Programs > ASUS > ASUS Update > ASUS Update to complete the updating process. Updating from the ASUS Update folder in the support DVD. 2. Follow the onscreen instructions to launch the ASUS Update utility. 2. ASUS CP5141 6-7
User Manual
Page 58
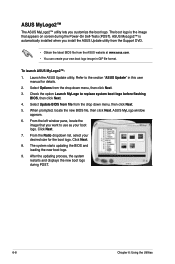
... the option Launch MyLogo to the section "ASUS Update" in GIF file format. The system starts updating the BIOS and loading the new boot logo. 9. To launch ASUS MyLogo2™: 1. When prompted, locate the new BIOS file, then click Next. ASUS MyLogo window appears. 6. From the Ratio ... Next. 8. Select Update BIOS from file from the drop down menu, then click Next. 5. ASUS MyLogo2™ The ASUS MyLogo2™ utility lets you install the ASUS Update utility from the Support DVD. • Obtain the latest BIOS file from the ASUS website at www.asus.com. • You ...
... the option Launch MyLogo to the section "ASUS Update" in GIF file format. The system starts updating the BIOS and loading the new boot logo. 9. To launch ASUS MyLogo2™: 1. When prompted, locate the new BIOS file, then click Next. ASUS MyLogo window appears. 6. From the Ratio ... Next. 8. Select Update BIOS from file from the drop down menu, then click Next. 5. ASUS MyLogo2™ The ASUS MyLogo2™ utility lets you install the ASUS Update utility from the Support DVD. • Obtain the latest BIOS file from the ASUS website at www.asus.com. • You ...


