CG8480 User's Manual
Page 11
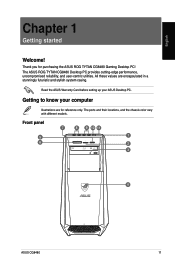
... utilities. The ports and their locations, and the chassis color vary with different models. Front panel 7 8 9 10 11 5 1 6 2 3 4 ASUS CG8480 11 Thank you for reference only. English Chapter 1 Getting started Welcome! Read the ASUS Warranty Card before setting up your computer Illustrations are encapsulated in a stunningly futuristic and stylish system casing. Getting to...
... utilities. The ports and their locations, and the chassis color vary with different models. Front panel 7 8 9 10 11 5 1 6 2 3 4 ASUS CG8480 11 Thank you for reference only. English Chapter 1 Getting started Welcome! Read the ASUS Warranty Card before setting up your computer Illustrations are encapsulated in a stunningly futuristic and stylish system casing. Getting to...

CG8480 User's Manual
Page 13
...) connector, and is for your USB 3.0 devices. This port is HDCP compliant allowing playback of HD DVD, Blu-ray, and other protected content. HDMI port. ASUS CG8480 13 Rear panel English 12 13 14 1 15 2 3 4 DVI VGA OUT 16 17 678 5 rear c/sub MIC IN LINE OUT LINE IN 18 19 20... 11 USB 2.0 ports. These Universal Serial Bus 2.0 (USB 2.0) ports connect to USB 2.0 devices such as a mouse, printer, scanner, camera, PDA, and others . USB 3.0 ports, support ASUS USB 3.0 Boost UASP Mode.
...) connector, and is for your USB 3.0 devices. This port is HDCP compliant allowing playback of HD DVD, Blu-ray, and other protected content. HDMI port. ASUS CG8480 13 Rear panel English 12 13 14 1 15 2 3 4 DVI VGA OUT 16 17 678 5 rear c/sub MIC IN LINE OUT LINE IN 18 19 20... 11 USB 2.0 ports. These Universal Serial Bus 2.0 (USB 2.0) ports connect to USB 2.0 devices such as a mouse, printer, scanner, camera, PDA, and others . USB 3.0 ports, support ASUS USB 3.0 Boost UASP Mode.

CG8480 User's Manual
Page 15
.../2 keyboard or mouse. LAN (RJ-45) port. Expansion slot bracket. The display output ports on this connector. VGA port. ASUS Graphics Card (optional). Wifi Card (optional). ASUS CG8480 15 Optical S/PDIF_OUT port. This port connects to a Local Area Network (LAN) through a network hub. This port is for... to an external audio output device via an optical S/PDIF cable. These ports connect to your computer to connect to this optional ASUS Graphics Card may vary with different models. Plug the power cord to a wireless network. LAN port LED indications Activity/Link LED...
.../2 keyboard or mouse. LAN (RJ-45) port. Expansion slot bracket. The display output ports on this connector. VGA port. ASUS Graphics Card (optional). Wifi Card (optional). ASUS CG8480 15 Optical S/PDIF_OUT port. This port connects to a Local Area Network (LAN) through a network hub. This port is for... to an external audio output device via an optical S/PDIF cable. These ports connect to your computer to connect to this optional ASUS Graphics Card may vary with different models. Plug the power cord to a wireless network. LAN port LED indications Activity/Link LED...

CG8480 User's Manual
Page 17
... card. • To connect multiple external monitors to your monitor to the onboard display output port. ASUS CG8480 17 Connect your monitor to a display output port on the rear panel of your computer comes with an ASUS Graphics Card, the graphics card is set as the primary display device in Chapter 3 of this...
... card. • To connect multiple external monitors to your monitor to the onboard display output port. ASUS CG8480 17 Connect your monitor to a display output port on the rear panel of your computer comes with an ASUS Graphics Card, the graphics card is set as the primary display device in Chapter 3 of this...

CG8480 User's Manual
Page 19
Turn your computer ON: 1. Turn the power switch ON, then press the power button on /off your computer after setting up your computer. For details on shutting down your Desktop PC, refer to turn your monitor ON. 2. Power button 3. ASUS CG8480 19 Turning your computer ON To turn on your computer. Wait until the operating system loads automatically. English Turning your computer ON/OFF This section describes how to the section Turning your Desktop PC OFF in Chapter 2.
Turn your computer ON: 1. Turn the power switch ON, then press the power button on /off your computer after setting up your computer. For details on shutting down your Desktop PC, refer to turn your monitor ON. 2. Power button 3. ASUS CG8480 19 Turning your computer ON To turn on your computer. Wait until the operating system loads automatically. English Turning your computer ON/OFF This section describes how to the section Turning your Desktop PC OFF in Chapter 2.

CG8480 User's Manual
Page 21
ASUS CG8480 21 English Chapter 2 Using Windows® 8 Starting for the first time When you start for the first time: 1. Turn your Windows® 8 operating system. For ...
ASUS CG8480 21 English Chapter 2 Using Windows® 8 Starting for the first time When you start for the first time: 1. Turn your Windows® 8 operating system. For ...
CG8480 User's Manual
Page 23
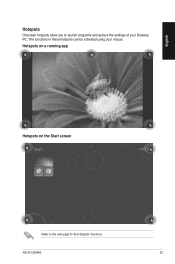
The functions in these hotspots can be activated using your Desktop PC. Hotspots on a running app Hotspots on the Start screen Refer to launch programs and access the settings of your mouse. ASUS CG8480 23 English Hotspots Onscreen hotspots allow you to the next page for the Hotspots' functions.
The functions in these hotspots can be activated using your Desktop PC. Hotspots on a running app Hotspots on the Start screen Refer to launch programs and access the settings of your mouse. ASUS CG8480 23 English Hotspots Onscreen hotspots allow you to the next page for the Hotspots' functions.

CG8480 User's Manual
Page 25
Customizing apps You can move, resize, or unpin apps from Start. ASUS CG8480 25 Launching apps • Position your mouse pointer on the top side of the launched app then wait for the pointer to change to a hand ...
Customizing apps You can move, resize, or unpin apps from Start. ASUS CG8480 25 Launching apps • Position your mouse pointer on the top side of the launched app then wait for the pointer to change to a hand ...

CG8480 User's Manual
Page 27
... screen. • Press + . Use your Desktop PC's mouse or keyboard to share applications and provide quick access for customizing the settings of your Desktop PC. ASUS CG8480 27 Charm bar The Charm bar is a toolbar that allow you to launch the Charm bar. • Move your screen. The image above shows how...
... screen. • Press + . Use your Desktop PC's mouse or keyboard to share applications and provide quick access for customizing the settings of your Desktop PC. ASUS CG8480 27 Charm bar The Charm bar is a toolbar that allow you to launch the Charm bar. • Move your screen. The image above shows how...

CG8480 User's Manual
Page 29
...; Launch an app then press + < . > to activate the Snap bar. c) Once the pointer changes to a hand icon, drag and drop the app to use Snap: 1. ASUS CG8480 29 Launch another app. To switch between apps. English Snap feature The Snap feature displays two apps side-by-side, allowing you to work or...
...; Launch an app then press + < . > to activate the Snap bar. c) Once the pointer changes to a hand icon, drag and drop the app to use Snap: 1. ASUS CG8480 29 Launch another app. To switch between apps. English Snap feature The Snap feature displays two apps side-by-side, allowing you to work or...

CG8480 User's Manual
Page 31
... your Desktop PC turns off. Allows you to peek at least four (4) seconds until your Desktop PC on Sleep mode, press the Power button once. ASUS CG8480 31 Zooms out your screen.
... your Desktop PC turns off. Allows you to peek at least four (4) seconds until your Desktop PC on Sleep mode, press the Power button once. ASUS CG8480 31 Zooms out your screen.

CG8480 User's Manual
Page 33
... to connect USB devices such as storage devices. English Chapter 3 Connecting devices to launch the Desktop Mode. 2. These USB ports allow you to your computer. ASUS CG8480 33
... to connect USB devices such as storage devices. English Chapter 3 Connecting devices to launch the Desktop Mode. 2. These USB ports allow you to your computer. ASUS CG8480 33

CG8480 User's Manual
Page 35
English Connecting 4-channel Speakers Connecting 6-channel Speakers ASUS CG8480 35
English Connecting 4-channel Speakers Connecting 6-channel Speakers ASUS CG8480 35

CG8480 User's Manual
Page 37
English Connecting the Phoebus Box (with a Phoebus Sound card) 1 Mic in 2 HP out 3 Box link Line in high-quality amplifier Port to this Mic-In port for voice communication, recording or karaoke. 2 Headphone The headphone port has a built-in Front Ctr / Sbw Rear Side / SPDIF out No Item Description 1 Microphone Connect the microphone's 3.5mm plug from the In Port Phoebus Control Box into this port. ASUS CG8480 37 Connect the Phoebus Control box directly to this port. 3 Box Link Port Connect Phoebus Control box directly to drive headphones.
English Connecting the Phoebus Box (with a Phoebus Sound card) 1 Mic in 2 HP out 3 Box link Line in high-quality amplifier Port to this Mic-In port for voice communication, recording or karaoke. 2 Headphone The headphone port has a built-in Front Ctr / Sbw Rear Side / SPDIF out No Item Description 1 Microphone Connect the microphone's 3.5mm plug from the In Port Phoebus Control Box into this port. ASUS CG8480 37 Connect the Phoebus Control box directly to this port. 3 Box Link Port Connect Phoebus Control box directly to drive headphones.

CG8480 User's Manual
Page 39
Right-click on the volume icon on the audio device. Click Set as Default Communication Device. English Switching Sound and Recording Devices To switch between the sound and recording device from the Phoebus control box and FIO audio jack: 1. ASUS CG8480 39 Click the Recording or Playback tab and right-click on the System Tray and click Playback devices. 2.
Right-click on the volume icon on the audio device. Click Set as Default Communication Device. English Switching Sound and Recording Devices To switch between the sound and recording device from the Phoebus control box and FIO audio jack: 1. ASUS CG8480 39 Click the Recording or Playback tab and right-click on the System Tray and click Playback devices. 2.

CG8480 User's Manual
Page 41
... use the additional monitor as a duplicate of the following to show desktop only on the Start screen from the section Working with Windows® apps. ASUS CG8480 41 For details, refer to use the additional monitor as an extension display.
... use the additional monitor as a duplicate of the following to show desktop only on the Start screen from the section Working with Windows® apps. ASUS CG8480 41 For details, refer to use the additional monitor as an extension display.

CG8480 User's Manual
Page 43
... typing. • Use your Desktop PC in a comfortably-lit area, and keep it away from sources of your wrists, hands, and other joints or muscles. ASUS CG8480 43
... typing. • Use your Desktop PC in a comfortably-lit area, and keep it away from sources of your wrists, hands, and other joints or muscles. ASUS CG8480 43

CG8480 User's Manual
Page 45
... on it . 5. Removing an optical disc To remove an optical disc: 1. Using the optical drive English Inserting an optical disc To insert an optical disc: 1. ASUS CG8480 45
... on it . 5. Removing an optical disc To remove an optical disc: 1. Using the optical drive English Inserting an optical disc To insert an optical disc: 1. ASUS CG8480 45

CG8480 User's Manual
Page 47
...Desktop PC comes with a left button, a right button, a scroll wheel, two side buttons, a DPI button, and a specially designed Profile Switch button. ASUS CG8480 47 Keys 1 2 3 4 5 6 Description Left button Right button Scroll wheel DPI switch Profile switch button/Profile indicator* LED DPI indicator** Keys 7 8...)*** *** To adjust the mouse weight, add or remove the weight blocks. The ASUS GX900 Gaming Mouse comes with the bundled ASUS GX900 Gaming Mouse for the package contents of the ASUS GX900 Gaming Mouse. Check the section Package contents for your full-blast game control....
...Desktop PC comes with a left button, a right button, a scroll wheel, two side buttons, a DPI button, and a specially designed Profile Switch button. ASUS CG8480 47 Keys 1 2 3 4 5 6 Description Left button Right button Scroll wheel DPI switch Profile switch button/Profile indicator* LED DPI indicator** Keys 7 8...)*** *** To adjust the mouse weight, add or remove the weight blocks. The ASUS GX900 Gaming Mouse comes with the bundled ASUS GX900 Gaming Mouse for the package contents of the ASUS GX900 Gaming Mouse. Check the section Package contents for your full-blast game control....

CG8480 User's Manual
Page 49
... save the settings you have made and exit the program. * Each profile provides two DPI levels. Displays the profile icon to the previously saved settings. ASUS CG8480 49 Two DPI switch LEDs light up indicating that you are using Level 1, and four LEDs light up indicating that you are using Level 2. Click...
... save the settings you have made and exit the program. * Each profile provides two DPI levels. Displays the profile icon to the previously saved settings. ASUS CG8480 49 Two DPI switch LEDs light up indicating that you are using Level 1, and four LEDs light up indicating that you are using Level 2. Click...


