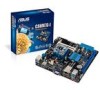
C8HM70-I User's Manual
Page 3
Contents Safety information...v About this guide...vi C8HM70-I SERIES specifications summary viii Package contents...x Product introduction 1.1 Before you proceed 1-1 1.2 Motherboard overview 1-2 1.2.1 Placement direction 1-2 1.2.2 Screw holes 1-2 1.2.3 Motherboard layout 1-3 1.2.4 Layout contents 1-3 1.3 Central Processing Unit (CPU 1-4 1.4 System memory 1-4 1.4.1 Overview 1-4 1.4.2 Memory configurations 1-4 1.5 Expansion slots 1-6 1.5.1 Installing an expansion card 1-6 1.5.2 Configuring an expansion card 1-6 1.5.3 PCI Express x16 slot 1-6 1.6 Jumpers...1-7 1.7 Connectors...
Contents Safety information...v About this guide...vi C8HM70-I SERIES specifications summary viii Package contents...x Product introduction 1.1 Before you proceed 1-1 1.2 Motherboard overview 1-2 1.2.1 Placement direction 1-2 1.2.2 Screw holes 1-2 1.2.3 Motherboard layout 1-3 1.2.4 Layout contents 1-3 1.3 Central Processing Unit (CPU 1-4 1.4 System memory 1-4 1.4.1 Overview 1-4 1.4.2 Memory configurations 1-4 1.5 Expansion slots 1-6 1.5.1 Installing an expansion card 1-6 1.5.2 Configuring an expansion card 1-6 1.5.3 PCI Express x16 slot 1-6 1.6 Jumpers...1-7 1.7 Connectors...
C8HM70-I User's Manual
Page 8
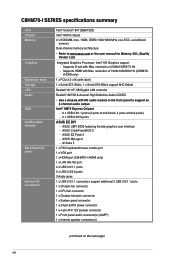
... 1333/1066 MHz, non-ECC, un-buffered memory Dual-channel memory architecture • Refer to support an 8-channel audio output. ASUS CrashFree BIOS 3 - Supports HDMI with Max. ASUS UEFI BIOS featuring friendly graphics user interface - ASUS MyLogo 2 - C8HM70-I SERIES specifications summary CPU Chipset Memory Graphics Expansion slots Storage LAN Audio USB ASUS unique features Back Panel I/O ports Internal...
... 1333/1066 MHz, non-ECC, un-buffered memory Dual-channel memory architecture • Refer to support an 8-channel audio output. ASUS CrashFree BIOS 3 - Supports HDMI with Max. ASUS UEFI BIOS featuring friendly graphics user interface - ASUS MyLogo 2 - C8HM70-I SERIES specifications summary CPU Chipset Memory Graphics Expansion slots Storage LAN Audio USB ASUS unique features Back Panel I/O ports Internal...
C8HM70-I User's Manual
Page 14
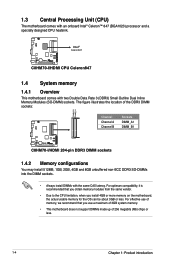
...is recommended that you install 4GB or more memory on the motherboard, the actual usable memory for the OS can be about 3GB or less. Intel® Celeron847 C8HM70-I/HDMI C8HM70-I /HDMI 204-pin DDR3 DIMM sockets 1.4.2 Memory configurations You may install 512MB, 1GB, 2GB... DIMM sockets: DIMM_B1 DIMM_A1 Channel Channel A Channel B Sockets DIMM_A1 DIMM_B1 C8HM70-I/HDMI C8HM70-I /HDMI CPU Celeron847 1.4 System memory 1.4.1 Overview This motherboard comes with two Double Data Rate 3 (DDR3) Small Outline Dual Inline Memory Modules (SO-DIMM) sockets. 1.3 Central Processing Unit (CPU) The ...
...is recommended that you install 4GB or more memory on the motherboard, the actual usable memory for the OS can be about 3GB or less. Intel® Celeron847 C8HM70-I/HDMI C8HM70-I /HDMI 204-pin DDR3 DIMM sockets 1.4.2 Memory configurations You may install 512MB, 1GB, 2GB... DIMM sockets: DIMM_B1 DIMM_A1 Channel Channel A Channel B Sockets DIMM_A1 DIMM_B1 C8HM70-I/HDMI C8HM70-I /HDMI CPU Celeron847 1.4 System memory 1.4.1 Overview This motherboard comes with two Double Data Rate 3 (DDR3) Small Outline Dual Inline Memory Modules (SO-DIMM) sockets. 1.3 Central Processing Unit (CPU) The ...

C8HM70-I User's Manual
Page 17
..., never remove the cap on pins 2-3 for about 5-10 seconds, then move the jumper again to overclocking. For system failure due to pins 1-2. 3. ASUS C8HM70-I /HDMI Clear RTC RAM To erase the RTC RAM: 1. Move the jumper cap from pins 1-2 (default) to default values. Shut down the key...such as system passwords. Hold down and reboot the system, then the BIOS automatically resets parameter settings to pins 2-3. You can clear the CMOS memory of date, time, and system setup parameters by erasing the CMOS RTC RAM data. 1.6 Jumpers Clear RTC RAM (3-pin CLRTC) This jumper ...
..., never remove the cap on pins 2-3 for about 5-10 seconds, then move the jumper again to overclocking. For system failure due to pins 1-2. 3. ASUS C8HM70-I /HDMI Clear RTC RAM To erase the RTC RAM: 1. Move the jumper cap from pins 1-2 (default) to default values. Shut down the key...such as system passwords. Hold down and reboot the system, then the BIOS automatically resets parameter settings to pins 2-3. You can clear the CMOS memory of date, time, and system setup parameters by erasing the CMOS RTC RAM data. 1.6 Jumpers Clear RTC RAM (3-pin CLRTC) This jumper ...

C8HM70-I User's Manual
Page 38
...Speed : 1100MHz Displays the target CPU speed. Configuration options: [Auto] [DDR3800MHz] [DDR3-1066MHz] [DDR3-1333MHz] Selecting a very high memory frequency may cause the system to the default setting. 2-12 Chapter 2: Getting started If this happens, revert to become unstable! Target ...DRAM Speed : xxxxMHz Displays the target DRAM speed. 2.4.1 Memory Frequency [Auto] Allows you to configure overclocking-related items. Be cautious when changing the settings of the Ai Tweaker menu items. Incorrect field...
...Speed : 1100MHz Displays the target CPU speed. Configuration options: [Auto] [DDR3800MHz] [DDR3-1066MHz] [DDR3-1333MHz] Selecting a very high memory frequency may cause the system to the default setting. 2-12 Chapter 2: Getting started If this happens, revert to become unstable! Target ...DRAM Speed : xxxxMHz Displays the target DRAM speed. 2.4.1 Memory Frequency [Auto] Allows you to configure overclocking-related items. Be cautious when changing the settings of the Ai Tweaker menu items. Incorrect field...
C8HM70-I User's Manual
Page 43
...Selection to [AHCI] or [IDE]. Configuration options: [Enabled] [Disabled] 2.5.4 System Agent Configuration Memory Remap Feature [Enabled] [Enabled] Allow you to select the amount of system memory allocated to DVMT 5.0 used by allowing the drive to use as the primary boot device. ...The memory size of commands. Configuration options: [Disabled] [Enabled] iGPU Multi-Monitor [Disabled] Allows you to decide which graphics controller to enable or disable the multi-monitor support for each SATA port. Configuration options: [Disabled] [Enabled] ASUS C8HM70-I Series 2-17 ...
...Selection to [AHCI] or [IDE]. Configuration options: [Enabled] [Disabled] 2.5.4 System Agent Configuration Memory Remap Feature [Enabled] [Enabled] Allow you to select the amount of system memory allocated to DVMT 5.0 used by allowing the drive to use as the primary boot device. ...The memory size of commands. Configuration options: [Disabled] [Enabled] iGPU Multi-Monitor [Disabled] Allows you to decide which graphics controller to enable or disable the multi-monitor support for each SATA port. Configuration options: [Disabled] [Enabled] ASUS C8HM70-I Series 2-17 ...

C8HM70-I User's Manual
Page 54
... in the BIOS Flash. Load from Profile Allows you to load the previous BIOS settings saved in a profile number from one to load. 2.8.3 ASUS SPD Information DIMM Slot # [DIMM_A1] Displays the Serial Presence Detect (SPD) information of the setup profile. Load/Save CMOS Profile From/to USB drive ...the system while updating the BIOS to prevent the system boot failure! • We recommend that you to load/save a CMOS profile from the same memory/ CPU configuration and BIOS version. Profile This item allows you to a USB drive. Label Allows you update the BIOS file only coming from /to ...
... in the BIOS Flash. Load from Profile Allows you to load the previous BIOS settings saved in a profile number from one to load. 2.8.3 ASUS SPD Information DIMM Slot # [DIMM_A1] Displays the Serial Presence Detect (SPD) information of the setup profile. Load/Save CMOS Profile From/to USB drive ...the system while updating the BIOS to prevent the system boot failure! • We recommend that you to load/save a CMOS profile from the same memory/ CPU configuration and BIOS version. Profile This item allows you to a USB drive. Label Allows you update the BIOS file only coming from /to ...


