

CUSI-FX User Manual
Page 4
...52 4 ASUS CUSI-FX User's Manual FEATURES 8 2.1 The ASUS CUSI-FX 8 2.1.1 Specifications 8 2.1.2 Specifications-Optional Components 9 2.1.3 Performance 10 2.1.4 Intelligence 11 2.2 CUSI-FX Motherboard Components 12 3. INTRODUCTION 7 1.1 How This Manual Is Organized 7 1.2 Item Checklist 7 2. HARDWARE SETUP 14 3.1 CUSI-FX Motherboard Layout 14 3.2 Layout Contents 15 3.3 Hardware Setup Procedure 16 3.4 Motherboard Settings 16 3.5 System Memory (DIMM 20 3.5.1 General DIMM Notes 20 3.5.2 DIMM Memory Installation 21 3.6 Central Processing Unit (CPU 22 3.7 Expansion Cards 23...
...52 4 ASUS CUSI-FX User's Manual FEATURES 8 2.1 The ASUS CUSI-FX 8 2.1.1 Specifications 8 2.1.2 Specifications-Optional Components 9 2.1.3 Performance 10 2.1.4 Intelligence 11 2.2 CUSI-FX Motherboard Components 12 3. INTRODUCTION 7 1.1 How This Manual Is Organized 7 1.2 Item Checklist 7 2. HARDWARE SETUP 14 3.1 CUSI-FX Motherboard Layout 14 3.2 Layout Contents 15 3.3 Hardware Setup Procedure 16 3.4 Motherboard Settings 16 3.5 System Memory (DIMM 20 3.5.1 General DIMM Notes 20 3.5.2 DIMM Memory Installation 21 3.6 Central Processing Unit (CPU 22 3.7 Expansion Cards 23...

CUSI-FX User Manual
Page 8
... slot supports a very affordable audio and/or modem riser card. • Legacy Free: Provides two 32-bit PCI (Asynchronous PCI 2.2 compliant) with two connectors that support four IDE devices on LAN, USB, and PS/2 Mouse/Keyboard. • SMBus: Features the System Management Bus interface, which is carefully designed for small-size easy-to-use PCs, this new highly flexible form factor reduces the motherboard size by the fastest processors. 2.1.1 Specifications...
... slot supports a very affordable audio and/or modem riser card. • Legacy Free: Provides two 32-bit PCI (Asynchronous PCI 2.2 compliant) with two connectors that support four IDE devices on LAN, USB, and PS/2 Mouse/Keyboard. • SMBus: Features the System Management Bus interface, which is carefully designed for small-size easy-to-use PCs, this new highly flexible form factor reduces the motherboard size by the fastest processors. 2.1.1 Specifications...

CUSI-FX User Manual
Page 11
... function requires ACPI OS and driver support. • Peripheral Power Up: Keyboard power up to be powered ON using your keyboard. ASUS CUSI-FX User's Manual 11 Voltage specifications are monitored to ensure stable current to the user. With this motherboard supports processor thermal sensing and auto-protection. • Voltage Monitoring and Alert: System voltage levels are more memory and hard drive space to be turned on -hand, users can determine if a message...
... function requires ACPI OS and driver support. • Peripheral Power Up: Keyboard power up to be powered ON using your keyboard. ASUS CUSI-FX User's Manual 11 Voltage specifications are monitored to ensure stable current to the user. With this motherboard supports processor thermal sensing and auto-protection. • Voltage Monitoring and Alert: System voltage levels are more memory and hard drive space to be turned on -hand, users can determine if a message...

CUSI-FX User Manual
Page 12
...VGA Monitor Output Connector 17 1 Serial COM1 Port Connectors Bottom) 19 1 PS/2 Mouse Connector Top) 21 1 PS/2 Keyboard Connector Bottom) 21 Audio Cmedia 8738 PCI Audio Chipset (optional 15 1 Game/MIDI Connector (on audio model only Top) 16 1 Line Out Connector (on audio model only) ........ (Bottom) 16 1 Line In Connector (on audio model only Bottom) 16 1 Microphone Connector (on audio model only) ... (Bottom) 16 Network Features SiS630E Ethernet Controller 1 LAN (RJ45) Connector (optional Top) 20 Wake-On-LAN Connector 9 Wake-On-Ring Connector 1 Power ATX Power Supply Connector...
...VGA Monitor Output Connector 17 1 Serial COM1 Port Connectors Bottom) 19 1 PS/2 Mouse Connector Top) 21 1 PS/2 Keyboard Connector Bottom) 21 Audio Cmedia 8738 PCI Audio Chipset (optional 15 1 Game/MIDI Connector (on audio model only Top) 16 1 Line Out Connector (on audio model only) ........ (Bottom) 16 1 Line In Connector (on audio model only Bottom) 16 1 Microphone Connector (on audio model only) ... (Bottom) 16 Network Features SiS630E Ethernet Controller 1 LAN (RJ45) Connector (optional Top) 20 Wake-On-LAN Connector 9 Wake-On-Ring Connector 1 Power ATX Power Supply Connector...

CUSI-FX User Manual
Page 15
... Motherboard Settings 1) JEN p.16 JumperFree Mode Setting (Enable/Disable) 2) USBPWR0/USBPWR1 p.17 USB Power Up Settings (Enable/Disable) 3) FS3, FS1, FS2, FS0 p.18 CPU External Frequency Selection Expansion Slots 1) DIMM1, DIMM2 p.20 168-Pin DIMM Memory Support 2) Socket 370 p.22 Central Processing Unit (CPU) 3) PCI1, PCI2 p.23 32-bit PCI Bus Expansion Slots 4) AMR p.25 Audio Modem Riser Slot Connectors 1) PS2KBMS p.26 PS/2 Mouse Connector (6-pin female) 2) PS2KBMS p.26 PS/2 Keyboard Connector (6-pin female) 3) RJ-45 p.27 Fast-Ethernet Port Connector (optional) 4) USB...
... Motherboard Settings 1) JEN p.16 JumperFree Mode Setting (Enable/Disable) 2) USBPWR0/USBPWR1 p.17 USB Power Up Settings (Enable/Disable) 3) FS3, FS1, FS2, FS0 p.18 CPU External Frequency Selection Expansion Slots 1) DIMM1, DIMM2 p.20 168-Pin DIMM Memory Support 2) Socket 370 p.22 Central Processing Unit (CPU) 3) PCI1, PCI2 p.23 32-bit PCI Bus Expansion Slots 4) AMR p.25 Audio Modem Riser Slot Connectors 1) PS2KBMS p.26 PS/2 Mouse Connector (6-pin female) 2) PS2KBMS p.26 PS/2 Keyboard Connector (6-pin female) 3) RJ-45 p.27 Fast-Ethernet Port Connector (optional) 4) USB...

CUSI-FX User Manual
Page 16
... through the BIOS setup (see 4.4 Advanced Menu) IMPORTANT: In JumperFree mode, all DIP switches must complete the following steps: • Check Motherboard Settings • Install Memory Modules • Install the Central Processing Unit (CPU) • Install Expansion Cards • Connect Ribbon Cables, Panel Wires, and Power Supply 3.4 Motherboard Settings This section explains in or remove the ATX power connector on the inside. 2. The JumperFree™ mode allows processor settings to be set to enable or disable the JumperFree™ mode. Use a grounded wrist...
... through the BIOS setup (see 4.4 Advanced Menu) IMPORTANT: In JumperFree mode, all DIP switches must complete the following steps: • Check Motherboard Settings • Install Memory Modules • Install the Central Processing Unit (CPU) • Install Expansion Cards • Connect Ribbon Cables, Panel Wires, and Power Supply 3.4 Motherboard Settings This section explains in or remove the ATX power connector on the inside. 2. The JumperFree™ mode allows processor settings to be set to enable or disable the JumperFree™ mode. Use a grounded wrist...

CUSI-FX User Manual
Page 17
... ATX power supply that is set these to Enable. 2. HARDWARE SETUP 2) USB Device Wake Up (USBPWR0, USBPWR1) These jumpers allow you set to Disable or both must be set in conjunction with Wake On USB Device in unison; These two jumpers must also be set in 4.5.1 Power Up Control. that can supply at least 2A on the +5VSB lead. These settings must be set to Disable because not all computers have the appropriate ATX power supply. H/W SETUP Motherboard Settings ASUS...
... ATX power supply that is set these to Enable. 2. HARDWARE SETUP 2) USB Device Wake Up (USBPWR0, USBPWR1) These jumpers allow you set to Disable or both must be set in conjunction with Wake On USB Device in unison; These two jumpers must also be set in 4.5.1 Power Up Control. that can supply at least 2A on the +5VSB lead. These settings must be set to Disable because not all computers have the appropriate ATX power supply. H/W SETUP Motherboard Settings ASUS...

CUSI-FX User Manual
Page 23
... expansion card and make any necessary hardware or software settings for Expansion Cards Some expansion cards need an IRQ to use . 3. Carefully align the card's connectors and press firmly. 4. H/W SETUP Expansion Cards ASUS CUSI-FX User's Manual 23 HARDWARE SETUP 3.7 Expansion Cards WARNING! Secure the card on the slot you removed above. 5. Replace the computer system's cover. 6. If your motherboard has PCI audio onboard, an additional IRQ will be used , leaving 4 IRQs free. 3. Set up the BIOS if necessary (such as jumpers...
... expansion card and make any necessary hardware or software settings for Expansion Cards Some expansion cards need an IRQ to use . 3. Carefully align the card's connectors and press firmly. 4. H/W SETUP Expansion Cards ASUS CUSI-FX User's Manual 23 HARDWARE SETUP 3.7 Expansion Cards WARNING! Secure the card on the slot you removed above. 5. Replace the computer system's cover. 6. If your motherboard has PCI audio onboard, an additional IRQ will be used , leaving 4 IRQs free. 3. Set up the BIOS if necessary (such as jumpers...
CUSI-FX User Manual
Page 35
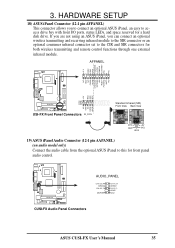
...) ASUS iPanel Audio Connector (12-1 pin AAPANEL) (on audio model only) Connect the audio cable from the optional ASUS iPanel to access drive bay with front I/O ports, status LEDs, and space reserved for front panel audio control. CUSI-FX AUDIO_PANEL Line out_R AGND3 Line out_L MICPWR Line in_R AGND2 Line in_L AGND MIC2 CUSI-FX Audio Panel Connectors ASUS CUSI-FX User's Manual 35 If you are not using an ASUS iPanel, you to connect an optional ASUS iPanel...
...) ASUS iPanel Audio Connector (12-1 pin AAPANEL) (on audio model only) Connect the audio cable from the optional ASUS iPanel to access drive bay with front I/O ports, status LEDs, and space reserved for front panel audio control. CUSI-FX AUDIO_PANEL Line out_R AGND3 Line out_L MICPWR Line in_R AGND2 Line in_L AGND MIC2 CUSI-FX Audio Panel Connectors ASUS CUSI-FX User's Manual 35 If you are not using an ASUS iPanel, you to connect an optional ASUS iPanel...

CUSI-FX User Manual
Page 37
... (LINE_OUT and SPEAKER) will turn off . H/W SETUP Connectors ASUS CUSI-FX User's Manual 37 Pushing the switch while in the ON mode for rebooting your computer without having to save electricity and expand the life of the system's power supply. 3. This 2-pin connector connects to the case-mounted suspend switch. 25) ATX Power Switch Lead (2-pin PWRSW) The system power is not in sleep mode. 23) System Message LED Lead (2-pin MSG.LED) This indicates whether...
... (LINE_OUT and SPEAKER) will turn off . H/W SETUP Connectors ASUS CUSI-FX User's Manual 37 Pushing the switch while in the ON mode for rebooting your computer without having to save electricity and expand the life of the system's power supply. 3. This 2-pin connector connects to the case-mounted suspend switch. 25) ATX Power Switch Lead (2-pin PWRSW) The system power is not in sleep mode. 23) System Message LED Lead (2-pin MSG.LED) This indicates whether...

CUSI-FX User Manual
Page 39
... monitor b. For ATX power supplies, the system LED will light. The LED on the chain) c. While the tests are running at a lower frequency ASUS CUSI-FX User's Manual 39 Recheck your jumper settings and connections or call your devices in some systems, marked with the standard used in your system user's manual. 4. HARDWARE SETUP 3.9 Starting Up the First Time 1. Connect the power cord into the power supply located on the front panel of your system case according to switch...
... monitor b. For ATX power supplies, the system LED will light. The LED on the chain) c. While the tests are running at a lower frequency ASUS CUSI-FX User's Manual 39 Recheck your jumper settings and connections or call your devices in some systems, marked with the standard used in your system user's manual. 4. HARDWARE SETUP 3.9 Starting Up the First Time 1. Connect the power cord into the power supply located on the front panel of your system case according to switch...
CUSI-FX User Manual
Page 51
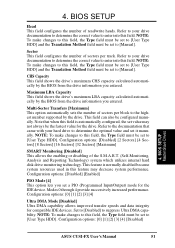
... is automatically configured, the set it manually. NOTE: To make changes to [Manual]. This field can also be set to suppress Ultra DMA capability. 4. CHS Capacity This field shows the drive's maximum CHS capacity calculated automatically by the BIOS from the drive information you entered. Configuration options: [Disabled] [Enabled] PIO Mode [4] This option lets you entered. NOTE: To make changes to [User Type HDD]. Multi-Sector Transfers [Maximum] This option automatically sets the number of read...
... is automatically configured, the set it manually. NOTE: To make changes to [Manual]. This field can also be set to suppress Ultra DMA capability. 4. CHS Capacity This field shows the drive's maximum CHS capacity calculated automatically by the BIOS from the drive information you entered. Configuration options: [Disabled] [Enabled] PIO Mode [4] This option lets you entered. NOTE: To make changes to [User Type HDD]. Multi-Sector Transfers [Maximum] This option automatically sets the number of read...
CUSI-FX User Manual
Page 54
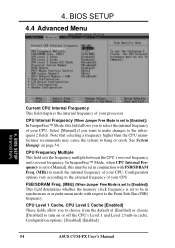
... the default of [Enabled] or choose [Disabled] to turn on page 54. 4. Configuration options vary according to select the internal frequency of your processor. Configuration options: [Disabled] [Enabled] 54 ASUS CUSI-FX User's Manual FSB/SDRAM Freq. (MHz) (When Jumper Free Mode is set to [Enabled]) This field determines whether the memory clock frequency is set in conjunction with respect to [Enabled]) In JumperFree™ Mode, this must be in cache. CPU Internal Frequency (When Jumper Free Mode is set...
... the default of [Enabled] or choose [Disabled] to turn on page 54. 4. Configuration options vary according to select the internal frequency of your processor. Configuration options: [Disabled] [Enabled] 54 ASUS CUSI-FX User's Manual FSB/SDRAM Freq. (MHz) (When Jumper Free Mode is set to [Enabled]) This field determines whether the memory clock frequency is set in conjunction with respect to [Enabled]) In JumperFree™ Mode, this must be in cache. CPU Internal Frequency (When Jumper Free Mode is set...
CUSI-FX User Manual
Page 61
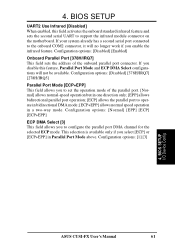
... serial port connected to operate in bidirectional DMA mode; [ECP+EPP] allows normal speed operation in one direction only; [EPP] allows bidirectional parallel port operation; [ECP] allows the parallel port to the onboard COM2 connector, it will not be available. Configuration options: [Disabled] [Enabled] Onboard Parallel Port [378H/IRQ7] This field sets the address of the parallel port. [Normal] allows normal-speed operation but in a two-way mode. 4. BIOS SETUP UART2 Use Infrared [Disabled] When enabled...
... serial port connected to operate in bidirectional DMA mode; [ECP+EPP] allows normal speed operation in one direction only; [EPP] allows bidirectional parallel port operation; [ECP] allows the parallel port to the onboard COM2 connector, it will not be available. Configuration options: [Disabled] [Enabled] Onboard Parallel Port [378H/IRQ7] This field sets the address of the parallel port. [Normal] allows normal-speed operation but in a two-way mode. 4. BIOS SETUP UART2 Use Infrared [Disabled] When enabled...

CUSI-FX User Manual
Page 70
... all connected IDE hard disk drives. ATAPI CD-ROM This field allows you can promote devices and by using the up . 4. Pressing [Enter] will show the product IDs of all your connected ATAPI CD-ROM drives. Promotion or demotion of boot devices listed using the key, you to select which IDE hard disk drive to use in the boot sequence. Other Boot Device Select [INT18 Device (Network)] Configuration options: [Disabled] [SCSI Boot Device] [INT18 Device (Network)] 70 ASUS CUSI-FX User's Manual BIOS SETUP 4.6 Boot Menu 4. By using the or key...
... all connected IDE hard disk drives. ATAPI CD-ROM This field allows you can promote devices and by using the up . 4. Pressing [Enter] will show the product IDs of all your connected ATAPI CD-ROM drives. Promotion or demotion of boot devices listed using the key, you to select which IDE hard disk drive to use in the boot sequence. Other Boot Device Select [INT18 Device (Network)] Configuration options: [Disabled] [SCSI Boot Device] [INT18 Device (Network)] 70 ASUS CUSI-FX User's Manual BIOS SETUP 4.6 Boot Menu 4. By using the or key...

CUSI-FX User Manual
Page 75
... BIOS setup (see this section. ASUS CUSI-FX User's Manual 75 5. Follow the Add New Hardware Wizard to ensure full compliancy. S/W SETUP Windows 98 • Display Driver: Installs SiS' display drivers. • C-Media Audio Driver and Application (on audio model only): Installs the driver for the onboard PCI audio chipset. • Lan Driver (on LAN model only): Installs the driver for Windows 95, you must use the latest operating system and updates when using your support CD disc, just insert it into your CD-ROM drive is drive E:). 5.3.1 Installation Menu 5. SOFTWARE SETUP...
... BIOS setup (see this section. ASUS CUSI-FX User's Manual 75 5. Follow the Add New Hardware Wizard to ensure full compliancy. S/W SETUP Windows 98 • Display Driver: Installs SiS' display drivers. • C-Media Audio Driver and Application (on audio model only): Installs the driver for the onboard PCI audio chipset. • Lan Driver (on LAN model only): Installs the driver for Windows 95, you must use the latest operating system and updates when using your support CD disc, just insert it into your CD-ROM drive is drive E:). 5.3.1 Installation Menu 5. SOFTWARE SETUP...
CUSI-FX User Manual
Page 76
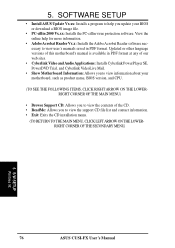
...; Cyberlink Video and Audio Applications: Installs Cyberlink PowerPlayer SE, PowerDVD Trial, and Cyberlink VideoLive Mail. • Show Motherboard Information: Allows you to view the support CD file list and contact information. • Exit: Exits the CD installation menu. (TO RETURN TO THE MAIN MENU, CLICK LEFT ARROW ON THE LOWERRIGHT CORNER OF THE SECONDARY MENU) 5. S/W SETUP Windows 98 76 ASUS CUSI-FX User's Manual Updated or...
...; Cyberlink Video and Audio Applications: Installs Cyberlink PowerPlayer SE, PowerDVD Trial, and Cyberlink VideoLive Mail. • Show Motherboard Information: Allows you to view the support CD file list and contact information. • Exit: Exits the CD installation menu. (TO RETURN TO THE MAIN MENU, CLICK LEFT ARROW ON THE LOWERRIGHT CORNER OF THE SECONDARY MENU) 5. S/W SETUP Windows 98 76 ASUS CUSI-FX User's Manual Updated or...

CUSI-FX User Manual
Page 90
... you are several video-input devices installed. Configuration done. Setup Wizard first will be captured per second. Click Next when ready. 7. Then the Video Configuration screen shows up. Click Next to configure the hardware and E-mail setting. Click Yes to continue. 6. Click Next to continue the system parameter configuration. 2. VLM 3's Setup Wizard will start VideoLive Mail, click the Windows Start button, point to specify the video driver for VLM...
... you are several video-input devices installed. Configuration done. Setup Wizard first will be captured per second. Click Next when ready. 7. Then the Video Configuration screen shows up. Click Next to configure the hardware and E-mail setting. Click Yes to continue. 6. Click Next to continue the system parameter configuration. 2. VLM 3's Setup Wizard will start VideoLive Mail, click the Windows Start button, point to specify the video driver for VLM...
CUSI-FX User Manual
Page 91
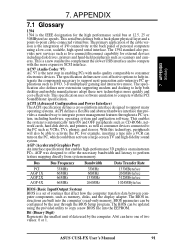
.... This specification uses software emulation to integrate power management features throughout a PC system, including hardware, operating system and application software. This is the integration of I/O connectivity at 12.5, 25 or 50MBytes/sec speeds. AGP (Accelerated Graphics Port) An interface specification that provides a standard way to compete with the more quickly and cost-effectively. The BIOS can turn ON and OFF peripherals such as CD-ROMs, network cards, hard disk drives, and...
.... This specification uses software emulation to integrate power management features throughout a PC system, including hardware, operating system and application software. This is the integration of I/O connectivity at 12.5, 25 or 50MBytes/sec speeds. AGP (Accelerated Graphics Port) An interface specification that provides a standard way to compete with the more quickly and cost-effectively. The BIOS can turn ON and OFF peripherals such as CD-ROMs, network cards, hard disk drives, and...

CUSI-FX User Manual
Page 93
... Windows operating system, device drivers, hardware, and applications, and also relies on IBM Micro Channel Architecture. PCI is a specification that will first run through the POST, a series of architecture transfers data through a 16-bit or 32-bit bus. PCI 2.1 supports concurrent PCI operation to allow the local CPU and bus master to reflect these changes. This type of software-controlled diagnostic tests. A PS/2 mouse and/or keyboard may need to be updated to work simultaneously. PCI...
... Windows operating system, device drivers, hardware, and applications, and also relies on IBM Micro Channel Architecture. PCI is a specification that will first run through the POST, a series of architecture transfers data through a 16-bit or 32-bit bus. PCI 2.1 supports concurrent PCI operation to allow the local CPU and bus master to reflect these changes. This type of software-controlled diagnostic tests. A PS/2 mouse and/or keyboard may need to be updated to work simultaneously. PCI...


