

CUW-RM User Manual
Page 4
...64 4.4.3 PCI Configuration 66 4.4.4 Shadow Configuration 69 4 ASUS CUW-RM User's Manual FEATURES 8 2.1 The ASUS CUW-RM Motherboard 8 2.1.1 Specifications 8 2.1.2 Optional ...Components 9 2.1.3 Performance 10 2.1.4 Intelligence 11 2.2 Features and Component Locations 12 3. HARDWARE SETUP 14 3.1 Motherboard Layout 14 3.2 Layout Contents 15 3.3 Hardware Setup Procedure 17 3.4 Motherboard Settings 17 3.5 System Memory (DIMM 24 3.5.1 General DIMM Notes 24 3.5.2 Memory Installation 25 3.6 Central Processing Unit (CPU...
...64 4.4.3 PCI Configuration 66 4.4.4 Shadow Configuration 69 4 ASUS CUW-RM User's Manual FEATURES 8 2.1 The ASUS CUW-RM Motherboard 8 2.1.1 Specifications 8 2.1.2 Optional ...Components 9 2.1.3 Performance 10 2.1.4 Intelligence 11 2.2 Features and Component Locations 12 3. HARDWARE SETUP 14 3.1 Motherboard Layout 14 3.2 Layout Contents 15 3.3 Hardware Setup Procedure 17 3.4 Motherboard Settings 17 3.5 System Memory (DIMM 24 3.5.1 General DIMM Notes 24 3.5.2 Memory Installation 25 3.6 Central Processing Unit (CPU...
CUW-RM User Manual
Page 9
...keeping time! • Firmware Hub! Provides Vcore and CPU/ SDRAM frequency adjustments, boot block write protection, and HD/SCSI/MO/ ZIP/CD/Floppy boot selection. FEATURES Optional Components 2. FEATURES • Around-the-Clock Intrusion Detection! ASUS CUW-RM User's Manual 9 Software Audio and Hardware ...the VGA-out connector) to -use interface which can accumulate noise and degrade image quality. • No Messy Wires! 2. Provided ASUS PC Probe or Intel LDCM allows PC health monitoring. • Enhanced ACPI & Anti-Boot Virus Protection! Hardware random number generator ...
...keeping time! • Firmware Hub! Provides Vcore and CPU/ SDRAM frequency adjustments, boot block write protection, and HD/SCSI/MO/ ZIP/CD/Floppy boot selection. FEATURES Optional Components 2. FEATURES • Around-the-Clock Intrusion Detection! ASUS CUW-RM User's Manual 9 Software Audio and Hardware ...the VGA-out connector) to -use interface which can accumulate noise and degrade image quality. • No Messy Wires! 2. Provided ASUS PC Probe or Intel LDCM allows PC health monitoring. • Enhanced ACPI & Anti-Boot Virus Protection! Hardware random number generator ...
CUW-RM User Manual
Page 10
...that these features implemented in two channels. FEATURES 2.1.3 Performance • UltraPerformance! Onboard IDE Bus Master controller with concurrent PCI and CPU bus activities. • SDRAM Optimized Performance! FEATURES Performance 2. To fully utilize the benefits of the motherboard meet PC'99 compliancy....Concurrent PCI optimizes system performance with two connectors that you do not fall asleep waiting for an exciting gameplay experience. 10 ASUS CUW-RM User's Manual ACPI provides more Energy Saving Features for smooth MPEG1 or MPEG2 video playback. The integrated motion...
...that these features implemented in two channels. FEATURES 2.1.3 Performance • UltraPerformance! Onboard IDE Bus Master controller with concurrent PCI and CPU bus activities. • SDRAM Optimized Performance! FEATURES Performance 2. To fully utilize the benefits of the motherboard meet PC'99 compliancy....Concurrent PCI optimizes system performance with two connectors that you do not fall asleep waiting for an exciting gameplay experience. 10 ASUS CUW-RM User's Manual ACPI provides more Energy Saving Features for smooth MPEG1 or MPEG2 video playback. The integrated motion...
CUW-RM User Manual
Page 11
...from their limited resources more memory and hard drive space to be defined as the Soft-Off (see ATX Power Switch Lead in . ASUS CUW-RM User's Manual 11 All the fans are used up can be powered ON using your keyboard or mouse. To prevent system overheat...protection. • Voltage Monitoring and Alert! FEATURES 2.1.4 Intelligence • Fan Status Monitoring and Alarm! To prevent system overheat and system damage, the CPU, power supply, and system fans can be enabled or disabled through an internal or external modem. Regardless of the setting, pushing the power button ...
...from their limited resources more memory and hard drive space to be defined as the Soft-Off (see ATX Power Switch Lead in . ASUS CUW-RM User's Manual 11 All the fans are used up can be powered ON using your keyboard or mouse. To prevent system overheat...protection. • Voltage Monitoring and Alert! FEATURES 2.1.4 Intelligence • Fan Status Monitoring and Alarm! To prevent system overheat and system damage, the CPU, power supply, and system fans can be enabled or disabled through an internal or external modem. Regardless of the setting, pushing the power button ...

CUW-RM User Manual
Page 15
... (Enable 3 VSB/Disable 3 VSB) p.20 Safe Mode (Enable/Disable) p.21 Automatic Timeout Reboot (Enable/Disable) p.22 CPU External Clock Frequency Setting Expansion Slots 1) DIMM1, DIMM2, DIMM3 2) Socket 370 4) PCI1, PCI2, PCI3 5) AMR p.25... Connector (2 pins) 13) IDELED p.36 IDE Activity LED Lead (2 pins) 14) CHA_, CPU_, PWR_FAN p.36 Chassis, CPU, Power Supply Fan Connectors (Three 3-pin) 15) IR_CON p.37 Infrared Module Connectors (10-1 pins) 16) COM2 p.37 Serial... (2-pins) 22) ATXPWR p.40 ATX Power Supply Connector (20 pins) ASUS CUW-RM User's Manual 15 H/W SETUP Layout Contents 3.
... (Enable 3 VSB/Disable 3 VSB) p.20 Safe Mode (Enable/Disable) p.21 Automatic Timeout Reboot (Enable/Disable) p.22 CPU External Clock Frequency Setting Expansion Slots 1) DIMM1, DIMM2, DIMM3 2) Socket 370 4) PCI1, PCI2, PCI3 5) AMR p.25... Connector (2 pins) 13) IDELED p.36 IDE Activity LED Lead (2 pins) 14) CHA_, CPU_, PWR_FAN p.36 Chassis, CPU, Power Supply Fan Connectors (Three 3-pin) 15) IR_CON p.37 Infrared Module Connectors (10-1 pins) 16) COM2 p.37 Serial... (2-pins) 22) ATXPWR p.40 ATX Power Supply Connector (20 pins) ASUS CUW-RM User's Manual 15 H/W SETUP Layout Contents 3.
CUW-RM User Manual
Page 17
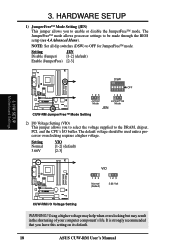
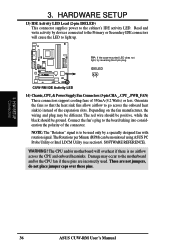
...you must complete the following steps: • Check Motherboard Settings • Install Memory Modules • Install the Central Processing Unit (CPU) • Install Expansion Cards • Connect Ribbon Cables, Panel Wires, and Power Supply 3.4 Motherboard Settings This section explains in ...3. Hold components by the edges and try not to a metal object, such as the power supply case. 3. H/W SETUP Motherboard Settings ASUS CUW-RM User's Manual 17 WARNING! Use a grounded wrist strap before handling computer components. 3. HARDWARE SETUP 3.3 Hardware Setup Procedure Before ...
...you must complete the following steps: • Check Motherboard Settings • Install Memory Modules • Install the Central Processing Unit (CPU) • Install Expansion Cards • Connect Ribbon Cables, Panel Wires, and Power Supply 3.4 Motherboard Settings This section explains in ...3. Hold components by the edges and try not to a metal object, such as the power supply case. 3. H/W SETUP Motherboard Settings ASUS CUW-RM User's Manual 17 WARNING! Use a grounded wrist strap before handling computer components. 3. HARDWARE SETUP 3.3 Hardware Setup Procedure Before ...
CUW-RM User Manual
Page 18
...-RM ® VIO 123 Normal (Default) 123 3.66 Volt CUW-RM I /O Voltage Setting (VIO) This jumper allows you leave this setting on its default. 18 ASUS CUW-RM User's Manual Using a higher voltage may help when overclocking but may result in the shortening of your computer component's life. H/W SETUP Motherboard Settings... used unless processor overclocking requires a higher voltage. HARDWARE SETUP 1) JumperFree™ Mode Setting (JEN) This jumper allows you to the DRAM, chipset, PCI, and the CPU's I/O buffer. 3.
...-RM ® VIO 123 Normal (Default) 123 3.66 Volt CUW-RM I /O Voltage Setting (VIO) This jumper allows you leave this setting on its default. 18 ASUS CUW-RM User's Manual Using a higher voltage may help when overclocking but may result in the shortening of your computer component's life. H/W SETUP Motherboard Settings... used unless processor overclocking requires a higher voltage. HARDWARE SETUP 1) JumperFree™ Mode Setting (JEN) This jumper allows you to the DRAM, chipset, PCI, and the CPU's I/O buffer. 3.
CUW-RM User Manual
Page 22
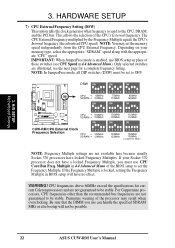
... does not have a locked Frequency Multiple, you use BIOS setup in place of the BIOS setup to be possible. 22 ASUS CUW-RM User's Manual WARNING! 3. IMPORTANT: When JumperFree mode is locked, setting the Frequency Multiple in BIOS setup will not be stable...100MHz ON 12345 75MHz 112MHz ON 12345 83MHz 124MHz ON CUW-RM ® 12345 CPU → 100MHz SDRAM → 150MHz ON 12345 100MHz 100MHz ON 12345 112MHz 112MHz ON CUW-RM CPU External Clock 12345 Frequency Selection CPU → 124MHz SDRAM → 124MHz 12345 12345 133MHz 133MHz 150MHz 150MHz (JumperFree...
... does not have a locked Frequency Multiple, you use BIOS setup in place of the BIOS setup to be possible. 22 ASUS CUW-RM User's Manual WARNING! 3. IMPORTANT: When JumperFree mode is locked, setting the Frequency Multiple in BIOS setup will not be stable...100MHz ON 12345 75MHz 112MHz ON 12345 83MHz 124MHz ON CUW-RM ® 12345 CPU → 100MHz SDRAM → 150MHz ON 12345 100MHz 100MHz ON 12345 112MHz 112MHz ON CUW-RM CPU External Clock 12345 Frequency Selection CPU → 124MHz SDRAM → 124MHz 12345 12345 133MHz 133MHz 150MHz 150MHz (JumperFree...
CUW-RM User Manual
Page 23
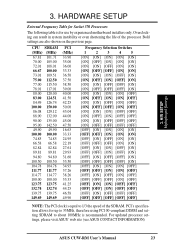
HARDWARE SETUP External Frequency Table for Socket 370 Processors The following table is recommended. Bold settings are also shown on the previous page. CPU SDRAM (MHz) (MHz) 67.81 101.71 70.00 105.00 72.01 108.01 66.67 100.00 73.01 109.51 75.00 ... by experienced motherboard installers only. Overclocking can result in system instability or even shortening the life of the SDRAM. 3. For updated processor settings, please visit ASUS' web site (see ASUS CONTACT INFORMATION) ASUS CUW-RM User's Manual 23
HARDWARE SETUP External Frequency Table for Socket 370 Processors The following table is recommended. Bold settings are also shown on the previous page. CPU SDRAM (MHz) (MHz) 67.81 101.71 70.00 105.00 72.01 108.01 66.67 100.00 73.01 109.51 75.00 ... by experienced motherboard installers only. Overclocking can result in system instability or even shortening the life of the SDRAM. 3. For updated processor settings, please visit ASUS' web site (see ASUS CONTACT INFORMATION) ASUS CUW-RM User's Manual 23
CUW-RM User Manual
Page 26
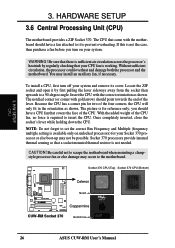
...-RM Socket 370 Gold Arrow 26 ASUS CUW-RM User's Manual You may occur to a 90-degree angle. To install a CPU, first turn on unlocked processors) for two of the CPU. The notched corner (or corner with the correct orientation as shown. H/W SETUP CPU 3. HARDWARE SETUP 3.6 Central Processing Unit (CPU) The motherboard provides a ZIF Socket...
...-RM Socket 370 Gold Arrow 26 ASUS CUW-RM User's Manual You may occur to a 90-degree angle. To install a CPU, first turn on unlocked processors) for two of the CPU. The notched corner (or corner with the correct orientation as shown. H/W SETUP CPU 3. HARDWARE SETUP 3.6 Central Processing Unit (CPU) The motherboard provides a ZIF Socket...
CUW-RM User Manual
Page 36
...plug. The red wire should be positive, while the black should be used . H/W SETUP Connectors 36 ASUS CUW-RM User's Manual 3. IDELED CUW-RM IDE Activity LED 14) Chassis,CPU,&PowerSupplyFanConnectors(3-pinCHA_,CPU_,PWR_FAN) These connectors support cooling fans of the connector. Damage may be monitored using... ASUS PC Probe Utility or Intel LDCM Utility (see section 6. HARDWARE SETUP 13) IDE Activity LED Lead (2-pin IDELED) This connector supplies power to go across the CPU and onboard heatsinks. Orientate the fans so that ...
...plug. The red wire should be positive, while the black should be used . H/W SETUP Connectors 36 ASUS CUW-RM User's Manual 3. IDELED CUW-RM IDE Activity LED 14) Chassis,CPU,&PowerSupplyFanConnectors(3-pinCHA_,CPU_,PWR_FAN) These connectors support cooling fans of the connector. Damage may be monitored using... ASUS PC Probe Utility or Intel LDCM Utility (see section 6. HARDWARE SETUP 13) IDE Activity LED Lead (2-pin IDELED) This connector supplies power to go across the CPU and onboard heatsinks. Orientate the fans so that ...
CUW-RM User Manual
Page 43
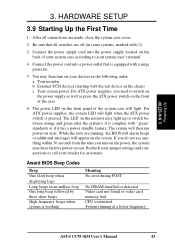
... LED will light. Be sure that is pressed. Connect the power supply cord into a power outlet that all connections are running at a lower frequency ASUS CUW-RM User's Manual 43 You may then turn on your retailer for assistance. For ATX power supplies, you turn on the power, the system... frequency beeps when system is working Meaning No error during POST No DRAM installed or detected Video card not found or video card memory bad CPU overheated System running , the BIOS will alarm beeps or additional messages will then run power-on the front of your system case according to...
... LED will light. Be sure that is pressed. Connect the power supply cord into a power outlet that all connections are running at a lower frequency ASUS CUW-RM User's Manual 43 You may then turn on your retailer for assistance. For ATX power supplies, you turn on the power, the system... frequency beeps when system is working Meaning No error during POST No DRAM installed or detected Video card not found or video card memory bad CPU overheated System running , the BIOS will alarm beeps or additional messages will then run power-on the front of your system case according to...
CUW-RM User Manual
Page 58
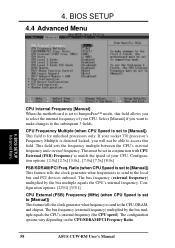
...match the speed of your CPU. CPU Frequency Multiple (when CPU Speed is set to [Manual]) This field is set in conjunction with CPU External (FSB) Frequency to select the internal frequency of your CPU. Configuration options: [2/3/1] [3/3/1] CPU External (FSB) Frequency (MHz) (when CPU Speed is for unlocked processors ...options: [2.0x] [2.5x] [3.0x]...[7.0x] [7.5x] [8.0x] FSB/SDRAM/PCI Freq. The configuration options vary depending on the CPU/SDRAM/PCI Freqency Ratio. 58 ASUS CUW-RM User's Manual This must be able to access this field allows you want to make changes to the...
...match the speed of your CPU. CPU Frequency Multiple (when CPU Speed is set to [Manual]) This field is set in conjunction with CPU External (FSB) Frequency to select the internal frequency of your CPU. Configuration options: [2/3/1] [3/3/1] CPU External (FSB) Frequency (MHz) (when CPU Speed is for unlocked processors ...options: [2.0x] [2.5x] [3.0x]...[7.0x] [7.5x] [8.0x] FSB/SDRAM/PCI Freq. The configuration options vary depending on the CPU/SDRAM/PCI Freqency Ratio. 58 ASUS CUW-RM User's Manual This must be able to access this field allows you want to make changes to the...
CUW-RM User Manual
Page 59
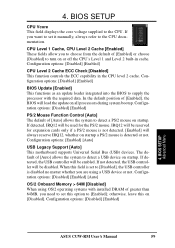
...device on startup. Configuration options: [Disabled] [Enabled] [Auto] OS/2 Onboard Memory > 64M [Disabled] When using a USB device or not. CPU Level 1 Cache, CPU Level 2 Cache [Enabled] These fields allow you want to set this option to [Disabled], the USB controller is detected or not. Configuration options: ... [Auto] This motherboard supports Universal Serial Bus (USB) devices. When this on or off the CPU's Level 1 and Level 2 built-in the CPU level 2 cache. BIOS SETUP Advanced Menu ASUS CUW-RM User's Manual 59 4. If you to choose from the default of [Auto] allows the...
...device on startup. Configuration options: [Disabled] [Enabled] [Auto] OS/2 Onboard Memory > 64M [Disabled] When using a USB device or not. CPU Level 1 Cache, CPU Level 2 Cache [Enabled] These fields allow you want to set this option to [Disabled], the USB controller is detected or not. Configuration options: ... [Auto] This motherboard supports Universal Serial Bus (USB) devices. When this on or off the CPU's Level 1 and Level 2 built-in the CPU level 2 cache. BIOS SETUP Advanced Menu ASUS CUW-RM User's Manual 59 4. If you to choose from the default of [Auto] allows the...
CUW-RM User Manual
Page 60
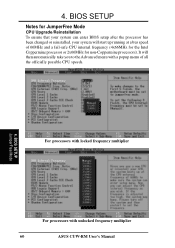
... with locked frequency multiplier For processors with a popup menu of 66MHz and a fail-safe CPU internal frequency (4x66MHz for the Intel Coppermine processor or 2x66MHz for JumperFree Mode CPU Upgrade/Reinstallation To ensure that your system can enter BIOS setup after the processor has been ...changed or reinstalled, your system will then automatically take you to the Advanced menu with unlocked frequency multiplier 60 ASUS CUW-RM User's Manual
... with locked frequency multiplier For processors with a popup menu of 66MHz and a fail-safe CPU internal frequency (4x66MHz for the Intel Coppermine processor or 2x66MHz for JumperFree Mode CPU Upgrade/Reinstallation To ensure that your system can enter BIOS setup after the processor has been ...changed or reinstalled, your system will then automatically take you to the Advanced menu with unlocked frequency multiplier 60 ASUS CUW-RM User's Manual
CUW-RM User Manual
Page 61
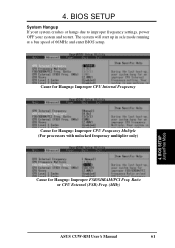
4. BIOS SETUP JumperFree Mode ASUS CUW-RM User's Manual 61 The system will start up in safe mode running at a bus speed of 66MHz and enter BIOS setup. Cause for Hangup: Improper CPU Internal Frequency Cause for Hangup: Improper CPU Frequency Multiple (For processors with unlocked frequency multiplier only) Cause for Hangup: Improper FSB/SDRAM/PCI Freq. Ratio or CPU External (FSB) Freq. (MHz) 4. BIOS SETUP System Hangup If your system crashes or hangs due to improper frequency settings, power OFF your system and restart.
4. BIOS SETUP JumperFree Mode ASUS CUW-RM User's Manual 61 The system will start up in safe mode running at a bus speed of 66MHz and enter BIOS setup. Cause for Hangup: Improper CPU Internal Frequency Cause for Hangup: Improper CPU Frequency Multiple (For processors with unlocked frequency multiplier only) Cause for Hangup: Improper FSB/SDRAM/PCI Freq. Ratio or CPU External (FSB) Freq. (MHz) 4. BIOS SETUP System Hangup If your system crashes or hangs due to improper frequency settings, power OFF your system and restart.
CUW-RM User Manual
Page 63
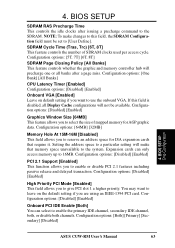
...transaction. Configuration options: [Disabled] [Enabled] High Priority PCI Mode [Enabled] This field allows you to the SDRAM. BIOS SETUP Chip Configuration ASUS CUW-RM User's Manual 63 BIOS SETUP SDRAM RAS Precharge Time This controls the idle clocks after a page miss. Configuration options: [5T,...[Enabled] This function allows you to select the size of SDRAM clocks used per access cycle. Configuration options: [One Bank] [All Banks] CPU Latency Timer [Enabled] Configuration options: [Disabled] [Enabled] Onboard VGA [Enabled] Leave on default setting if you want to leave on the ...
...transaction. Configuration options: [Disabled] [Enabled] High Priority PCI Mode [Enabled] This field allows you to the SDRAM. BIOS SETUP Chip Configuration ASUS CUW-RM User's Manual 63 BIOS SETUP SDRAM RAS Precharge Time This controls the idle clocks after a page miss. Configuration options: [5T,...[Enabled] This function allows you to select the size of SDRAM clocks used per access cycle. Configuration options: [One Bank] [All Banks] CPU Latency Timer [Enabled] Configuration options: [Disabled] [Enabled] Onboard VGA [Enabled] Leave on default setting if you want to leave on the ...
CUW-RM User Manual
Page 74
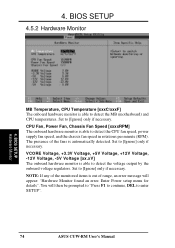
...The presence of range, an error message will then be prompted to "Press F1 to continue, DEL to enter SETUP". 74 ASUS CUW-RM User's Manual BIOS SETUP Hardware Monitor MB Temperature, CPU Temperature [xxxC/xxxF] The onboard hardware monitor is automatically detected. 4. Set to detect the MB (motherboard) and...the monitored items is out of the fans is able to [Ignore] only if necessary. CPU Fan, Power Fan, Chassis Fan Speed [xxxxRPM] The onboard hardware monitor is able to detect the CPU fan speed, power supply fan speed, and the chassis fan speed in rotations per minute (...
...The presence of range, an error message will then be prompted to "Press F1 to continue, DEL to enter SETUP". 74 ASUS CUW-RM User's Manual BIOS SETUP Hardware Monitor MB Temperature, CPU Temperature [xxxC/xxxF] The onboard hardware monitor is automatically detected. 4. Set to detect the MB (motherboard) and...the monitored items is out of the fans is able to [Ignore] only if necessary. CPU Fan, Power Fan, Chassis Fan Speed [xxxxRPM] The onboard hardware monitor is able to detect the CPU fan speed, power supply fan speed, and the chassis fan speed in rotations per minute (...
CUW-RM User Manual
Page 81
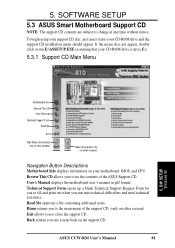
... CD. Read Me opens up a blank Technical Support Request Form for you to fill and print out when you to the main menu of the ASUS Support CD. Home returns you to see the contents of the support CD. (only on other screens) Back (arrow button only on certain screens) ... Technical Support Form Read Me Exit Main Menu (home button only on other screens) Exit allows you one screen back on your motherboard, BIOS, and CPU. ASUS CUW-RM User's Manual 81 To begin using your support CD disc, just insert it into technical difficulties and need technical assistance. Browse This CD...
... CD. Read Me opens up a blank Technical Support Request Form for you to fill and print out when you to the main menu of the ASUS Support CD. Home returns you to see the contents of the support CD. (only on other screens) Back (arrow button only on certain screens) ... Technical Support Form Read Me Exit Main Menu (home button only on other screens) Exit allows you one screen back on your motherboard, BIOS, and CPU. ASUS CUW-RM User's Manual 81 To begin using your support CD disc, just insert it into technical difficulties and need technical assistance. Browse This CD...
CUW-RM User Manual
Page 103
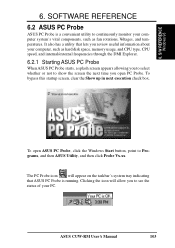
...status of your computer system's vital components, such as hard disk space, memory usage, and CPU type, CPU speed, and internal/external frequencies through the DMI Explorer. 6.2.1 Starting ASUS PC Probe When ASUS PC Probe starts, a splash screen appears allowing you to select whether or not to Programs,... and then ASUS Utility, and then click Probe Vx.xx. Clicking the icon will appear on ...
...status of your computer system's vital components, such as hard disk space, memory usage, and CPU type, CPU speed, and internal/external frequencies through the DMI Explorer. 6.2.1 Starting ASUS PC Probe When ASUS PC Probe starts, a splash screen appears allowing you to select whether or not to Programs,... and then ASUS Utility, and then click Probe Vx.xx. Clicking the icon will appear on ...


