
User Manual
Page 11
All these values are for purchasing the ASUS Desktop PC! The ports and their locations, and the chassis color vary with different models. ASUS BT6130 1-1 Read the ASUS Warranty Card before setting up your computer Illustrations are encapsulated in a stunningly futuristic and stylish system casing. Getting to know your ASUS Desktop PC. Thank you for reference only. The ASUS Desktop PC provides cutting-edge performance, uncompromised reliability, and user-centric utilities. Chapter 1 Getting started Welcome!
All these values are for purchasing the ASUS Desktop PC! The ports and their locations, and the chassis color vary with different models. ASUS BT6130 1-1 Read the ASUS Warranty Card before setting up your computer Illustrations are encapsulated in a stunningly futuristic and stylish system casing. Getting to know your ASUS Desktop PC. Thank you for reference only. The ASUS Desktop PC provides cutting-edge performance, uncompromised reliability, and user-centric utilities. Chapter 1 Getting started Welcome!

User Manual
Page 13
This port is for any USB 3.0 port when installing Windows® operating system. • Due to prevent the system from overheating. 1. ASUS BT6130 1-3 ENGLISH Rear panel 13 12 1 11 2 3 10 1 9 4 8 5 67 Do NOT cover the rear vent , and the ambient temperature is HDCP compliant allowing playback of HD ...
This port is for any USB 3.0 port when installing Windows® operating system. • Due to prevent the system from overheating. 1. ASUS BT6130 1-3 ENGLISH Rear panel 13 12 1 11 2 3 10 1 9 4 8 5 67 Do NOT cover the rear vent , and the ambient temperature is HDCP compliant allowing playback of HD ...

User Manual
Page 15
To connect an external monitor using the onboard display output ports: 1. ASUS BT6130 1-5 Using the onboard display output ports Connect your computer comes with an ASUS Graphics Card, the graphics card is set as the external monitor, keyboard, mouse, and power cord, to your computer. Plug your monitor to a power source. &#...
To connect an external monitor using the onboard display output ports: 1. ASUS BT6130 1-5 Using the onboard display output ports Connect your computer comes with an ASUS Graphics Card, the graphics card is set as the external monitor, keyboard, mouse, and power cord, to your computer. Plug your monitor to a power source. &#...

User Manual
Page 17
ASUS BT6130 1-7 Turning your computer ON To turn your computer OFF: 1. Power button 3. Turning your computer OFF To turn on/off your computer after setting up your monitor ON. 2. Turn your computer. Close all running applications. 2. Wait until the operating system loads automatically. Click to turn your computer ON: 1. Click on your computer. Press the power button on the Windows® desktop. 3. ENGLISH Turning your computer ON/OFF This section describes how to shut down the operating system.
ASUS BT6130 1-7 Turning your computer ON To turn your computer OFF: 1. Power button 3. Turning your computer OFF To turn on/off your computer after setting up your monitor ON. 2. Turn your computer. Close all running applications. 2. Wait until the operating system loads automatically. Click to turn your computer ON: 1. Click on your computer. Press the power button on the Windows® desktop. 3. ENGLISH Turning your computer ON/OFF This section describes how to shut down the operating system.

User Manual
Page 19
... any information. Key in configuring the basic settings of your Windows® 7 operating system. Turn your language. The system loads the new settings and restarts. ASUS BT6130 2-1 You may also click Next to guide you in the necessary information to set up your computer for the first time: 1. Click Next. 3. Click Next...
... any information. Key in configuring the basic settings of your Windows® 7 operating system. Turn your language. The system loads the new settings and restarts. ASUS BT6130 2-1 You may also click Next to guide you in the necessary information to set up your computer for the first time: 1. Click Next. 3. Click Next...

User Manual
Page 21
... icon. 2. Unpinning programs from the Start menu To unpin programs from the taskbar: 1. From the Windows® taskbar, click the Start icon to Start menu. ASUS BT6130 2-3 You may pin items on the jumplist such as favorite websites, often-visited folders or drives, or recently played media files. ENGLISH Pinning items on...
... icon. 2. Unpinning programs from the Start menu To unpin programs from the taskbar: 1. From the Windows® taskbar, click the Start icon to Start menu. ASUS BT6130 2-3 You may pin items on the jumplist such as favorite websites, often-visited folders or drives, or recently played media files. ENGLISH Pinning items on...

User Manual
Page 23
...; Explorer allows you want . From the Windows® taskbar, click the Start icon 2. From the navigation pane, select the location of the drive or folder. ASUS BT6130 2-5 Click Computer to display the dropdown list. 3. Customizing the file/folder view To customize the file/folder view: 1. From the Arrange by field, click to...
...; Explorer allows you want . From the Windows® taskbar, click the Start icon 2. From the navigation pane, select the location of the drive or folder. ASUS BT6130 2-5 Click Computer to display the dropdown list. 3. Customizing the file/folder view To customize the file/folder view: 1. From the Arrange by field, click to...

User Manual
Page 25
...® Update: 1. From the Windows® taskbar, click the Start icon to enhance the security and performance of your computer. Select All Programs > Windows Update. 3. ASUS BT6130 2-7 From Windows 7 Action Center, click the task that you want to complete the process. For more details, refer to do . From the Windows Update screen...
...® Update: 1. From the Windows® taskbar, click the Start icon to enhance the security and performance of your computer. Select All Programs > Windows Update. 3. ASUS BT6130 2-7 From Windows 7 Action Center, click the task that you want to complete the process. For more details, refer to do . From the Windows Update screen...

User Manual
Page 27
...: 1. It is pre-installed on your computer. Carefully read the license terms. Click Agree & Activate. 3. Click Finish to obtain the latest Windows® online help. ASUS BT6130 2-9 To launch Windows® Help and Support, click > Help and Support. It is a third-party anti-virus software protecting your location. Getting Windows® Help...
...: 1. It is pre-installed on your computer. Carefully read the license terms. Click Agree & Activate. 3. Click Finish to obtain the latest Windows® online help. ASUS BT6130 2-9 To launch Windows® Help and Support, click > Help and Support. It is a third-party anti-virus software protecting your location. Getting Windows® Help...

User Manual
Page 29
The USB ports allow you to connect USB devices such as storage devices. Front panel Rear panel ASUS BT6130 3-1 To connect a USB storage device: • Insert the USB storage device to your computer Connecting a USB storage device This desktop PC provides USB 2.0/1.1 ports on both the front and rear panels. Chapter 3 Connecting devices to your computer.
The USB ports allow you to connect USB devices such as storage devices. Front panel Rear panel ASUS BT6130 3-1 To connect a USB storage device: • Insert the USB storage device to your computer Connecting a USB storage device This desktop PC provides USB 2.0/1.1 ports on both the front and rear panels. Chapter 3 Connecting devices to your computer.

User Manual
Page 31
ENGLISH Connecting 2-channel Speakers Connecting 4-channel Speakers ASUS BT6130 3-3
ENGLISH Connecting 2-channel Speakers Connecting 4-channel Speakers ASUS BT6130 3-3

User Manual
Page 33
ASUS BT6130 4-1 Eye level to the top of the monitor screen Foot rest 90˚ angles To maintain the proper posture: • Position your computer chair to ...
ASUS BT6130 4-1 Eye level to the top of the monitor screen Foot rest 90˚ angles To maintain the proper posture: • Position your computer chair to ...

User Manual
Page 35
Configure the necessary Internet connection settings. ASUS BT6130 5-1 Connect one end of your computer and the other end to the documentation that came with your DSL/cable modem. Turn on the rear panel ...
Configure the necessary Internet connection settings. ASUS BT6130 5-1 Connect one end of your computer and the other end to the documentation that came with your DSL/cable modem. Turn on the rear panel ...
User Manual
Page 37
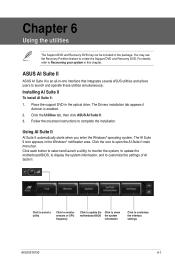
... II To install AI Suite II: 1. Place the support DVD in the Windows® notification area. Click the Utilities tab, then click ASUS AI Suite II. 3. Follow the onscreen instructions to customize the settings of AI Suite II. Click each button to select and launch a utility...launch and operate these utilities simultaneously. The AI Suite II icon appears in the optical drive. ASUS AI Suite II ASUS AI Suite II is enabled. 2. Click the icon to customize the interface settings ASUS BT6130 6-1 For details, refer to Recovering your system in the package. Click to select a ...
... II To install AI Suite II: 1. Place the support DVD in the Windows® notification area. Click the Utilities tab, then click ASUS AI Suite II. 3. Follow the onscreen instructions to customize the settings of AI Suite II. Click each button to select and launch a utility...launch and operate these utilities simultaneously. The AI Suite II icon appears in the optical drive. ASUS AI Suite II ASUS AI Suite II is enabled. 2. Click the icon to customize the interface settings ASUS BT6130 6-1 For details, refer to Recovering your system in the package. Click to select a ...

User Manual
Page 39
..., among others. Saves your configuration Loads your saved configuration Loads the default threshold values for each sensor Applies your computer is a utility that your changes ASUS BT6130 6-3
..., among others. Saves your configuration Loads your saved configuration Loads the default threshold values for each sensor Applies your computer is a utility that your changes ASUS BT6130 6-3

User Manual
Page 41
...file or view the BIOS version information. Click Yes if you to enable the BIOS downgradable and Auto-BIOS backup functions. 3. ASUS BT6130 6-5 Launching CPU Frequency The CPU Frequency panel �d�is the image appearing on screen during the Power‑On Self-...65533;O��t�h�e�r�w��i�s�e�,��c�li�c�k� No. 5. From the ASUS Update screen, select Update BIOS from the BIOS server. 4. When no updated version is detected, a message is displayed informing you ...
...file or view the BIOS version information. Click Yes if you to enable the BIOS downgradable and Auto-BIOS backup functions. 3. ASUS BT6130 6-5 Launching CPU Frequency The CPU Frequency panel �d�is the image appearing on screen during the Power‑On Self-...65533;O��t�h�e�r�w��i�s�e�,��c�li�c�k� No. 5. From the ASUS Update screen, select Update BIOS from the BIOS server. 4. When no updated version is detected, a message is displayed informing you ...

User Manual
Page 43
...the quick bar and the main window, and to launch the AI Manager either from the Windows® desktop, click Start > All Programs > ASUS > AI Manager > AI Manager 1.xx.xx. After launching the application, the AI Manager icon appears in the optical drive. The AI Manager ...: 1. If Autorun is disabled, double-click the setup.exe file from the ASUS AI Manager folder in the support DVD. 2. Click the Utilities tab, then click ASUS AI Manager. 3. ENGLISH ASUS AI Manager ASUS AI Manager is a utility which gives you quick and easy access to complete the installation. ASUS BT6130 6-7
...the quick bar and the main window, and to launch the AI Manager either from the Windows® desktop, click Start > All Programs > ASUS > AI Manager > AI Manager 1.xx.xx. After launching the application, the AI Manager icon appears in the optical drive. The AI Manager ...: 1. If Autorun is disabled, double-click the setup.exe file from the ASUS AI Manager folder in the support DVD. 2. Click the Utilities tab, then click ASUS AI Manager. 3. ENGLISH ASUS AI Manager ASUS AI Manager is a utility which gives you quick and easy access to complete the installation. ASUS BT6130 6-7

User Manual
Page 45
... utilities installed on your data files (such as network settings). About the Recovery Partition The Recovery Partition is created at the factory. ASUS BT6130 6-9 Information Click the tab on the file location window. Select a device, then click the left/right button to see the detailed...your Desktop PC at the factory and cannot be restored if deleted. ENGLISH AI Booting AI Booting allows you want to add to the ASUS website, technical support website, download support website, or contact information. The Recovery Partition is a reserved space on your system, motherboard,...
... utilities installed on your data files (such as network settings). About the Recovery Partition The Recovery Partition is created at the factory. ASUS BT6130 6-9 Information Click the tab on the file location window. Select a device, then click the left/right button to see the detailed...your Desktop PC at the factory and cannot be restored if deleted. ENGLISH AI Booting AI Booting allows you want to add to the ASUS website, technical support website, download support website, or contact information. The Recovery Partition is a reserved space on your system, motherboard,...

User Manual
Page 47
... the Number Lock key to turn it on. ? I cannot connect to a wireless network using the ASUS WLAN Card (on selected models only)? • Ensure that are not working. ASUS BT6130 7-1 Chapter 7 Troubleshooting Troubleshooting This chapter presents some problems you want to connect to. • Connect... the external antennas (optional) to the antenna connectors on the ASUS WLAN Card and place the antennas on the top...
... the Number Lock key to turn it on. ? I cannot connect to a wireless network using the ASUS WLAN Card (on selected models only)? • Ensure that are not working. ASUS BT6130 7-1 Chapter 7 Troubleshooting Troubleshooting This chapter presents some problems you want to connect to. • Connect... the external antennas (optional) to the antenna connectors on the ASUS WLAN Card and place the antennas on the top...

User Manual
Page 49
... working properly. ? To change the screen resolution: 1. Do any of your monitor and your Windows desktop. To enable the system sounds, click from the menu. ASUS BT6130 7-3 The DVD drive eject button is scratched or damaged. ? ENGLISH ? Adjust the screen resolution to fit your speakers to another computer to adjust the volume...
... working properly. ? To change the screen resolution: 1. Do any of your monitor and your Windows desktop. To enable the system sounds, click from the menu. ASUS BT6130 7-3 The DVD drive eject button is scratched or damaged. ? ENGLISH ? Adjust the screen resolution to fit your speakers to another computer to adjust the volume...


