BM6AE_BM1AE_BP1AE User's Manual
Page 2
...not be registered trademarks or copyrights of the product is repaired, modified or altered, unless such repair, modification of ASUSTeK Computer Inc. ("ASUS"). IN NO EVENT SHALL ASUS, ITS DIRECTORS, OFFICERS, EMPLOYEES OR AGENTS BE LIABLE FOR ANY INDIRECT, SPECIAL, INCIDENTAL, OR CONSEQUENTIAL DAMAGES (INCLUDING DAMAGES ...DAMAGES ARISING FROM ANY DEFECT OR ERROR IN THIS MANUAL OR PRODUCT. E8100 First Edition January 2013 Copyright © 2013 ASUSTeK Computer Inc. ASUS PROVIDES THIS MANUAL "AS IS" WITHOUT WARRANTY OF ANY KIND, EITHER EXPRESS OR IMPLIED, INCLUDING BUT NOT LIMITED TO THE ...
...not be registered trademarks or copyrights of the product is repaired, modified or altered, unless such repair, modification of ASUSTeK Computer Inc. ("ASUS"). IN NO EVENT SHALL ASUS, ITS DIRECTORS, OFFICERS, EMPLOYEES OR AGENTS BE LIABLE FOR ANY INDIRECT, SPECIAL, INCIDENTAL, OR CONSEQUENTIAL DAMAGES (INCLUDING DAMAGES ...DAMAGES ARISING FROM ANY DEFECT OR ERROR IN THIS MANUAL OR PRODUCT. E8100 First Edition January 2013 Copyright © 2013 ASUSTeK Computer Inc. ASUS PROVIDES THIS MANUAL "AS IS" WITHOUT WARRANTY OF ANY KIND, EITHER EXPRESS OR IMPLIED, INCLUDING BUT NOT LIMITED TO THE ...

BM6AE_BM1AE_BP1AE User's Manual
Page 3
... this guide 9 Where to find more information 9 Package contents 10 Chapter 1: Getting started Welcome!...11 Getting to know your computer 11 Setting up your computer 23 Turning your computer ON/OFF 28 Chapter 2: Using Windows® 7 Starting for the first time 29 Using Windows® 7 desktop 30 ...Managing your files and folders 32 Restoring your system settings 34 Protecting your computer 35 Getting Windows® Help and Support 36 Chapter 3: Using Windows® 8 Starting for the first time 37 Using the Windows®...
... this guide 9 Where to find more information 9 Package contents 10 Chapter 1: Getting started Welcome!...11 Getting to know your computer 11 Setting up your computer 23 Turning your computer ON/OFF 28 Chapter 2: Using Windows® 7 Starting for the first time 29 Using Windows® 7 desktop 30 ...Managing your files and folders 32 Restoring your system settings 34 Protecting your computer 35 Getting Windows® Help and Support 36 Chapter 3: Using Windows® 8 Starting for the first time 37 Using the Windows®...

BM6AE_BM1AE_BP1AE User's Manual
Page 11
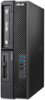
Chapter 1 Getting started Welcome! The ports and their locations, and the chassis color vary with different models. All these values are for purchasing the ASUS Desktop PC! The ASUS Desktop PC provides cutting-edge performance, uncompromised reliability, and user-centric utilities. ASUS BM6AE(MD780), BM1AE, and BP1AE(SD780) 11 Thank you for reference only. Getting to know your ASUS Desktop PC. Read the ASUS Warranty Card before setting up your computer Illustrations are encapsulated in a stunningly futuristic and stylish system casing.
Chapter 1 Getting started Welcome! The ports and their locations, and the chassis color vary with different models. All these values are for purchasing the ASUS Desktop PC! The ASUS Desktop PC provides cutting-edge performance, uncompromised reliability, and user-centric utilities. ASUS BM6AE(MD780), BM1AE, and BP1AE(SD780) 11 Thank you for reference only. Getting to know your ASUS Desktop PC. Read the ASUS Warranty Card before setting up your computer Illustrations are encapsulated in a stunningly futuristic and stylish system casing.
BM6AE_BM1AE_BP1AE User's Manual
Page 12
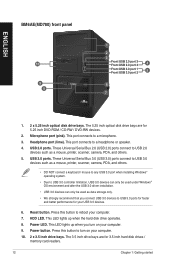
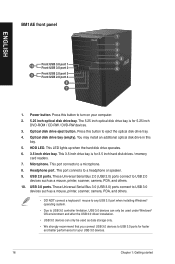
...; Due to reboot your USB 3.0 devices. 6. Power LED. These Universal Serial Bus 2.0 (USB 2.0) ports connect to turn on your computer. 9. This LED lights up when the hard disk drive operates. 8. Power button. This port connects to a headphone or speaker. 4. ...Press this button to USB 2.0 devices such as data storage only. • We strongly recommend that you turn on your computer. 10. 2 x 3.5 inch drive bays. ENGLISH BM6AE(MD780) front panel 10 9 8 1 2 3 Front USB 2.0 port 3 Front USB 2.0 port 4 4 Front USB 3.0 port 1 Front...
...; Due to reboot your USB 3.0 devices. 6. Power LED. These Universal Serial Bus 2.0 (USB 2.0) ports connect to turn on your computer. 9. This LED lights up when the hard disk drive operates. 8. Power button. This port connects to a headphone or speaker. 4. ...Press this button to USB 2.0 devices such as data storage only. • We strongly recommend that you turn on your computer. 10. 2 x 3.5 inch drive bays. ENGLISH BM6AE(MD780) front panel 10 9 8 1 2 3 Front USB 2.0 port 3 Front USB 2.0 port 4 4 Front USB 3.0 port 1 Front...
BM6AE_BM1AE_BP1AE User's Manual
Page 15
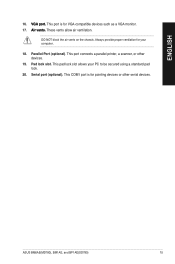
... monitor. 17. ��A��ir��v�e�n�t�s�. ASUS BM6AE(MD780), BM1AE, and BP1AE(SD780) 15 This port connects a parallel printer, a scanner, or other serial devices. This pad lock slot allows your computer. 18. DO NOT block the air vents on the chassis. Always provide proper ventilation...
... monitor. 17. ��A��ir��v�e�n�t�s�. ASUS BM6AE(MD780), BM1AE, and BP1AE(SD780) 15 This port connects a parallel printer, a scanner, or other serial devices. This pad lock slot allows your computer. 18. DO NOT block the air vents on the chassis. Always provide proper ventilation...
BM6AE_BM1AE_BP1AE User's Manual
Page 16
.... HDD LED. Microphone. This port connects to a microphone. 8. These Universal Serial Bus 3.0 (USB 3.0) ports connect to USB 3.0 ports for faster and better performance for your computer. 2. 5.25 inch optical disk drive bay. Power button. This 3.5 inch drive bay is for 3.5 inch hard disk drives / memory card readers. 7. These Universal Serial Bus...
.... HDD LED. Microphone. This port connects to a microphone. 8. These Universal Serial Bus 3.0 (USB 3.0) ports connect to USB 3.0 ports for faster and better performance for your computer. 2. 5.25 inch optical disk drive bay. Power button. This 3.5 inch drive bay is for 3.5 inch hard disk drives / memory card readers. 7. These Universal Serial Bus...

BM6AE_BM1AE_BP1AE User's Manual
Page 19
... monitor. 17. ��A��ir��v�e�n�t�s�. Pad lock slot. This pad lock slot allows your computer. 18. ASUS BM6AE(MD780), BM1AE, and BP1AE(SD780) 19 These Universal Serial Bus 2.0 (USB 2.0) ports connect to be secured using a standard pad lock. 20. The Kensington® lock slot...
... monitor. 17. ��A��ir��v�e�n�t�s�. Pad lock slot. This pad lock slot allows your computer. 18. ASUS BM6AE(MD780), BM1AE, and BP1AE(SD780) 19 These Universal Serial Bus 2.0 (USB 2.0) ports connect to be secured using a standard pad lock. 20. The Kensington® lock slot...
BM6AE_BM1AE_BP1AE User's Manual
Page 20
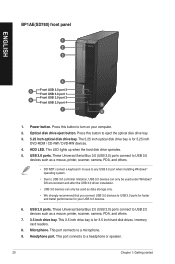
...ROM / CD-RW / DVD-RW devices.� 4. HDD LED. Press this button to USB 3.0 ports for faster and better performance for your computer. 2. This LED lights up when the hard disk drive operates. 5. Microphone. This port connects to eject the optical disk drive tray. 3. ...5.25 inch optical disk drive bay. ENGLISH BP1AE(SD780) front panel 1 2 3 4 5 Front USB 3.0 port 2 Front USB 3.0 port 1 6 Front USB 2.0 port 3 Front USB 2.0 port 4 9 7 8 1. Optical disk ...
...ROM / CD-RW / DVD-RW devices.� 4. HDD LED. Press this button to USB 3.0 ports for faster and better performance for your computer. 2. This LED lights up when the hard disk drive operates. 5. Microphone. This port connects to eject the optical disk drive tray. 3. ...5.25 inch optical disk drive bay. ENGLISH BP1AE(SD780) front panel 1 2 3 4 5 Front USB 3.0 port 2 Front USB 3.0 port 1 6 Front USB 2.0 port 3 Front USB 2.0 port 4 9 7 8 1. Optical disk ...
BM6AE_BM1AE_BP1AE User's Manual
Page 22
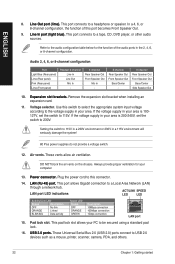
...;�r�t�(�li�g�h�t��b�l�u�e�)�. Voltage selector. ENGLISH 8. ���L��in your computer. 13. ��P�o��w�e�r��c�o�n�n�e�c�t�o�r�. This port allows Gigabit connection to...
...;�r�t�(�li�g�h�t��b�l�u�e�)�. Voltage selector. ENGLISH 8. ���L��in your computer. 13. ��P�o��w�e�r��c�o�n�n�e�c�t�o�r�. This port allows Gigabit connection to...
BM6AE_BM1AE_BP1AE User's Manual
Page 23
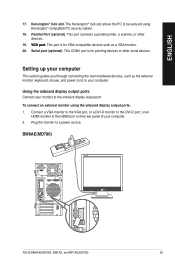
... pointing devices or other devices. 19. ��V�G��A�p��o�rt�. BM6AE(MD780) ASUS BM6AE(MD780), BM1AE, and BP1AE(SD780) 23 Parallel Port (optional). Using the onboard display output ports Connect your monitor to the HDMI port on the ... monitor to the DVI-D port, or an HDMI monitor to the onboard display output port. Setting up your computer. The Kensington® lock slot allows the PC to your computer This section guides you through connecting the main hardware devices, such as a VGA monitor. 20. To connect ...
... pointing devices or other devices. 19. ��V�G��A�p��o�rt�. BM6AE(MD780) ASUS BM6AE(MD780), BM1AE, and BP1AE(SD780) 23 Parallel Port (optional). Using the onboard display output ports Connect your monitor to the HDMI port on the ... monitor to the DVI-D port, or an HDMI monitor to the onboard display output port. Setting up your computer. The Kensington® lock slot allows the PC to your computer This section guides you through connecting the main hardware devices, such as a VGA monitor. 20. To connect ...
BM6AE_BM1AE_BP1AE User's Manual
Page 24
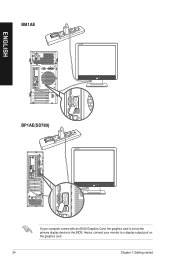
ENGLISH BM1AE BP1AE(SD780) If your monitor to a display output port on the graphics card. 24 Chapter 1: Getting started Hence, connect your computer comes with an ASUS Graphics Card, the graphics card is set as the primary display device in the BIOS.
ENGLISH BM1AE BP1AE(SD780) If your monitor to a display output port on the graphics card. 24 Chapter 1: Getting started Hence, connect your computer comes with an ASUS Graphics Card, the graphics card is set as the primary display device in the BIOS.
BM6AE_BM1AE_BP1AE User's Manual
Page 25
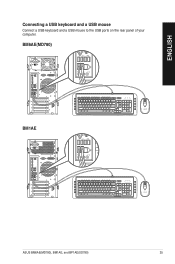
BM6AE(MD780) ` BM1AE ` ASUS BM6AE(MD780), BM1AE, and BP1AE(SD780) 25 ENGLISH Connecting a USB keyboard and a USB mouse Connect a USB keyboard and a USB mouse to the USB ports on the rear panel of your computer.
BM6AE(MD780) ` BM1AE ` ASUS BM6AE(MD780), BM1AE, and BP1AE(SD780) 25 ENGLISH Connecting a USB keyboard and a USB mouse Connect a USB keyboard and a USB mouse to the USB ports on the rear panel of your computer.
BM6AE_BM1AE_BP1AE User's Manual
Page 26
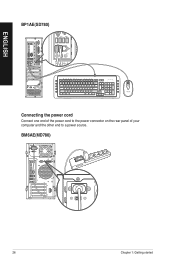
BM6AE(MD780) 26 Chapter 1: Getting started ENGLISH BP1AE(SD780) ` Connecting the power cord Connect one end of the power cord to the power connector on the rear panel of your computer and the other end to a power source.
BM6AE(MD780) 26 Chapter 1: Getting started ENGLISH BP1AE(SD780) ` Connecting the power cord Connect one end of the power cord to the power connector on the rear panel of your computer and the other end to a power source.
BM6AE_BM1AE_BP1AE User's Manual
Page 28
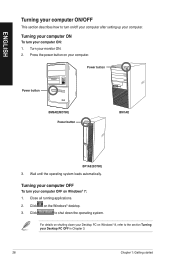
... all running applications. 2. Power button Power button BM6AE(MD780) Power button BM1AE BP1AE(SD780) 3. Turning your computer OFF To turn your computer OFF on Windows® 8, refer to the section Turning your Desktop PC OFF in Chapter 3. 28 Chapter 1: Getting ...system. Click on your computer. Press the power button on the Windows® desktop. 3. ENGLISH Turning your computer ON/OFF This section describes how to turn your computer ON: 1. Wait until the operating system loads automatically. Turning your computer ON To turn on/off your computer after setting up your ...
... all running applications. 2. Power button Power button BM6AE(MD780) Power button BM1AE BP1AE(SD780) 3. Turning your computer OFF To turn your computer OFF on Windows® 8, refer to the section Turning your Desktop PC OFF in Chapter 3. 28 Chapter 1: Getting ...system. Click on your computer. Press the power button on the Windows® desktop. 3. ENGLISH Turning your computer ON/OFF This section describes how to turn your computer ON: 1. Wait until the operating system loads automatically. Turning your computer ON To turn on/off your computer after setting up your ...
BM6AE_BM1AE_BP1AE User's Manual
Page 29
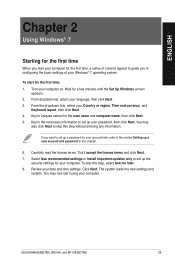
...and time settings. You may now start using your computer. To skip this step without entering any information. Review your Country or region, Time and currency, and Keyboard layout, then click Next. 4. ASUS BM6AE(MD780), BM1AE, and BP1AE(SD780) 29 To start for a few minutes until ...the Set Up Windows screen appears. 2. Wait for the first time: 1. The system loads the new settings and restarts. From dropdown list, select your computer on. ENGLISH Chapter 2 Using ...
...and time settings. You may now start using your computer. To skip this step without entering any information. Review your Country or region, Time and currency, and Keyboard layout, then click Next. 4. ASUS BM6AE(MD780), BM1AE, and BP1AE(SD780) 29 To start for a few minutes until ...the Set Up Windows screen appears. 2. Wait for the first time: 1. The system loads the new settings and restarts. From dropdown list, select your computer on. ENGLISH Chapter 2 Using ...
BM6AE_BM1AE_BP1AE User's Manual
Page 30
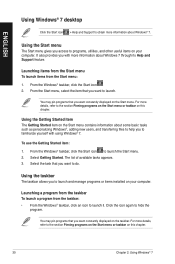
... about some basic tasks such as personalizing Windows®, adding new users, and transferring files to launch and manage programs or items installed on your computer. You may pin programs that you to help you want constantly displayed on your...
... about some basic tasks such as personalizing Windows®, adding new users, and transferring files to launch and manage programs or items installed on your computer. You may pin programs that you to help you want constantly displayed on your...

BM6AE_BM1AE_BP1AE User's Manual
Page 32
... To display an alert notification: • Click the Notification icon , then click the message to launch the Start menu. 32 Chapter 2: Using Windows® 7 Click Computer to display all the alert messages/notifications and launch the Windows® Action Center. To customize icons and notifications: 1. ENGLISH Using the notification area By...
... To display an alert notification: • Click the Notification icon , then click the message to launch the Start menu. 32 Chapter 2: Using Windows® 7 Click Computer to display all the alert messages/notifications and launch the Windows® Action Center. To customize icons and notifications: 1. ENGLISH Using the notification area By...
BM6AE_BM1AE_BP1AE User's Manual
Page 34
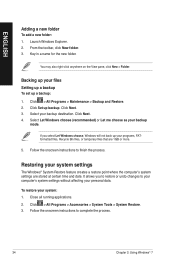
... Next. 4. To restore your system settings The Windows® System Restore feature creates a restore point where the computer's system settings are 1GB or more. 5. If you to restore or undo changes to your computer's system settings without affecting your programs, FATformatted files, Recycle Bin files, or temporary files that are stored at...
... Next. 4. To restore your system settings The Windows® System Restore feature creates a restore point where the computer's system settings are 1GB or more. 5. If you to restore or undo changes to your computer's system settings without affecting your programs, FATformatted files, Recycle Bin files, or temporary files that are stored at...
BM6AE_BM1AE_BP1AE User's Manual
Page 35
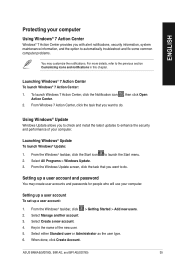
...information, system maintenance information, and the option to automatically troubleshoot and fix some common computer problems. You may create user accounts and passwords for people who will use your computer. Launching Windows® Update To launch Windows® Update: 1. From the ...: 1. From the Windows® taskbar, click the Start icon to launch the Start menu. 2. ASUS BM6AE(MD780), BM1AE, and BP1AE(SD780) 35 Select Manage another account. 3. ENGLISH Protecting your computer Using Windows® 7 Action Center Windows® 7 Action Center provides you want to do .
...information, system maintenance information, and the option to automatically troubleshoot and fix some common computer problems. You may create user accounts and passwords for people who will use your computer. Launching Windows® Update To launch Windows® Update: 1. From the ...: 1. From the Windows® taskbar, click the Start icon to launch the Start menu. 2. ASUS BM6AE(MD780), BM1AE, and BP1AE(SD780) 35 Select Manage another account. 3. ENGLISH Protecting your computer Using Windows® 7 Action Center Windows® 7 Action Center provides you want to do .

BM6AE_BM1AE_BP1AE User's Manual
Page 36
... anti-virus software protecting your location. Carefully read the license terms. Click Agree & Activate. 3. Input your e-mail address and select your computer from virus. To launch Windows® Help and Support, click > Help and Support. Activating the anti-virus software Trend Micro Internet Security...complete the activation. Select the user that you with guides and answers in using the applications in Windows® 7 platform. Key in your computer. You have a 30-day trial period after activating it . When done, click Create password. Click Finish to set up a user's ...
... anti-virus software protecting your location. Carefully read the license terms. Click Agree & Activate. 3. Input your e-mail address and select your computer from virus. To launch Windows® Help and Support, click > Help and Support. Activating the anti-virus software Trend Micro Internet Security...complete the activation. Select the user that you with guides and answers in using the applications in Windows® 7 platform. Key in your computer. You have a 30-day trial period after activating it . When done, click Create password. Click Finish to set up a user's ...


