User Manual
Page 9
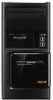
Read the ASUS Warranty Card before setting up your computer Illustrations are encapsulated in a stunningly futuristic and stylish system casing. All these values are for purchasing the ASUS Desktop PC! Getting to know your ASUS Desktop PC. Thank you for reference only. ASUS BM6630/MD510, BP6230/SD510, BM6330 1-1 Chapter 1 Getting started Welcome! The ports and their locations, and the chassis color vary with different models. The ASUS Desktop PC provides cutting-edge performance, uncompromised reliability, and user-centric utilities.
Read the ASUS Warranty Card before setting up your computer Illustrations are encapsulated in a stunningly futuristic and stylish system casing. All these values are for purchasing the ASUS Desktop PC! Getting to know your ASUS Desktop PC. Thank you for reference only. ASUS BM6630/MD510, BP6230/SD510, BM6330 1-1 Chapter 1 Getting started Welcome! The ports and their locations, and the chassis color vary with different models. The ASUS Desktop PC provides cutting-edge performance, uncompromised reliability, and user-centric utilities.
User Manual
Page 11
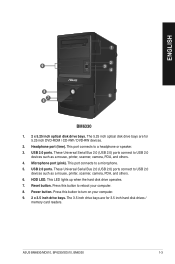
..., printer, scanner, camera, PDA, and others . 6. This port connects to a microphone. 5. These Universal Serial Bus 2.0 (USB 2.0) ports connect to reboot your computer. 9. 2 x 3.5 inch drive bays. ASUS BM6630/MD510, BP6230/SD510, BM6330 1-3 The 3.5 inch drive bays are for 3.5 inch hard disk drives / memory card readers. The 5.25 inch optical disk drive bays are...
..., printer, scanner, camera, PDA, and others . 6. This port connects to a microphone. 5. These Universal Serial Bus 2.0 (USB 2.0) ports connect to reboot your computer. 9. 2 x 3.5 inch drive bays. ASUS BM6630/MD510, BP6230/SD510, BM6330 1-3 The 3.5 inch drive bays are for 3.5 inch hard disk drives / memory card readers. The 5.25 inch optical disk drive bays are...

User Manual
Page 13
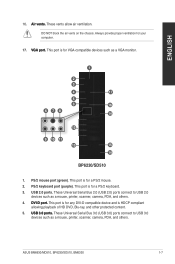
...connect to �r�. If the voltage supply in your area is for a PS/2 mouse. 4. If the voltage supply in your area. ASUS BM6630/MD510, BP6230/SD510, BM6330 1-5 This port is 100127V, set the switch to 230V.� Setting the switch to 115V in a 230V environment ... is for a PS/2 keyboard. 5. ENGLISH Rear panel 1 2 16 3 4 5 6 17 7 16 5 15 8 9 10 14 11 12 13 BM6630/MD510 and BM6330 1. ���P�o�w��e�r�c�o�n�n��e�c�to USB 2.0 devices such as a mouse...
...connect to �r�. If the voltage supply in your area is for a PS/2 mouse. 4. If the voltage supply in your area. ASUS BM6630/MD510, BP6230/SD510, BM6330 1-5 This port is 100127V, set the switch to 230V.� Setting the switch to 115V in a 230V environment ... is for a PS/2 keyboard. 5. ENGLISH Rear panel 1 2 16 3 4 5 6 17 7 16 5 15 8 9 10 14 11 12 13 BM6630/MD510 and BM6330 1. ���P�o�w��e�r�c�o�n�n��e�c�to USB 2.0 devices such as a mouse...
User Manual
Page 15
... for your computer. 17. � V�G��A��p�o�r�t�. These vents allow air ventilation. PS/2 mouse port (green). USB 2.0 ports. ASUS BM6630/MD510, BP6230/SD510, BM6330 1-7
... for your computer. 17. � V�G��A��p�o�r�t�. These vents allow air ventilation. PS/2 mouse port (green). USB 2.0 ports. ASUS BM6630/MD510, BP6230/SD510, BM6330 1-7

User Manual
Page 17
ASUS BM6630/MD510, BP6230/SD510, BM6330 1-9 ENGLISH 16. ��L�A�N��(R�J�-�4��5�)�p��o�r�t�. This ...
ASUS BM6630/MD510, BP6230/SD510, BM6330 1-9 ENGLISH 16. ��L�A�N��(R�J�-�4��5�)�p��o�r�t�. This ...

User Manual
Page 19
Hence, connect your monitor to a display output port on the graphics card. • To connect multiple external monitors to Connecting multiple external monitors in the BIOS. BP6230/SD510 ENGLISH • If your computer, refer to your computer comes with an ASUS Graphics Card, the graphics card is set as the primary display device in Chapter 3 of this user manual for details. ASUS BM6630/MD510, BP6230/SD510, BM6330 1-11
Hence, connect your monitor to a display output port on the graphics card. • To connect multiple external monitors to Connecting multiple external monitors in the BIOS. BP6230/SD510 ENGLISH • If your computer, refer to your computer comes with an ASUS Graphics Card, the graphics card is set as the primary display device in Chapter 3 of this user manual for details. ASUS BM6630/MD510, BP6230/SD510, BM6330 1-11
User Manual
Page 21
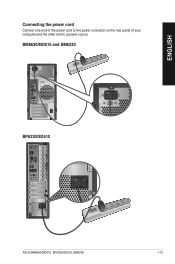
BM6630/MD510 and BM6330 BP6230/SD510 ASUS BM6630/MD510, BP6230/SD510, BM6330 1-13 ENGLISH Connecting the power cord Connect one end of the power cord to the power connector on the rear panel of your computer and the other end to a power source.
BM6630/MD510 and BM6330 BP6230/SD510 ASUS BM6630/MD510, BP6230/SD510, BM6330 1-13 ENGLISH Connecting the power cord Connect one end of the power cord to the power connector on the rear panel of your computer and the other end to a power source.
User Manual
Page 23
..., a series of your Windows® 7 operating system. From dropdown list, select your computer on. Review your Country or region, Time and currency, and Keyboard layout. ASUS BM6630/MD510, BP6230/SD510, BM6330 2-1 Click Next. 4. Key in configuring the basic settings of screens appear to guide you want to set up your computer. Click...
..., a series of your Windows® 7 operating system. From dropdown list, select your computer on. Review your Country or region, Time and currency, and Keyboard layout. ASUS BM6630/MD510, BP6230/SD510, BM6330 2-1 Click Next. 4. Key in configuring the basic settings of screens appear to guide you want to set up your computer. Click...

User Manual
Page 25
... such as favorite websites, often-visited folders or drives, or recently played media files. Unpinning programs from the taskbar To unpin programs from the jumplist: 1. ASUS BM6630/MD510, BP6230/SD510, BM6330 2-3 Unpinning items from the jumplist To unpin items from the taskbar: 1. Right-click the item that you want to pin, then...
... such as favorite websites, often-visited folders or drives, or recently played media files. Unpinning programs from the taskbar To unpin programs from the jumplist: 1. ASUS BM6630/MD510, BP6230/SD510, BM6330 2-3 Unpinning items from the jumplist To unpin items from the taskbar: 1. Right-click the item that you want to pin, then...
User Manual
Page 27
... files and folders To explore files and folders: 1. Launch Windows Explorer. 2. Customizing the file/folder view To customize the file/folder view: 1. Launch Windows Explorer. 2. ASUS BM6630/MD510, BP6230/SD510, BM6330 2-5 You may also right-click anywhere on the View pane, click View, and select the view type that you to view...
... files and folders To explore files and folders: 1. Launch Windows Explorer. 2. Customizing the file/folder view To customize the file/folder view: 1. Launch Windows Explorer. 2. ASUS BM6630/MD510, BP6230/SD510, BM6330 2-5 You may also right-click anywhere on the View pane, click View, and select the view type that you to view...

User Manual
Page 29
... some common computer problems. You may customize the notifications. ENGLISH Restoring your personal data. From the Windows® taskbar, click the Start icon to do . ASUS BM6630/MD510, BP6230/SD510, BM6330 2-7 To restore your system: 1. Launching Windows® 7 Action Center To launch Windows® 7 Action Center: 1. From Windows 7 Action Center, click the...
... some common computer problems. You may customize the notifications. ENGLISH Restoring your personal data. From the Windows® taskbar, click the Start icon to do . ASUS BM6630/MD510, BP6230/SD510, BM6330 2-7 To restore your system: 1. Launching Windows® 7 Action Center To launch Windows® 7 Action Center: 1. From Windows 7 Action Center, click the...
User Manual
Page 31
... Security: 1. Run the Trend Micro Internet Security application. 2. Click Next. 4. Ensure that you with guides and answers in using the applications in Windows® 7 platform. ASUS BM6630/MD510, BP6230/SD510, BM6330 2-9 You have a 30-day trial period after activating it. Input your e-mail address and select your computer. Click Finish to obtain...
... Security: 1. Run the Trend Micro Internet Security application. 2. Click Next. 4. Ensure that you with guides and answers in using the applications in Windows® 7 platform. ASUS BM6630/MD510, BP6230/SD510, BM6330 2-9 You have a 30-day trial period after activating it. Input your e-mail address and select your computer. Click Finish to obtain...
User Manual
Page 33
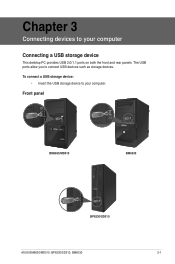
Chapter 3 Connecting devices to connect USB devices such as storage devices. Front panel BM6630/MD510 BM6330 BP6230/SD510 ASUS BM6630/MD510, BP6230/SD510, BM6330 3-1 The USB ports allow you to your computer. To connect a USB storage device: • Insert the USB storage device to your computer Connecting a USB storage device This desktop PC provides USB 2.0/1.1 ports on both the front and rear panels.
Chapter 3 Connecting devices to connect USB devices such as storage devices. Front panel BM6630/MD510 BM6330 BP6230/SD510 ASUS BM6630/MD510, BP6230/SD510, BM6330 3-1 The USB ports allow you to your computer. To connect a USB storage device: • Insert the USB storage device to your computer Connecting a USB storage device This desktop PC provides USB 2.0/1.1 ports on both the front and rear panels.
User Manual
Page 37
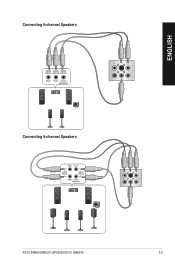
ENGLISH Connecting 6-channel Speakers Connecting 8-channel Speakers ASUS BM6630/MD510, BP6230/SD510, BM6330 3-5
ENGLISH Connecting 6-channel Speakers Connecting 8-channel Speakers ASUS BM6630/MD510, BP6230/SD510, BM6330 3-5
User Manual
Page 39
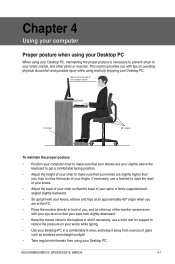
... of your knees. • Adjust the back of your chair so that the base of your spine is necessary to prevent strain to your thighs. ASUS BM6630/MD510, BP6230/SD510, BM6330 4-1 Chapter 4 Using your computer Proper posture when using your Desktop PC When using your Desktop PC, maintaining the proper posture is...
... of your knees. • Adjust the back of your chair so that the base of your spine is necessary to prevent strain to your thighs. ASUS BM6630/MD510, BP6230/SD510, BM6330 4-1 Chapter 4 Using your computer Proper posture when using your Desktop PC When using your Desktop PC, maintaining the proper posture is...
User Manual
Page 41
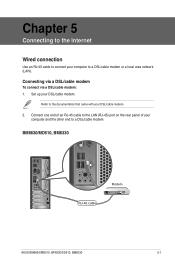
Connecting via a DSL/cable modem To connect via a DSL/cable modem: 1. Refer to a DSL/cable modem. Set up your computer to a DSL/cable modem or a local area network (LAN). Connect one end of an RJ-45 cable to the LAN (RJ-45) port on the rear panel of your computer and the other end to the documentation that came with your DSL/cable modem. 2. Chapter 5 Connecting to the Internet Wired connection Use an RJ-45 cable to connect your DSL/cable modem. BM6630/MD510, BM6330 Modem RJ-45 cable ASUS BM6630/MD510, BP6230/SD510, BM6330 5-1
Connecting via a DSL/cable modem To connect via a DSL/cable modem: 1. Refer to a DSL/cable modem. Set up your computer to a DSL/cable modem or a local area network (LAN). Connect one end of an RJ-45 cable to the LAN (RJ-45) port on the rear panel of your computer and the other end to the documentation that came with your DSL/cable modem. 2. Chapter 5 Connecting to the Internet Wired connection Use an RJ-45 cable to connect your DSL/cable modem. BM6630/MD510, BM6330 Modem RJ-45 cable ASUS BM6630/MD510, BP6230/SD510, BM6330 5-1
User Manual
Page 43
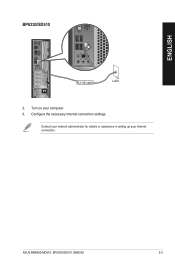
Configure the necessary Internet connection settings. Contact your network administrator for details or assistance in setting up your computer. 3. ASUS BM6630/MD510, BP6230/SD510, BM6330 5-3 Turn on your Internet connection. ENGLISH BP6230/SD510 RJ-45 cable LAN 2.
Configure the necessary Internet connection settings. Contact your network administrator for details or assistance in setting up your computer. 3. ASUS BM6630/MD510, BP6230/SD510, BM6330 5-3 Turn on your Internet connection. ENGLISH BP6230/SD510 RJ-45 cable LAN 2.
User Manual
Page 45
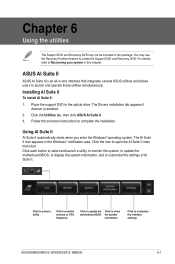
...6 Using the utilities The Support DVD and Recovery DVD may use the Recovery Partition feature to launch and operate these utilities simultaneously. ASUS AI Suite II ASUS AI Suite II is enabled. 2. Installing AI Suite II To install AI Suite II: 1. Click the icon to complete the ... launch a utility, to monitor the system, to update the motherboard BIOS, to display the system information, and to customize the interface settings ASUS BM6630/MD510, BP6230/SD510, BM6330 6-1 For details, refer to Recovering your system in the package. The AI Suite II icon appears in the optical...
...6 Using the utilities The Support DVD and Recovery DVD may use the Recovery Partition feature to launch and operate these utilities simultaneously. ASUS AI Suite II ASUS AI Suite II is enabled. 2. Installing AI Suite II To install AI Suite II: 1. Click the icon to complete the ... launch a utility, to monitor the system, to update the motherboard BIOS, to display the system information, and to customize the interface settings ASUS BM6630/MD510, BP6230/SD510, BM6330 6-1 For details, refer to Recovering your system in the package. The AI Suite II icon appears in the optical...
User Manual
Page 47
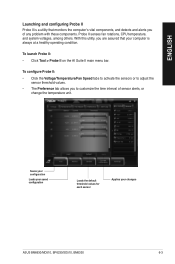
... II main menu bar. Probe II senses fan rotations, CPU temperature, and system voltages, among others. With this utility, you are assured that your changes ASUS BM6630/MD510, BP6230/SD510, BM6330 6-3 To configure Probe II: • Click the Voltage/Temperature/Fan Speed tabs to activate the sensors or to adjust the sensor...
... II main menu bar. Probe II senses fan rotations, CPU temperature, and system voltages, among others. With this utility, you are assured that your changes ASUS BM6630/MD510, BP6230/SD510, BM6330 6-3 To configure Probe II: • Click the Voltage/Temperature/Fan Speed tabs to activate the sensors or to adjust the sensor...
User Manual
Page 49
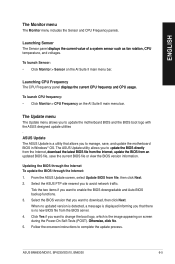
...menu allows you to enable the BIOS downgradable and Auto-BIOS backup functions. 3. From the ASUS Update screen, select Update BIOS from the BIOS server. 4. Select the ASUS FTP site nearest you want to u�p�d�a�t�e��t�h�e&#...;a�n� updated BIOS file, save , and update the motherboard BIOS in Windows® OS. ASUS Update The ASUS Update is a utility that you to avoid network traffic. ASUS BM6630/MD510, BP6230/SD510, BM6330 6-5 Launching CPU Frequency The CPU Frequency panel �d�is �p&#...
...menu allows you to enable the BIOS downgradable and Auto-BIOS backup functions. 3. From the ASUS Update screen, select Update BIOS from the BIOS server. 4. Select the ASUS FTP site nearest you want to u�p�d�a�t�e��t�h�e&#...;a�n� updated BIOS file, save , and update the motherboard BIOS in Windows® OS. ASUS Update The ASUS Update is a utility that you to avoid network traffic. ASUS BM6630/MD510, BP6230/SD510, BM6330 6-5 Launching CPU Frequency The CPU Frequency panel �d�is �p&#...


