User Manual
Page 10
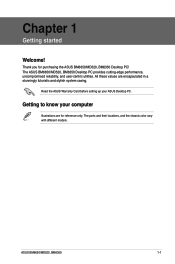
Getting to know your ASUS Desktop PC. The ports and their locations, and the chassis color vary with different models. The ASUS BM6650/MD520, BM6350 Desktop PC provides cutting-edge performance, uncompromised reliability, and user-centric utilities. Read the ASUS Warranty Card before setting up your computer Illustrations are encapsulated in a stunningly futuristic and stylish system casing. All these values are for purchasing the ASUS BM6650/MD520, BM6350 Desktop PC! ASUS BM6650/MD520, BM6350 1-1 Thank you for reference only. Chapter 1 Getting started Welcome!
Getting to know your ASUS Desktop PC. The ports and their locations, and the chassis color vary with different models. The ASUS BM6650/MD520, BM6350 Desktop PC provides cutting-edge performance, uncompromised reliability, and user-centric utilities. Read the ASUS Warranty Card before setting up your computer Illustrations are encapsulated in a stunningly futuristic and stylish system casing. All these values are for purchasing the ASUS BM6650/MD520, BM6350 Desktop PC! ASUS BM6650/MD520, BM6350 1-1 Thank you for reference only. Chapter 1 Getting started Welcome!

User Manual
Page 12
...turn on your computer. 8. This port connects to USB 2.0 devices such as a mouse, printer, scanner, camera, PDA, and others . 6. HDD LED. BM6350 1. 2 x 5.25 inch optical disk drive bays. Microphone port (pink). USB 2.0 ports. Power button. Press this button to USB 2.0 devices such as ... printer, scanner, camera, PDA, and others . 4. The 3.5 inch drive bays are for 3.5 inch hard disk drives / memory card readers. ASUS BM6650/MD520, BM6350 1-3 The 5.25 inch optical disk drive bays are for 5.25 inch DVD-ROM / CD-RW / DVD-RW devices.� 2. These Universal Serial...
...turn on your computer. 8. This port connects to USB 2.0 devices such as a mouse, printer, scanner, camera, PDA, and others . 6. HDD LED. BM6350 1. 2 x 5.25 inch optical disk drive bays. Microphone port (pink). USB 2.0 ports. Power button. Press this button to USB 2.0 devices such as ... printer, scanner, camera, PDA, and others . 4. The 3.5 inch drive bays are for 3.5 inch hard disk drives / memory card readers. ASUS BM6650/MD520, BM6350 1-3 The 5.25 inch optical disk drive bays are for 5.25 inch DVD-ROM / CD-RW / DVD-RW devices.� 2. These Universal Serial...

User Manual
Page 14
... USB 3.0 devices to the rear speakers in an 8-channel audio configuration. 14. This port connects to a tape, CD, DVD player, or other audio sources. ASUS BM6650/MD520, BM6350 1-5 This port connects to the audio configuration table below for your USB 3.0 devices. 12. ��L�A�N��(R��J�-4�...
... USB 3.0 devices to the rear speakers in an 8-channel audio configuration. 14. This port connects to a tape, CD, DVD player, or other audio sources. ASUS BM6650/MD520, BM6350 1-5 This port connects to the audio configuration table below for your USB 3.0 devices. 12. ��L�A�N��(R��J�-4�...
User Manual
Page 16
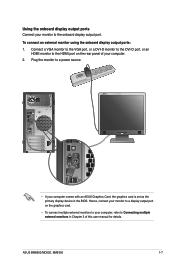
Using the onboard display output ports Connect your computer comes with an ASUS Graphics Card, the graphics card is set as the primary display device in Chapter 3 of your monitor to the onboard display output port. Connect a VGA ... to a display output port on the rear panel of this user manual for details. To connect an external monitor using the onboard display output ports: 1. ASUS BM6650/MD520, BM6350 1-7
Using the onboard display output ports Connect your computer comes with an ASUS Graphics Card, the graphics card is set as the primary display device in Chapter 3 of your monitor to the onboard display output port. Connect a VGA ... to a display output port on the rear panel of this user manual for details. To connect an external monitor using the onboard display output ports: 1. ASUS BM6650/MD520, BM6350 1-7

User Manual
Page 18
... BM6650/MD520 3. Wait until the operating system loads automatically. Turn the power switch ON, then press the power button on the Windows® desktop. 3. BM6350 ASUS BM6650/MD520, BM6350 1-9 Turning your computer OFF To turn your computer OFF: 1. Turning your computer ON To turn your computer ON: 1. Click to turn on/off your...
... BM6650/MD520 3. Wait until the operating system loads automatically. Turn the power switch ON, then press the power button on the Windows® desktop. 3. BM6350 ASUS BM6650/MD520, BM6350 1-9 Turning your computer OFF To turn your computer OFF: 1. Turning your computer ON To turn your computer ON: 1. Click to turn on/off your...
User Manual
Page 19
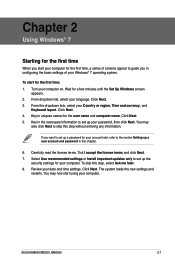
... in configuring the basic settings of screens appear to guide you want to set up your computer. The system loads the new settings and restarts. ASUS BM6650/MD520, BM6350 2-1 Turn your Windows® 7 operating system. You may now start for the first time: 1. Click Next.
... in configuring the basic settings of screens appear to guide you want to set up your computer. The system loads the new settings and restarts. ASUS BM6650/MD520, BM6350 2-1 Turn your Windows® 7 operating system. You may now start for the first time: 1. Click Next.

User Manual
Page 21
... the Start menu. 2. For more details, refer to familiarize yourself with using Windows® 7. Select the task that you want to hide the program. ASUS BM6650/MD520, BM6350 2-3 To use the Getting Started item: 1. The list of available tasks appears. 3. Select Getting Started. You may pin programs that you to the section...
... the Start menu. 2. For more details, refer to familiarize yourself with using Windows® 7. Select the task that you want to hide the program. ASUS BM6650/MD520, BM6350 2-3 To use the Getting Started item: 1. The list of available tasks appears. 3. Select Getting Started. You may pin programs that you to the section...

User Manual
Page 23
... the wired or wireless network connection. Volume Click this icon to display all the alert messages/notifications and launch the Windows® Action Center. ASUS BM6650/MD520, BM6350 2-5 Unpinning programs from the Start menu To unpin programs from the taskbar: 1. Using the notification area By default, the notification area shows these three...
... the wired or wireless network connection. Volume Click this icon to display all the alert messages/notifications and launch the Windows® Action Center. ASUS BM6650/MD520, BM6350 2-5 Unpinning programs from the Start menu To unpin programs from the taskbar: 1. Using the notification area By default, the notification area shows these three...

User Manual
Page 25
From the breadcrumb bar, click the arrow to launch Windows Explorer. Click Computer to display the contents of your data. 3. ASUS BM6650/MD520, BM6350 2-7 From the navigation or view pane, browse for the location of the drive or folder. From the Windows® taskbar, click the Start icon 2. Launching ...
From the breadcrumb bar, click the arrow to launch Windows Explorer. Click Computer to display the contents of your data. 3. ASUS BM6650/MD520, BM6350 2-7 From the navigation or view pane, browse for the location of the drive or folder. From the Windows® taskbar, click the Start icon 2. Launching ...

User Manual
Page 27
Launch Windows Explorer. 2. Adding a new folder To add a new folder: 1. Right-click anywhere on the View pane. 3. Right-click anywhere on the View pane. 3. ASUS BM6650/MD520, BM6350 2-9 From the menu that appears, select Sort by , then select your preferred sorting type. From the menu that appears, select Group by , then select your...
Launch Windows Explorer. 2. Adding a new folder To add a new folder: 1. Right-click anywhere on the View pane. 3. Right-click anywhere on the View pane. 3. ASUS BM6650/MD520, BM6350 2-9 From the menu that appears, select Sort by , then select your preferred sorting type. From the menu that appears, select Group by , then select your...

User Manual
Page 29
... fix some common computer problems. You may customize the notifications. To launch Windows 7 Action Center, click the Notification icon , then click Open Action Center. 2. ASUS BM6650/MD520, BM6350 2-11 Launching Windows® 7 Action Center To launch Windows® 7 Action Center: 1. Protecting your computer Using Windows® 7 Action Center Windows® 7 Action Center...
... fix some common computer problems. You may customize the notifications. To launch Windows 7 Action Center, click the Notification icon , then click Open Action Center. 2. ASUS BM6650/MD520, BM6350 2-11 Launching Windows® 7 Action Center To launch Windows® 7 Action Center: 1. Protecting your computer Using Windows® 7 Action Center Windows® 7 Action Center...

User Manual
Page 31
From the Windows® taskbar, click > Getting Started > Add new users. 2. ASUS BM6650/MD520, BM6350 2-13 When done, click Create Account. Select Create a new account. 4. Select either Standard user or Administrator as the user type. 6. Select Manage another account. 3. Setting up a user account To set up a user account and password You may create user accounts and passwords for people who will use your computer. Setting up a user account: 1. Key in the name of the new user. 5.
From the Windows® taskbar, click > Getting Started > Add new users. 2. ASUS BM6650/MD520, BM6350 2-13 When done, click Create Account. Select Create a new account. 4. Select either Standard user or Administrator as the user type. 6. Select Manage another account. 3. Setting up a user account To set up a user account and password You may create user accounts and passwords for people who will use your computer. Setting up a user account: 1. Key in the name of the new user. 5.
User Manual
Page 33
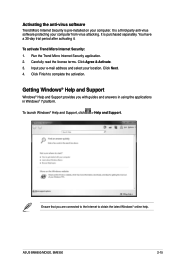
... Trend Micro Internet Security: 1. Click Next. 4. Activating the anti-virus software Trend Micro Internet Security is purchased separately. Run the Trend Micro Internet Security application. 2. ASUS BM6650/MD520, BM6350 2-15
... Trend Micro Internet Security: 1. Click Next. 4. Activating the anti-virus software Trend Micro Internet Security is purchased separately. Run the Trend Micro Internet Security application. 2. ASUS BM6650/MD520, BM6350 2-15

User Manual
Page 34
The USB ports allow you to your computer Connecting a USB storage device This desktop PC provides USB 2.0/1.1 ports on both the front and rear panels. Front panel Rear panel BM6650/MD520 BM6350 ASUS BM6650/MD520, BM6350 3-1 To connect a USB storage device: • Insert the USB storage device to connect USB devices such as storage devices. Chapter 3 Connecting devices to your computer.
The USB ports allow you to your computer Connecting a USB storage device This desktop PC provides USB 2.0/1.1 ports on both the front and rear panels. Front panel Rear panel BM6650/MD520 BM6350 ASUS BM6650/MD520, BM6350 3-1 To connect a USB storage device: • Insert the USB storage device to connect USB devices such as storage devices. Chapter 3 Connecting devices to your computer.

User Manual
Page 36
Connecting 2-channel Speakers Connecting 4-channel Speakers ASUS BM6650/MD520, BM6350 3-3
Connecting 2-channel Speakers Connecting 4-channel Speakers ASUS BM6650/MD520, BM6350 3-3

User Manual
Page 38
... on how to connect a monitor to your Windows desktop. To set up multiple displays When using multiple monitors, you to connect multiple external displays. ASUS BM6650/MD520, BM6350 3-5 BM6650/MD520 For some graphic cards, only the monitor that is installed in Chapter 1 for details on the output ports of your main display...
... on how to connect a monitor to your Windows desktop. To set up multiple displays When using multiple monitors, you to connect multiple external displays. ASUS BM6650/MD520, BM6350 3-5 BM6650/MD520 For some graphic cards, only the monitor that is installed in Chapter 1 for details on the output ports of your main display...

User Manual
Page 40
Click Apply or OK. Then click Keep Changes on the confirmation message. 6. ASUS BM6650/MD520, BM6350 3-7
Click Apply or OK. Then click Keep Changes on the confirmation message. 6. ASUS BM6650/MD520, BM6350 3-7
User Manual
Page 42
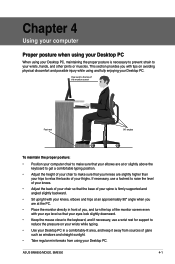
ASUS BM6650/MD520, BM6350 4-1 If necessary, use a wrist rest for support to reduce the pressure on avoiding physical discomfort and possible injury while using your Desktop PC, maintaining the ...
ASUS BM6650/MD520, BM6350 4-1 If necessary, use a wrist rest for support to reduce the pressure on avoiding physical discomfort and possible injury while using your Desktop PC, maintaining the ...

User Manual
Page 43
... your Internet Service Provider (ISP) for details or assistance in setting up your computer. 4. Connecting via a DSL/cable modem To connect via a DSL/cable modem: 1. ASUS BM6650/MD520, BM6350 5-1 Chapter 5 Connecting to the Internet Wired connection Use an RJ-45 cable to connect your Internet connection. Modem RJ-45 cable 3.
... your Internet Service Provider (ISP) for details or assistance in setting up your computer. 4. Connecting via a DSL/cable modem To connect via a DSL/cable modem: 1. ASUS BM6650/MD520, BM6350 5-1 Chapter 5 Connecting to the Internet Wired connection Use an RJ-45 cable to connect your Internet connection. Modem RJ-45 cable 3.
User Manual
Page 45
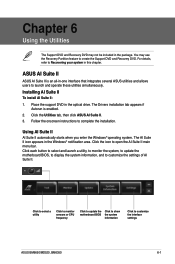
... and Recovery DVD may use the Recovery Partition feature to create the Support DVD and Recovery DVD. ASUS AI Suite II ASUS AI Suite II is enabled. 2. Follow the onscreen instructions to customize the settings of AI Suite...bar. The Drivers installation tab appears if Autorun is an all-in-one interface that integrates several ASUS utilities and allows users to Recovering your system in the package. Using AI Suite II AI Suite... these utilities simultaneously. Click the icon to customize the interface settings ASUS BM6650/MD520, BM6350 6-1 You may not be included in this chapter.
... and Recovery DVD may use the Recovery Partition feature to create the Support DVD and Recovery DVD. ASUS AI Suite II ASUS AI Suite II is enabled. 2. Follow the onscreen instructions to customize the settings of AI Suite...bar. The Drivers installation tab appears if Autorun is an all-in-one interface that integrates several ASUS utilities and allows users to Recovering your system in the package. Using AI Suite II AI Suite... these utilities simultaneously. Click the icon to customize the interface settings ASUS BM6650/MD520, BM6350 6-1 You may not be included in this chapter.


