

BE24EQK Series User Guide
Page 12
... definition of the power indicator is off with a long press for 5 seconds. 3. Microphone Mute button: • To mute or unmute the microphone. 1-2 Chapter 1: Product introduction 1.3 Monitor introduction 1.3.1 Front view 89 7 7 BE24EQK BE24EQSK 65 4 3 2 1 1. Power button/power indicator • Turns the monitor on and off . • Exits the OSD menu. 4.
... definition of the power indicator is off with a long press for 5 seconds. 3. Microphone Mute button: • To mute or unmute the microphone. 1-2 Chapter 1: Product introduction 1.3 Monitor introduction 1.3.1 Front view 89 7 7 BE24EQK BE24EQSK 65 4 3 2 1 1. Power button/power indicator • Turns the monitor on and off . • Exits the OSD menu. 4.

BE24EQK Series User Guide
Page 14
... connection with a USB upstream cable. USB upstream port. This port is for connection with an HDMI compatible device. 8. Press the switch to turn on the monitor. 1-4 Chapter 1: Product introduction Kensington lock slot. 2. This port is connected. 6. 1.3.2 Back view BE24EQK BE24EQSK 1. This port connects the power cord. 4. Audio-in .
... connection with a USB upstream cable. USB upstream port. This port is for connection with an HDMI compatible device. 8. Press the switch to turn on the monitor. 1-4 Chapter 1: Product introduction Kensington lock slot. 2. This port is connected. 6. 1.3.2 Back view BE24EQK BE24EQSK 1. This port connects the power cord. 4. Audio-in .
BE24EQK Series User Guide
Page 15
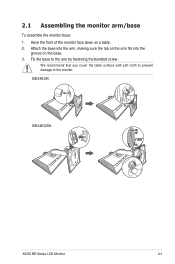
Have the front of the monitor face down on the base. 3. We recommend that you cover the table surface with soft cloth to prevent damage to the arm by fastening the bundled screw. Attach the base into the arm, making sure the tab on the arm fits into the groove on a table. 2. Fix the base to the monitor. BE24EQK BE24EQSK 1 180° 2 ASUS BE Series LCD Monitor 2-1 2.1 Assembling the monitor arm/base To assemble the monitor base: 1.
Have the front of the monitor face down on the base. 3. We recommend that you cover the table surface with soft cloth to prevent damage to the arm by fastening the bundled screw. Attach the base into the arm, making sure the tab on the arm fits into the groove on a table. 2. Fix the base to the monitor. BE24EQK BE24EQSK 1 180° 2 ASUS BE Series LCD Monitor 2-1 2.1 Assembling the monitor arm/base To assemble the monitor base: 1.
BE24EQK Series User Guide
Page 16
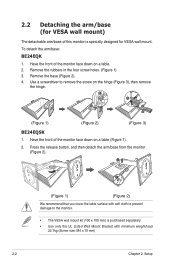
...(Screw size: M4 x 10 mm) 2-2 Chapter 2: Setup 2.2 Detaching the arm/base (for VESA wall mount) The detachable arm/base of the monitor face down on a table (Figure 1). 2. Remove the base (Figure 2). 4. Remove the rubbers in the four screw holes. (Figure 1) 3. Have the ...cloth to prevent damage to remove the screw on the hinge (Figure 3), then remove the hinge. 1 1 2 2 (Figure 1) (Figure 2) (Figure 3) BE24EQSK 1. To detach the arm/base: BE24EQK 1. Use a screwdriver to the monitor. • The VESA wall mount kit (100 x 100 mm) is specially designed for VESA wall mount.
...(Screw size: M4 x 10 mm) 2-2 Chapter 2: Setup 2.2 Detaching the arm/base (for VESA wall mount) The detachable arm/base of the monitor face down on a table (Figure 1). 2. Remove the base (Figure 2). 4. Remove the rubbers in the four screw holes. (Figure 1) 3. Have the ...cloth to prevent damage to remove the screw on the hinge (Figure 3), then remove the hinge. 1 1 2 2 (Figure 1) (Figure 2) (Figure 3) BE24EQSK 1. To detach the arm/base: BE24EQK 1. Use a screwdriver to the monitor. • The VESA wall mount kit (100 x 100 mm) is specially designed for VESA wall mount.

BE24EQK Series User Guide
Page 18
...° (Swivel) 130mm (Height adjustment) Pivoting the monitor (BE24EQSK) 1. Pivot the monitor clockwise/counterclockwise to its angle. • BE24EQK: The recommended adjusting angle is most comfortable for you. • Hold the stand to prevent the monitor from falling when you need. 2-4 Chapter 2: Setup You can adjust the monitor's angle from +35˚ to the highest position...
...° (Swivel) 130mm (Height adjustment) Pivoting the monitor (BE24EQSK) 1. Pivot the monitor clockwise/counterclockwise to its angle. • BE24EQK: The recommended adjusting angle is most comfortable for you. • Hold the stand to prevent the monitor from falling when you need. 2-4 Chapter 2: Setup You can adjust the monitor's angle from +35˚ to the highest position...
BE24EQK Series User Guide
Page 19
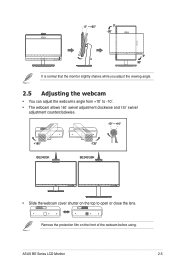
ASUS BE Series LCD Monitor 2-5 Remove the protection film on the top to -10˚. • The webcam allows 180˚ swivel adjustment clockwise and 135˚ swivel adjustment counterclockwise. -10° ~ +10° +180° BE24EQK -135° BE24EQSK • Slide the webcam cover shutter on the... front of the webcam before using. -5° ~ +35° 0° - 90° 0° 90° It is normal that the monitor slightly shakes while you adjust the viewing angle. ...
ASUS BE Series LCD Monitor 2-5 Remove the protection film on the top to -10˚. • The webcam allows 180˚ swivel adjustment clockwise and 135˚ swivel adjustment counterclockwise. -10° ~ +10° +180° BE24EQK -135° BE24EQSK • Slide the webcam cover shutter on the... front of the webcam before using. -5° ~ +35° 0° - 90° 0° 90° It is normal that the monitor slightly shakes while you adjust the viewing angle. ...
BE24EQK Series User Guide
Page 20
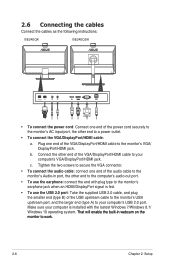
... cables Connect the cables as the following instructions: BE24EQK BE24EQSK • To connect the power cord: Connect one end of the VGA/DisplayPort/HDMI cable to your computer's VGA/DisplayPort/HDMI jack. Connect the other end of the power cord securely to the monitor's AC input port, the other end to the.... Tighten the two screws to secure the VGA connector. • To connect the audio cable: connect one end of the USB upstream cable to the monitor's USB upstream port, and the larger end (type A) to your computer is fed. • To use the earphone: connect the end with plug ...
... cables Connect the cables as the following instructions: BE24EQK BE24EQSK • To connect the power cord: Connect one end of the VGA/DisplayPort/HDMI cable to your computer's VGA/DisplayPort/HDMI jack. Connect the other end of the power cord securely to the monitor's AC input port, the other end to the.... Tighten the two screws to secure the VGA connector. • To connect the audio cable: connect one end of the USB upstream cable to the monitor's USB upstream port, and the larger end (type A) to your computer is fed. • To use the earphone: connect the end with plug ...
BE24EQK Series User Guide
Page 35
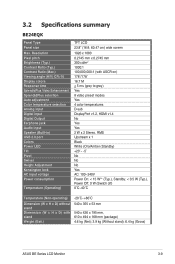
... (Esti.) -20˚C~+60˚C 540 x 355 x 53 mm 540 x 426 x 195 mm, 610 x 494 x 168 mm (package) 4.6 kg (Net); 3.9 kg (Without stand); 6.4 kg (Gross) ASUS BE Series LCD Monitor 3-9 3.2 Specifications summary BE24EQK Panel Type Panel size Max.
... (Esti.) -20˚C~+60˚C 540 x 355 x 53 mm 540 x 426 x 195 mm, 610 x 494 x 168 mm (package) 4.6 kg (Net); 3.9 kg (Without stand); 6.4 kg (Gross) ASUS BE Series LCD Monitor 3-9 3.2 Specifications summary BE24EQK Panel Type Panel size Max.


