User Manual
Page 7
... the system. 3. How this guide Audience This guide provides general information and installation instructions about the ASUS BA5120/AS-D672 PC system. About this guide is intended for experienced users and integrators with hardware knowledge of the ASUS BA5120/AS-D672. Chapter 1: System introduction This chapter gives a general description of personal computers. Chapter 2: Basic...
... the system. 3. How this guide Audience This guide provides general information and installation instructions about the ASUS BA5120/AS-D672 PC system. About this guide is intended for experienced users and integrators with hardware knowledge of the ASUS BA5120/AS-D672. Chapter 1: System introduction This chapter gives a general description of personal computers. Chapter 2: Basic...
User Manual
Page 9
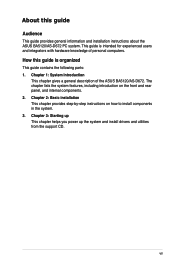
CD • Support CD • Recovery CD 4. System package contents Check your BA5120/AS-D672 system package for the following items. If any of the items is damaged or missing, contact your retailer immediately. 1. Cable • AC power cable 3. Documents • User guide • Warranty card ix ASUS BA5120/AS-D672 PC system with • ASUS motherboard • Power supply unit • ASUS chassis 2.
CD • Support CD • Recovery CD 4. System package contents Check your BA5120/AS-D672 system package for the following items. If any of the items is damaged or missing, contact your retailer immediately. 1. Cable • AC power cable 3. Documents • User guide • Warranty card ix ASUS BA5120/AS-D672 PC system with • ASUS motherboard • Power supply unit • ASUS chassis 2.

User Manual
Page 11
The chapter lists the system features including introduction on the front and rear panel, and internal components. System introduction Chapter 1 This chapter gives a general description of the ASUS BA5120/ASD672.
The chapter lists the system features including introduction on the front and rear panel, and internal components. System introduction Chapter 1 This chapter gives a general description of the ASUS BA5120/ASD672.
User Manual
Page 12
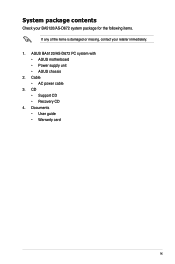
The system comes in a stylish casing and powered by the ASUS motherboard that supports the Intel® Core™2 Extreme / Core™2 Duo / Pentium® D / Pentium® 4 / Celeron® D processors...ROM 2* 5.25 ODD bay Headphone Jack USB 2.0 Ports MIC Jack Reset Button HDD LED USB 2.0 Ports 1-2 Chapter 1: System introduction The ASUS BA5120/AS-D672 is an all-in the 775-land package. The system supports up to 4 GB of power computing. 1.2 Front panel The front... x16 slot, Serial ATA, USB 2.0, and 8-channel audio feature the system and take you for choosing the ASUS BA5120/AS-D672!
The system comes in a stylish casing and powered by the ASUS motherboard that supports the Intel® Core™2 Extreme / Core™2 Duo / Pentium® D / Pentium® 4 / Celeron® D processors...ROM 2* 5.25 ODD bay Headphone Jack USB 2.0 Ports MIC Jack Reset Button HDD LED USB 2.0 Ports 1-2 Chapter 1: System introduction The ASUS BA5120/AS-D672 is an all-in the 775-land package. The system supports up to 4 GB of power computing. 1.2 Front panel The front... x16 slot, Serial ATA, USB 2.0, and 8-channel audio feature the system and take you for choosing the ASUS BA5120/AS-D672!

User Manual
Page 13
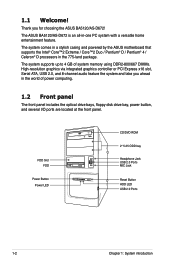
... Expansion Slot Cover Side Cover Lock (One at each side) Voltage selector The PSU has a 115V/230V voltage selector switch located beside the power connector. ASUS BA5120/AS-D672 1-3
... Expansion Slot Cover Side Cover Lock (One at each side) Voltage selector The PSU has a 115V/230V voltage selector switch located beside the power connector. ASUS BA5120/AS-D672 1-3
User Manual
Page 17
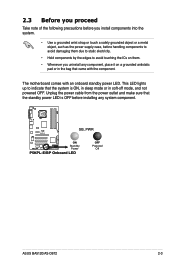
... mode or in the bag that came with an onboard standby power LED. P5KPL-E SB_PWR ON Standby Power P5KPL-E/BP Onboard LED OFF Powered Off ASUS BA5120/AS-D672 2-3 The motherboard comes with the component. This LED lights up to avoid touching the ICs on a grounded antistatic pad or in soft-off...
... mode or in the bag that came with an onboard standby power LED. P5KPL-E SB_PWR ON Standby Power P5KPL-E/BP Onboard LED OFF Powered Off ASUS BA5120/AS-D672 2-3 The motherboard comes with the component. This LED lights up to avoid touching the ICs on a grounded antistatic pad or in soft-off...
User Manual
Page 19
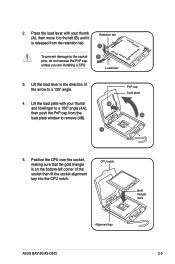
... the load plate window to a 100º angle (4A), then push the PnP cap from the retention tab. CPU notch Gold triangle mark Alignment key ASUS BA5120/AS-D672 2-5 Retention tab A To prevent damage to a 135º angle. 4.
... the load plate window to a 100º angle (4A), then push the PnP cap from the retention tab. CPU notch Gold triangle mark Alignment key ASUS BA5120/AS-D672 2-5 Retention tab A To prevent damage to a 135º angle. 4.

User Manual
Page 21
... CPU FAN PWM CPU FAN IN CPU FAN PWR GND P5KPL-E P5KPL-E/BP CPU Fan Connector DO NOT forget to the connector on the motherboard. 2. ASUS BA5120/AS-D672 2-7 If you purchased a separate CPU heatsink and fan assembly, ensure that the B four fasteners match the holes on the motherboard. Push down two...
... CPU FAN PWM CPU FAN IN CPU FAN PWR GND P5KPL-E P5KPL-E/BP CPU Fan Connector DO NOT forget to the connector on the motherboard. 2. ASUS BA5120/AS-D672 2-7 If you purchased a separate CPU heatsink and fan assembly, ensure that the B four fasteners match the holes on the motherboard. Push down two...
User Manual
Page 23
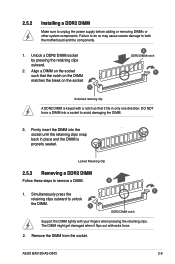
... socket such that the notch on the DIMM matches the break on the socket. 1 2 DDR2 DIMM notch 1 Unlocked retaining clip A DDR2 DIMM is properly seated. ASUS BA5120/AS-D672 2-9 2.5.2 Installing a DDR2 DIMM Make sure to both the motherboard and the components. 1. The DIMM might get damaged when it fits in place and...
... socket such that the notch on the DIMM matches the break on the socket. 1 2 DDR2 DIMM notch 1 Unlocked retaining clip A DDR2 DIMM is properly seated. ASUS BA5120/AS-D672 2-9 2.5.2 Installing a DDR2 DIMM Make sure to both the motherboard and the components. 1. The DIMM might get damaged when it fits in place and...
User Manual
Page 25
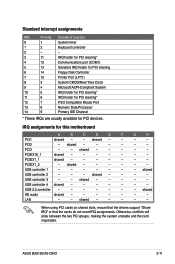
PCI2 - shared - - - - - - shared USB controller 2 - - - USB 2.0 controller - - - - - - - ASUS BA5120/AS-D672 2-11 PCIEX16_1 shared - - - - - - - shared - - - - shared - - - - shared - - - - - shared - - - - - - USB controller 3 - - PCI3 - - PCIEX1_2 - shared - - - - - Otherwise, conflicts will arise between the two PCI groups, making the ...
PCI2 - shared - - - - - - shared USB controller 2 - - - USB 2.0 controller - - - - - - - ASUS BA5120/AS-D672 2-11 PCIEX16_1 shared - - - - - - - shared - - - - shared - - - - shared - - - - - shared - - - - - - USB controller 3 - - PCI3 - - PCIEX1_2 - shared - - - - - Otherwise, conflicts will arise between the two PCI groups, making the ...
User Manual
Page 27
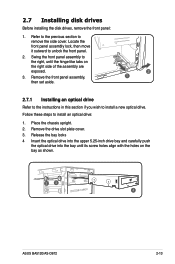
... upper 5.25-inch drive bay and carefully push the optical drive into the bay until the hinge-like tabs on the bay as shown. 33 4 ASUS BA5120/AS-D672 2-13 Refer to the previous section to install a new optical drive. Place the chassis upright. 2.
... upper 5.25-inch drive bay and carefully push the optical drive into the bay until the hinge-like tabs on the bay as shown. 33 4 ASUS BA5120/AS-D672 2-13 Refer to the previous section to install a new optical drive. Place the chassis upright. 2.
User Manual
Page 29
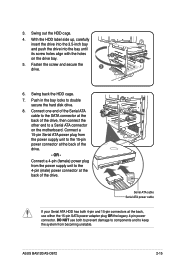
... drive bay. 4 5. Swing out the HDD cage. 4. DO NOT use either the 15-pin SATA power adapter plug OR the legacy 4‑pin power connector. ASUS BA5120/AS-D672 2-15 Fasten the screw and secure the drive. 3 6. Push in the bay locks to the 15-pin power connector at the back, use...
... drive bay. 4 5. Swing out the HDD cage. 4. DO NOT use either the 15-pin SATA power adapter plug OR the legacy 4‑pin power connector. ASUS BA5120/AS-D672 2-15 Fasten the screw and secure the drive. 3 6. Push in the bay locks to the 15-pin power connector at the back, use...
User Manual
Page 31
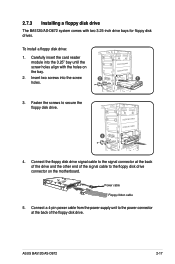
... unit to the power connector at the back of the drive and the other end of the floppy disk drive. Power cable Floppy ribbon cable 5. ASUS BA5120/AS-D672 2-17 Connect the floppy disk drive signal cable to secure the floppy disk drive. 3 4. Fasten the screws to the signal connector at the... cable to the floppy disk drive connector on the bay. 2. Carefully insert the card reader module into the screw 2 1 holes. 3. 2.7.3 Installing a floppy disk drive The BA5120/AS-D672 system comes with the holes on the motherboard.
... unit to the power connector at the back of the drive and the other end of the floppy disk drive. Power cable Floppy ribbon cable 5. ASUS BA5120/AS-D672 2-17 Connect the floppy disk drive signal cable to secure the floppy disk drive. 3 4. Fasten the screws to the signal connector at the... cable to the floppy disk drive connector on the bay. 2. Carefully insert the card reader module into the screw 2 1 holes. 3. 2.7.3 Installing a floppy disk drive The BA5120/AS-D672 system comes with the holes on the motherboard.
User Manual
Page 35
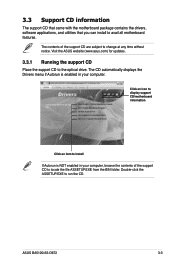
...menu if Autorun is NOT enabled in your computer, browse the contents of the support CD are subject to change at any time without notice. ASUS BA5120/AS-D672 3-3 Click an icon to display support CD/motherboard information Click an item to install If Autorun is enabled in your computer. 3.3... applications, and utilities that you can install to the optical drive. The contents of the support CD to run the CD. Visit the ASUS website (www.asus.com) for updates. 3.3.1 Running the support CD Place the support CD to avail all motherboard features. Double-click the ASSETUP.EXE to ...
...menu if Autorun is NOT enabled in your computer, browse the contents of the support CD are subject to change at any time without notice. ASUS BA5120/AS-D672 3-3 Click an icon to display support CD/motherboard information Click an item to install If Autorun is enabled in your computer. 3.3... applications, and utilities that you can install to the optical drive. The contents of the support CD to run the CD. Visit the ASUS website (www.asus.com) for updates. 3.3.1 Running the support CD Place the support CD to avail all motherboard features. Double-click the ASSETUP.EXE to ...
User Manual
Page 37
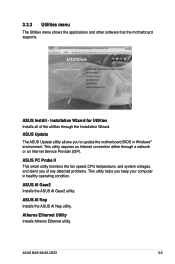
... Gear2 utility. 3.3.3 Utilities menu The Utilities menu shows the applications and other software that the motherboard supports. ASUS BA5120/AS-D672 3-5 ASUS InstAll - ASUS PC Probe II This smart utility monitors the fan speed, CPU temperature, and system voltages, and alerts you of the utilities through a network ...). Installation Wizard for Utilities Installs all of any detected problems. This utility helps you to update the motherboard BIOS in healthy operating condition. ASUS Update The ASUS Update utility allows you keep your computer in Windows® environment.
... Gear2 utility. 3.3.3 Utilities menu The Utilities menu shows the applications and other software that the motherboard supports. ASUS BA5120/AS-D672 3-5 ASUS InstAll - ASUS PC Probe II This smart utility monitors the fan speed, CPU temperature, and system voltages, and alerts you of the utilities through a network ...). Installation Wizard for Utilities Installs all of any detected problems. This utility helps you to update the motherboard BIOS in healthy operating condition. ASUS Update The ASUS Update utility allows you keep your computer in Windows® environment.
User Manual
Page 39
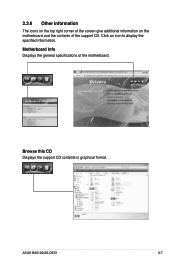
Click an icon to display the specified information. Motherboard Info Displays the general specifications of the support CD. Browse this CD Displays the support CD contents in graphical format. ASUS BA5120/AS-D672 3-7 3.3.6 Other information The icons on the top right corner of the screen give additional information on the motherboard and the contents of the motherboard.
Click an icon to display the specified information. Motherboard Info Displays the general specifications of the support CD. Browse this CD Displays the support CD contents in graphical format. ASUS BA5120/AS-D672 3-7 3.3.6 Other information The icons on the top right corner of the screen give additional information on the motherboard and the contents of the motherboard.
User Manual
Page 41
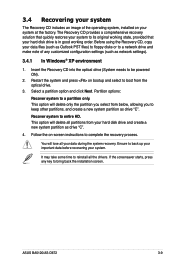
... all your system. It may take some time to keep other partitions, and create a new system partition as network settings). 3.4.1 In Windows® XP environment 1. ASUS BA5120/AS-D672 3-9 This option will lose all the drivers. You will delete only the partition you select from your system at the factory. Follow the...
... all your system. It may take some time to keep other partitions, and create a new system partition as network settings). 3.4.1 In Windows® XP environment 1. ASUS BA5120/AS-D672 3-9 This option will lose all the drivers. You will delete only the partition you select from your system at the factory. Follow the...


