User Manual
Page 4
Table of contents Chapter 3: Starting up 3.1 Installing an operating system 3-2 3.2 Powering up 3-2 3.3 Support CD information 3-3 3.3.1 Running the support CD 3-3 3.3.2 Drivers menu 3-4 3.3.3 Utilities menu 3-5 3.3.4 Manual menu 3-6 3.3.5 ASUS Contact information 3-6 3.3.6 Other information 3-7 3.4 Recovering your system 3-9 3.4.1 In Windows® XP environment 3-9 3.4.2 In Windows® Vista™ environment 3-10 iv
Table of contents Chapter 3: Starting up 3.1 Installing an operating system 3-2 3.2 Powering up 3-2 3.3 Support CD information 3-3 3.3.1 Running the support CD 3-3 3.3.2 Drivers menu 3-4 3.3.3 Utilities menu 3-5 3.3.4 Manual menu 3-6 3.3.5 ASUS Contact information 3-6 3.3.6 Other information 3-7 3.4 Recovering your system 3-9 3.4.1 In Windows® XP environment 3-9 3.4.2 In Windows® Vista™ environment 3-10 iv
User Manual
Page 7
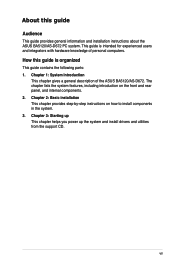
... About this guide is intended for experienced users and integrators with hardware knowledge of the ASUS BA5120/AS-D672. Chapter 3: Starting up This chapter helps you power up the system and install drivers and utilities from the support CD. How this guide Audience This guide provides general information and installation instructions about the...
... About this guide is intended for experienced users and integrators with hardware knowledge of the ASUS BA5120/AS-D672. Chapter 3: Starting up This chapter helps you power up the system and install drivers and utilities from the support CD. How this guide Audience This guide provides general information and installation instructions about the...
User Manual
Page 9
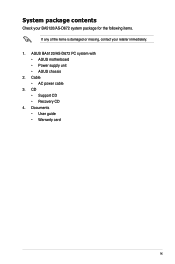
Cable • AC power cable 3. CD • Support CD • Recovery CD 4. Documents • User guide • Warranty card ix ASUS BA5120/AS-D672 PC system with • ASUS motherboard • Power supply unit • ASUS chassis 2. System package contents Check your BA5120/AS-D672 system package for the following items. If any of the items is damaged or missing, contact your retailer immediately. 1.
Cable • AC power cable 3. CD • Support CD • Recovery CD 4. Documents • User guide • Warranty card ix ASUS BA5120/AS-D672 PC system with • ASUS motherboard • Power supply unit • ASUS chassis 2. System package contents Check your BA5120/AS-D672 system package for the following items. If any of the items is damaged or missing, contact your retailer immediately. 1.
User Manual
Page 12
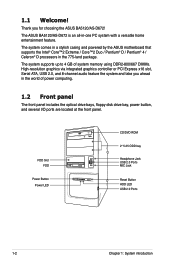
... home entertainment feature. 1.1 Welcome! The system supports up to 4 GB of system memory using DDR2-800/667 DIMMs. High-resolution graphics via integrated graphics controller or PCI Express x16 slot, Serial ATA, USB 2.0, and 8-channel audio feature the system and take you for choosing the ASUS BA5120/AS-D672! FDD Slot FDD Power...
... home entertainment feature. 1.1 Welcome! The system supports up to 4 GB of system memory using DDR2-800/667 DIMMs. High-resolution graphics via integrated graphics controller or PCI Express x16 slot, Serial ATA, USB 2.0, and 8-channel audio feature the system and take you for choosing the ASUS BA5120/AS-D672! FDD Slot FDD Power...
User Manual
Page 18
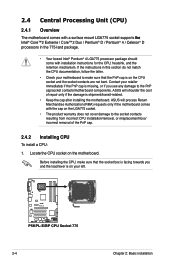
...missing, or if you and the load lever is shipment/transit-related. • Keep the cap after installing the motherboard. ASUS will process Return Merchandise Authorization (RMA) requests only if the motherboard comes with the cap on the motherboard. P5KPL-E P5KPL...cover damage to the PnP cap/socket contacts/motherboard components. 2.4 Central Processing Unit (CPU) 2.4.1 Overview The motherboard comes with a surface mount LGA775 socket supports t�h��e� Intel® Core™2 Extreme / Core™2 Duo / Pentium® D / Pentium® 4 / Celeron®...
...missing, or if you and the load lever is shipment/transit-related. • Keep the cap after installing the motherboard. ASUS will process Return Merchandise Authorization (RMA) requests only if the motherboard comes with the cap on the motherboard. P5KPL-E P5KPL...cover damage to the PnP cap/socket contacts/motherboard components. 2.4 Central Processing Unit (CPU) 2.4.1 Overview The motherboard comes with a surface mount LGA775 socket supports t�h��e� Intel® Core™2 Extreme / Core™2 Duo / Pentium® D / Pentium® 4 / Celeron®...

User Manual
Page 22
... that you obtain memory modules from the same vendor. Refer to the DDR2 Qualified Vendors List for the ODT value. • This motherboard does not support memory modules made up of the sockets: P5KPL-E P5KPL-E/BP 240-pin DDR2 DIMM Sockets 2.5.1 Memory configurations You may downgrade to 4 GB system memory using...
... that you obtain memory modules from the same vendor. Refer to the DDR2 Qualified Vendors List for the ODT value. • This motherboard does not support memory modules made up of the sockets: P5KPL-E P5KPL-E/BP 240-pin DDR2 DIMM Sockets 2.5.1 Memory configurations You may downgrade to 4 GB system memory using...
User Manual
Page 23
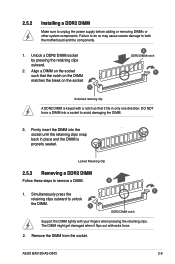
... Make sure to both the motherboard and the components. 1. Locked Retaining Clip 2.5.3 Removing a DDR2 DIMM Follow these steps to unlock the DIMM. 1 DDR2 DIMM notch Support the DIMM lightly with extra force. 2. Align a DIMM on the socket. 1 2 DDR2 DIMM notch 1 Unlocked retaining clip A DDR2 DIMM is properly seated. ASUS BA5120/AS-D672 2-9
... Make sure to both the motherboard and the components. 1. Locked Retaining Clip 2.5.3 Removing a DDR2 DIMM Follow these steps to unlock the DIMM. 1 DDR2 DIMM notch Support the DIMM lightly with extra force. 2. Align a DIMM on the socket. 1 2 DDR2 DIMM notch 1 Unlocked retaining clip A DDR2 DIMM is properly seated. ASUS BA5120/AS-D672 2-9
User Manual
Page 24
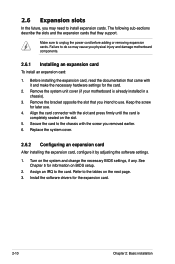
... the necessary hardware settings for later use . Install the software drivers for information on the next page. 3. Remove the bracket opposite the slot that they support. 2.6 Expansion slots In the future, you physical injury and damage motherboard components. 2.6.1 Installing an expansion card To install an expansion card: 1.
... the necessary hardware settings for later use . Install the software drivers for information on the next page. 3. Remove the bracket opposite the slot that they support. 2.6 Expansion slots In the future, you physical injury and damage motherboard components. 2.6.1 Installing an expansion card To install an expansion card: 1.
User Manual
Page 25
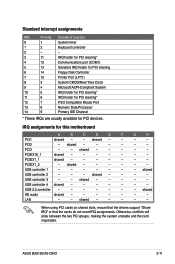
.... shared - - - - PCI2 - shared - - - - - - shared - - - - - shared - - - - - - USB controller 1 - - - - - - - When using PCI cards on shared slots, ensure that the drivers support "Share IRQ" or that the cards do not need IRQ assignments. USB controller 4 shared - - - - - - - ASUS BA5120/AS-D672 2-11 shared USB controller 2 - - - Otherwise, conflicts will arise between the two PCI groups, making the system...
.... shared - - - - PCI2 - shared - - - - - - shared - - - - - shared - - - - - - USB controller 1 - - - - - - - When using PCI cards on shared slots, ensure that the drivers support "Share IRQ" or that the cards do not need IRQ assignments. USB controller 4 shared - - - - - - - ASUS BA5120/AS-D672 2-11 shared USB controller 2 - - - Otherwise, conflicts will arise between the two PCI groups, making the system...
User Manual
Page 26
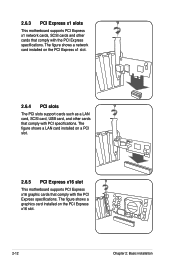
...x16 slot. 2-12 Chapter 2: Basic installation The figure shows a graphics card installed on a PCI slot. 2.6.5 PCI Express x16 slot This motherboard supports PCI Express x16 graphic cards that comply with the PCI Express specifications. The figure shows a network card installed on the PCI Express x1 slot. 2.6.4... PCI slots The PCI slots support cards such as a LAN card, SCSI card, USB card, and other cards that comply with PCI specifications. 2.6.3 PCI Express x1 slots ...
...x16 slot. 2-12 Chapter 2: Basic installation The figure shows a graphics card installed on a PCI slot. 2.6.5 PCI Express x16 slot This motherboard supports PCI Express x16 graphic cards that comply with the PCI Express specifications. The figure shows a network card installed on the PCI Express x1 slot. 2.6.4... PCI slots The PCI slots support cards such as a LAN card, SCSI card, USB card, and other cards that comply with PCI specifications. 2.6.3 PCI Express x1 slots ...
User Manual
Page 33
Chapter 3 This chapter helps you power up Starting up the system and install drivers and utilities from the support CD.
Chapter 3 This chapter helps you power up Starting up the system and install drivers and utilities from the support CD.
User Manual
Page 34
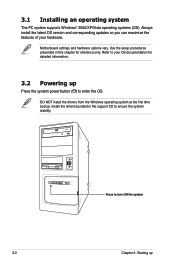
Use the setup procedures presented in the support CD to your hardware. Refer to ensure the system stability. Motherboard settings and hardware options vary. Install the drivers bundled in this chapter for detailed ...information. 3.2 Powering up Press the system power button ( ) to turn ON the system 3-2 Chapter 3: Starting up 3.1 Installing an operating system The PC system supports Windows® 2000/XP/Vista operating systems (OS). DO NOT install the drivers from the Windows operating system at the first time bootup. Press to...
Use the setup procedures presented in the support CD to your hardware. Refer to ensure the system stability. Motherboard settings and hardware options vary. Install the drivers bundled in this chapter for detailed ...information. 3.2 Powering up Press the system power button ( ) to turn ON the system 3-2 Chapter 3: Starting up 3.1 Installing an operating system The PC system supports Windows® 2000/XP/Vista operating systems (OS). DO NOT install the drivers from the Windows operating system at the first time bootup. Press to...
User Manual
Page 35
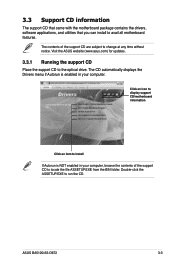
.../motherboard information Click an item to install If Autorun is enabled in your computer. ASUS BA5120/AS-D672 3-3 3.3 Support CD information The support CD that came with the motherboard package contains the drivers, software applications, and utilities that you can install to run the CD....menu if Autorun is NOT enabled in your computer, browse the contents of the support CD are subject to change at any time without notice. Visit the ASUS website (www.asus.com) for updates. 3.3.1 Running the support CD Place the support CD to locate the file ASSETUP.EXE from the BIN folder.
.../motherboard information Click an item to install If Autorun is enabled in your computer. ASUS BA5120/AS-D672 3-3 3.3 Support CD information The support CD that came with the motherboard package contains the drivers, software applications, and utilities that you can install to run the CD....menu if Autorun is NOT enabled in your computer, browse the contents of the support CD are subject to change at any time without notice. Visit the ASUS website (www.asus.com) for updates. 3.3.1 Running the support CD Place the support CD to locate the file ASSETUP.EXE from the BIN folder.
User Manual
Page 37
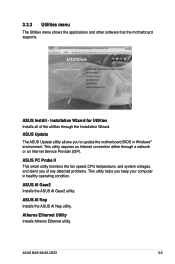
...Utilities menu shows the applications and other software that the motherboard supports. ASUS Update The ASUS Update utility allows you to update the motherboard BIOS in healthy operating condition. ASUS AI Nap Installs the ASUS AI Nap utility. This utility requires an Internet connection either through... utility helps you of the utilities through a network or an Internet Service Provider (ISP). ASUS AI Gear2 Installs the ASUS AI Gear2 utility. ASUS BA5120/AS-D672 3-5 ASUS InstAll - ASUS PC Probe II This smart utility monitors the fan speed, CPU temperature, and system voltages,...
...Utilities menu shows the applications and other software that the motherboard supports. ASUS Update The ASUS Update utility allows you to update the motherboard BIOS in healthy operating condition. ASUS AI Nap Installs the ASUS AI Nap utility. This utility requires an Internet connection either through... utility helps you of the utilities through a network or an Internet Service Provider (ISP). ASUS AI Gear2 Installs the ASUS AI Gear2 utility. ASUS BA5120/AS-D672 3-5 ASUS InstAll - ASUS PC Probe II This smart utility monitors the fan speed, CPU temperature, and system voltages,...
User Manual
Page 39
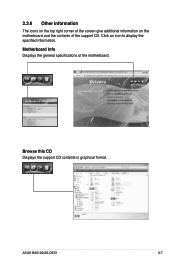
ASUS BA5120/AS-D672 3-7 Browse this CD Displays the support CD contents in graphical format. Click an icon to display the specified information. 3.3.6 Other information The icons on the top right corner of the screen give additional information on the motherboard and the contents of the motherboard. Motherboard Info Displays the general specifications of the support CD.
ASUS BA5120/AS-D672 3-7 Browse this CD Displays the support CD contents in graphical format. Click an icon to display the specified information. 3.3.6 Other information The icons on the top right corner of the screen give additional information on the motherboard and the contents of the motherboard. Motherboard Info Displays the general specifications of the support CD.
User Manual
Page 40
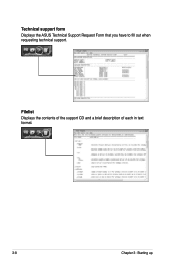
Technical support form Displays the ASUS Technical Support Request Form that you have to fill out when requesting technical support. Filelist Displays the contents of the support CD and a brief description of each in text format. 3-8 Chapter 3: Starting up
Technical support form Displays the ASUS Technical Support Request Form that you have to fill out when requesting technical support. Filelist Displays the contents of the support CD and a brief description of each in text format. 3-8 Chapter 3: Starting up
User Manual
Page 42
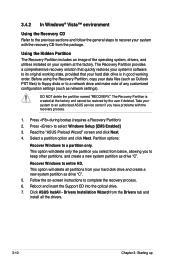
...EMS Enabled] 3. DO NOT delete the partition named "RECOVERY." Read the "ASUS Preload Wizard" screen and click Next. 4. Partition options: Recover Windows to its original working order. Reboot and insert the Support CD into the optical drive. 7. Take your hard disk drive and create... a new system partition as network settings). Select a partition option and click Next. Click ASUS InstAll - The Recovery Partition provides a comprehensive recovery solution...
...EMS Enabled] 3. DO NOT delete the partition named "RECOVERY." Read the "ASUS Preload Wizard" screen and click Next. 4. Partition options: Recover Windows to its original working order. Reboot and insert the Support CD into the optical drive. 7. Take your hard disk drive and create... a new system partition as network settings). Select a partition option and click Next. Click ASUS InstAll - The Recovery Partition provides a comprehensive recovery solution...


