

User Guide
Page 3
... information...iv About this guide...iv Package contents...vi B85M-D PLUS specifications summary vi Chapter 1: Product introduction 1.1 Before you proceed 1-1 1.2 Motherboard overview 1-2 1.3 Central Processing Unit (CPU 1-4 1.4 System memory 1-8 1.5 Expansion slots 1-10 1.6 Headers...1-12 1.7 Connectors 1-13 1.9 Software support 1-21 Chapter 2: BIOS information 2.1 Managing and updating your BIOS 2-1 2.2 BIOS setup program 2-6 2.3 My Favorites 2-9 2.4 Main menu 2-10 2.5 Ai...
... information...iv About this guide...iv Package contents...vi B85M-D PLUS specifications summary vi Chapter 1: Product introduction 1.1 Before you proceed 1-1 1.2 Motherboard overview 1-2 1.3 Central Processing Unit (CPU 1-4 1.4 System memory 1-8 1.5 Expansion slots 1-10 1.6 Headers...1-12 1.7 Connectors 1-13 1.9 Software support 1-21 Chapter 2: BIOS information 2.1 Managing and updating your BIOS 2-1 2.2 BIOS setup program 2-6 2.3 My Favorites 2-9 2.4 Main menu 2-10 2.5 Ai...
User Guide
Page 4
...supply is broken, do not try to moisture. • Place the product on the motherboard. • Chapter 2: BIOS information This chapter discusses changing system settings through the BIOS Setup menus. iv Contact a qualified service technician or your area. If you add a device. • Before ... To avoid short circuits, keep paper clips, screws, and staples away from the motherboard, ensure that the power cables for the BIOS parameters are not damaged. Operation safety • Before installing the motherboard and adding components, carefully read all power cables from the ...
...supply is broken, do not try to moisture. • Place the product on the motherboard. • Chapter 2: BIOS information This chapter discusses changing system settings through the BIOS Setup menus. iv Contact a qualified service technician or your area. If you add a device. • Before ... To avoid short circuits, keep paper clips, screws, and staples away from the motherboard, ensure that the power cables for the BIOS parameters are not damaged. Operation safety • Before installing the motherboard and adding components, carefully read all power cables from the ...

User Guide
Page 7
...-Hour Solid Capacitors - 2.5X longer lifespan with excellent durability - ASUS MyLogo 2 ASUS Exclusive Features - ASUS AI Suite 3 - ASUS Anti Surge ASUS Quiet Thermal Solution - ASUS UEFI BIOS EZ Mode featuring friendly graphics user interface - ASUS ESD Guards - Network iControl - ASUS GPU Boost - ASUS Enhanced DRAM Overcurrent Protection- ASUS USB 3.0 Boost - B85M-D PLUS specifications summary ASUS unique features Rear panel I /O - 3X more durable corrosion-resistant...
...-Hour Solid Capacitors - 2.5X longer lifespan with excellent durability - ASUS MyLogo 2 ASUS Exclusive Features - ASUS AI Suite 3 - ASUS Anti Surge ASUS Quiet Thermal Solution - ASUS UEFI BIOS EZ Mode featuring friendly graphics user interface - ASUS ESD Guards - Network iControl - ASUS GPU Boost - ASUS Enhanced DRAM Overcurrent Protection- ASUS USB 3.0 Boost - B85M-D PLUS specifications summary ASUS unique features Rear panel I /O - 3X more durable corrosion-resistant...

User Guide
Page 8
viii B85M-D PLUS specifications summary Internal connectors BIOS features Manageability Support DVD Form factor 1 x USB 3.0 connector supports additional 2 USB 3.0 ports 2 x USB 2.0 connectors support additional 4 USB 2.0 ports 2 x SATA 3.0 Gb/s connectors 4 x SATA 6.0 Gb...connector 1 x 4-pin ATX 12V power connector 128Mb Flash ROM, AMI UEFI BIOS, PnP, DMI v2.0, WfM2.0, SM BIOS v2.8, ACPI v2.0a, Multi-language BIOS, ASUS EZ Flash 2, ASUS CrashFree BIOS 3 WfM 2.0, DMI 2.0, WOL by PME, WOR by PME, PXE Drivers ASUS utilities EZ Update Anti-virus software (OEM version) mATX form factor: 9.6 in...
viii B85M-D PLUS specifications summary Internal connectors BIOS features Manageability Support DVD Form factor 1 x USB 3.0 connector supports additional 2 USB 3.0 ports 2 x USB 2.0 connectors support additional 4 USB 2.0 ports 2 x SATA 3.0 Gb/s connectors 4 x SATA 6.0 Gb...connector 1 x 4-pin ATX 12V power connector 128Mb Flash ROM, AMI UEFI BIOS, PnP, DMI v2.0, WfM2.0, SM BIOS v2.8, ACPI v2.0a, Multi-language BIOS, ASUS EZ Flash 2, ASUS CrashFree BIOS 3 WfM 2.0, DMI 2.0, WOL by PME, WOR by PME, PXE Drivers ASUS utilities EZ Update Anti-virus software (OEM version) mATX form factor: 9.6 in...
User Guide
Page 18
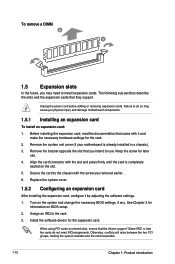
...is already installed in a chassis). 3. Remove the system unit cover (if your motherboard is completely seated on the system and change the necessary BIOS settings, if any. Keep the screw for information on shared slots, ensure that the drivers support "Share IRQ" or that you removed earlier... documentation that they support. See Chapter 2 for later use . Failure to do not need to the card. 3. When using PCI cards on BIOS setup. 2. Align the card connector with it by adjusting the software settings. 1. Otherwise, conflicts will arise between the two PCI groups, making the...
...is already installed in a chassis). 3. Remove the system unit cover (if your motherboard is completely seated on the system and change the necessary BIOS settings, if any. Keep the screw for information on shared slots, ensure that the drivers support "Share IRQ" or that you removed earlier... documentation that they support. See Chapter 2 for later use . Failure to do not need to the card. 3. When using PCI cards on BIOS setup. 2. Align the card connector with it by adjusting the software settings. 1. Otherwise, conflicts will arise between the two PCI groups, making the...

User Guide
Page 20
... the power cord and turn ON the computer. 4. Shut down the key during the boot process and enter BIOS setup to default values. 1-12 Chapter 1: Product introduction B85M-D PLUS CLRTC 12 12 Normal Clear CMOS Values (Open) (Short) B85M-D PLUS Clear RTC RAM To erase the RTC RAM: 1. Use a metal object such as system passwords.
... the power cord and turn ON the computer. 4. Shut down the key during the boot process and enter BIOS setup to default values. 1-12 Chapter 1: Product introduction B85M-D PLUS CLRTC 12 12 Normal Clear CMOS Values (Open) (Short) B85M-D PLUS Clear RTC RAM To erase the RTC RAM: 1. Use a metal object such as system passwords.
User Guide
Page 24
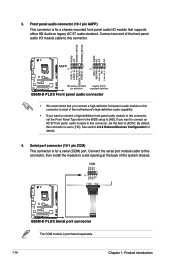
...to [AC97]. If you want to connect an AC'97 front panel audio module to this connector, set the Front Panel Type item in the BIOS setup to [HD]. Serial port connector (10-1 pin COM) This connector is set the item to [HD]. Front panel audio connector (10.... 1-16 Chapter 1: Product introduction See section 2.6.8 Onboard Devices Configuration for details. 4. COM PIN 1 RXD DTR DSR CTS DCD TXD GND RTS RI B85M-D PLUS B85M-D PLUS Serial port connector The COM module is for a serial (COM) port. AGND NC SENSE1_RETUR SENSE2_RETUR AGND NC NC NC AAFP PIN 1 PIN 1 MIC2 ...
...to [AC97]. If you want to connect an AC'97 front panel audio module to this connector, set the Front Panel Type item in the BIOS setup to [HD]. Serial port connector (10-1 pin COM) This connector is set the item to [HD]. Front panel audio connector (10.... 1-16 Chapter 1: Product introduction See section 2.6.8 Onboard Devices Configuration for details. 4. COM PIN 1 RXD DTR DSR CTS DCD TXD GND RTS RI B85M-D PLUS B85M-D PLUS Serial port connector The COM module is for a serial (COM) port. AGND NC SENSE1_RETUR SENSE2_RETUR AGND NC NC NC AAFP PIN 1 PIN 1 MIC2 ...

User Guide
Page 26
... GND RSATA_RXP3 RSATA_RXN3 GND RSATA_TXN3 RSATA_TXP3 GND GND RSATA_RXP4 RSATA_RXN4 GND RSATA_TXN4 RSATA_TXP4 GND B B85M-D PLUS SATA 6.0Gb/s connectors When using hot-plug and NCQ, set the SATA Mode Selection item in the BIOS to Serial ATA 3.0 Gb/s hard disk drives and optical drives via Serial ATA ... GND RSATA_RXP1 RSATA_RXN1 GND RSATA_TXN1 RSATA_TXP1 GND GND RSATA_RXP2 RSATA_RXN2 GND RSATA_TXN2 RSATA_TXP2 GND B85M-D PLUS SATA 3.0Gb/s connectors When using hot-plug and NCQ, set the SATA Mode Selection item in the BIOS to Serial ATA 6.0 Gb/s hard disk drives via Serial ATA 3.0 Gb/s...
... GND RSATA_RXP3 RSATA_RXN3 GND RSATA_TXN3 RSATA_TXP3 GND GND RSATA_RXP4 RSATA_RXN4 GND RSATA_TXN4 RSATA_TXP4 GND B B85M-D PLUS SATA 6.0Gb/s connectors When using hot-plug and NCQ, set the SATA Mode Selection item in the BIOS to Serial ATA 3.0 Gb/s hard disk drives and optical drives via Serial ATA ... GND RSATA_RXP1 RSATA_RXN1 GND RSATA_TXN1 RSATA_TXP1 GND GND RSATA_RXP2 RSATA_RXN2 GND RSATA_TXN2 RSATA_TXP2 GND B85M-D PLUS SATA 3.0Gb/s connectors When using hot-plug and NCQ, set the SATA Mode Selection item in the BIOS to Serial ATA 6.0 Gb/s hard disk drives via Serial ATA 3.0 Gb/s...
User Guide
Page 31
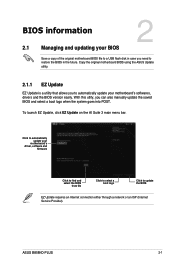
... either through a network or an ISP (Internet Service Provider). Click to automatically update your motherboard's softwares, drivers and the BIOS version easily. ASUS B85M-D PLUS 2-1 With this utlity, you can also manually update the saved BIOS and select a boot logo when the system goes into POST. To launch EZ Update, click EZ Update on the...
... either through a network or an ISP (Internet Service Provider). Click to automatically update your motherboard's softwares, drivers and the BIOS version easily. ASUS B85M-D PLUS 2-1 With this utlity, you can also manually update the saved BIOS and select a boot logo when the system goes into POST. To launch EZ Update, click EZ Update on the...

User Guide
Page 32
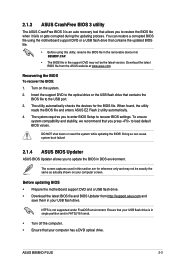
... to switch to the Folder Info field. 6. 2.1.2 ASUS EZ Flash 2 The ASUS EZ Flash 2 feature allows you start using an OS‑based utility. Before you to update the BIOS without using this utility, download the latest BIOS file from the ASUS website at www.asus.com. Press the Up/Down arrow keys to find... the BIOS file, and then press to the USB port. 2. Press to switch to...
... to switch to the Folder Info field. 6. 2.1.2 ASUS EZ Flash 2 The ASUS EZ Flash 2 feature allows you start using an OS‑based utility. Before you to update the BIOS without using this utility, download the latest BIOS file from the ASUS website at www.asus.com. Press the Up/Down arrow keys to find... the BIOS file, and then press to the USB port. 2. Press to switch to...
User Guide
Page 33
.... Turn on your computer screen. To ensure system compatibility and stability, we recommend that you press to recover BIOS settings. ASUS B85M-D PLUS 2-3 You can cause system boot failure! 2.1.4 ASUS BIOS Updater ASUS BIOS Updater allows you to update the BIOS in your computer has a DVD optical drive. DO NOT shut down or reset the system while updating the...
.... Turn on your computer screen. To ensure system compatibility and stability, we recommend that you press to recover BIOS settings. ASUS B85M-D PLUS 2-3 You can cause system boot failure! 2.1.4 ASUS BIOS Updater ASUS BIOS Updater allows you to update the BIOS in your computer has a DVD optical drive. DO NOT shut down or reset the system while updating the...
User Guide
Page 34
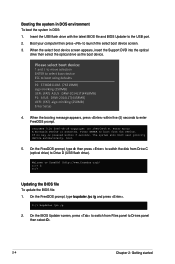
... will boot next priority device automatically. Welcome to boot using defaults P2: ST3808110AS (76319MB) aigo miniking (250MB) UEFI: (FAT) ASUS DRW-2014L1T(4458MB) P1: ASUS DRW-2014L1T(4458MB) UEFI: (FAT) aigo miniking (250MB) Enter Setup 4. Peter Anvin A Bootable DVD/CD is pressed within five... (5) seconds to the USB port. 2. C:/> d: D:/> Updating the BIOS file To update the BIOS file: 1. On the FreeDOS prompt, type d: then press to...
... will boot next priority device automatically. Welcome to boot using defaults P2: ST3808110AS (76319MB) aigo miniking (250MB) UEFI: (FAT) ASUS DRW-2014L1T(4458MB) P1: ASUS DRW-2014L1T(4458MB) UEFI: (FAT) aigo miniking (250MB) Enter Setup 4. Peter Anvin A Bootable DVD/CD is pressed within five... (5) seconds to the USB port. 2. C:/> d: D:/> Updating the BIOS file To update the BIOS file: 1. On the FreeDOS prompt, type d: then press to...

User Guide
Page 35
...to security regulations. 5. Ensure to load the BIOS default settings to prevent system boot failaure. Drives panel ASUSTeK BIOS Updater for details. Yes No The BIOS Backup feature is done, press to select the BIOS file and press . 4. ASUS B85M-D PLUS 2-5 Select Yes then press . Select the Load... Optimized Defaults item under the Exit BIOS menu. DO NOT shut down...
...to security regulations. 5. Ensure to load the BIOS default settings to prevent system boot failaure. Drives panel ASUSTeK BIOS Updater for details. Yes No The BIOS Backup feature is done, press to select the BIOS file and press . 4. ASUS B85M-D PLUS 2-5 Select Yes then press . Select the Load... Optimized Defaults item under the Exit BIOS menu. DO NOT shut down...
User Guide
Page 36
... at startup To enter BIOS Setup at www.asus.com to download the latest BIOS file for reference purposes only, and may not exactly match what you to the default value. If you always shut down the system properly from the operating system. • The BIOS setup screens shown in ... for details. • If the system fails to boot after changing any BIOS setting, load the default settings to ensure system compatibility and stability. See section 1.6 Headers for information on your screen. • Visit the ASUS website at startup: Press or during the Power-On Self Test (POST). ...
... at startup To enter BIOS Setup at www.asus.com to download the latest BIOS file for reference purposes only, and may not exactly match what you to the default value. If you always shut down the system properly from the operating system. • The BIOS setup screens shown in ... for details. • If the system fails to boot after changing any BIOS setting, load the default settings to ensure system compatibility and stability. See section 1.6 Headers for information on your screen. • Visit the ASUS website at startup: Press or during the Power-On Self Test (POST). ...
User Guide
Page 37
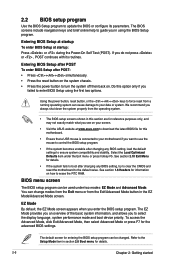
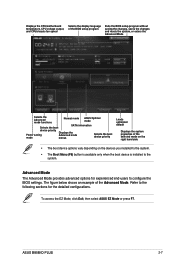
...options for the detailed configurations. To access the EZ Mode, click Exit, then select ASUS EZ Mode or press F7. Refer to the following sections for experienced end-users to the system. ASUS B85M-D PLUS 2-7 The figure below shows an example of the selected mode on the right hand ...side • The boot device options vary depending on the devices you installed to the system. • The Boot Menu (F8) button is available only when the boot device is installed to configure the BIOS...
...options for the detailed configurations. To access the EZ Mode, click Exit, then select ASUS EZ Mode or press F7. Refer to the following sections for experienced end-users to the system. ASUS B85M-D PLUS 2-7 The figure below shows an example of the selected mode on the right hand ...side • The boot device options vary depending on the devices you installed to the system. • The Boot Menu (F8) button is available only when the boot device is installed to configure the BIOS...

User Guide
Page 39
... menu items. If an item is not user-configurable. Pop-up window with the configuration options for the BIOS setup program. You cannot select an item that is user-configurable, you have done in BIOS. Quick Note button This button allows you to display a list of the activities that you can change... keys for that do not fit on the screen. Scroll bar A scroll bar appears on the right side of the menu screen is your favorite BIOS items. ASUS B85M-D PLUS 2-9 Use the navigation keys to display a pop-up window Select a menu item and press to select items in...
... menu items. If an item is not user-configurable. Pop-up window with the configuration options for the BIOS setup program. You cannot select an item that is user-configurable, you have done in BIOS. Quick Note button This button allows you to display a list of the activities that you can change... keys for that do not fit on the screen. Scroll bar A scroll bar appears on the right side of the menu screen is your favorite BIOS items. ASUS B85M-D PLUS 2-9 Use the navigation keys to display a pop-up window Select a menu item and press to select items in...

User Guide
Page 40
... to set the system date, time, language, and security settings. 2.4.1 System Language [English] Allows you to choose the BIOS language version from the options. Adding items to My Favorites To add frequently-used BIOS items to add. Use the arrow keys to select an item that you enter the Advanced Mode of... the BIOS Setup program. Press on your keyboard or right-click on your mouse to add the item to the item. 2. The Main menu provides you an ...
... to set the system date, time, language, and security settings. 2.4.1 System Language [English] Allows you to choose the BIOS language version from the options. Adding items to My Favorites To add frequently-used BIOS items to add. Use the arrow keys to select an item that you enter the Advanced Mode of... the BIOS Setup program. Press on your keyboard or right-click on your mouse to add the item to the item. 2. The Main menu provides you an ...

User Guide
Page 41
...the password. Select the User Password item and press . 2. From the Create New Password box, key in the current password, then press . 3. ASUS B85M-D PLUS 2-11 From the Enter Current Password box, key in a new password, then press . 4. User Password If you have set a user password,... and press . 2. To change an administrator password: 1. Administrator Password If you have forgotten your BIOS password, erase the CMOS Real Time Clock (RTC) RAM to clear the BIOS password. To set an administrator password, we recommend that you enter the administrator password for accessing the...
...the password. Select the User Password item and press . 2. From the Create New Password box, key in the current password, then press . 3. ASUS B85M-D PLUS 2-11 From the Enter Current Password box, key in a new password, then press . 4. User Password If you have set a user password,... and press . 2. To change an administrator password: 1. Administrator Password If you have forgotten your BIOS password, erase the CMOS Real Time Clock (RTC) RAM to clear the BIOS password. To set an administrator password, we recommend that you enter the administrator password for accessing the...

User Guide
Page 50
... flag to always return to change the settings for CPUs with extended CPUID functions. [Disabled] Disables this menu show the CPU-related information that the BIOS automatically detects. Intel® Adaptive Thermal Monitor [Enabled] [Enabled] Enables the overheated CPU to throttle its clock speed to malfunction. 2.6.1 CPU Configuration The items in...
... flag to always return to change the settings for CPUs with extended CPUID functions. [Disabled] Disables this menu show the CPU-related information that the BIOS automatically detects. Intel® Adaptive Thermal Monitor [Enabled] [Enabled] Enables the overheated CPU to throttle its clock speed to malfunction. 2.6.1 CPU Configuration The items in...
User Guide
Page 53
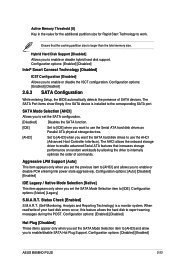
...Enabled] S.M.A.R.T. (Self-Monitoring, Analysis and Reporting Technology) is larger than the total memory size. Configuration options: [Disabled] [Enabled] ASUS B85M-D PLUS 2-23 Configuration options: [Enabled] [Disabled] Intel® Smart Connect Technology [Disabled] ICST Configuration [Disabled] Allows you want the ... the AHCI (Advanced Host Controller Interface). Configuration options: [Enabled] [Disabled] 2.6.3 SATA Configuration While entering Setup, the BIOS automatically detects the presence of your hard disk errors occur, this feature allows the hard disk to use the Serial ATA...
...Enabled] S.M.A.R.T. (Self-Monitoring, Analysis and Reporting Technology) is larger than the total memory size. Configuration options: [Disabled] [Enabled] ASUS B85M-D PLUS 2-23 Configuration options: [Enabled] [Disabled] Intel® Smart Connect Technology [Disabled] ICST Configuration [Disabled] Allows you want the ... the AHCI (Advanced Host Controller Interface). Configuration options: [Enabled] [Disabled] 2.6.3 SATA Configuration While entering Setup, the BIOS automatically detects the presence of your hard disk errors occur, this feature allows the hard disk to use the Serial ATA...


