B75M-A User's Manual
Page 31
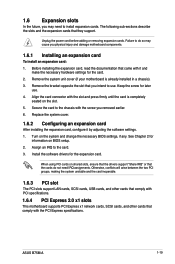
... an IRQ to install expansion cards. ASUS B75M-A 1-19 Remove the system unit cover (if your motherboard is completely seated on BIOS setup. 2. Unplug the power cord before adding or removing expansion cards. Turn on shared slots, ensure that the drivers support "Share IRQ" or that came... with the PCI Express specifications. Failure to do not need to the card. 3. Keep the screw for the card. 2. 1.6 Expansion slots In the future, you physical injury and damage motherboard components. 1.6.1 Installing an ...
... an IRQ to install expansion cards. ASUS B75M-A 1-19 Remove the system unit cover (if your motherboard is completely seated on BIOS setup. 2. Unplug the power cord before adding or removing expansion cards. Turn on shared slots, ensure that the drivers support "Share IRQ" or that came... with the PCI Express specifications. Failure to do not need to the card. 3. Keep the screw for the card. 2. 1.6 Expansion slots In the future, you physical injury and damage motherboard components. 1.6.1 Installing an ...
B75M-A User's Manual
Page 44
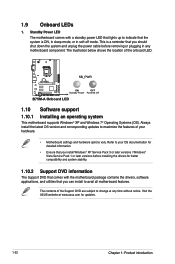
... with a standby power LED that lights up to change at www.asus.com for better compatibility and system stability. 1.10.2 Support DVD information The Support DVD that comes with the motherboard package contains the drivers, software applications, and utilities that the system is a reminder that ...and unplug the power cable before removing or plugging in soft-off mode. B75M-A SB_PWR ON OFF Standby Power Powered Off B75M-A Onboard LED 1.10 Software support 1.10.1 Installing an operating system This motherboard supports Windows® XP and Windows 7® Operating Systems (OS). ...
... with a standby power LED that lights up to change at www.asus.com for better compatibility and system stability. 1.10.2 Support DVD information The Support DVD that comes with the motherboard package contains the drivers, software applications, and utilities that the system is a reminder that ...and unplug the power cable before removing or plugging in soft-off mode. B75M-A SB_PWR ON OFF Standby Power Powered Off B75M-A Onboard LED 1.10 Software support 1.10.1 Installing an operating system This motherboard supports Windows® XP and Windows 7® Operating Systems (OS). ...

B75M-A User's Manual
Page 45
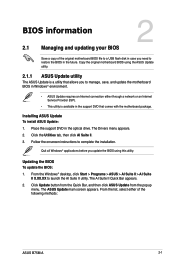
...DVD to install If Autorun is for reference only. Click an icon to display Support DVD/motherboard information Click an item to locate the file ASSETUP.EXE from the BIN folder. Click Drivers, Utilities, Make Disk, Manual, and Contact tabs to run the Support DVD Place the ...Support DVD into the optical drive. The following screen is NOT enabled in your ASUS motherboard. Double-click the ASSETUP.EXE to display their respective menus. ASUS B75M-A 1-33
...DVD to install If Autorun is for reference only. Click an icon to display Support DVD/motherboard information Click an item to locate the file ASSETUP.EXE from the BIN folder. Click Drivers, Utilities, Make Disk, Manual, and Contact tabs to run the Support DVD Place the ...Support DVD into the optical drive. The following screen is NOT enabled in your ASUS motherboard. Double-click the ASSETUP.EXE to display their respective menus. ASUS B75M-A 1-33
B75M-A User's Manual
Page 47
...using the ASUS Update utility. 2.1.1 ASUS Update utility The ASUS Update is available in the support DVD that allows you to manage, save, and update the motherboard BIOS in Windows® environment. • ASUS Update requires an Internet connection either of the following methods: ASUS B75M-A 2-1 Click... ASUS Update main screen appears. Place the support DVD in the future. The AI Suite II Quick Bar appears. 2. Quit all Windows® applications before you need to restore the BIOS in the optical drive. Copy the original motherboard BIOS using this utility. The Drivers...
...using the ASUS Update utility. 2.1.1 ASUS Update utility The ASUS Update is available in the support DVD that allows you to manage, save, and update the motherboard BIOS in Windows® environment. • ASUS Update requires an Internet connection either of the following methods: ASUS B75M-A 2-1 Click... ASUS Update main screen appears. Place the support DVD in the future. The AI Suite II Quick Bar appears. 2. Quit all Windows® applications before you need to restore the BIOS in the optical drive. Copy the original motherboard BIOS using this utility. The Drivers...


