
B150 PRO GAMING/AURA Users manual English
Page 2
... ARISING FROM ANY DEFECT OR ERROR IN THIS MANUAL OR PRODUCT. The source code will not be extended if: (1) the product is repaired, modified or altered, unless such repair, modification of the product is dependent on the preferred carrier and the location where you want to have it from http://support.asus.com/download or (2) for which you encounter...
... ARISING FROM ANY DEFECT OR ERROR IN THIS MANUAL OR PRODUCT. The source code will not be extended if: (1) the product is repaired, modified or altered, unless such repair, modification of the product is dependent on the preferred carrier and the location where you want to have it from http://support.asus.com/download or (2) for which you encounter...
B150 PRO GAMING/AURA Users manual English
Page 7
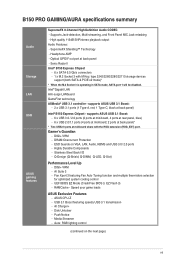
B150 PRO GAMING/AURA specifications summary Audio Storage LAN USB ASUS gaming features SupremeFX 8-Channel High Definition Audio CODEC - Intel® Gigabit LAN Anti-surge LANGuard GameFirst technology ASMedia® USB 3.1 controller - Stainless Steel Back I/O - DIGI+ VRM - UEFI BIOS EZ Mode (CrashFree BIOS 3, EZ Flash 3) - USB 3.1 Boost featuring speedy USB 3.1 transmission - High quality 115dB SNR stereo playback output Audio Features: - SupremeFX Shielding™ Technology - supports ASUS USB 3.1 Boost: - 6 x USB 3.0 / 2.0 ports (2 ports at mid-board, 4 ports at rear panel, ...
B150 PRO GAMING/AURA specifications summary Audio Storage LAN USB ASUS gaming features SupremeFX 8-Channel High Definition Audio CODEC - Intel® Gigabit LAN Anti-surge LANGuard GameFirst technology ASMedia® USB 3.1 controller - Stainless Steel Back I/O - DIGI+ VRM - UEFI BIOS EZ Mode (CrashFree BIOS 3, EZ Flash 3) - USB 3.1 Boost featuring speedy USB 3.1 transmission - High quality 115dB SNR stereo playback output Audio Features: - SupremeFX Shielding™ Technology - supports ASUS USB 3.1 Boost: - 6 x USB 3.0 / 2.0 ports (2 ports at mid-board, 4 ports at rear panel, ...
B150 PRO GAMING/AURA Users manual English
Page 8
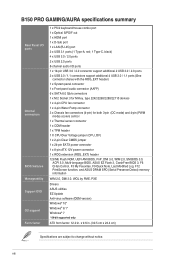
... x COM header 1 x TPM header 1 X CPU Over Voltage jumper (CPU_OV) 1 x 2-pin Clear CMOS jumper 1 x 24-pin EATX power connector 1 x 8-pin ATX 12V power connector 1 x ROG extension (ROG_EXT) header 128 Mb Flash ROM, UEFI AMI BIOS, PnP, DMI 3.0, WfM 2.0, SM BIOS 3.0, ACPI 5.0, Multi-language BIOS, ASUS EZ Flash 3, CrashFree BIOS 3, F6 Q-fan Control, F3 My Favorites, F9 Quick Note, Last Modified Log, F12 PrintScreen function, and ASUS DRAM SPD (Serial Presence Detect) memory information WfM 2.0, DMI 3.0, WOL by PME, PXE Drivers ASUS utilities EZ Update Anti-virus software (OEM version) Windows®...
... x COM header 1 x TPM header 1 X CPU Over Voltage jumper (CPU_OV) 1 x 2-pin Clear CMOS jumper 1 x 24-pin EATX power connector 1 x 8-pin ATX 12V power connector 1 x ROG extension (ROG_EXT) header 128 Mb Flash ROM, UEFI AMI BIOS, PnP, DMI 3.0, WfM 2.0, SM BIOS 3.0, ACPI 5.0, Multi-language BIOS, ASUS EZ Flash 3, CrashFree BIOS 3, F6 Q-fan Control, F3 My Favorites, F9 Quick Note, Last Modified Log, F12 PrintScreen function, and ASUS DRAM SPD (Serial Presence Detect) memory information WfM 2.0, DMI 3.0, WOL by PME, PXE Drivers ASUS utilities EZ Update Anti-virus software (OEM version) Windows®...
B150 PRO GAMING/AURA Users manual English
Page 9
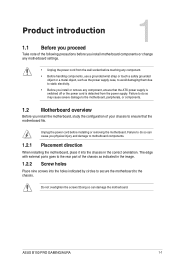
... that the motherboard fits. ASUS B150 PRO GAMING/AURA 1-1 Failure to static electricity. • Before you physical injury and damage to motherboard components. 1.2.1 Placement direction When installing the motherboard, place it into the chassis in the image. 1.2.2 Screw holes Place nine screws into the holes indicated by circles to secure the motherboard to ensure that the ATX power supply is switched off or the power cord is...
... that the motherboard fits. ASUS B150 PRO GAMING/AURA 1-1 Failure to static electricity. • Before you physical injury and damage to motherboard components. 1.2.1 Placement direction When installing the motherboard, place it into the chassis in the image. 1.2.2 Screw holes Place nine screws into the holes indicated by circles to secure the motherboard to ensure that the ATX power supply is switched off or the power cord is...
B150 PRO GAMING/AURA Users manual English
Page 11
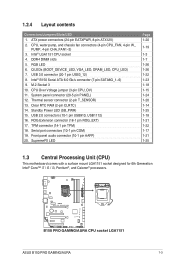
...® processors. ATX power connectors (24-pin EATXPWR, 8-pin ATX12V) 2. RGB LED 6. System panel connector (20-5 pin PANEL) 12. CPU, water pump, and chassis fan connectors (4-pin CPU_FAN, 4-pin W_ PUMP, 4-pin CHA_FAN1~3) 3. USB 3.0 connector (20-1 pin USB3_12) 8. B150 PRO GAMING/AURA CPU socket LGA1151 ASUS B150 PRO GAMING/AURA 1-3 CPU Over Voltage jumper (3-pin CPU_OV) 11. ROG Extension connector (18-1 pin ROG_EXT) 17. DDR4 DIMM slots 5. Clear RTC RAM (2-pin CLRTC) 14. Front panel audio connector (10-1 pin AAFP) 20. Thermal sensor connector (2-pin T_SENSOR...
...® processors. ATX power connectors (24-pin EATXPWR, 8-pin ATX12V) 2. RGB LED 6. System panel connector (20-5 pin PANEL) 12. CPU, water pump, and chassis fan connectors (4-pin CPU_FAN, 4-pin W_ PUMP, 4-pin CHA_FAN1~3) 3. USB 3.0 connector (20-1 pin USB3_12) 8. B150 PRO GAMING/AURA CPU socket LGA1151 ASUS B150 PRO GAMING/AURA 1-3 CPU Over Voltage jumper (3-pin CPU_OV) 11. ROG Extension connector (18-1 pin ROG_EXT) 17. DDR4 DIMM slots 5. Clear RTC RAM (2-pin CLRTC) 14. Front panel audio connector (10-1 pin AAFP) 20. Thermal sensor connector (2-pin T_SENSOR...
B150 PRO GAMING/AURA Users manual English
Page 20
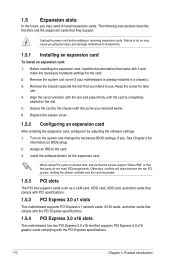
... already installed in a chassis). 3. Turn on BIOS setup. 2. Install the software drivers for the card. 2. Remove the system unit cover (if your motherboard is completely seated on shared slots, ensure that the drivers support "Share IRQ" or that they support. Align the card connector with it by adjusting the software settings. 1. Replace the system cover. 1.5.2 Configuring an expansion card After installing the expansion card, configure it and make the necessary hardware settings for the expansion card. When using PCI cards...
... already installed in a chassis). 3. Turn on BIOS setup. 2. Install the software drivers for the card. 2. Remove the system unit cover (if your motherboard is completely seated on shared slots, ensure that the drivers support "Share IRQ" or that they support. Align the card connector with it by adjusting the software settings. 1. Replace the system cover. 1.5.2 Configuring an expansion card After installing the expansion card, configure it and make the necessary hardware settings for the expansion card. When using PCI cards...
B150 PRO GAMING/AURA Users manual English
Page 21
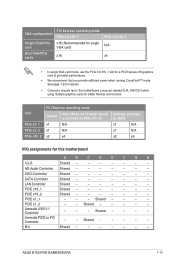
... graphics cards for details. • Connect a chassis fan to PCI Controller - - Asmedia USB 3.1 Controller - - - XHCI Controller Shared - - - - - - - PCI Express operating mode VGA configuration PCIe 3.0 x16_1 Single VGA/PCIe x16 (Recommended for single card VGA card) Dual VGA/PCIe cards x16 PCIe 3.0 x16_2 N/A x4 • In single VGA card mode, use the PCIe 3.0 x16_1 slot for this motherboard A B C D E F G H I.G.D. PCIE x16_1 Shared - - - - - - - Shared - - - - Shared - - - - Shared - - - - - ASUS B150 PRO GAMING/AURA...
... graphics cards for details. • Connect a chassis fan to PCI Controller - - Asmedia USB 3.1 Controller - - - XHCI Controller Shared - - - - - - - PCI Express operating mode VGA configuration PCIe 3.0 x16_1 Single VGA/PCIe x16 (Recommended for single card VGA card) Dual VGA/PCIe cards x16 PCIe 3.0 x16_2 N/A x4 • In single VGA card mode, use the PCIe 3.0 x16_1 slot for this motherboard A B C D E F G H I.G.D. PCIE x16_1 Shared - - - - - - - Shared - - - - Shared - - - - Shared - - - - - ASUS B150 PRO GAMING/AURA...

B150 PRO GAMING/AURA Users manual English
Page 23
...Disable Enable (default setting) B150 PRO GAMING/AURA CPU_OV setting 1.7 Connectors 1.7.1 Rear panel connectors 1 2 3 45 6 7 14 13 10 12 11 10 98 1. This port allows Gigabit connection to pins 2-3. To gain more CPU voltage setting, insert the jumper to a Local Area Network (LAN) through a network hub. To go back to its default CPU voltage setting, insert the jumper to set a higher CPU voltage for a VGA monitor or other VGA-compatible devices. 3. Video Graphics Adapter (VGA) port. This 15-pin port is for a PS/2 mouse or keyboard. 2. LAN (RJ-45) port. PS/2 keyboard...
...Disable Enable (default setting) B150 PRO GAMING/AURA CPU_OV setting 1.7 Connectors 1.7.1 Rear panel connectors 1 2 3 45 6 7 14 13 10 12 11 10 98 1. This port allows Gigabit connection to pins 2-3. To gain more CPU voltage setting, insert the jumper to a Local Area Network (LAN) through a network hub. To go back to its default CPU voltage setting, insert the jumper to set a higher CPU voltage for a VGA monitor or other VGA-compatible devices. 3. Video Graphics Adapter (VGA) port. This 15-pin port is for a PS/2 mouse or keyboard. 2. LAN (RJ-45) port. PS/2 keyboard...
B150 PRO GAMING/AURA Users manual English
Page 25
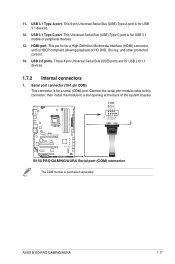
...chassis. RXD DTR DSR CTS DCD TXD GND RTS RI ASUS B150 PRO GAMING/AURA 1-17 USB 3.1 Type A port. These 4-pin Universal Serial Bus (USB) ports are for a High-Definition Multimedia Interface (HDMI) connector, and is for USB 2.0/1.1 devices. 1.7.2 Internal connectors 1. This Universal Serial Bus (USB) Type C port is for USB 3.1 mobile or peripheral devices. 13. USB 2.0 ports. Connect the serial port module cable to this connector, then install the module to a slot opening at the back of HD DVD, Blu-ray, and other protected content. 14. COM PIN 1 B150 PRO GAMING/AURA Serial port...
...chassis. RXD DTR DSR CTS DCD TXD GND RTS RI ASUS B150 PRO GAMING/AURA 1-17 USB 3.1 Type A port. These 4-pin Universal Serial Bus (USB) ports are for a High-Definition Multimedia Interface (HDMI) connector, and is for USB 2.0/1.1 devices. 1.7.2 Internal connectors 1. This Universal Serial Bus (USB) Type C port is for USB 3.1 mobile or peripheral devices. 13. USB 2.0 ports. Connect the serial port module cable to this connector, then install the module to a slot opening at the back of HD DVD, Blu-ray, and other protected content. 14. COM PIN 1 B150 PRO GAMING/AURA Serial port...
B150 PRO GAMING/AURA Users manual English
Page 27
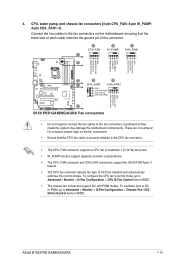
... CPU Q-Fan Control item in BIOS. ASUS B150 PRO GAMING/AURA 1-19 Do not place jumper caps on the fan connectors! • Ensure that the CPU fan cable is securely installed to the CPU fan connector. • The CPU_FAN connector supports a CPU fan of maximum 1 A (12 W) fan power. • W_PUMP function support depends on the motherboard, ensuring that the black wire of each cable matches the ground pin of CPU fan installed and automatically switches the control modes. To configure the CPU fan's control mode, go to Advanced > Monitor > Q-Fan Configuration > Chassis Fan 1/2/3 Q-Fan...
... CPU Q-Fan Control item in BIOS. ASUS B150 PRO GAMING/AURA 1-19 Do not place jumper caps on the fan connectors! • Ensure that the CPU fan cable is securely installed to the CPU fan connector. • The CPU_FAN connector supports a CPU fan of maximum 1 A (12 W) fan power. • W_PUMP function support depends on the motherboard, ensuring that the black wire of each cable matches the ground pin of CPU fan installed and automatically switches the control modes. To configure the CPU fan's control mode, go to Advanced > Monitor > Q-Fan Configuration > Chassis Fan 1/2/3 Q-Fan...
B150 PRO GAMING/AURA Users manual English
Page 29
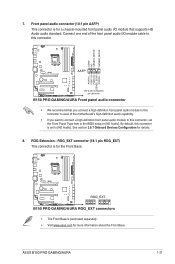
AAFP HD-audio-compliant pin definition B150 PRO GAMING/AURA Front panel audio connector • We recommend that supports HD Audio audio standard. See section 2.6.7 Onboard Devices Configuration for more information about the Front Base. ROG Extension - ASUS B150 PRO GAMING/AURA 1-21 AGND NC SENSE1_RETUR SENSE2_RETUR PORT1 L PORT1 R PORT2 R SENSE_SEND PORT2 L 7. ROG_EXT B150 PRO GAMING/AURA ROG_EXT connectors • The Front Base is set the Front Panel Type item in the BIOS setup to [HD Audio]. By default, this connector is purchased separately...
AAFP HD-audio-compliant pin definition B150 PRO GAMING/AURA Front panel audio connector • We recommend that supports HD Audio audio standard. See section 2.6.7 Onboard Devices Configuration for more information about the Front Base. ROG Extension - ASUS B150 PRO GAMING/AURA 1-21 AGND NC SENSE1_RETUR SENSE2_RETUR PORT1 L PORT1 R PORT2 R SENSE_SEND PORT2 L 7. ROG_EXT B150 PRO GAMING/AURA ROG_EXT connectors • The Front Base is set the Front Panel Type item in the BIOS setup to [HD Audio]. By default, this connector is purchased separately...
B150 PRO GAMING/AURA Users manual English
Page 35
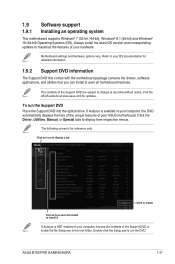
... run the DVD. The following screen is for updates. ASUS B150 PRO GAMING/AURA 1-27 1.9 Software support 1.9.1 Installing an operating system This motherboard supports Windows® 7 (32-bit / 64-bit), Windows® 8.1 (64-bit) and Windows® 10 (64-bit) Operating Systems (OS). Visit the ASUS website at any time without notice. Click the Driver, Utilities, Manual, or Special tabs to change at www.asus.com for reference only. Double-click the Setup.exe to locate the file Setup.exe...
... run the DVD. The following screen is for updates. ASUS B150 PRO GAMING/AURA 1-27 1.9 Software support 1.9.1 Installing an operating system This motherboard supports Windows® 7 (32-bit / 64-bit), Windows® 8.1 (64-bit) and Windows® 10 (64-bit) Operating Systems (OS). Visit the ASUS website at any time without notice. Click the Driver, Utilities, Manual, or Special tabs to change at www.asus.com for reference only. Double-click the Setup.exe to locate the file Setup.exe...
B150 PRO GAMING/AURA Users manual English
Page 37
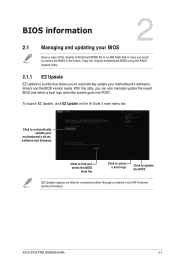
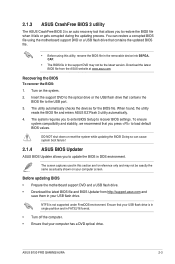
... motherboard BIOS using the ASUS Update utility. 2.1.1 EZ Update EZ Update is a utility that allows you can also manually update the saved BIOS and select a boot logo when the system goes into POST. ASUS B150 PRO GAMING/AURA 2-1 With this utlity, you to automatically update your motherboard's softwares, drivers and the BIOS version easily. BIOS information 2 2.1 Managing and updating your BIOS Save a copy of the original motherboard BIOS file to a USB flash disk in case you need to update the BIOS EZ Update requires an Internet connection either through a network...
... motherboard BIOS using the ASUS Update utility. 2.1.1 EZ Update EZ Update is a utility that allows you can also manually update the saved BIOS and select a boot logo when the system goes into POST. ASUS B150 PRO GAMING/AURA 2-1 With this utlity, you to automatically update your motherboard's softwares, drivers and the BIOS version easily. BIOS information 2 2.1 Managing and updating your BIOS Save a copy of the original motherboard BIOS file to a USB flash disk in case you need to update the BIOS EZ Update requires an Internet connection either through a network...
B150 PRO GAMING/AURA Users manual English
Page 39
When found, the utility reads the BIOS file and enters ASUS EZ Flash 3 utility automatically. 4. DO NOT shut down or reset the system while updating the BIOS! ASUS B150 PRO GAMING/AURA 2-3 Turn on your computer screen. The system requires you to enter BIOS Setup to update the BIOS in the removable device into B5PGA. Doing so can restore a corrupted BIOS file using the motherboard support DVD or a USB flash drive that contains the updated BIOS file. • Before using this section are for the BIOS file. NTFS is in...
When found, the utility reads the BIOS file and enters ASUS EZ Flash 3 utility automatically. 4. DO NOT shut down or reset the system while updating the BIOS! ASUS B150 PRO GAMING/AURA 2-3 Turn on your computer screen. The system requires you to enter BIOS Setup to update the BIOS in the removable device into B5PGA. Doing so can restore a corrupted BIOS file using the motherboard support DVD or a USB flash drive that contains the updated BIOS file. • Before using this section are for the BIOS file. NTFS is in...
B150 PRO GAMING/AURA Users manual English
Page 49
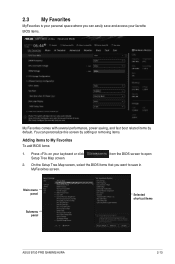
... the BIOS screen to My Favorites To add BIOS items: 1. Press on your keyboard or click Setup Tree Map screen. Main menu panel Submenu panel Selected shortcut items ASUS B150 PRO GAMING/AURA 2-13 You can easily save in MyFavorites screen. 2.3 My Favorites MyFavorites is your personal space where you want to save and access your favorite BIOS items. My Favorites comes with several performance, power saving, and fast boot...
... the BIOS screen to My Favorites To add BIOS items: 1. Press on your keyboard or click Setup Tree Map screen. Main menu panel Submenu panel Selected shortcut items ASUS B150 PRO GAMING/AURA 2-13 You can easily save in MyFavorites screen. 2.3 My Favorites MyFavorites is your personal space where you want to save and access your favorite BIOS items. My Favorites comes with several performance, power saving, and fast boot...
B150 PRO GAMING/AURA Users manual English
Page 63
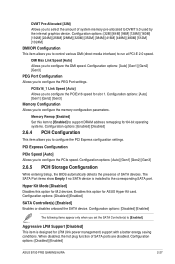
... of SATA ports are disabled. Configuration options: [Disabled] [Enabled] SATA Controller(s) [Enabled] Enables or disables onboard the SATA device. PCIEx16_1 Link Speed [Auto] Allows you to configure the PCIEx16 speed for M.2 devices. Configuration options: [Disabled] [Enabled] ASUS B150 PRO GAMING/AURA 2-27 The SATA Port items show Empty if no SATA device is designed for ASUS Hyper Kit card. DVMT Pre-Allocated [32M] Allows you to control various DMI (direct media interface) to run at PCI-E 2.0 speed. Hyper Kit Mode [Disabled] Disables this item to [Enabled] to support DRAM...
... of SATA ports are disabled. Configuration options: [Disabled] [Enabled] SATA Controller(s) [Enabled] Enables or disables onboard the SATA device. PCIEx16_1 Link Speed [Auto] Allows you to configure the PCIEx16 speed for M.2 devices. Configuration options: [Disabled] [Enabled] ASUS B150 PRO GAMING/AURA 2-27 The SATA Port items show Empty if no SATA device is designed for ASUS Hyper Kit card. DVMT Pre-Allocated [32M] Allows you to control various DMI (direct media interface) to run at PCI-E 2.0 speed. Hyper Kit Mode [Disabled] Disables this item to [Enabled] to support DRAM...

B150 PRO GAMING/AURA Users manual English
Page 65
... Mode] [Breathing Mode] [Flowing Mode] RGB LED (onboard) [Enabled] [Enabled] The LEDs will always light up at the S0(Working), S3(Sleep), and S5(Soft off) states, but not light up . SATA6G_1 can only support PCIE devices. PCIe X1_1 and PCIe X1_2 will be switched to M.2. M.2 / SATA6G_1 Configuration [Auto] Configuration options: [Auto] [Manual] The following two items appear only when you set the M.2 / SATA6G_1 Configuration to [Manual]. ASUS B150 PRO GAMING/AURA 2-29 M.2 and SATA6G_1 SATA Mode Configuration [SATA6G_1] M.2 shares SATA mode with all slots enabled...
... Mode] [Breathing Mode] [Flowing Mode] RGB LED (onboard) [Enabled] [Enabled] The LEDs will always light up at the S0(Working), S3(Sleep), and S5(Soft off) states, but not light up . SATA6G_1 can only support PCIE devices. PCIe X1_1 and PCIe X1_2 will be switched to M.2. M.2 / SATA6G_1 Configuration [Auto] Configuration options: [Auto] [Manual] The following two items appear only when you set the M.2 / SATA6G_1 Configuration to [Manual]. ASUS B150 PRO GAMING/AURA 2-29 M.2 and SATA6G_1 SATA Mode Configuration [SATA6G_1] M.2 shares SATA mode with all slots enabled...
B150 PRO GAMING/AURA Users manual English
Page 67
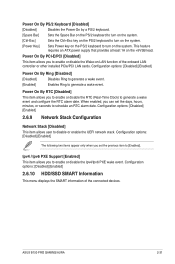
... alarm date. Power On By PCI-E/PCI [Disabled] This item allows you set the days, hours, minutes, or seconds to [Enabled]. Ipv4 / Ipv6 PXE Support [Enabled] This item allows you to enable or disable the RTC (Real-Time Clock) to enable or disable the Wake-on the system. Configuration options: [Disabled] [Enabled] 2.6.10 HDD/SSD SMART Information This menu displays the SMART information of the onboard LAN controller or other installed PCIe/PCI LAN cards. This feature requires an ATX power supply that provides...
... alarm date. Power On By PCI-E/PCI [Disabled] This item allows you set the days, hours, minutes, or seconds to [Enabled]. Ipv4 / Ipv6 PXE Support [Enabled] This item allows you to enable or disable the RTC (Real-Time Clock) to enable or disable the Wake-on the system. Configuration options: [Disabled] [Enabled] 2.6.10 HDD/SSD SMART Information This menu displays the SMART information of the onboard LAN controller or other installed PCIe/PCI LAN cards. This feature requires an ATX power supply that provides...
B150 PRO GAMING/AURA Users manual English
Page 79
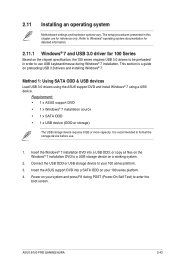
...4. Connect the USB ODD or USB storage device to format the storage device before use USB keyboard/mouse during Windows® 7 installation. It is a guide on the chipset specification, the 100 series requires USB 3.0 drivers to be preloaded in this chapter are for 100 Series Based on preloading USB 3.0 drivers and installing Windows® 7. ASUS B150 PRO GAMING/AURA 2-43 2.11 Installing an operating system Motherboard settings and hardware options vary. The setup procedures presented in order to enter the boot screen. Requirement: • 1 x ASUS support DVD •...
...4. Connect the USB ODD or USB storage device to format the storage device before use USB keyboard/mouse during Windows® 7 installation. It is a guide on the chipset specification, the 100 series requires USB 3.0 drivers to be preloaded in this chapter are for 100 Series Based on preloading USB 3.0 drivers and installing Windows® 7. ASUS B150 PRO GAMING/AURA 2-43 2.11 Installing an operating system Motherboard settings and hardware options vary. The setup procedures presented in order to enter the boot screen. Requirement: • 1 x ASUS support DVD •...
B150 PRO GAMING/AURA Users manual English
Page 81
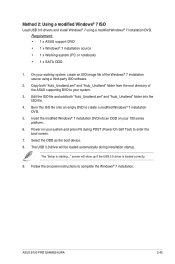
...; 7 installation DVD into the ISO file. 4. Select the ODD as the boot device. 8. Power on your system and press F8 during installation startup. ASUS B150 PRO GAMING/AURA 2-45 Copy both "Auto_Unattend.xml" and "Auto_Unattend" folder into an ODD on your 100 series platform. 6. The "Setup is loaded correctly. 9. screen will be loaded automatically during POST (Power-On Self Test) to create a modified Windows® 7 installation DVD. 5. Method 2: Using a modified Windows® 7 ISO Load USB 3.0 drivers and install Windows...
...; 7 installation DVD into the ISO file. 4. Select the ODD as the boot device. 8. Power on your system and press F8 during installation startup. ASUS B150 PRO GAMING/AURA 2-45 Copy both "Auto_Unattend.xml" and "Auto_Unattend" folder into an ODD on your 100 series platform. 6. The "Setup is loaded correctly. 9. screen will be loaded automatically during POST (Power-On Self Test) to create a modified Windows® 7 installation DVD. 5. Method 2: Using a modified Windows® 7 ISO Load USB 3.0 drivers and install Windows...


