
SK8N User Manual
Page 1
Motherboard SK8N User Guide
Motherboard SK8N User Guide

SK8N User Manual
Page 3
... to find more information ix SK8N specifications summary x Chapter 1: Product introduction 1.1 Welcome 1-1 1.2 Package contents 1-1 1.3 Special features 1-2 1.3.1 Product Highlights 1-2 1.3.2 Unique ASUS features 1-4 Chapter 2: Hardware information 2.1 Before you proceed 2-1 2.2 Motherboard overview 2-2 2.2.1 Placement direction 2-2 2.2.2 Screw holes 2-2 2.2.3 Motherboard layout 2-3 2.2.4 Layout Contents 2-4 2.3 Central Processing Unit (CPU 2-6 2.3.1 Overview 2-6 2.3.2 Installing the CPU 2-6 2.3.3 Installing the heatsink and fan 2-8 2.3.4 Connecting the CPU...
... to find more information ix SK8N specifications summary x Chapter 1: Product introduction 1.1 Welcome 1-1 1.2 Package contents 1-1 1.3 Special features 1-2 1.3.1 Product Highlights 1-2 1.3.2 Unique ASUS features 1-4 Chapter 2: Hardware information 2.1 Before you proceed 2-1 2.2 Motherboard overview 2-2 2.2.1 Placement direction 2-2 2.2.2 Screw holes 2-2 2.2.3 Motherboard layout 2-3 2.2.4 Layout Contents 2-4 2.3 Central Processing Unit (CPU 2-6 2.3.1 Overview 2-6 2.3.2 Installing the CPU 2-6 2.3.3 Installing the heatsink and fan 2-8 2.3.4 Connecting the CPU...

SK8N User Manual
Page 7
...away from connectors, slots, sockets and circuitry. • Avoid dust, humidity, and temperature extremes. Operation safety • Before installing the motherboard and adding devices on a stable surface. • If you encounter technical problems with the package. • Before using the product, ... are unplugged. • Seek professional assistance before you add a device. • Before connecting or removing signal cables from the motherboard, ensure that came with the product, contact a qualified service technician or your area. If possible, disconnect all power cables from...
...away from connectors, slots, sockets and circuitry. • Avoid dust, humidity, and temperature extremes. Operation safety • Before installing the motherboard and adding devices on a stable surface. • If you encounter technical problems with the package. • Before using the product, ... are unplugged. • Seek professional assistance before you add a device. • Before connecting or removing signal cables from the motherboard, ensure that came with the product, contact a qualified service technician or your area. If possible, disconnect all power cables from...

SK8N User Manual
Page 8
... this guide is organized This manual contains the following parts: • Chapter 1: Product introduction This chapter describes the motherboard features of shutting down the system. • Chapter 4: BIOS setup This chapter tells how to perform when installing system components. How this...guide contains the information you have to change system settings through the BIOS Setup menus. It includes description of the jumpers and connectors on the motherboard. • Chapter 3: Powering up This chapter describes the power up sequence, the vocal POST messages, and ways of the and the new...
... this guide is organized This manual contains the following parts: • Chapter 1: Product introduction This chapter describes the motherboard features of shutting down the system. • Chapter 4: BIOS setup This chapter tells how to perform when installing system components. How this...guide contains the information you have to change system settings through the BIOS Setup menus. It includes description of the jumpers and connectors on the motherboard. • Chapter 3: Powering up This chapter describes the power up sequence, the vocal POST messages, and ways of the and the new...

SK8N User Manual
Page 13
Chapter 1 This chapter describes the motherboard features and the new technologies it supports. Product introduction
Chapter 1 This chapter describes the motherboard features and the new technologies it supports. Product introduction

SK8N User Manual
Page 14
Chapter summary 1.1 Welcome 1-1 1.2 Package contents 1-1 1.3 Special features 1-2 ASUS SK8N motherboard
Chapter summary 1.1 Welcome 1-1 1.2 Package contents 1-1 1.3 Special features 1-2 ASUS SK8N motherboard
SK8N User Manual
Page 15
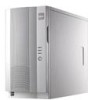
... User Guide WinDVD Suite (Retail boxes only) Instant Music Label (Retail boxes only) If any of ASUS quality motherboards! ASUS SK8N motherboard 1-1 Thank you start installing the motherboard, and hardware devices on it another standout in the world of system memory with the list below.... 1.2 Package contents Check your motherboard package for the following items. ASUS SK8N motherboard ASUS support CD 2 x SATA cable 1 x 4 port USB module w/ cable 1 x Single port 1394 module 1 x S/PDIF ...
... User Guide WinDVD Suite (Retail boxes only) Instant Music Label (Retail boxes only) If any of ASUS quality motherboards! ASUS SK8N motherboard 1-1 Thank you start installing the motherboard, and hardware devices on it another standout in the world of system memory with the list below.... 1.2 Package contents Check your motherboard package for the following items. ASUS SK8N motherboard ASUS support CD 2 x SATA cable 1 x 4 port USB module w/ cable 1 x Single port 1394 module 1 x S/PDIF ...

SK8N User Manual
Page 16
...Channel DDR memory support Employing the Double Data Rate (DDR) memory technology, the motherboard supports up to 150 MB/s data transfer rate. With the Promise PDC 20378 RAID controller onboard, the motherboard supports RAID 0, RAID 1, and RAID 0+1 configurations using PC3200/ PC2700/PC2100 ... run applications faster than processors with high bandwidth speeds up to 48 times faster than other existing technologies. Serial ATA solution The motherboard supports two interfaces compliant to 2.12 GB/s. 1-2 Chapter 1: Product introduction The 128-bit-wide data paths of the Parallel ATA...
...Channel DDR memory support Employing the Double Data Rate (DDR) memory technology, the motherboard supports up to 150 MB/s data transfer rate. With the Promise PDC 20378 RAID controller onboard, the motherboard supports RAID 0, RAID 1, and RAID 0+1 configurations using PC3200/ PC2700/PC2100 ... run applications faster than processors with high bandwidth speeds up to 48 times faster than other existing technologies. Serial ATA solution The motherboard supports two interfaces compliant to 2.12 GB/s. 1-2 Chapter 1: Product introduction The 128-bit-wide data paths of the Parallel ATA...

SK8N User Manual
Page 17
... S/PDIF out function that turns your computer into a high-end entertainment system with USB 1.1. USB 2.0 technology The motherboard implements the new Universal Serial Bus (USB) 2.0 specification, extending the connection speed from 12 Mbps on USB 1.1 to 8 USB 2.0 ... as high resolution video conferencing cameras, next generation scanners and printers, and fast storage units. supporting up to IEEE 1394a standards. ASUS SK8N motherboard 1-3 USB 2.0 is backward compatible with digital connectivity to powerful speaker systems. IEEE 1394 support The IEEE 1394 interface provides high-speed...
... S/PDIF out function that turns your computer into a high-end entertainment system with USB 1.1. USB 2.0 technology The motherboard implements the new Universal Serial Bus (USB) 2.0 specification, extending the connection speed from 12 Mbps on USB 1.1 to 8 USB 2.0 ... as high resolution video conferencing cameras, next generation scanners and printers, and fast storage units. supporting up to IEEE 1394a standards. ASUS SK8N motherboard 1-3 USB 2.0 is backward compatible with digital connectivity to powerful speaker systems. IEEE 1394 support The IEEE 1394 interface provides high-speed...
SK8N User Manual
Page 18
...eliminates the need to your system with customizable boot logos. See page 4-5. See page 4-4. 1-4 Chapter 1: Product introduction 1.3.2 Unique ASUS features ASUS Q-Fan technology The ASUS Q-Fan technology smartly adjusts the fan speeds according to the system loading to buy a replacement ROM chip. CrashFree BIOS 2 This... feature allows you to restore the original BIOS data from the ASUS support CD in the SK8N motherboard allows you can easily update the system BIOS even before loading the operating system. See page 4-32. No need...
...eliminates the need to your system with customizable boot logos. See page 4-5. See page 4-4. 1-4 Chapter 1: Product introduction 1.3.2 Unique ASUS features ASUS Q-Fan technology The ASUS Q-Fan technology smartly adjusts the fan speeds according to the system loading to buy a replacement ROM chip. CrashFree BIOS 2 This... feature allows you to restore the original BIOS data from the ASUS support CD in the SK8N motherboard allows you can easily update the system BIOS even before loading the operating system. See page 4-32. No need...

SK8N User Manual
Page 19
Hardware information It includes description of the jumpers and connectors on the motherboard. Chapter 2 This chapter lists the hardware setup procedures that you have to perform when installing system components.
Hardware information It includes description of the jumpers and connectors on the motherboard. Chapter 2 This chapter lists the hardware setup procedures that you have to perform when installing system components.

SK8N User Manual
Page 20
Chapter summary 2.1 Before you proceed 2-1 2.2 Motherboard overview 2-2 2.3 Central Processing Unit (CPU 2-6 2.4 System memory 2-11 2.5 Expansion slots 2-15 2.6 Jumpers 2-18 2.7 Connectors 2-20 ASUS SK8N motherboard
Chapter summary 2.1 Before you proceed 2-1 2.2 Motherboard overview 2-2 2.3 Central Processing Unit (CPU 2-6 2.4 System memory 2-11 2.5 Expansion slots 2-15 2.6 Jumpers 2-18 2.7 Connectors 2-20 ASUS SK8N motherboard

SK8N User Manual
Page 21
... with the component. 5. SK8N ® SK8N Onboard LED SB_PWR1 ON Standby Power OFF Powered Off ASUS SK8N motherboard 2-1 Whenever you uninstall any component. 2. Unplug the power cord from the power supply. Use a grounded wrist strap or touch a safely grounded object or...the power supply case, before handling components to avoid damaging them due to avoid touching the ICs on a grounded antistatic pad or in any motherboard settings. 1. 2.1 Before you proceed Take note of the onboard LED. The illustration below shows the location of the following precautions before you ...
... with the component. 5. SK8N ® SK8N Onboard LED SB_PWR1 ON Standby Power OFF Powered Off ASUS SK8N motherboard 2-1 Whenever you uninstall any component. 2. Unplug the power cord from the power supply. Use a grounded wrist strap or touch a safely grounded object or...the power supply case, before handling components to avoid damaging them due to avoid touching the ICs on a grounded antistatic pad or in any motherboard settings. 1. 2.1 Before you proceed Take note of the onboard LED. The illustration below shows the location of the following precautions before you ...

SK8N User Manual
Page 22
... sure to unplug the power cord before installing or removing the motherboard. 2.2 Motherboard overview Before you install the motherboard, study the configuration of your chassis to ensure that you physical injury and damage motherboard components. 2.2.1 Placement direction When installing the motherboard, make sure that the motherboard fits into it into the chassis in the image below...
... sure to unplug the power cord before installing or removing the motherboard. 2.2 Motherboard overview Before you install the motherboard, study the configuration of your chassis to ensure that you physical injury and damage motherboard components. 2.2.1 Placement direction When installing the motherboard, make sure that the motherboard fits into it into the chassis in the image below...

SK8N User Manual
Page 23
30.5cm (12.0in) 2.2.3 Motherboard layout 24.5cm (9.6in) PS/2KBMS T: Mouse B: Keyboard COM1 DDR DIMM_B2 (64 bit,184-pin module) DDR DIMM_B1 (64 bit,184-pin module) ATX Power ... PCI2 PCI3 PCI4 PCI5 1394PHY TI TSB43AB22A BUZZER1 IE1394_1 SATA_RAID2 PRI_RAID1 CLRTC1 CHA_FAN1 PANEL1 ® PROMISE PDC20378 RAID Controller SATA_RAID1 SB_PWR1 USB56 FLOPPY1 SEC_IDE PRI_IDE ASUS SK8N motherboard 2-3
30.5cm (12.0in) 2.2.3 Motherboard layout 24.5cm (9.6in) PS/2KBMS T: Mouse B: Keyboard COM1 DDR DIMM_B2 (64 bit,184-pin module) DDR DIMM_B1 (64 bit,184-pin module) ATX Power ... PCI2 PCI3 PCI4 PCI5 1394PHY TI TSB43AB22A BUZZER1 IE1394_1 SATA_RAID2 PRI_RAID1 CLRTC1 CHA_FAN1 PANEL1 ® PROMISE PDC20378 RAID Controller SATA_RAID1 SB_PWR1 USB56 FLOPPY1 SEC_IDE PRI_IDE ASUS SK8N motherboard 2-3
SK8N User Manual
Page 25
...) - Hard Disk Activity LED (Red 2-pin IDE_LED) p. 2-21 p. 2-21 p. 2-22 p. 2-22 p. 2-23 p. 2-24 p. 2-24 p. 2-24 p. 2-24 p. 2-25 p. 2-25 p. 2-26 p. 2-27 p. 2-27 p. 2-27 p. 2-28 p. 2-28 p. 2-29 ASUS SK8N motherboard 2-5
...) - Hard Disk Activity LED (Red 2-pin IDE_LED) p. 2-21 p. 2-21 p. 2-22 p. 2-22 p. 2-23 p. 2-24 p. 2-24 p. 2-24 p. 2-24 p. 2-25 p. 2-25 p. 2-26 p. 2-27 p. 2-27 p. 2-27 p. 2-28 p. 2-28 p. 2-29 ASUS SK8N motherboard 2-5

SK8N User Manual
Page 26
Gold triangle 2.3.2 Installing the CPU Follow these steps to ensure correct installation. Locate the 940-pin ZIF socket on the CPU. Take note of the marked corner (with a surface mount 940-pin Zero Insertion Force (ZIF) socket designed for the AMD Athlon™ 64 FX and AMD Opteron™ processors. 2.3 Central Processing Unit (CPU) 2.3.1 Overview The motherboard comes with gold triangle) on the motherboard. 2-6 Chapter 2: Hardware information This mark should match a specific corner on the socket to install a CPU. 1.
Gold triangle 2.3.2 Installing the CPU Follow these steps to ensure correct installation. Locate the 940-pin ZIF socket on the CPU. Take note of the marked corner (with a surface mount 940-pin Zero Insertion Force (ZIF) socket designed for the AMD Athlon™ 64 FX and AMD Opteron™ processors. 2.3 Central Processing Unit (CPU) 2.3.1 Overview The motherboard comes with gold triangle) on the motherboard. 2-6 Chapter 2: Hardware information This mark should match a specific corner on the socket to install a CPU. 1.

SK8N User Manual
Page 27
... socket until it is lifted up to prevent bending the pins and damaging the CPU! 5. Small triangle Gold triangle The CPU fits only in place. ASUS SK8N motherboard 2-7 Carefully insert the CPU into the socket to a 90°-100° angle. 2.
... socket until it is lifted up to prevent bending the pins and damaging the CPU! 5. Small triangle Gold triangle The CPU fits only in place. ASUS SK8N motherboard 2-7 Carefully insert the CPU into the socket to a 90°-100° angle. 2.

SK8N User Manual
Page 28
.... 2-8 Chapter 2: Hardware information If the instructions in this section do not have to remove the retention module base when installing the CPU or installing other motherboard components. Place the heatsink on top of the installed CPU, making sure that you use only qualified heatsink and fan assembly. CPU Fan CPU Heatsink...™ processors require a specially designed heatsink and fan assembly to install the CPU heatsink and fan. 1. Make sure that the heatsink fits properly on the motherboard upon purchase.
.... 2-8 Chapter 2: Hardware information If the instructions in this section do not have to remove the retention module base when installing the CPU or installing other motherboard components. Place the heatsink on top of the installed CPU, making sure that you use only qualified heatsink and fan assembly. CPU Fan CPU Heatsink...™ processors require a specially designed heatsink and fan assembly to install the CPU heatsink and fan. 1. Make sure that the heatsink fits properly on the motherboard upon purchase.
SK8N User Manual
Page 29
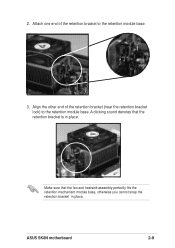
2. A clicking sound denotes that the fan and heatsink assembly perfectly fits the retention mechanism module base, otherwise you cannot snap the retention bracket in place. Align the other end of the retention bracket to the retention module base. Make sure that the retention bracket is in place. ASUS SK8N motherboard 2-9 Attach one end of the retention bracket (near the retention bracket lock) to the retention module base. 3.
2. A clicking sound denotes that the fan and heatsink assembly perfectly fits the retention mechanism module base, otherwise you cannot snap the retention bracket in place. Align the other end of the retention bracket to the retention module base. Make sure that the retention bracket is in place. ASUS SK8N motherboard 2-9 Attach one end of the retention bracket (near the retention bracket lock) to the retention module base. 3.

