
SK8N User Manual
Page 5
... 4-32 4.6.3 Security 4-34 4.7 Exit menu 4-36 Chapter 5: Software support 5.1 Install an operating system 5-1 5.2 Support CD information 5-1 5.2.1 Running the support CD 5-1 5.2.2 Drivers menu 5-2 5.2.3 Utilities menu 5-3 5.2.4 ASUS Contact Information 5-4 5.2.5 Other information 5-5 5.3 Software Information 5-7 5.3.1 ASUS MyLogo2 5-7 5.4 Multi-channel audio feature 5-9 5.5 RAID configurations 5-11 5.5.1 Install the hard disks 5-12 5.5.2 Enter the MBFastBuild™ utility 5-13 5.5.3 Creating a RAID...
... 4-32 4.6.3 Security 4-34 4.7 Exit menu 4-36 Chapter 5: Software support 5.1 Install an operating system 5-1 5.2 Support CD information 5-1 5.2.1 Running the support CD 5-1 5.2.2 Drivers menu 5-2 5.2.3 Utilities menu 5-3 5.2.4 ASUS Contact Information 5-4 5.2.5 Other information 5-5 5.3 Software Information 5-7 5.3.1 ASUS MyLogo2 5-7 5.4 Multi-channel audio feature 5-9 5.5 RAID configurations 5-11 5.5.1 Install the hard disks 5-12 5.5.2 Enter the MBFastBuild™ utility 5-13 5.5.3 Creating a RAID...

SK8N User Manual
Page 11
... 2.0/1.1 DMI 2.0, WOL by PME, WOR by PME ATX power supply (with 4-pin 12V plug) ATX form factor: 12 in x 9.6 in (30.5 cm x 24.4 cm) Device drivers ASUS PC Probe Trend Micro™ PC-cillin 2002 anti-virus software * Specifications are subject to change without notice. xi
... 2.0/1.1 DMI 2.0, WOL by PME, WOR by PME ATX power supply (with 4-pin 12V plug) ATX form factor: 12 in x 9.6 in (30.5 cm x 24.4 cm) Device drivers ASUS PC Probe Trend Micro™ PC-cillin 2002 anti-virus software * Specifications are subject to change without notice. xi
SK8N User Manual
Page 35
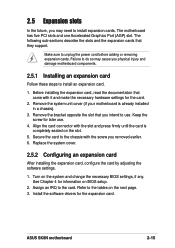
... card. Turn on the next page. 3. Assign an IRQ to unplug the power cord before adding or removing expansion cards. Install the software drivers for information on the slot. 5. 2.5 Expansion slots In the future, you physical injury and damage motherboard components. 2.5.1 Installing an expansion card...completely seated on BIOS setup. 2. Secure the card to the tables on the system and change the necessary BIOS settings, if any. ASUS SK8N motherboard 2-15 See Chapter 4 for the expansion card. Before installing the expansion card, read the documentation that they support. Remove the...
... card. Turn on the next page. 3. Assign an IRQ to unplug the power cord before adding or removing expansion cards. Install the software drivers for information on the slot. 5. 2.5 Expansion slots In the future, you physical injury and damage motherboard components. 2.5.1 Installing an expansion card...completely seated on BIOS setup. 2. Secure the card to the tables on the system and change the necessary BIOS settings, if any. ASUS SK8N motherboard 2-15 See Chapter 4 for the expansion card. Before installing the expansion card, read the documentation that they support. Remove the...

SK8N User Manual
Page 36
PCI INT D INT D INT A INTB INT C INT D - - - When using PCI cards on shared slots, ensure that the drivers support "Share IRQ" or that the cards do not need IRQ assignments. IRQ assignments for ISA or PCI devices. Otherwise, conflicts will arise between the ...
PCI INT D INT D INT A INTB INT C INT D - - - When using PCI cards on shared slots, ensure that the drivers support "Share IRQ" or that the cards do not need IRQ assignments. IRQ assignments for ISA or PCI devices. Otherwise, conflicts will arise between the ...

SK8N User Manual
Page 46
8. You must install the driver before you can use the USB 2.0 capability. USB headers (10-1 pin USB56) If the USB ports on USB 1.1 allows faster Internet connection, interactive gaming, and ...
8. You must install the driver before you can use the USB 2.0 capability. USB headers (10-1 pin USB56) If the USB ports on USB 1.1 allows faster Internet connection, interactive gaming, and ...
SK8N User Manual
Page 63
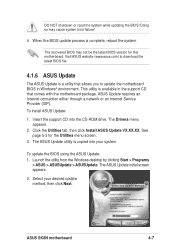
... menu screen. 3. Insert the support CD into your desired update method, then click Next. Click the Utilities tab, then click Install ASUS Update VX.XX.XX. DO NOT shutdown or reset the system while updating the BIOS! This utility is copied into the CD-ROM drive...update the motherboard BIOS in the support CD that allows you to download the latest BIOS file. 4.1.6 ASUS Update The ASUS Update is complete, reboot the system. The ASUS Update initial screen appears. 2. The Drivers menu appears. 2. The recovered BIOS may cause system boot failure! 4. Launch the utility from the...
... menu screen. 3. Insert the support CD into your desired update method, then click Next. Click the Utilities tab, then click Install ASUS Update VX.XX.XX. DO NOT shutdown or reset the system while updating the BIOS! This utility is copied into the CD-ROM drive...update the motherboard BIOS in the support CD that allows you to download the latest BIOS file. 4.1.6 ASUS Update The ASUS Update is complete, reboot the system. The ASUS Update initial screen appears. 2. The Drivers menu appears. 2. The recovered BIOS may cause system boot failure! 4. Launch the utility from the...

SK8N User Manual
Page 96
Chapter summary 5.1 Install an operating system 5-1 5.2 Support CD information 5-1 5.3 Software information 5-7 5.4 Multi-channel audio feature 5-9 5.5 RAID configurations 5-11 5.6 Creating a floppy disk with RAID driver .... 5-19 ASUS SK8N motherboard
Chapter summary 5.1 Install an operating system 5-1 5.2 Support CD information 5-1 5.3 Software information 5-7 5.4 Multi-channel audio feature 5-9 5.5 RAID configurations 5-11 5.6 Creating a floppy disk with RAID driver .... 5-19 ASUS SK8N motherboard
SK8N User Manual
Page 97
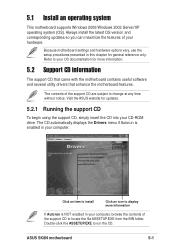
.... 5.2 Support CD information The support CD that came with the motherboard contains useful software and several utility drivers that enhance the motherboard features. Visit the ASUS website for more information If Autorun is enabled in this chapter for general reference only. Click an item... Click an icon to change at any time without notice. ASUS SK8N motherboard 5-1 Because motherboard settings and hardware options vary, use the setup procedures presented in your hardware. The CD automatically displays the Drivers menu if Autorun is NOT enabled in your CD-ROM drive...
.... 5.2 Support CD information The support CD that came with the motherboard contains useful software and several utility drivers that enhance the motherboard features. Visit the ASUS website for more information If Autorun is enabled in this chapter for general reference only. Click an item... Click an icon to change at any time without notice. ASUS SK8N motherboard 5-1 Because motherboard settings and hardware options vary, use the setup procedures presented in your hardware. The CD automatically displays the Drivers menu if Autorun is NOT enabled in your CD-ROM drive...
SK8N User Manual
Page 98
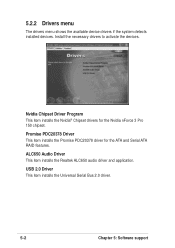
Install the necessary drivers to activate the devices. 5.2.2 Drivers menu The drivers menu shows the available device drivers if the system detects installed devices. Promise PDC20378 Driver This item installs the Promise PDC20378 driver for the Nvidia nForce 3 Pro 150 chipset. ALC650 Audio Driver This item installs the Realtek ALC650 audio driver and application. USB 2.0 Driver This item installs the...
Install the necessary drivers to activate the devices. 5.2.2 Drivers menu The drivers menu shows the available device drivers if the system detects installed devices. Promise PDC20378 Driver This item installs the Promise PDC20378 driver for the Nvidia nForce 3 Pro 150 chipset. ALC650 Audio Driver This item installs the Realtek ALC650 audio driver and application. USB 2.0 Driver This item installs the...

SK8N User Manual
Page 105
...ALC650 AC97 Audio Configuration dialogue box. Click on your motherboard package. 5.4 Multi-channel audio feature The RealTek ALC650 6-channel AC'97 audio driver and applications are included in the support CD that came with your Windows desktop, then select Programs > Audio Sound Manager > SoundMan ...Sound Effect icon to Karaoke or load the Equalizer from the support CD. 2. Setting the RealTek ALC650 AC'97 Audio Configuration 1. ASUS SK8N motherboard 5-9 After installation, the RealTek "Sound Effect" icon appears on the Equalizer tab to display panel to enable the multi...
...ALC650 AC97 Audio Configuration dialogue box. Click on your motherboard package. 5.4 Multi-channel audio feature The RealTek ALC650 6-channel AC'97 audio driver and applications are included in the support CD that came with your Windows desktop, then select Programs > Audio Sound Manager > SoundMan ...Sound Effect icon to Karaoke or load the Equalizer from the support CD. 2. Setting the RealTek ALC650 AC'97 Audio Configuration 1. ASUS SK8N motherboard 5-9 After installation, the RealTek "Sound Effect" icon appears on the Equalizer tab to display panel to enable the multi...
SK8N User Manual
Page 107
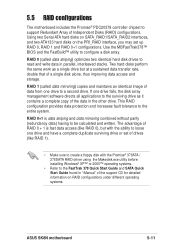
...second drive. Using two Serial ATA hard disks on SATA_RAID1/SATA_RAID2 interfaces, and two ATA133 hard disks on RAID configurations under different operating systems. ASUS SK8N motherboard 5-11 RAID 0 (called data mirroring) copies and maintains an identical image of RAID 0 + 1 is data striping and data...rate, double that of drives (like RAID 1). • Make sure to create a floppy disk with the Promise® 378ATA / 378SATA RAID driver using the Makedisk.exe utility before installing Windows® XP™ or 2000™ operating systems. • Refer to be calculated and written...
...second drive. Using two Serial ATA hard disks on SATA_RAID1/SATA_RAID2 interfaces, and two ATA133 hard disks on RAID configurations under different operating systems. ASUS SK8N motherboard 5-11 RAID 0 (called data mirroring) copies and maintains an identical image of RAID 0 + 1 is data striping and data...rate, double that of drives (like RAID 1). • Make sure to create a floppy disk with the Promise® 378ATA / 378SATA RAID driver using the Makedisk.exe utility before installing Windows® XP™ or 2000™ operating systems. • Refer to be calculated and written...
SK8N User Manual
Page 110
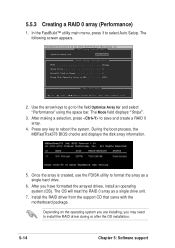
... the RAID 0 array as a single hard drive. 6. After you may need to save and create a RAID 0 array. 4. Install the RAID driver from the support CD that came with the motherboard package. FastBuild (tm) Utility 2.00 (c) 2002-2005 Promise Technology, Inc. [ Auto Setup Options ... ] [ ] Up [ ] Down [ , ,Space] Change Option [ESC] Exit [CTRL-Y] Save 2. After making a selection, press to install the RAID driver during or after the OS installation. 5-14 Chapter 5: Software support Depending on the operating system you are installing, you have formatted the arrayed drives, install...
... the RAID 0 array as a single hard drive. 6. After you may need to save and create a RAID 0 array. 4. Install the RAID driver from the support CD that came with the motherboard package. FastBuild (tm) Utility 2.00 (c) 2002-2005 Promise Technology, Inc. [ Auto Setup Options ... ] [ ] Up [ ] Down [ , ,Space] Change Option [ESC] Exit [CTRL-Y] Save 2. After making a selection, press to install the RAID driver during or after the OS installation. 5-14 Chapter 5: Software support Depending on the operating system you are installing, you have formatted the arrayed drives, install...
SK8N User Manual
Page 112
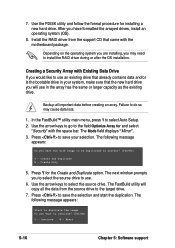
Install the RAID driver from the source drive to the field Optimize Array for and select "Security" with the motherboard package. Use the arrow keys to go to the ... installing, you may cause data loss. 1. Failure to do so may need to duplicate the image... The following message appears: Start to install the RAID driver during or after the OS installation. Abort 5-16 Chapter 5: Software support Backup all the data from the support CD that the new hard drive you...
Install the RAID driver from the source drive to the field Optimize Array for and select "Security" with the motherboard package. Use the arrow keys to go to the ... installing, you may cause data loss. 1. Failure to do so may need to duplicate the image... The following message appears: Start to install the RAID driver during or after the OS installation. Abort 5-16 Chapter 5: Software support Backup all the data from the support CD that the new hard drive you...
SK8N User Manual
Page 113
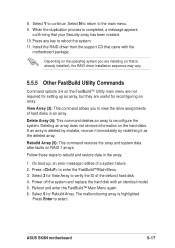
... recover it immediately by redefining it as the deleted array. When the duplication process is already installed), the RAID driver installation sequence may vary. 5.5.5 Other FastBuild Utility Commands Command options 3-6 on the FastBuild™ Utility main menu ... RAID 1 arrays. Select 3 for View Array to rebuild and restore data in an array. Install the RAID driver from the support CD that your Security array has been created. 10. On boot-up an array, but they... (4): This command deletes an array to select. Press Enter to reconfigure the system. ASUS SK8N motherboard 5-17
... recover it immediately by redefining it as the deleted array. When the duplication process is already installed), the RAID driver installation sequence may vary. 5.5.5 Other FastBuild Utility Commands Command options 3-6 on the FastBuild™ Utility main menu ... RAID 1 arrays. Select 3 for View Array to rebuild and restore data in an array. Install the RAID driver from the support CD that your Security array has been created. 10. On boot-up an array, but they... (4): This command deletes an array to select. Press Enter to reconfigure the system. ASUS SK8N motherboard 5-17
SK8N User Manual
Page 115
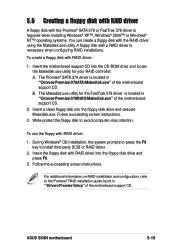
.... 3. Write-protect the floppy disk to install third-party SCSI or RAID driver. 2. Insert a clean floppy disk into the floppy disk drive and press F6. 3. To use the floppy with RAID driver: 1. ASUS SK8N motherboard 5-19 The Makedisk.exe utility for your RAID controller. Insert the... floppy disk with RAID driver into the floppy disk drive and execute Makedisk.exe. 5.6 Creating a floppy disk with RAID driver A floppy disk with the Promise®...
.... 3. Write-protect the floppy disk to install third-party SCSI or RAID driver. 2. Insert a clean floppy disk into the floppy disk drive and press F6. 3. To use the floppy with RAID driver: 1. ASUS SK8N motherboard 5-19 The Makedisk.exe utility for your RAID controller. Insert the... floppy disk with RAID driver into the floppy disk drive and execute Makedisk.exe. 5.6 Creating a floppy disk with RAID driver A floppy disk with the Promise®...