AT3IONT-I Series user's manual
Page 2
.... SPECIFICATIONS AND INFORMATION CONTAINED IN THIS MANUAL ARE FURNISHED FOR INFORMATIONAL USE ONLY, AND ARE SUBJECT TO CHANGE AT ANY TIME WITHOUT NOTICE, AND SHOULD NOT BE CONSTRUED AS A COMMITMENT BY ASUS. If however you encounter any problems in obtaining the full corresponding source code we can coordinate the terms and cost of this email address). No part...
.... SPECIFICATIONS AND INFORMATION CONTAINED IN THIS MANUAL ARE FURNISHED FOR INFORMATIONAL USE ONLY, AND ARE SUBJECT TO CHANGE AT ANY TIME WITHOUT NOTICE, AND SHOULD NOT BE CONSTRUED AS A COMMITMENT BY ASUS. If however you encounter any problems in obtaining the full corresponding source code we can coordinate the terms and cost of this email address). No part...
AT3IONT-I Series user's manual
Page 3
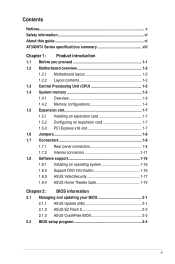
... Unit (CPU 1-3 1.4 System memory 1-3 1.4.1 Overview 1-3 1.4.2 Memory configurations 1-4 1.5 Expansion slot 1-7 1.5.1 Installing an expansion card 1-7 1.5.2 Configuring an expansion card 1-7 1.5.3 PCI Express x16 slot 1-7 1.6 Jumpers 1-8 1.7 Connectors 1-8 1.7.1 Rear panel connectors 1-8 1.7.2 Internal connectors 1-11 1.8 Software support 1-16 1.8.1 Installing an operating system 1-16 1.8.2 Support DVD information 1-16 1.8.3 ASUS VideoSecurity 1-17 1.8.4 ASUS Home Theater Gate 1-19 Chapter 2: BIOS information 2.1 Managing and updating your BIOS 2-1 2.1.1 ASUS Update utility...
... Unit (CPU 1-3 1.4 System memory 1-3 1.4.1 Overview 1-3 1.4.2 Memory configurations 1-4 1.5 Expansion slot 1-7 1.5.1 Installing an expansion card 1-7 1.5.2 Configuring an expansion card 1-7 1.5.3 PCI Express x16 slot 1-7 1.6 Jumpers 1-8 1.7 Connectors 1-8 1.7.1 Rear panel connectors 1-8 1.7.2 Internal connectors 1-11 1.8 Software support 1-16 1.8.1 Installing an operating system 1-16 1.8.2 Support DVD information 1-16 1.8.3 ASUS VideoSecurity 1-17 1.8.4 ASUS Home Theater Gate 1-19 Chapter 2: BIOS information 2.1 Managing and updating your BIOS 2-1 2.1.1 ASUS Update utility...
AT3IONT-I Series user's manual
Page 8
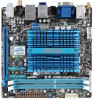
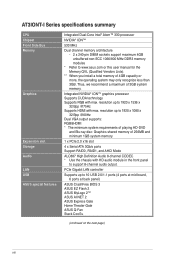
... 3GB. AT3IONT-I Series specifications summary CPU Chipset Front Side Bus Memory Graphics Expansion slot Storage Audio LAN USB ASUS special features Integrated Dual-Core Intel® Atom™ 330 processor NVIDIA® ION™ 533 MHz Dual channel memory architecture - 2 x 240-pin DIMM sockets support maximum 4GB unbuffered non-ECC 1066/800 MHz DDR3 memory modules * Refer to 10 USB 2.0/1.1 ports (4 ports at mid-board, 6 ports at back panel) ASUS CrashFree BIOS 3 ASUS EZ Flash 2 ASUS MyLogo 2™ ASUS AI NET 2 ASUS Express Gate Home Theater Gate ASUS Q-Fan Stack...
... 3GB. AT3IONT-I Series specifications summary CPU Chipset Front Side Bus Memory Graphics Expansion slot Storage Audio LAN USB ASUS special features Integrated Dual-Core Intel® Atom™ 330 processor NVIDIA® ION™ 533 MHz Dual channel memory architecture - 2 x 240-pin DIMM sockets support maximum 4GB unbuffered non-ECC 1066/800 MHz DDR3 memory modules * Refer to 10 USB 2.0/1.1 ports (4 ports at mid-board, 6 ports at back panel) ASUS CrashFree BIOS 3 ASUS EZ Flash 2 ASUS MyLogo 2™ ASUS AI NET 2 ASUS Express Gate Home Theater Gate ASUS Q-Fan Stack...

AT3IONT-I Series user's manual
Page 11
... 12. Connectors/Jumpers/Slots/LED System panel connector (10-1 pin F_PANEL) Clear RTC RAM (3-pin CLRTC) Onboard LED (SB_PWR) Serial ATA connectors (7-pin SATA1, SATA2, SATA3, SATA4) Front panel audio connector (10-1 pin AAFP) USB connector (10-1 pin USB78, USB910) Page 1-14 1-8 1-1 1-11 1-13 1-12 ASUS AT3IONT-I DELUXE two models The layout varies with external ports goes to the chassis. SATA power connectors (4-pin SATA_PWR1) 6. Ensure that you install the motherboard into the holes indicated by circles to secure the motherboard to the rear part of the chassis...
... 12. Connectors/Jumpers/Slots/LED System panel connector (10-1 pin F_PANEL) Clear RTC RAM (3-pin CLRTC) Onboard LED (SB_PWR) Serial ATA connectors (7-pin SATA1, SATA2, SATA3, SATA4) Front panel audio connector (10-1 pin AAFP) USB connector (10-1 pin USB78, USB910) Page 1-14 1-8 1-1 1-11 1-13 1-12 ASUS AT3IONT-I DELUXE two models The layout varies with external ports goes to the chassis. SATA power connectors (4-pin SATA_PWR1) 6. Ensure that you install the motherboard into the holes indicated by circles to secure the motherboard to the rear part of the chassis...
AT3IONT-I Series user's manual
Page 16
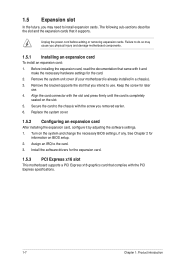
... card. 3. Secure the card to the chassis with it and make the necessary hardware settings for the expansion card. 1.5.3 PCI Express x16 slot This motherboard supports a PCI Express x16 graphics card that it by adjusting the software settings. 1. Remove the system unit cover (if your motherboard is completely seated on the system and change the necessary BIOS settings, if any. Align the card connector with the PCI Express specifications. 1-7 Chapter 1: Product introduction See Chapter 2 for later use . Turn...
... card. 3. Secure the card to the chassis with it and make the necessary hardware settings for the expansion card. 1.5.3 PCI Express x16 slot This motherboard supports a PCI Express x16 graphics card that it by adjusting the software settings. 1. Remove the system unit cover (if your motherboard is completely seated on the system and change the necessary BIOS settings, if any. Align the card connector with the PCI Express specifications. 1-7 Chapter 1: Product introduction See Chapter 2 for later use . Turn...

AT3IONT-I Series user's manual
Page 20
... details on a hard disk drive that includes a RAID/AHCI set the SATA Mode Select item in the support DVD. 1-11 Chapter 1: Product introduction You could use a USB floppy disk drive when installing Windows® XP operating system on RAID/AHCI, refer to the RAID/AHCI Supplementary Guide included in the folder named Manual in the BIOS to other media such as a USB flash disk and load RAID driver during installing Windows® Vista OS with the Serial ATA 1.5Gb/s specification. The Serial ATA 3Gb/s is...
... details on a hard disk drive that includes a RAID/AHCI set the SATA Mode Select item in the support DVD. 1-11 Chapter 1: Product introduction You could use a USB floppy disk drive when installing Windows® XP operating system on RAID/AHCI, refer to the RAID/AHCI Supplementary Guide included in the folder named Manual in the BIOS to other media such as a USB flash disk and load RAID driver during installing Windows® Vista OS with the Serial ATA 1.5Gb/s specification. The Serial ATA 3Gb/s is...
AT3IONT-I Series user's manual
Page 21
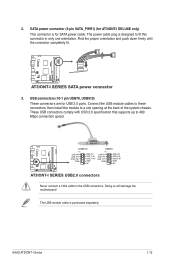
...connectors (10-1 pin USB78, USB910) These connectors are for SATA power cable. Doing so will damage the motherboard! SATA power connector (4-pin SATA_PWR1) (for AT3IONT-I SERIES USB2.0 connectors Never connect a 1394 cable to fit this connector in only one orientation. These USB connectors comply with USB 2.0 specification that supports up to a slot opening at the back of the system chassis. AT3IONT-I DELUXE AT3IONT-I Series 1-12 ASUS AT3IONT-I SERIES SATA power connector 3. AT3IONT-I DELUXE USB910 USB78 PIN 1 USB+5V USB_P9USB_P9+ GND USB+5V USB_P10USB_P10+ GND NC PIN 1 USB...
...connectors (10-1 pin USB78, USB910) These connectors are for SATA power cable. Doing so will damage the motherboard! SATA power connector (4-pin SATA_PWR1) (for AT3IONT-I SERIES USB2.0 connectors Never connect a 1394 cable to fit this connector in only one orientation. These USB connectors comply with USB 2.0 specification that supports up to a slot opening at the back of the system chassis. AT3IONT-I DELUXE AT3IONT-I Series 1-12 ASUS AT3IONT-I SERIES SATA power connector 3. AT3IONT-I DELUXE USB910 USB78 PIN 1 USB+5V USB_P9USB_P9+ GND USB+5V USB_P10USB_P10+ GND NC PIN 1 USB...
AT3IONT-I Series user's manual
Page 25
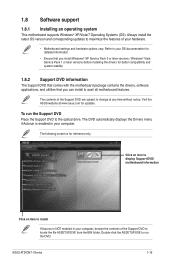
... only. ASUS AT3IONT-I Series 1-16 The following screen is NOT enabled in your OS documentation for detailed information. • Ensure that you install Windows® XP Service Pack 3 or later versions / Windows® Vista Service Pack 1 or later versions before installing the drivers for updates. Visit the ASUS website at any time without notice. Click an icon to display Support DVD/ motherboard information Click an item to locate the file ASSETUP.EXE...
... only. ASUS AT3IONT-I Series 1-16 The following screen is NOT enabled in your OS documentation for detailed information. • Ensure that you install Windows® XP Service Pack 3 or later versions / Windows® Vista Service Pack 1 or later versions before installing the drivers for updates. Visit the ASUS website at any time without notice. Click an icon to display Support DVD/ motherboard information Click an item to locate the file ASSETUP.EXE...
AT3IONT-I Series user's manual
Page 29
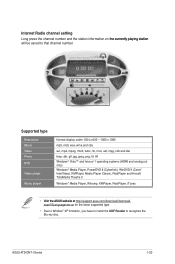
ASUS AT3IONT-I Series 1-20 Internet Radio channel setting Long press the channel... for the latest supported type. • Due to Window® XP limitation, you have to install the UDF Reader to that channel number. Supported type Resolution Music Video Photo DTS Video player Music player Normal display under 1024 x ...tif, tiff Windows® Vista™ and Window® 7 operating systems (HDMI and analog out only) Windows® Media Player, PowerDVD 8 (Cyberlink), WinDVD 9 (Corel/ InterVideo), KMPlayer, Media Player Classic, RealPlayer and Arcsoft TotalMedia Theatre 3 Windows® ...
ASUS AT3IONT-I Series 1-20 Internet Radio channel setting Long press the channel... for the latest supported type. • Due to Window® XP limitation, you have to install the UDF Reader to that channel number. Supported type Resolution Music Video Photo DTS Video player Music player Normal display under 1024 x ...tif, tiff Windows® Vista™ and Window® 7 operating systems (HDMI and analog out only) Windows® Media Player, PowerDVD 8 (Cyberlink), WinDVD 9 (Corel/ InterVideo), KMPlayer, Media Player Classic, RealPlayer and Arcsoft TotalMedia Theatre 3 Windows® ...
AT3IONT-I Series user's manual
Page 31
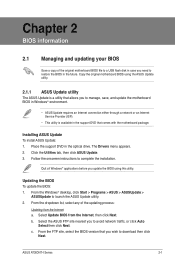
... original motherboard BIOS file to a USB flash disk in case you need to restore the BIOS in the support DVD that allows you update the BIOS using the ASUS Update utility. 2.1.1 ASUS Update utility The ASUS Update is available in the future. Quit all Windows® applications before you to manage, save, and update the motherboard BIOS in Windows® environment. • ASUS Update requires an Internet connection either through a network or an Internet Service Provider (ISP). • This utility is a utility that...
... original motherboard BIOS file to a USB flash disk in case you need to restore the BIOS in the support DVD that allows you update the BIOS using the ASUS Update utility. 2.1.1 ASUS Update utility The ASUS Update is available in the future. Quit all Windows® applications before you to manage, save, and update the motherboard BIOS in Windows® environment. • ASUS Update requires an Internet connection either through a network or an Internet Service Provider (ISP). • This utility is a utility that...

AT3IONT-I Series user's manual
Page 32
... update the utility to enable it. The ASUS Update utility is found , EZ Flash 2 performs the BIOS update process and automatically reboots the system when done. 2-2 Chapter 2: BIOS information ASUSTek EZ Flash 2 BIOS ROM Utility V3.38 FLASH TYPE: MXIC 25L8005 Current ROM BOARD: AT3IONT-I Series VER: 0207 (H:00 B:05) DATE: 12/29/2009 Update ROM BOARD: Unknown VER: Unknown DATE: Unknown PATH: A:\ A: Note [Enter] Select or Load [Up/Down/Home/End] Move [Tab] Switch [B] Backup [V] Drive...
... update the utility to enable it. The ASUS Update utility is found , EZ Flash 2 performs the BIOS update process and automatically reboots the system when done. 2-2 Chapter 2: BIOS information ASUSTek EZ Flash 2 BIOS ROM Utility V3.38 FLASH TYPE: MXIC 25L8005 Current ROM BOARD: AT3IONT-I Series VER: 0207 (H:00 B:05) DATE: 12/29/2009 Update ROM BOARD: Unknown VER: Unknown DATE: Unknown PATH: A:\ A: Note [Enter] Select or Load [Up/Down/Home/End] Move [Tab] Switch [B] Backup [V] Drive...
AT3IONT-I Series user's manual
Page 33
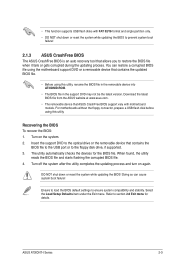
... BIOS: 1. Ensure to load the BIOS default settings to section 2.8 Exit menu for the BIOS file. • This function supports USB flash disks with motherboard models. Refer to ensure system compatibility and stability. For motherboards without the floppy connector, prepare a USB flash disk before using this utility. Turn off the system after the utility completes the updating process and turn on the system. 2. You can cause system boot failure! Select the Load Setup Defaults item under the Exit menu. Download the latest BIOS file from the ASUS...
... BIOS: 1. Ensure to load the BIOS default settings to section 2.8 Exit menu for the BIOS file. • This function supports USB flash disks with motherboard models. Refer to ensure system compatibility and stability. For motherboards without the floppy connector, prepare a USB flash disk before using this utility. Turn off the system after the utility completes the updating process and turn on the system. 2. You can cause system boot failure! Select the Load Setup Defaults item under the Exit menu. Download the latest BIOS file from the ASUS...
AT3IONT-I Series user's manual
Page 35
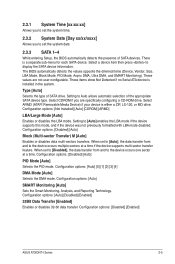
... LBA mode disabled. Type [Auto] Selects the type of the appropriate SATA device type. When set to [Auto], the data transfer from and to the device occurs one sector at a time if the device supports multi-sector transfer feature. Configuration options: [Auto] SMART Monitoring [Auto] Sets the Smart Monitoring, Analysis, and Reporting Technology. Configuration options: [Disabled] [Enabled] ASUS AT3IONT-I Series 2-5 There is installed in the system. Select ARMD (ATAPI Removable Media Device) if your device is either a ZIP, LS-120, or MO drive. Configuration options: [Not Installed] [Auto...
... LBA mode disabled. Type [Auto] Selects the type of the appropriate SATA device type. When set to [Auto], the data transfer from and to the device occurs one sector at a time if the device supports multi-sector transfer feature. Configuration options: [Auto] SMART Monitoring [Auto] Sets the Smart Monitoring, Analysis, and Reporting Technology. Configuration options: [Disabled] [Enabled] ASUS AT3IONT-I Series 2-5 There is installed in the system. Select ARMD (ATAPI Removable Media Device) if your device is either a ZIP, LS-120, or MO drive. Configuration options: [Not Installed] [Auto...
AT3IONT-I Series user's manual
Page 36
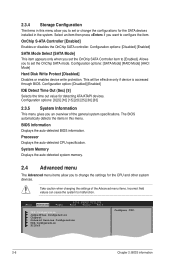
...] [RAID Mode] [AHCI Mode] Hard Disk Write Protect [Disabled] Disables or enables device write protection. 2.3.4 Storage Configuration The items in this menu. Allows you want to configure the item. Configuration option: [Disabled] [Enabled] IDE Detect Time Out (Sec) [5] Selects the time out value for the SATA devices installed in this menu allow you to set the OnChip SATA Controller item to change the configurations for detecting ATA/ATAPI devices. Take caution when changing the settings of the general system specifications. Main Advanced Power BIOS SETUP UTILITY Boot...
...] [RAID Mode] [AHCI Mode] Hard Disk Write Protect [Disabled] Disables or enables device write protection. 2.3.4 Storage Configuration The items in this menu. Allows you want to configure the item. Configuration option: [Disabled] [Enabled] IDE Detect Time Out (Sec) [5] Selects the time out value for the SATA devices installed in this menu allow you to set the OnChip SATA Controller item to change the configurations for detecting ATA/ATAPI devices. Take caution when changing the settings of the general system specifications. Main Advanced Power BIOS SETUP UTILITY Boot...
AT3IONT-I Series user's manual
Page 37
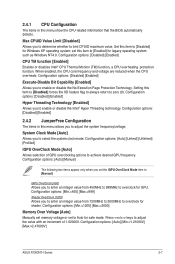
... to overclock for legacy operating system such as Windows NT4.0. Configuration options: [Auto] [Manual] The following two items appear only when you to enter an integer value from 450MHz to 999MHz to [Manual]. Setting this item to enable or disable the No-Execution Page Protection Technology. Configuration options: [Disabled] [Enabled] Hyper Threading Technology [Enabled] Allows you to [Disabled] for safe mode. Configuration options: [Min.=1200] [Max.=2000] Memory Over Voltage [Auto] Manually set memory voltage or set to select the system clock mode. System Clock Mode [Auto...
... to overclock for legacy operating system such as Windows NT4.0. Configuration options: [Auto] [Manual] The following two items appear only when you to enter an integer value from 450MHz to 999MHz to [Manual]. Setting this item to enable or disable the No-Execution Page Protection Technology. Configuration options: [Disabled] [Enabled] Hyper Threading Technology [Enabled] Allows you to [Disabled] for safe mode. Configuration options: [Min.=1200] [Max.=2000] Memory Over Voltage [Auto] Manually set memory voltage or set to select the system clock mode. System Clock Mode [Auto...
AT3IONT-I Series user's manual
Page 39
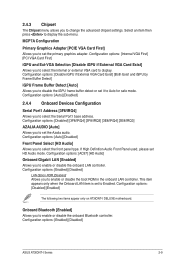
...Configuration options: [Auto] [Disabled] Front Panel Select [HD Audio] Allows you to enable or disable the boot ROM in the onboard LAN controller. If High Definition Audio Front Panel used, please set the primary graphics adapter. Configuration options: [Enabled] [Disabled] LAN Option ROM [Disabled] Allows you to select the front panel type. Onboard Bluetooth [Enabled] Allows you to change the advanced chipset settings. MCP7A Configuration Primary Graphics Adapter [PCIE VGA Card First] Allows you to disable the iGPU frame buffer detect or set to Enabled. Configuration options: [Disable...
...Configuration options: [Auto] [Disabled] Front Panel Select [HD Audio] Allows you to enable or disable the boot ROM in the onboard LAN controller. If High Definition Audio Front Panel used, please set the primary graphics adapter. Configuration options: [Enabled] [Disabled] LAN Option ROM [Disabled] Allows you to select the front panel type. Onboard Bluetooth [Enabled] Allows you to change the advanced chipset settings. MCP7A Configuration Primary Graphics Adapter [PCIE VGA Card First] Allows you to disable the iGPU frame buffer detect or set to Enabled. Configuration options: [Disable...
AT3IONT-I Series user's manual
Page 40
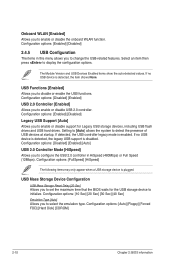
... allows you to change the USB-related features. If detected, the USB controller legacy mode is plugged. Configuration options: [Auto] [Floppy] [Forced FDD] [Hard Disk] [CDROM] 2-10 Chapter 2: BIOS information Configuration options: [Disabled] [Enabled] USB 2.0 Controller [Enabled] Allows you to disable or enable the USB functions. Configuration options: [FullSpeed] [HiSpeed] The following items may only appear when a USB storage device is enabled. Setting to [Auto] allows the system to display the configuration options. The Module Version and USB Devices Enabled items show...
... allows you to change the USB-related features. If detected, the USB controller legacy mode is plugged. Configuration options: [Auto] [Floppy] [Forced FDD] [Hard Disk] [CDROM] 2-10 Chapter 2: BIOS information Configuration options: [Disabled] [Enabled] USB 2.0 Controller [Enabled] Allows you to disable or enable the USB functions. Configuration options: [FullSpeed] [HiSpeed] The following items may only appear when a USB storage device is enabled. Setting to [Auto] allows the system to display the configuration options. The Module Version and USB Devices Enabled items show...
AT3IONT-I Series user's manual
Page 41
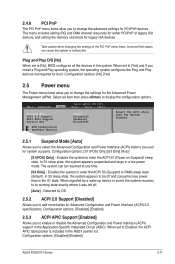
... enable or disable the Advanced Configuration and Power Interface (ACPI) support in the system. Enables the system to enter the ACPI S3 (Suspend to display the configuration options. Select an item then press to RAM) sleep state (default). Configuration options: [Disabled] [Enabled] ASUS AT3IONT-I Series 2-11 Main Advanced Power BIOS SETUP UTILITY Boot Tools Exit Suspend Mode ACPI 2.0 Support ACPI APIC Support Control EuP [Auto] [Disabled] [Enabled] [Disabled] APM Configuration Hardware Monitor Select the ACPI state used for system suspend. 2.4.6 PCI PnP The PCI PnP menu...
... enable or disable the Advanced Configuration and Power Interface (ACPI) support in the system. Enables the system to enter the ACPI S3 (Suspend to display the configuration options. Select an item then press to RAM) sleep state (default). Configuration options: [Disabled] [Enabled] ASUS AT3IONT-I Series 2-11 Main Advanced Power BIOS SETUP UTILITY Boot Tools Exit Suspend Mode ACPI 2.0 Support ACPI APIC Support Control EuP [Auto] [Disabled] [Enabled] [Disabled] APM Configuration Hardware Monitor Select the ACPI state used for system suspend. 2.4.6 PCI PnP The PCI PnP menu...
AT3IONT-I Series user's manual
Page 43
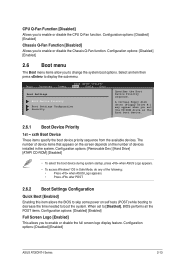
...boot the system. Main Advanced Power BIOS SETUP UTILITY Boot Tools Exit Boot Settings Boot Device Priority Boot Settings Configuration Security Specifies the Boot Device Priority sequence. Configuration options: [Disabled] [Enabled] ASUS AT3IONT-I Series 2-13 Configuration options: [Removable Dev.] [Hard Drive] [ATAPI CD-ROM] [Disabled] • To select the boot device during system startup, press when ASUS Logo appears. • To access Windows® OS in Safe Mode, do any of devices installed in the system. When set the CD-ROM drive as the first boot device. 2.6.1 Boot...
...boot the system. Main Advanced Power BIOS SETUP UTILITY Boot Tools Exit Boot Settings Boot Device Priority Boot Settings Configuration Security Specifies the Boot Device Priority sequence. Configuration options: [Disabled] [Enabled] ASUS AT3IONT-I Series 2-13 Configuration options: [Removable Dev.] [Hard Drive] [ATAPI CD-ROM] [Disabled] • To select the boot device during system startup, press when ASUS Logo appears. • To access Windows® OS in Safe Mode, do any of devices installed in the system. When set the CD-ROM drive as the first boot device. 2.6.1 Boot...
AT3IONT-I Series user's manual
Page 46
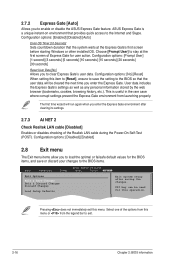
... screen of the Realtek LAN cable during the Power-On Self‑Test (POST). ASUS Express Gate is useful in the rare case where corrupt settings prevent the Express Gate environment from the legend bar to exit this item to [Reset], ensure to save or discard your changes to the BIOS items. Main Advanced BIOS SETUP UTILITY Power Boot Tools Exit Exit Options Exit & Save Changes Exit & Discard Changes Discard Changes Load Setup Defaults ExEixtitsyssytsetmemsesteutpup afatfetrersasvaivnigngthtehe chcahnagnegse.s. Configuration options...
... screen of the Realtek LAN cable during the Power-On Self‑Test (POST). ASUS Express Gate is useful in the rare case where corrupt settings prevent the Express Gate environment from the legend bar to exit this item to [Reset], ensure to save or discard your changes to the BIOS items. Main Advanced BIOS SETUP UTILITY Power Boot Tools Exit Exit Options Exit & Save Changes Exit & Discard Changes Discard Changes Load Setup Defaults ExEixtitsyssytsetmemsesteutpup afatfetrersasvaivnigngthtehe chcahnagnegse.s. Configuration options...


