A8N-VM User's Manual for English Edtion
Page 4
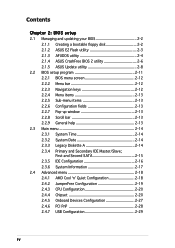
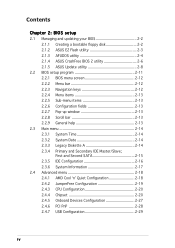
...2: BIOS setup 2.1 Managing and updating your BIOS 2-2 2.1.1 Creating a bootable floppy disk 2-2 2.1.2 ASUS EZ Flash utility 2-3 2.1.3 AFUDOS utility 2-4 2.1.4 ASUS CrashFree BIOS 2 utility 2-6 2.1.5 ASUS Update utility 2-8 2.2 BIOS setup program 2-11 2.2.1 BIOS menu screen 2-12 2.2.2 Menu bar ...2-12 2.2.3 Navigation keys 2-12 2.2.4 Menu items 2-13 2.2.5 Sub-menu items 2-13 2.2.6 Configuration fields 2-13 2.2.7 Pop-up window 2-13 2.2.8...
...2: BIOS setup 2.1 Managing and updating your BIOS 2-2 2.1.1 Creating a bootable floppy disk 2-2 2.1.2 ASUS EZ Flash utility 2-3 2.1.3 AFUDOS utility 2-4 2.1.4 ASUS CrashFree BIOS 2 utility 2-6 2.1.5 ASUS Update utility 2-8 2.2 BIOS setup program 2-11 2.2.1 BIOS menu screen 2-12 2.2.2 Menu bar ...2-12 2.2.3 Navigation keys 2-12 2.2.4 Menu items 2-13 2.2.5 Sub-menu items 2-13 2.2.6 Configuration fields 2-13 2.2.7 Pop-up window 2-13 2.2.8...
A8N-VM User's Manual for English Edtion
Page 33
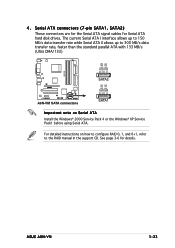
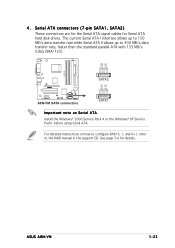
... RSATA_RXP2 GND RSATA_TXN2 RSATA_TXP2 GND A8N-VM SATA2 ® GND RSATA_RXN1 RSATA_RXP1 GND RSATA_TXN1 RSATA_TXP1 GND A8N-VM SATA connectors SATA1 Important note on Serial ATA Install the Windows® 2000 Service Pack 4 or the Windows® XP Service Pack1 before using Serial ATA. See page 3-6 for Serial ATA hard disk drives. ASUS A8N-VM 1-23 4 . The current Serial...
... RSATA_RXP2 GND RSATA_TXN2 RSATA_TXP2 GND A8N-VM SATA2 ® GND RSATA_RXN1 RSATA_RXP1 GND RSATA_TXN1 RSATA_TXP1 GND A8N-VM SATA connectors SATA1 Important note on Serial ATA Install the Windows® 2000 Service Pack 4 or the Windows® XP Service Pack1 before using Serial ATA. See page 3-6 for Serial ATA hard disk drives. ASUS A8N-VM 1-23 4 . The current Serial...
A8N-VM User's Manual for English Edtion
Page 40
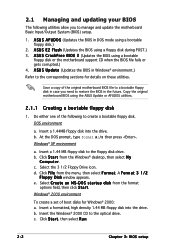
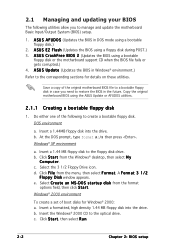
DOS environment a. Insert a 1.44MB floppy disk into the drive. Windows® XP environment a. c. Click F i l e from the Windows® desktop, then select M y C o m p u t e r. c. A S U S E Z F l a s h (Updates the BIOS using the ASUS Update or AFUDOS utilities. 2.1.1 Creating a bootable floppy disk 1. Windows® 2000 environment To create a set of the following utilities allow you need to restore the BIOS in the...
DOS environment a. Insert a 1.44MB floppy disk into the drive. Windows® XP environment a. c. Click F i l e from the Windows® desktop, then select M y C o m p u t e r. c. A S U S E Z F l a s h (Updates the BIOS using the ASUS Update or AFUDOS utilities. 2.1.1 Creating a bootable floppy disk 1. Windows® 2000 environment To create a set of the following utilities allow you need to restore the BIOS in the...
A8N-VM User's Manual for English Edtion
Page 46
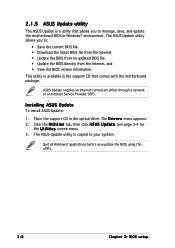
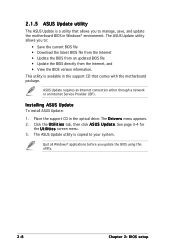
...; Update the BIOS directly from the Internet, and • View the BIOS version information. 2.1.5 ASUS Update utility The ASUS Update is a utility that comes with the motherboard package. Place the support CD in Windows® environment. Installing ASUS Update To install ASUS Update: 1. Click the U t i l i t i e s tab, then click A S U S U p d a t e. This utility is available in the support...
...; Update the BIOS directly from the Internet, and • View the BIOS version information. 2.1.5 ASUS Update utility The ASUS Update is a utility that comes with the motherboard package. Place the support CD in Windows® environment. Installing ASUS Update To install ASUS Update: 1. Click the U t i l i t i e s tab, then click A S U S U p d a t e. This utility is available in the support...
A8N-VM User's Manual for English Edtion
Page 47
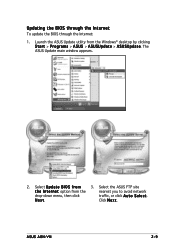
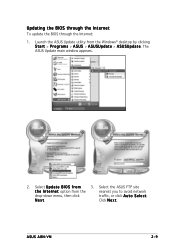
Launch the ASUS Update utility from the nearest you to avoid network drop-down menu, then click traffic, or click A u t o S e l e c t. Select U p d a t e B I n t e r n e t option from the Windows® desktop by clicking S t a r t > P r o g r a m s > A S U S > A S U S U p d a t e > A S U S U p d a t e. ASUS A8N-VM 2-9 Updating the BIOS through the Internet To update the BIOS through the Internet: 1. The ASUS Update main window appears. 2. Click N e x t. N e x t. Select the ASUS FTP site t h e I O S f r o m 3.
Launch the ASUS Update utility from the nearest you to avoid network drop-down menu, then click traffic, or click A u t o S e l e c t. Select U p d a t e B I n t e r n e t option from the Windows® desktop by clicking S t a r t > P r o g r a m s > A S U S > A S U S U p d a t e > A S U S U p d a t e. ASUS A8N-VM 2-9 Updating the BIOS through the Internet To update the BIOS through the Internet: 1. The ASUS Update main window appears. 2. Click N e x t. N e x t. Select the ASUS FTP site t h e I O S f r o m 3.

A8N-VM User's Manual for English Edtion
Page 48
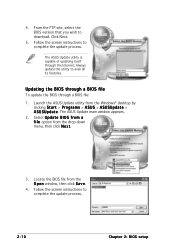
Launch the ASUS Update utility from the drop-down menu, then click N e x t. 3. 4. Click Next. 5. Select U p d a t e B I O S f r o m a f i l e option from the Windows® desktop by clicking S t a r t > P r o g r a m s > A S U S > A S U S U p d a t e > A S U S U p d a t e. Always update the utility to complete the update process. ...the BIOS through a BIOS file To update the BIOS through the Internet. The ASUS Update utility is capable of updating itself through a BIOS file: 1. The ASUS Update main window appears. 2. From the FTP site, select the BIOS version that you wish...
Launch the ASUS Update utility from the drop-down menu, then click N e x t. 3. 4. Click Next. 5. Select U p d a t e B I O S f r o m a f i l e option from the Windows® desktop by clicking S t a r t > P r o g r a m s > A S U S > A S U S U p d a t e > A S U S U p d a t e. Always update the utility to complete the update process. ...the BIOS through a BIOS file To update the BIOS through the Internet. The ASUS Update utility is capable of updating itself through a BIOS file: 1. The ASUS Update main window appears. 2. From the FTP site, select the BIOS version that you wish...
A8N-VM User's Manual for English Edtion
Page 51
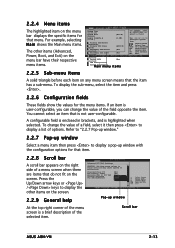
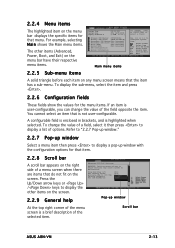
... item is user-configurable, you can change the value of a field, select it then press to 3.5 in.] configure system time. Scroll bar ASUS A8N-VM 2-13 To change the value of the field opposite the item. Plug And Play O/S PCI Latency Timer Allocate IRQ to malfunction. Primary IDE Master...and press . 2.2.6 Configuration fields These fields show the values for that the item has a sub-menu. Refer to "2.2.7 Pop-up window." 2.2.7 Pop-up window Select a menu item then press to Sub Screen Select Field General Help Save and Exit Exit Fivr0s2t.5S8AT(AC)Copyright 1985-20[0N4o,...
... item is user-configurable, you can change the value of a field, select it then press to 3.5 in.] configure system time. Scroll bar ASUS A8N-VM 2-13 To change the value of the field opposite the item. Plug And Play O/S PCI Latency Timer Allocate IRQ to malfunction. Primary IDE Master...and press . 2.2.6 Configuration fields These fields show the values for that the item has a sub-menu. Refer to "2.2.7 Pop-up window." 2.2.7 Pop-up window Select a menu item then press to Sub Screen Select Field General Help Save and Exit Exit Fivr0s2t.5S8AT(AC)Copyright 1985-20[0N4o,...
A8N-VM User's Manual for English Edtion
Page 77
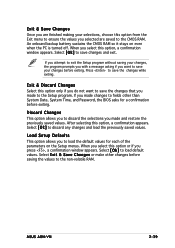
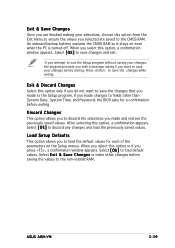
...ASUS A8N-VM 2-39 When you to load the default values for a confirmation before saving the values to the non-volatile RAM. Press to save changes and exit. After selecting this option or if you selected are saved to the CMOS RAM. Load Setup Defaults This option allows you select this option, a confirmation window... Once you are finished making your selections, choose this option from the Exit menu to ensure the values you press , a confirmation window appears. When you select this option, a confirmation appears. If you attempt to exit the Setup program without saving your changes, the...
...ASUS A8N-VM 2-39 When you to load the default values for a confirmation before saving the values to the non-volatile RAM. Press to save changes and exit. After selecting this option or if you selected are saved to the CMOS RAM. Load Setup Defaults This option allows you select this option, a confirmation window... Once you are finished making your selections, choose this option from the Exit menu to ensure the values you press , a confirmation window appears. When you select this option, a confirmation appears. If you attempt to exit the Setup program without saving your changes, the...
A8N-VM User's Manual for English Edtion
Page 80
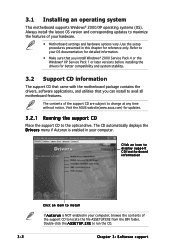
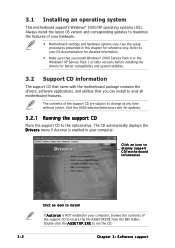
... to maximize the features of your OS documentation for detailed information. • Make sure that you install Windows® 2000 Service Pack 4 or the Windows® XP Service Pack 1 or later versions before installing the drivers for better compatibility and system stability....asus.com) for reference only. Click an icon to display support CD/motherboard information Click an item to change at any time without notice. The CD automatically displays the D r i v e r s menu if Autorun is NOT enabled in your computer. 3.1 Installing an operating system This motherboard supports Windows...
... to maximize the features of your OS documentation for detailed information. • Make sure that you install Windows® 2000 Service Pack 4 or the Windows® XP Service Pack 1 or later versions before installing the drivers for better compatibility and system stability....asus.com) for reference only. Click an icon to display support CD/motherboard information Click an item to change at any time without notice. The CD automatically displays the D r i v e r s menu if Autorun is NOT enabled in your computer. 3.1 Installing an operating system This motherboard supports Windows...
A8N-VM User's Manual for English Edtion
Page 82
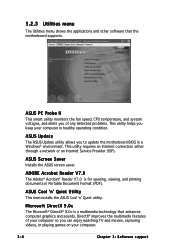
... is for opening, viewing, and printing documents in a Windows® environment. DirectX® improves the multimedia features of any detected problems. This utility helps you can enjoy watching TV and movies, capturing videos, or playing games on your computer in healthy operating condition. ASUS PC Probe II This smart utility monitors the...
... is for opening, viewing, and printing documents in a Windows® environment. DirectX® improves the multimedia features of any detected problems. This utility helps you can enjoy watching TV and movies, capturing videos, or playing games on your computer in healthy operating condition. ASUS PC Probe II This smart utility monitors the...
A8N-VM User's Manual for English Edtion
Page 83
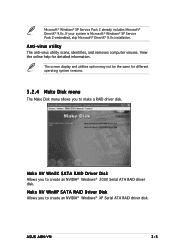
... same for detailed information. Make NV Win2K SATA RAID Driver Disk Allows you to create an NVIDIA® Windows® XP Serial ATA RAID driver disk. Microsoft® Windows® XP Service Pack 2 already includes Microsoft® DirectX® 9.0c. View the online help for...Make Disk menu allows you to create an NVIDIA® Windows® 2000 Serial ATA RAID driver disk. Anti-virus utility The anti-virus utility scans, identifies, and removes computer viruses. ASUS A8N-VM 3-5 If your system is Microsoft® Windows® XP Service Pack 2-embedded, skip Microsoft® ...
... same for detailed information. Make NV Win2K SATA RAID Driver Disk Allows you to create an NVIDIA® Windows® XP Serial ATA RAID driver disk. Microsoft® Windows® XP Service Pack 2 already includes Microsoft® DirectX® 9.0c. View the online help for...Make Disk menu allows you to create an NVIDIA® Windows® 2000 Serial ATA RAID driver disk. Anti-virus utility The anti-virus utility scans, identifies, and removes computer viruses. ASUS A8N-VM 3-5 If your system is Microsoft® Windows® XP Service Pack 2-embedded, skip Microsoft® ...
A8N-VM English Manual E2230
Page 4
... updating your BIOS 2-2 2.1.1 Creating a bootable floppy disk 2-2 2.1.2 ASUS EZ Flash utility 2-3 2.1.3 AFUDOS utility 2-4 2.1.4 ASUS CrashFree BIOS 2 utility 2-6 2.1.5 ASUS Update utility 2-8 2.2 BIOS setup program 2-11 2.2.1 BIOS menu screen 2-12 2.2.2 Menu bar 2-12 2.2.3 Navigation keys 2-12 2.2.4 Menu items 2-13 2.2.5 Sub-menu items 2-13 2.2.6 Configuration fields 2-13 2.2.7 Pop-up window 2-13 2.2.8 Scroll bar 2-13 2.2.9 General help 2-13...
... updating your BIOS 2-2 2.1.1 Creating a bootable floppy disk 2-2 2.1.2 ASUS EZ Flash utility 2-3 2.1.3 AFUDOS utility 2-4 2.1.4 ASUS CrashFree BIOS 2 utility 2-6 2.1.5 ASUS Update utility 2-8 2.2 BIOS setup program 2-11 2.2.1 BIOS menu screen 2-12 2.2.2 Menu bar 2-12 2.2.3 Navigation keys 2-12 2.2.4 Menu items 2-13 2.2.5 Sub-menu items 2-13 2.2.6 Configuration fields 2-13 2.2.7 Pop-up window 2-13 2.2.8 Scroll bar 2-13 2.2.9 General help 2-13...
A8N-VM English Manual E2230
Page 33
... DMA/133) GND RSATA_RXN2 RSATA_RXP2 GND RSATA_TXN2 RSATA_TXP2 GND A8N-VM SATA2 ® GND RSATA_RXN1 RSATA_RXP1 GND RSATA_TXN1 RSATA_TXP1 GND A8N-VM SATA connectors SATA1 Important note on Serial ATA Install the Windows® 2000 Service Pack 4 or the Windows® XP Service Pack1 before using Serial ATA. ASUS A8N-VM 1-23 4 . The current Serial ATA I interface allows up...
... DMA/133) GND RSATA_RXN2 RSATA_RXP2 GND RSATA_TXN2 RSATA_TXP2 GND A8N-VM SATA2 ® GND RSATA_RXN1 RSATA_RXP1 GND RSATA_TXN1 RSATA_TXP1 GND A8N-VM SATA connectors SATA1 Important note on Serial ATA Install the Windows® 2000 Service Pack 4 or the Windows® XP Service Pack1 before using Serial ATA. ASUS A8N-VM 1-23 4 . The current Serial ATA I interface allows up...
A8N-VM English Manual E2230
Page 40
... when the BIOS file fails or gets corrupted.) 4. Insert a 1.44MB floppy disk into the drive. b. Windows® XP environment a. c. Click F i l e from the Windows® desktop, then select M y C o m p u t e r. Windows® 2000 environment To create a set of boot disks for details on these utilities. b. A S U... S C r a s h F r e e B I O S 2 (Updates the BIOS using the ASUS Update or AFUDOS utilities. 2.1.1 ...
... when the BIOS file fails or gets corrupted.) 4. Insert a 1.44MB floppy disk into the drive. b. Windows® XP environment a. c. Click F i l e from the Windows® desktop, then select M y C o m p u t e r. Windows® 2000 environment To create a set of boot disks for details on these utilities. b. A S U... S C r a s h F r e e B I O S 2 (Updates the BIOS using the ASUS Update or AFUDOS utilities. 2.1.1 ...
A8N-VM English Manual E2230
Page 46
... motherboard BIOS in the optical drive. The D r i v e r s menu appears. 2. Quit all Windows® applications before you to your system. Place the support CD in Windows® environment. The ASUS Update utility allows you update the BIOS using this utility. 2-8 Chapter 2: BIOS setup ASUS Update requires an Internet connection either through a network or an Internet...
... motherboard BIOS in the optical drive. The D r i v e r s menu appears. 2. Quit all Windows® applications before you to your system. Place the support CD in Windows® environment. The ASUS Update utility allows you update the BIOS using this utility. 2-8 Chapter 2: BIOS setup ASUS Update requires an Internet connection either through a network or an Internet...
A8N-VM English Manual E2230
Page 47
Launch the ASUS Update utility from the nearest you to avoid network drop-down menu, then click traffic, or click A u t o S e l e c t. ASUS A8N-VM 2-9 Select U p d a t e B I n t e r n e t option from the Windows® desktop by clicking S t a r t > P r o g r a m s > A S U S > A S U S U p d a t e > A S U S U p d a t e. Click N e x t. Updating the BIOS through the Internet To update the BIOS through the Internet: 1. Select the ASUS FTP site t h e I O S f r o m 3. The ASUS Update main window appears. 2. N e x t.
Launch the ASUS Update utility from the nearest you to avoid network drop-down menu, then click traffic, or click A u t o S e l e c t. ASUS A8N-VM 2-9 Select U p d a t e B I n t e r n e t option from the Windows® desktop by clicking S t a r t > P r o g r a m s > A S U S > A S U S U p d a t e > A S U S U p d a t e. Click N e x t. Updating the BIOS through the Internet To update the BIOS through the Internet: 1. Select the ASUS FTP site t h e I O S f r o m 3. The ASUS Update main window appears. 2. N e x t.
A8N-VM English Manual E2230
Page 48
... a v e. 4. From the FTP site, select the BIOS version that you wish to complete the update process. The ASUS Update utility is capable of updating itself through a BIOS file: 1. The ASUS Update main window appears. 2. Locate the BIOS file from the drop-down menu, then click N e x t. 3. Follow the screen ... avail all its features. Updating the BIOS through a BIOS file To update the BIOS through the Internet. Click Next. 5. Launch the ASUS Update utility from the Windows® desktop by clicking S t a r t > P r o g r a m s > A S U S > A S U S U p d a t e > A S U S U p d a t...
... a v e. 4. From the FTP site, select the BIOS version that you wish to complete the update process. The ASUS Update utility is capable of updating itself through a BIOS file: 1. The ASUS Update main window appears. 2. Locate the BIOS file from the drop-down menu, then click N e x t. 3. Follow the screen ... avail all its features. Updating the BIOS through a BIOS file To update the BIOS through the Internet. Click Next. 5. Launch the ASUS Update utility from the Windows® desktop by clicking S t a r t > P r o g r a m s > A S U S > A S U S U p d a t e > A S U S U p d a t...
A8N-VM English Manual E2230
Page 51
...[1.44M, 3.5 in brackets, and is user-configurable, you can change the value of a field, select it then press to display a pop-up window At the top right corner of the menu screen is a brief description of options. You cannot select an item that menu. Press the Up/Down...PCI VGA Palette Snooping PCI IDE BusMaster [No] [64] [Yes] [Disabled] [Enabled] Pop-up window with the configuration options for the menu items. If an item is highlighted when selected. Scroll bar ASUS A8N-VM 2-13 Main menu items A solid triangle before each item on any menu screen means that item. 2.2.8...
...[1.44M, 3.5 in brackets, and is user-configurable, you can change the value of a field, select it then press to display a pop-up window At the top right corner of the menu screen is a brief description of options. You cannot select an item that menu. Press the Up/Down...PCI VGA Palette Snooping PCI IDE BusMaster [No] [64] [Yes] [Disabled] [Enabled] Pop-up window with the configuration options for the menu items. If an item is highlighted when selected. Scroll bar ASUS A8N-VM 2-13 Main menu items A solid triangle before each item on any menu screen means that item. 2.2.8...
A8N-VM English Manual E2230
Page 77
... Exit menu to ensure the values you select this option only if you do not want to save the changes that you press , a confirmation window appears. ASUS A8N-VM 2-39 When you selected are finished making your changes before exiting. After selecting this option or if you made changes to fields other changes before...
... Exit menu to ensure the values you select this option only if you do not want to save the changes that you press , a confirmation window appears. ASUS A8N-VM 2-39 When you selected are finished making your changes before exiting. After selecting this option or if you made changes to fields other changes before...
A8N-VM English Manual E2230
Page 80
...; 2000 Service Pack 4 or the Windows® XP Service Pack 1 or later versions before installing the drivers for reference only. The contents of the support CD are subject to the optical drive. Visit the ASUS website(www.asus.com) for updates. 3.2.1 Running the support CD ...vary. E X E to maximize the features of the support CD to avail all motherboard features. 3.1 Installing an operating system This motherboard supports Windows® 2000/XP operating systems (OS). Always install the latest OS version and corresponding updates to run the CD. 3-2 Chapter 3: Software support...
...; 2000 Service Pack 4 or the Windows® XP Service Pack 1 or later versions before installing the drivers for reference only. The contents of the support CD are subject to the optical drive. Visit the ASUS website(www.asus.com) for updates. 3.2.1 Running the support CD ...vary. E X E to maximize the features of the support CD to avail all motherboard features. 3.1 Installing an operating system This motherboard supports Windows® 2000/XP operating systems (OS). Always install the latest OS version and corresponding updates to run the CD. 3-2 Chapter 3: Software support...


