A8N-VM User's Manual for English Edtion
Page 4
... 2.1 Managing and updating your BIOS 2-2 2.1.1 Creating a bootable floppy disk 2-2 2.1.2 ASUS EZ Flash utility 2-3 2.1.3 AFUDOS utility 2-4 2.1.4 ASUS CrashFree BIOS 2 utility 2-6 2.1.5 ASUS Update utility 2-8 2.2 BIOS setup program 2-11 2.2.1 BIOS menu screen 2-12 2.2.2 Menu bar 2-12 2.2.3 Navigation keys 2-12 2.2.4 Menu items 2-13 2.2.5 Sub-menu items 2-13 2.2.6 Configuration fields 2-13 2.2.7 Pop-up window 2-13 2.2.8 Scroll bar 2-13 2.2.9 General ...
... 2.1 Managing and updating your BIOS 2-2 2.1.1 Creating a bootable floppy disk 2-2 2.1.2 ASUS EZ Flash utility 2-3 2.1.3 AFUDOS utility 2-4 2.1.4 ASUS CrashFree BIOS 2 utility 2-6 2.1.5 ASUS Update utility 2-8 2.2 BIOS setup program 2-11 2.2.1 BIOS menu screen 2-12 2.2.2 Menu bar 2-12 2.2.3 Navigation keys 2-12 2.2.4 Menu items 2-13 2.2.5 Sub-menu items 2-13 2.2.6 Configuration fields 2-13 2.2.7 Pop-up window 2-13 2.2.8 Scroll bar 2-13 2.2.9 General ...
A8N-VM User's Manual for English Edtion
Page 41
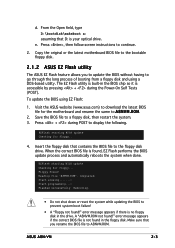
... not shut down or reset the system while updating the BIOS to display the following. Press , then follow screen instructions to a floppy disk, then restart the system. 3. Press + during the Power-On Self Tests (POST). When the correct BIOS file is not found in the drive. A "A8NVM.ROM... the floppy disk that D: is no floppy disk in the floppy disk. ASUS A8N-VM 2-3 R O M. 2. To update the BIOS using a DOS-based utility. From the Open field, type D:\bootdisk\makeboot a: assuming that contains the BIOS file to A8NVM.ROM. Reading file "A8NVM.ROM". Make sure that you to...
... not shut down or reset the system while updating the BIOS to display the following. Press , then follow screen instructions to a floppy disk, then restart the system. 3. Press + during the Power-On Self Tests (POST). When the correct BIOS file is not found in the drive. A "A8NVM.ROM... the floppy disk that D: is no floppy disk in the floppy disk. ASUS A8N-VM 2-3 R O M. 2. To update the BIOS using a DOS-based utility. From the Open field, type D:\bootdisk\makeboot a: assuming that contains the BIOS file to A8NVM.ROM. Reading file "A8NVM.ROM". Make sure that you to...

A8N-VM User's Manual for English Edtion
Page 42
... the file. • The succeeding BIOS screens are for the extension name. The actual BIOS screen displays may not be exactly the same as backup when the BIOS fails or gets corrupted during the updating process. Version 1.10 Copyright (C) 2002 American Megatrends, Inc. Copying the current BIOS To copy the current BIOS file using a bootable floppy disk...
... the file. • The succeeding BIOS screens are for the extension name. The actual BIOS screen displays may not be exactly the same as backup when the BIOS fails or gets corrupted during the updating process. Version 1.10 Copyright (C) 2002 American Megatrends, Inc. Copying the current BIOS To copy the current BIOS file using a bootable floppy disk...
A8N-VM User's Manual for English Edtion
Page 46
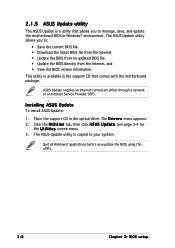
... (ISP). The D r i v e r s menu appears. 2. Click the U t i l i t i e s tab, then click A S U S U p d a t e. Installing ASUS Update To install ASUS Update: 1. See page 3-4 for the U t i l i t i e s screen menu. 3. Place the support CD in Windows® environment. The ASUS Update utility allows you update the BIOS using this utility. 2-8 Chapter 2: BIOS setup The ASUS Update utility is copied to manage, save, and update the...
... (ISP). The D r i v e r s menu appears. 2. Click the U t i l i t i e s tab, then click A S U S U p d a t e. Installing ASUS Update To install ASUS Update: 1. See page 3-4 for the U t i l i t i e s screen menu. 3. Place the support CD in Windows® environment. The ASUS Update utility allows you update the BIOS using this utility. 2-8 Chapter 2: BIOS setup The ASUS Update utility is copied to manage, save, and update the...
A8N-VM User's Manual for English Edtion
Page 48
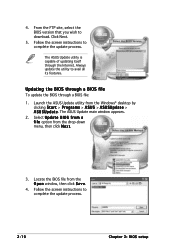
...: 1. Select U p d a t e B I O S f r o m a f i l e option from the Windows® desktop by clicking S t a r t > P r o g r a m s > A S U S > A S U S U p d a t e > A S U S U p d a t e. 4. The ASUS Update main window appears. 2. Follow the screen instructions to avail all its features. Launch the ASUS Update utility from the drop-down menu, then click N e x t. 3. Locate the BIOS file from the O p e n window, then click S a v e. 4. Always update the utility to complete the update process...
...: 1. Select U p d a t e B I O S f r o m a f i l e option from the Windows® desktop by clicking S t a r t > P r o g r a m s > A S U S > A S U S U p d a t e > A S U S U p d a t e. 4. The ASUS Update main window appears. 2. Follow the screen instructions to avail all its features. Launch the ASUS Update utility from the drop-down menu, then click N e x t. 3. Locate the BIOS file from the O p e n window, then click S a v e. 4. Always update the utility to complete the update process...
A8N-VM User's Manual for English Edtion
Page 49
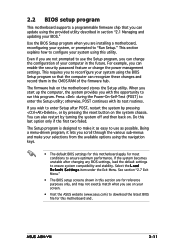
...See section "2.7 Exit Menu." • The BIOS setup screens shown in this section are installing a motherboard, reconfiguring your screen. • Visit the ASUS website (www.asus.com) to "Run Setup." Use the BIOS Setup program when you can update using the BIOS Setup program so that you are for most conditions... POST, restart the system by pressing , or by turning the system off and then back on the motherboard stores the Setup utility. ASUS A8N-VM 2-11 For example, you to enter the Setup utility; The Setup program is designed to make your system using the navigation keys....
...See section "2.7 Exit Menu." • The BIOS setup screens shown in this section are installing a motherboard, reconfiguring your screen. • Visit the ASUS website (www.asus.com) to "Run Setup." Use the BIOS Setup program when you can update using the BIOS Setup program so that you are for most conditions... POST, restart the system by pressing , or by turning the system off and then back on the motherboard stores the Setup utility. ASUS A8N-VM 2-11 For example, you to enter the Setup utility; The Setup program is designed to make your system using the navigation keys....

A8N-VM User's Manual for English Edtion
Page 50
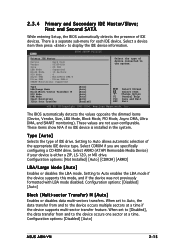
... Master Secondary IDE Slave First SATA Second SATA IDE Configuration System Information [ST320410A] [ASUS CD-S520/A] [Not Detected] [Not Detected] [Not Detected] [Not Detected] Use [+] or [-] to Sub Screen Tab Select Field F1 General Help F10 Save and Exit ESC Exit v02.58 (C)Copyright... to select items in ] Use [ENTER], [TAB] or [SHIFT-TAB] to another. 2-12 Chapter 2: BIOS setup 2.2.1 BIOS menu screen Menu items Menu bar Configuration fields General help Main Advanced BIOS SETUP UTILITY Power Boot Exit System Time System Date Legacy Diskette A [10:55:25] [Thu 08/25/2005...
... Master Secondary IDE Slave First SATA Second SATA IDE Configuration System Information [ST320410A] [ASUS CD-S520/A] [Not Detected] [Not Detected] [Not Detected] [Not Detected] Use [+] or [-] to Sub Screen Tab Select Field F1 General Help F10 Save and Exit ESC Exit v02.58 (C)Copyright... to select items in ] Use [ENTER], [TAB] or [SHIFT-TAB] to another. 2-12 Chapter 2: BIOS setup 2.2.1 BIOS menu screen Menu items Menu bar Configuration fields General help Main Advanced BIOS SETUP UTILITY Power Boot Exit System Time System Date Legacy Diskette A [10:55:25] [Thu 08/25/2005...

A8N-VM User's Manual for English Edtion
Page 52
.... 2.3.3 Legacy Diskette A [1.44M, 3.5 in.] Sets the type of the basic system information. Refer to section "2.2.1 BIOS menu screen" for information on the menu screen items and how to configure the System Time. Primary IDE Master Primary IDE Slave Secondary IDE Master Secondary IDE Slave First SATA... Second SATA IDE Configuration System Information [ST320410A] [ASUS CD-S520/A] [Not Detected] [Not Detected] [Not Detected] [Not Detected] Use [+] or [-] to navigate through them. Select Screen Select Item Enter Go to Sub Screen Tab Select Field F1 General Help F10 Save and Exit ...
.... 2.3.3 Legacy Diskette A [1.44M, 3.5 in.] Sets the type of the basic system information. Refer to section "2.2.1 BIOS menu screen" for information on the menu screen items and how to configure the System Time. Primary IDE Master Primary IDE Slave Secondary IDE Master Secondary IDE Slave First SATA... Second SATA IDE Configuration System Information [ST320410A] [ASUS CD-S520/A] [Not Detected] [Not Detected] [Not Detected] [Not Detected] Use [+] or [-] to navigate through them. Select Screen Select Item Enter Go to Sub Screen Tab Select Field F1 General Help F10 Save and Exit ...
A8N-VM User's Manual for English Edtion
Page 53
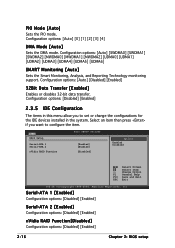
...Auto] [Auto] [Auto] [Auto] [Auto] [Auto] [Enabled] Select Screen Select Item +- Configuration options: [Disabled] [Auto] Block (Multi-sector Transfer) M [Auto] Enables or disables data multi-sectors transfers. The BIOS automatically detects the values opposite the dimmed items (Device, Vendor, Size, LBA... ASUS A8N-VM 2-15 Select a device item then press to the system. Type [Auto] Selects the type of IDE devices. Setting to Auto allows automatic selection of device connected to display the IDE device information. First and Second SATA While entering Setup, the BIOS...
...Auto] [Auto] [Auto] [Auto] [Auto] [Auto] [Enabled] Select Screen Select Item +- Configuration options: [Disabled] [Auto] Block (Multi-sector Transfer) M [Auto] Enables or disables data multi-sectors transfers. The BIOS automatically detects the values opposite the dimmed items (Device, Vendor, Size, LBA... ASUS A8N-VM 2-15 Select a device item then press to the system. Type [Auto] Selects the type of IDE devices. Setting to Auto allows automatic selection of device connected to display the IDE device information. First and Second SATA While entering Setup, the BIOS...
A8N-VM User's Manual for English Edtion
Page 54
... [Auto] Sets the Smart Monitoring, Analysis, and Reporting Technology monitoring support. Main RAID Setup Serial-ATA 1 Serial-ATA 2 nVidia RAID Function BIOS SETUP UTILITY [Enabled] [Enabled] [Disabled] Options Enabled Disabled Select Screen Select Item +- Serial-ATA 1 [Enabled] Configuration options: [Disabled] [Enabled] Serial-ATA 2 [Enabled] Configuration options: [Disabled] [Enabled] nVidia RAID Function [Disabled...
... [Auto] Sets the Smart Monitoring, Analysis, and Reporting Technology monitoring support. Main RAID Setup Serial-ATA 1 Serial-ATA 2 nVidia RAID Function BIOS SETUP UTILITY [Enabled] [Enabled] [Disabled] Options Enabled Disabled Select Screen Select Item +- Serial-ATA 1 [Enabled] Configuration options: [Disabled] [Enabled] Serial-ATA 2 [Enabled] Configuration options: [Disabled] [Enabled] nVidia RAID Function [Disabled...
A8N-VM User's Manual for English Edtion
Page 55
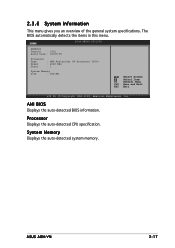
... Memory Displays the auto-detected system memory. ASUS A8N-VM 2-17 AMI BIOS Displays the auto-detected BIOS information. Main BIOS SETUP UTILITY AMIBIOS Version : 0112 Build Date : 09/07/05 Processor Type Speed Count : AMD Athlon(tm) 64 Processor 3200+ : 2020 MHz : 1 System Memory Size : 240 MB Select Screen Select Item F1 General Help F10 Save...
... Memory Displays the auto-detected system memory. ASUS A8N-VM 2-17 AMI BIOS Displays the auto-detected BIOS information. Main BIOS SETUP UTILITY AMIBIOS Version : 0112 Build Date : 09/07/05 Processor Type Speed Count : AMD Athlon(tm) 64 Processor 3200+ : 2020 MHz : 1 System Memory Size : 240 MB Select Screen Select Item F1 General Help F10 Save...
A8N-VM User's Manual for English Edtion
Page 56
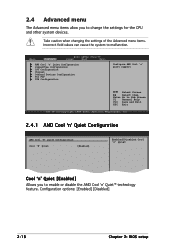
... can cause the system to malfunction. Main Advanced BIOS SETUP UTILITY Power Boot Exit AMD Cool 'n' Quiet Configuration JumperFree Configuration CPU Configuration Chipset Onboard Devices Configuration PCI PnP USB Configuration Configure AMD Cool 'n' Quiet support Select Screen Select Item Enter Go to Sub Screen F1 General Help F10 Save and Exit ESC Exit...
... can cause the system to malfunction. Main Advanced BIOS SETUP UTILITY Power Boot Exit AMD Cool 'n' Quiet Configuration JumperFree Configuration CPU Configuration Chipset Onboard Devices Configuration PCI PnP USB Configuration Configure AMD Cool 'n' Quiet support Select Screen Select Item Enter Go to Sub Screen F1 General Help F10 Save and Exit ESC Exit...
A8N-VM User's Manual for English Edtion
Page 58
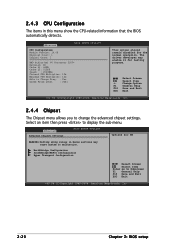
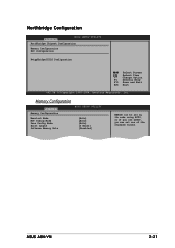
... Exit ESC Exit v02.58 (C)Copyright 1985-2004, American Megatrends, Inc. 2-20 Chapter 2: BIOS setup NorthBridge Configuration SouthBridge/MCP51 Configuration Hyper Transport Configuration Select Screen Select Item Enter Go to change the advanced chipset settings. Select an item then press to ...Level : 0x41 This option should remain disabled for testing purpose. Select Screen Select Item +- The driver developer may cause system to display the sub-menu. Advanced Advanced Chipset Settings BIOS SETUP UTILITY Options for NB WARNING:Setting wrong values in this menu show...
... Exit ESC Exit v02.58 (C)Copyright 1985-2004, American Megatrends, Inc. 2-20 Chapter 2: BIOS setup NorthBridge Configuration SouthBridge/MCP51 Configuration Hyper Transport Configuration Select Screen Select Item Enter Go to change the advanced chipset settings. Select an item then press to ...Level : 0x41 This option should remain disabled for testing purpose. Select Screen Select Item +- The driver developer may cause system to display the sub-menu. Advanced Advanced Chipset Settings BIOS SETUP UTILITY Options for NB WARNING:Setting wrong values in this menu show...
A8N-VM User's Manual for English Edtion
Page 59
ASUS A8N-VM 2-21 Change Option F1 General Help F10 Save and Exit ESC Exit v02.58 (C)Copyright 1985-2004, American Megatrends, Inc. Memory Configuration Advanced Memory Configuration Memclock Mode MCT Timing Mode User Config Mode Burst Length Software Memory Hole BIOS SETUP UTILITY [Auto] [Auto] [Auto] [4 Beats] [Disabled] MEMCLK can be set by the...
ASUS A8N-VM 2-21 Change Option F1 General Help F10 Save and Exit ESC Exit v02.58 (C)Copyright 1985-2004, American Megatrends, Inc. Memory Configuration Advanced Memory Configuration Memclock Mode MCT Timing Mode User Config Mode Burst Length Software Memory Hole BIOS SETUP UTILITY [Auto] [Auto] [Auto] [4 Beats] [Disabled] MEMCLK can be set by the...

A8N-VM User's Manual for English Edtion
Page 62
... Graphics Adapter OnChip VGA Frame Buffer Size OnChip VGA Trap Enable [PCI -> PCI Express] [64 MB] [Disabled] Options PCI -> PCI Express IGP -> PCI Express Select Screen Select Item +- Primary Graphics Adapter [PCI -> PCI Express -> IGP] Allows selection of the graphics controller to be corrected while idle. Change Option F1 General Help...] [84.00ms] Data Cache BG Scrub [Disabled] Allows the L1 Data Cache RAM to use as a primary boot device. Configuration options: [Disabled] [Enabled] 2-24 Chapter 2: BIOS setup
... Graphics Adapter OnChip VGA Frame Buffer Size OnChip VGA Trap Enable [PCI -> PCI Express] [64 MB] [Disabled] Options PCI -> PCI Express IGP -> PCI Express Select Screen Select Item +- Primary Graphics Adapter [PCI -> PCI Express -> IGP] Allows selection of the graphics controller to be corrected while idle. Change Option F1 General Help...] [84.00ms] Data Cache BG Scrub [Disabled] Allows the L1 Data Cache RAM to use as a primary boot device. Configuration options: [Disabled] [Enabled] 2-24 Chapter 2: BIOS setup

A8N-VM User's Manual for English Edtion
Page 64
... MHz] [800 MHz] [1000 MHz] [1200 MHz] [1400 MHz] [1600 MHz] MCP51(SB) to C51G (NB)frequency selection. Hyper Transport Configuration Advanced BIOS Setup Utility Hyper Transport C51G Configuration LDT (K8) to C51G (NB) Frequency LDT (K8) to C51G (NB) LinkWidth [Auto] [Auto] Hyper Transport MCP51 ... [800 MHz] MCP51(SB) to NVIDIA (NB) LinkWidth [8 8 ] LDT (K8) to NVIDIA (NB) LinkWidth [8 8 ] Configuration options: [4 4 ] [8 8 ] [16 16 ] 2-26 Chapter 2: BIOS setup Change Option F1 General Help F10 Save and Exit ESC Exit v02.58 (C)Copyright 1985-2004, American Megatrends, Inc. Select...
... MHz] [800 MHz] [1000 MHz] [1200 MHz] [1400 MHz] [1600 MHz] MCP51(SB) to C51G (NB)frequency selection. Hyper Transport Configuration Advanced BIOS Setup Utility Hyper Transport C51G Configuration LDT (K8) to C51G (NB) Frequency LDT (K8) to C51G (NB) LinkWidth [Auto] [Auto] Hyper Transport MCP51 ... [800 MHz] MCP51(SB) to NVIDIA (NB) LinkWidth [8 8 ] LDT (K8) to NVIDIA (NB) LinkWidth [8 8 ] Configuration options: [4 4 ] [8 8 ] [16 16 ] 2-26 Chapter 2: BIOS setup Change Option F1 General Help F10 Save and Exit ESC Exit v02.58 (C)Copyright 1985-2004, American Megatrends, Inc. Select...
A8N-VM User's Manual for English Edtion
Page 66
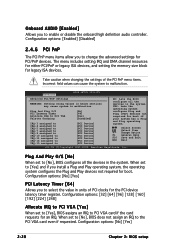
...F10 Save and Exit ESC Exit v02.58 (C)Copyright 1985-2004, American Megatrends, Inc. Configuration options: [No] [Yes] 2-28 Chapter 2: BIOS setup Take caution when changing the settings of PCI clocks for the PCI device latency timer register. When set to [Yes] and if you ...Configuration options: [Enabled] [Disabled] 2.4.6 PCI PnP The PCI PnP menu items allow you to enable or disable the onboard high definition audio controller. Select Screen Select Item +- Plug And Play O/S PCI Latency Timer Allocate IRQ to PCI VGA Palette Snooping [No] [64] [Yes] [Disabled] IRQ-3 assigned ...
...F10 Save and Exit ESC Exit v02.58 (C)Copyright 1985-2004, American Megatrends, Inc. Configuration options: [No] [Yes] 2-28 Chapter 2: BIOS setup Take caution when changing the settings of PCI clocks for the PCI device latency timer register. When set to [Yes] and if you ...Configuration options: [Enabled] [Disabled] 2.4.6 PCI PnP The PCI PnP menu items allow you to enable or disable the onboard high definition audio controller. Select Screen Select Item +- Plug And Play O/S PCI Latency Timer Allocate IRQ to PCI VGA Palette Snooping [No] [64] [Yes] [Disabled] IRQ-3 assigned ...
A8N-VM User's Manual for English Edtion
Page 67
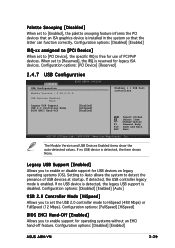
...Screen Select Item +- The Module Version and USB Devices Enabled items show the auto-detected values. Configuration options: [Disabled] [Enabled] [Auto] USB 2.0 Controller Mode [HiSpeed] Allows you to enable support for operating systems without an EHCI hand-off feature. Configuration options: [FullSpeed] [HiSpeed] BIOS...If no USB device is enabled. Configuration options: [Disabled] [Enabled] ASUS A8N-VM 2-29 Configuration options: [PCI Device] [Reserved] 2.4.7 USB Configuration Advanced BIOS SETUP UTILITY USB Configuration Module Version - 2.24.0-11.4 USB Devices Enabled:...
...Screen Select Item +- The Module Version and USB Devices Enabled items show the auto-detected values. Configuration options: [Disabled] [Enabled] [Auto] USB 2.0 Controller Mode [HiSpeed] Allows you to enable support for operating systems without an EHCI hand-off feature. Configuration options: [FullSpeed] [HiSpeed] BIOS...If no USB device is enabled. Configuration options: [Disabled] [Enabled] ASUS A8N-VM 2-29 Configuration options: [PCI Device] [Reserved] 2.4.7 USB Configuration Advanced BIOS SETUP UTILITY USB Configuration Module Version - 2.24.0-11.4 USB Devices Enabled:...

A8N-VM User's Manual for English Edtion
Page 68
... Determines whether to enable or disable the Advanced Configuration and Power Interface (ACPI) support in the RSDT pointer list. Select Screen Select Item +- Configuration options: [No] [Yes] 2.5.3 ACPI 2.0 Support [Enabled] Specifies the Advanced Configuration and Power ...Interface (ACPI) version supported. Configuration options: [Disabled] [Enabled] 2-30 Chapter 2: BIOS setup Main Advanced BIOS SETUP UTILITY Power Boot Exit Suspend Mode Repost Video on S3/STR resume. Configuration options: [Disabled] [Enabled] 2.5.4 ACPI...
... Determines whether to enable or disable the Advanced Configuration and Power Interface (ACPI) support in the RSDT pointer list. Select Screen Select Item +- Configuration options: [No] [Yes] 2.5.3 ACPI 2.0 Support [Enabled] Specifies the Advanced Configuration and Power ...Interface (ACPI) version supported. Configuration options: [Disabled] [Enabled] 2-30 Chapter 2: BIOS setup Main Advanced BIOS SETUP UTILITY Power Boot Exit Suspend Mode Repost Video on S3/STR resume. Configuration options: [Disabled] [Enabled] 2.5.4 ACPI...

A8N-VM English Manual E2230
Page 42
... bootable floppy disk you created earlier. 2. A:\>afudos /oOLDBIOS1.ROM Main filename Extension name 3. Press . The actual BIOS screen displays may not be exactly the same as backup when the BIOS fails or gets corrupted during the updating process. 2.1.3 AFUDOS utility The AFUDOS utility allows you to update the... BIOS file in DOS mode, then at the prompt type: afudos /o[filename] where the [filename] is not write-protected and has at least 600 KB free space to save the file. • The succeeding BIOS screens are for the extension name. All ...
... bootable floppy disk you created earlier. 2. A:\>afudos /oOLDBIOS1.ROM Main filename Extension name 3. Press . The actual BIOS screen displays may not be exactly the same as backup when the BIOS fails or gets corrupted during the updating process. 2.1.3 AFUDOS utility The AFUDOS utility allows you to update the... BIOS file in DOS mode, then at the prompt type: afudos /o[filename] where the [filename] is not write-protected and has at least 600 KB free space to save the file. • The succeeding BIOS screens are for the extension name. All ...


