
A8N-E English edition user's manual, version E1911
Page 32
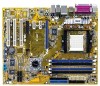
...Keep the screw for information on the slot. 5. Turn on the next page. 3. See Chapter 2 for later use . Install the software drivers for the card. 2. The following sub-sections describe the slots and the expansion cards that you intend to use . 4. Replace the system... the it and make the necessary hardware settings for the expansion card. 1-18 Chapter 1: Product introduction Remove the system unit cover (if your motherboard is completely seated on BIOS setup. 2. Secure the card to unplug the power cord before installing a PCI Express x16 card. 1.8.1 Installing an...
...Keep the screw for information on the slot. 5. Turn on the next page. 3. See Chapter 2 for later use . Install the software drivers for the card. 2. The following sub-sections describe the slots and the expansion cards that you intend to use . 4. Replace the system... the it and make the necessary hardware settings for the expansion card. 1-18 Chapter 1: Product introduction Remove the system unit cover (if your motherboard is completely seated on BIOS setup. 2. Secure the card to unplug the power cord before installing a PCI Express x16 card. 1.8.1 Installing an...

A8N-E English edition user's manual, version E1911
Page 33
...- PCI slot 3 - - shared - - - - - PCI slot 2 - Onboard LAN1 shared - - -- - - - ASUS A8N-E 1-19 IRQ assignments for ISA or PCI devices. Onboard USB 2.0 controller shared - - -- - - - When using PCI cards on...cards that the cards do not need IRQ assignments. The figure shows a LAN card installed on shared slots, ensure that the drivers support "Share IRQ" or that comply with PCI specifications. 1.8.3 Interrupt assignments Standard interrupt assignments IRQ Priority 0 1 1 2 2... motherboard A B C D E F G H PCI slot 1 shared - - -- - - -
...- PCI slot 3 - - shared - - - - - PCI slot 2 - Onboard LAN1 shared - - -- - - - ASUS A8N-E 1-19 IRQ assignments for ISA or PCI devices. Onboard USB 2.0 controller shared - - -- - - - When using PCI cards on...cards that the cards do not need IRQ assignments. The figure shows a LAN card installed on shared slots, ensure that the drivers support "Share IRQ" or that comply with PCI specifications. 1.8.3 Interrupt assignments Standard interrupt assignments IRQ Priority 0 1 1 2 2... motherboard A B C D E F G H PCI slot 1 shared - - -- - - -
A8N-E English edition user's manual, version E1911
Page 90
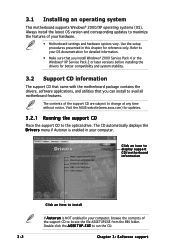
...asus.com) for updates. 3.2.1 Running the support CD Place the support CD to avail all motherboard features. The CD automatically displays the D r i v e r s menu if Autorun is NOT enabled in this chapter for better compatibility and system stability. 3.2 Support CD information The support CD that came with the motherboard package contains the drivers..., software applications, and utilities that you can install to the optical drive. Refer to your hardware. • Motherboard settings and hardware options vary. ...
...asus.com) for updates. 3.2.1 Running the support CD Place the support CD to avail all motherboard features. The CD automatically displays the D r i v e r s menu if Autorun is NOT enabled in this chapter for better compatibility and system stability. 3.2 Support CD information The support CD that came with the motherboard package contains the drivers..., software applications, and utilities that you can install to the optical drive. Refer to your hardware. • Motherboard settings and hardware options vary. ...

A8N-E English edition user's manual, version E1911
Page 109
... to a second drive. Refer to section "3.5 Creating a RAID driver disk" for this setup. ASUS A8N-E 3-21 Use four new hard disk drives or use an existing drive and a new drive for this setup. The motherboard supports the following RAID configurations. Use two new drives or use an... This RAID configuration provides data protection and increases fault tolerance to read and write data in a RAID set . 3.4 RAID configurations The motherboard comes with the NVIDIA® nForce™ 4 Ultra southbridge RAID controller that allow you to configure IDE and Serial ATA hard disk drives...
... to a second drive. Refer to section "3.5 Creating a RAID driver disk" for this setup. ASUS A8N-E 3-21 Use four new hard disk drives or use an existing drive and a new drive for this setup. The motherboard supports the following RAID configurations. Use two new drives or use an... This RAID configuration provides data protection and increases fault tolerance to read and write data in a RAID set . 3.4 RAID configurations The motherboard comes with the NVIDIA® nForce™ 4 Ultra southbridge RAID controller that allow you to configure IDE and Serial ATA hard disk drives...

A8N-E English edition user's manual, version E1911
Page 118
.../XP operating system on a hard disk drive that is included in a RAID set. Write-protect the floppy disk to install third-party SCSI or RAID driver. 2. During the OS installation, the system prompts you to press the F6 key to avoid computer virus infection. When the D r i v e r s menu appears, click ... A R A I N X P _ 2 K \ D r i v e r _ D i s k for details. 4. Insert floppy disk to complete process. 6. Place the motherboard support CD into the floppy disk drive. 3. Follow succeeding screen information to floppy disk drive. 5. Or Browse the contents of the support CD and locate...
.../XP operating system on a hard disk drive that is included in a RAID set. Write-protect the floppy disk to install third-party SCSI or RAID driver. 2. During the OS installation, the system prompts you to press the F6 key to avoid computer virus infection. When the D r i v e r s menu appears, click ... A R A I N X P _ 2 K \ D r i v e r _ D i s k for details. 4. Insert floppy disk to complete process. 6. Place the motherboard support CD into the floppy disk drive. 3. Follow succeeding screen information to floppy disk drive. 5. Or Browse the contents of the support CD and locate...

A8N-E English edition user's manual, version E1911
Page 119
...following dialog box appears. 5. Click O K to install the Cool 'n' Quiet!™ driver and application before using this feature. 3.6 Cool 'n' Quiet!™ Technology The motherboard supports the AMD Cool 'n' Quiet!™ Technology that dynamically and automatically change the CPU .... 4. Reboot your computer and set to Y e s. Make sure the Control Panel is set your Power Option Properties depending on your changes and exit BIOS Setup. 5. ASUS A8N-E 3-31 From the Windows® 2000/XP operating system, click the S t a r t button. In the P o w e r menu, select the item A C P ...
...following dialog box appears. 5. Click O K to install the Cool 'n' Quiet!™ driver and application before using this feature. 3.6 Cool 'n' Quiet!™ Technology The motherboard supports the AMD Cool 'n' Quiet!™ Technology that dynamically and automatically change the CPU .... 4. Reboot your computer and set to Y e s. Make sure the Control Panel is set your Power Option Properties depending on your changes and exit BIOS Setup. 5. ASUS A8N-E 3-31 From the Windows® 2000/XP operating system, click the S t a r t button. In the P o w e r menu, select the item A C P ...


