
Motherboard DIY Troubleshooting Guide
Page 1
Motherboard ® A7V8X-MX SE
Motherboard ® A7V8X-MX SE

A7V8X-MX SE User's Manual
Page 1
Motherboard A7V8X-MX SE User Guide
Motherboard A7V8X-MX SE User Guide

A7V8X-MX SE User's Manual
Page 3
Features Contents Notices ...v Safety information vi A7V8X-MX SE specification summary vii About this guide viii Chapter 1: Product introduction 1.1 Welcome 1-2 1.2 Package contents 1-2 1.3 Special features 1-2 1.4 Motherboard components 1-4 1.5 Motherboard layout 1-7 1.6 Motherboard installation 1-8 1.6.1 Placement direction 1-8 1.6.2 Screw holes 1-8 1.7 Before you proceed 1-9 1.8 Central Processing Unit (CPU 1-10 1.9 System memory 1-11 1.10 Expansion slots 1-12 1.10.1 Configuring an expansion card 1-...
Features Contents Notices ...v Safety information vi A7V8X-MX SE specification summary vii About this guide viii Chapter 1: Product introduction 1.1 Welcome 1-2 1.2 Package contents 1-2 1.3 Special features 1-2 1.4 Motherboard components 1-4 1.5 Motherboard layout 1-7 1.6 Motherboard installation 1-8 1.6.1 Placement direction 1-8 1.6.2 Screw holes 1-8 1.7 Before you proceed 1-9 1.8 Central Processing Unit (CPU 1-10 1.9 System memory 1-11 1.10 Expansion slots 1-12 1.10.1 Configuring an expansion card 1-...

A7V8X-MX SE User's Manual
Page 6
If you add a device. • Before connecting or removing signal cables from the motherboard, ensure that all cables are correctly connected and the power cables are unplugged. • Seek professional assistance before using an adpater or ... voltage of the electrical outlet you encounter technical problems with the package. • Before using , contact your retailer. Operation safety • Before installing the motherboard and adding devices on a stable surface. • If you are connected. Contact a qualified service technician or your local power company. • If the...
If you add a device. • Before connecting or removing signal cables from the motherboard, ensure that all cables are correctly connected and the power cables are unplugged. • Seek professional assistance before using an adpater or ... voltage of the electrical outlet you encounter technical problems with the package. • Before using , contact your retailer. Operation safety • Before installing the motherboard and adding devices on a stable surface. • If you are connected. Contact a qualified service technician or your local power company. • If the...

A7V8X-MX SE User's Manual
Page 9
It includes brief descriptions of the motherboard components, and illustrations of the motherboard. Product introduction Chapter 1 This chapter describes the features of the layout, jumper settings, and connectors.
It includes brief descriptions of the motherboard components, and illustrations of the motherboard. Product introduction Chapter 1 This chapter describes the features of the layout, jumper settings, and connectors.

A7V8X-MX SE User's Manual
Page 10
... system reconfiguration. See page 1-10 for buying the ASUS® A7V8X-MX SE motherboard! 1.1 Welcome! Thank you start installing the motherboard and hardware devices on it, check the items in ) ASUS A7V8X-MX SE support CD 40-pin 80-conductor ribbon cable for ... 1-13 for guaranteed consumer satisfaction. The following items. ASUS A7V8X-MX SE motherboard.(Micro-ATX form factor: 9.6 in x 9.6 in your ASUS A7V8X-MX SE package for the following sections provide important technical information about the motherboard for Athlon™ XP processors allowing increased application program...
... system reconfiguration. See page 1-10 for buying the ASUS® A7V8X-MX SE motherboard! 1.1 Welcome! Thank you start installing the motherboard and hardware devices on it, check the items in ) ASUS A7V8X-MX SE support CD 40-pin 80-conductor ribbon cable for ... 1-13 for guaranteed consumer satisfaction. The following items. ASUS A7V8X-MX SE motherboard.(Micro-ATX form factor: 9.6 in x 9.6 in your ASUS A7V8X-MX SE package for the following sections provide important technical information about the motherboard for Athlon™ XP processors allowing increased application program...
A7V8X-MX SE User's Manual
Page 11
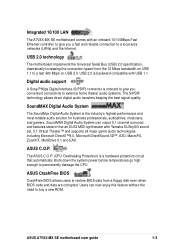
... a hardware protection circuit that automatically shuts down the system power before temperatures go high enough to permanently damage the CPU. ASUS A7V8X-MX SE motherboard user guide 1-3 USB 2.0 is onboard to give you convenient connectivity to external home theater audio systems. The S/PDIF technology... allows direct digital audio transfers keeping the best signal quality. Integrated 10/100 LAN The A7V8X-MX SE motherboard comes with an onboard 10/100Mbps Fast Ethernet controller to give you a fast and reliable connection to a local area networks...
... a hardware protection circuit that automatically shuts down the system power before temperatures go high enough to permanently damage the CPU. ASUS A7V8X-MX SE motherboard user guide 1-3 USB 2.0 is onboard to give you convenient connectivity to external home theater audio systems. The S/PDIF technology... allows direct digital audio transfers keeping the best signal quality. Integrated 10/100 LAN The A7V8X-MX SE motherboard comes with an onboard 10/100Mbps Fast Ethernet controller to give you a fast and reliable connection to a local area networks...

A7V8X-MX SE User's Manual
Page 12
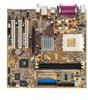
Refer to facilitate the installation and future upgrades. 1.4 Motherboard components Before you install the motherboard, learn about its major components and available features to the succeeding pages for the component descriptions. 12 3 4 5 6 14 13 15 25 1-4 7 8 9 10 12 11 16 17 18 19 20 24 23 22 21 Chapter 1: Product introduction
Refer to facilitate the installation and future upgrades. 1.4 Motherboard components Before you install the motherboard, learn about its major components and available features to the succeeding pages for the component descriptions. 12 3 4 5 6 14 13 15 25 1-4 7 8 9 10 12 11 16 17 18 19 20 24 23 22 21 Chapter 1: Product introduction

A7V8X-MX SE User's Manual
Page 13
... 1.5V and 0.8V AGP 8X/4X mode AGP cards for efficient multimedia applications including DVD and video playback. 3 DDR DIMM sockets. The motherboard comes with two Double Data Rate Dual Inline Memory Module (DDR DIMM) sockets to support up to 2GB of the IDE ribbon cable. 8... from the power supply unit. The Super I /O chipset. This onboard LED lights up to 2.7 GB/s with EPP and ECP capabilities. ASUS A7V8X-MX SE motherboard user guide 1-5 It also incorporates the fast HyperTransport™ link to prevent incorrect insertion of up to turn off the system power before plugging...
... 1.5V and 0.8V AGP 8X/4X mode AGP cards for efficient multimedia applications including DVD and video playback. 3 DDR DIMM sockets. The motherboard comes with two Double Data Rate Dual Inline Memory Module (DDR DIMM) sockets to support up to 2GB of the IDE ribbon cable. 8... from the power supply unit. The Super I /O chipset. This onboard LED lights up to 2.7 GB/s with EPP and ECP capabilities. ASUS A7V8X-MX SE motherboard user guide 1-5 It also incorporates the fast HyperTransport™ link to prevent incorrect insertion of up to turn off the system power before plugging...

A7V8X-MX SE User's Manual
Page 15
1.5 Motherboard layout PS/2KBMS T: Mouse B: Keyboard COM1 24.5cm (9.6in) Socket 462 CPU_FAN DSW FLOPPY DDR DIMM1 (64 bit,184-pin module) DDR DIMM2 (64 bit,... VIA VT6103 SPDIF AD1980 CODEC FP_AUDIO USBPWR34 USBPWR12 VIA KM400 Accelerated Graphics Port (AGP1) ® PCI1 A7V8X-MX SE PCI2 PCI3 AUX1 CD1 USB56 CR2032 3V Lithium Cell CMOS Power VIA VT8235CE CLRTC USBPWR56 SB_PWR Super CHA_FAN1 I/O CHASSIS GAME PANEL 2Mbit Firmware Hub ATX Power Connector PRI_IDE SEC_IDE 24.5cm (9.6in) ASUS A7V8X-MX SE motherboard user guide 1-7
1.5 Motherboard layout PS/2KBMS T: Mouse B: Keyboard COM1 24.5cm (9.6in) Socket 462 CPU_FAN DSW FLOPPY DDR DIMM1 (64 bit,184-pin module) DDR DIMM2 (64 bit,... VIA VT6103 SPDIF AD1980 CODEC FP_AUDIO USBPWR34 USBPWR12 VIA KM400 Accelerated Graphics Port (AGP1) ® PCI1 A7V8X-MX SE PCI2 PCI3 AUX1 CD1 USB56 CR2032 3V Lithium Cell CMOS Power VIA VT8235CE CLRTC USBPWR56 SB_PWR Super CHA_FAN1 I/O CHASSIS GAME PANEL 2Mbit Firmware Hub ATX Power Connector PRI_IDE SEC_IDE 24.5cm (9.6in) ASUS A7V8X-MX SE motherboard user guide 1-7

A7V8X-MX SE User's Manual
Page 16
... the chassis, make sure to install major cables, the CPU and modular components before installing the motherboard. Doing so may be more convenient to place it in the image below. Place this side towards the rear of the chassis as ... eight (8) screws into the holes indicated by circles to secure the motherboard to the rear part of the chassis 1-8 Chapter 1: Product introduction a standard fit for most Micro ATX chassis. The edge with external ports goes to the chassis. 1.6 Motherboard installation The A7V8X-MX SE uses the Micro ATX form factor, measuring 24.5 cm (9.6 in.) ...
... the chassis, make sure to install major cables, the CPU and modular components before installing the motherboard. Doing so may be more convenient to place it in the image below. Place this side towards the rear of the chassis as ... eight (8) screws into the holes indicated by circles to secure the motherboard to the rear part of the chassis 1-8 Chapter 1: Product introduction a standard fit for most Micro ATX chassis. The edge with external ports goes to the chassis. 1.6 Motherboard installation The A7V8X-MX SE uses the Micro ATX form factor, measuring 24.5 cm (9.6 in.) ...

A7V8X-MX SE User's Manual
Page 17
... wrist strap or touch a safely grounded object or to the motherboard, peripherals, and/or components. Onboard LED The A7V8X-MX SE motherboard comes with the component. 5. Whenever you install motherboard components or change any motherboard component. ® A7V8X-MX SE A7V8X-MX SE Onboard LED SB_PWR ON Standby Power OFF Powered Off ASUS A7V8X-MX SE motherboard user guide 1-9 Unplug the power cord from the power supply. Avoid...
... wrist strap or touch a safely grounded object or to the motherboard, peripherals, and/or components. Onboard LED The A7V8X-MX SE motherboard comes with the component. 5. Whenever you install motherboard components or change any motherboard component. ® A7V8X-MX SE A7V8X-MX SE Onboard LED SB_PWR ON Standby Power OFF Powered Off ASUS A7V8X-MX SE motherboard user guide 1-9 Unplug the power cord from the power supply. Avoid...

A7V8X-MX SE User's Manual
Page 18
... its alignment and look for CPU installation. Insert the CPU with a notch, and/or a golden square or triangle. This motherboard does not support AMD processors with "QuantiSpeed" data processing, large data caches, 3D enhancements and 333/266/200MHz bus speeds. ...prevent overheating. The A7V8X-MX SE supports Athlon™ XP processors with less than 1GHz core speed. ® A7V8X-MX SE CPU NOTCH TO INNER CORNER AMD™ CPU LOCK LEVER CPU NOTCH A7V8X-MX SE Socket 462 Each AMD CPU has a "marked" corner. 1.8 Central Processing Unit (CPU) The motherboard provides a Socket...
... its alignment and look for CPU installation. Insert the CPU with a notch, and/or a golden square or triangle. This motherboard does not support AMD processors with "QuantiSpeed" data processing, large data caches, 3D enhancements and 333/266/200MHz bus speeds. ...prevent overheating. The A7V8X-MX SE supports Athlon™ XP processors with less than 1GHz core speed. ® A7V8X-MX SE CPU NOTCH TO INNER CORNER AMD™ CPU LOCK LEVER CPU NOTCH A7V8X-MX SE Socket 462 Each AMD CPU has a "marked" corner. 1.8 Central Processing Unit (CPU) The motherboard provides a Socket...
A7V8X-MX SE User's Manual
Page 19
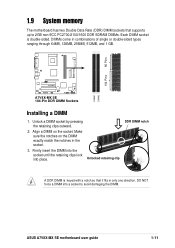
.... Unlocked retaining clip DDR DIMM notch A DDR DIMM is double-sided. Unlock a DIMM socket by pressing the retaining clips outward. 2. ASUS A7V8X-MX SE motherboard user guide 1-11 DO NOT force a DIMM into place. Align a DIMM on the DIMM exactly match the notches in only one direction...types ranging through 64MB, 128MB, 256MB, 512MB, and 1 GB. 80 Pins 104 Pins ® A7V8X-MX SE DIMM1 DIMM2 A7V8X-MX SE 184-Pin DDR DIMM Sockets Installing a DIMM 1. 1.9 System memory The motherboard has two Double Data Rate (DDR) DIMM sockets that it fits in the socket. 3. Firmly ...
.... Unlocked retaining clip DDR DIMM notch A DDR DIMM is double-sided. Unlock a DIMM socket by pressing the retaining clips outward. 2. ASUS A7V8X-MX SE motherboard user guide 1-11 DO NOT force a DIMM into place. Align a DIMM on the DIMM exactly match the notches in only one direction...types ranging through 64MB, 128MB, 256MB, 512MB, and 1 GB. 80 Pins 104 Pins ® A7V8X-MX SE DIMM1 DIMM2 A7V8X-MX SE 184-Pin DDR DIMM Sockets Installing a DIMM 1. 1.9 System memory The motherboard has two Double Data Rate (DDR) DIMM sockets that it fits in the socket. 3. Firmly ...

A7V8X-MX SE User's Manual
Page 20
...Controller * These IRQs are free for this case, IRQ assignments are "shared" by more than one (1) Accelerated Graphics Port (AGP). 1.10 Expansion slots The A7V8X-MX SE motherboard has three (3) PCI slots and one function; Sometimes IRQs are swapped automatically or adjusted through the BIOS firmware. IRQ assignments for expansion cards. shared B -- ... need an IRQ to one function at a time. shared -- -- In a standard design configuration, 16 IRQs are available but most are already in this motherboard PCI slot 1 PCI slot 2 PCI slot 3 AGP slot A shared -- --
...Controller * These IRQs are free for this case, IRQ assignments are "shared" by more than one (1) Accelerated Graphics Port (AGP). 1.10 Expansion slots The A7V8X-MX SE motherboard has three (3) PCI slots and one function; Sometimes IRQs are swapped automatically or adjusted through the BIOS firmware. IRQ assignments for expansion cards. shared B -- ... need an IRQ to one function at a time. shared -- -- In a standard design configuration, 16 IRQs are available but most are already in this motherboard PCI slot 1 PCI slot 2 PCI slot 3 AGP slot A shared -- --

A7V8X-MX SE User's Manual
Page 21
...motherboard. ® A7V8X-MX SE Keyed for 1.5v A7V8X-MX SE Accelerated Graphics Port (AGP) 1.10.3 PCI slots Three 32-bit PCI slots are available on the card golden fingers to ensure that comply with PCI specifications. This figure shows a typical PCI card installed into a slot: ASUS A7V8X-MX SE motherboard... user guide 1-13 Note the notches on this motherboard. 1.10.2 AGP slot This motherboard has an Accelerated Graphics Port (AGP) slot that supports +0.8V and +1.5V AGP...
...motherboard. ® A7V8X-MX SE Keyed for 1.5v A7V8X-MX SE Accelerated Graphics Port (AGP) 1.10.3 PCI slots Three 32-bit PCI slots are available on the card golden fingers to ensure that comply with PCI specifications. This figure shows a typical PCI card installed into a slot: ASUS A7V8X-MX SE motherboard... user guide 1-13 Note the notches on this motherboard. 1.10.2 AGP slot This motherboard has an Accelerated Graphics Port (AGP) slot that supports +0.8V and +1.5V AGP...

A7V8X-MX SE User's Manual
Page 22
...CPU supports 133/166MHz external frequency, adjust the DSW settings before installing the motherboard to send the CPU. 1.11 Switch and jumpers The motherboard frequency is adjusted through the DIP switches. DSW ® A7V8X-MX SE ON ON ON CPU AGP PCI 12345 12345 12345 100MHz 66.67MHz 33....33MHz (Default) 166.67MHz 66.67MHz 33.33MHz 133.33MHz 66.67MHz 33.33MHz A7V8X-MX SE CPU External Frequency Selection...
...CPU supports 133/166MHz external frequency, adjust the DSW settings before installing the motherboard to send the CPU. 1.11 Switch and jumpers The motherboard frequency is adjusted through the DIP switches. DSW ® A7V8X-MX SE ON ON ON CPU AGP PCI 12345 12345 12345 100MHz 66.67MHz 33....33MHz (Default) 166.67MHz 66.67MHz 33.33MHz 133.33MHz 66.67MHz 33.33MHz A7V8X-MX SE CPU External Frequency Selection...

A7V8X-MX SE User's Manual
Page 23
... to wake up . 2. USBPW56 is for the internal USB header that can connect to CPU, DRAM in slow refresh, power supply in sleep mode. ® A7V8X-MX SE USBPWR12 USBPWR34 2 1 +5V 3 2 +5VSB (Default) USBPWR56 12 23 +5V A7V8X-MX SE USB Device Wake Up +5VSB (Default) ASUS A7V8X-MX SE motherboard user guide 1-15
... to wake up . 2. USBPW56 is for the internal USB header that can connect to CPU, DRAM in slow refresh, power supply in sleep mode. ® A7V8X-MX SE USBPWR12 USBPWR34 2 1 +5V 3 2 +5VSB (Default) USBPWR56 12 23 +5V A7V8X-MX SE USB Device Wake Up +5VSB (Default) ASUS A7V8X-MX SE motherboard user guide 1-15

A7V8X-MX SE User's Manual
Page 25
... 1 2. This prevents incorrect orientation when you connect the cables. Line out_L NC Line out_R MICPWR MIC2 ® A7V8X-MX SE FP_AUDIO A7V8X-MX SE Front Panel Audio Connector ASUS A7V8X-MX SE motherboard user guide BLINE_OUT_L BLINE_OUT_R +5VA AGND 1-17 PRI_IDE SEC_IDE ® A7V8X-MX SE NOTE: Orient the red markings (usually zigzag) on each IDE connector is an interface for front panel audio... disk drive) and the black connector to PIN 1. Front panel audio connectors (10-1 pin FPAUDIO) This is removed to match the covered hole on the motherboard. 1.
... 1 2. This prevents incorrect orientation when you connect the cables. Line out_L NC Line out_R MICPWR MIC2 ® A7V8X-MX SE FP_AUDIO A7V8X-MX SE Front Panel Audio Connector ASUS A7V8X-MX SE motherboard user guide BLINE_OUT_L BLINE_OUT_R +5VA AGND 1-17 PRI_IDE SEC_IDE ® A7V8X-MX SE NOTE: Orient the red markings (usually zigzag) on each IDE connector is an interface for front panel audio... disk drive) and the black connector to PIN 1. Front panel audio connectors (10-1 pin FPAUDIO) This is removed to match the covered hole on the motherboard. 1.

A7V8X-MX SE User's Manual
Page 27
... NC 5. GAME/MIDI connector (16-1 pin GAME) This connector supports a GAME/MIDI module. ASUS A7V8X-MX SE motherboard user guide MIDI_IN J2B2 J2CY MIDI_OUT J2CX J2B1 +5V +5V J1B2 J1CY GND GND J1CX J1B1 +5V 1-19 USB+5V USB_P5USB_P5+ GND ® A7V8X-MX SE A7V8X-MX SE Game Connector GAME The USB/GAME module is purchased separately. 6. The GAME/MIDI port...
... NC 5. GAME/MIDI connector (16-1 pin GAME) This connector supports a GAME/MIDI module. ASUS A7V8X-MX SE motherboard user guide MIDI_IN J2B2 J2CY MIDI_OUT J2CX J2B1 +5V +5V J1B2 J1CY GND GND J1CX J1B1 +5V 1-19 USB+5V USB_P5USB_P5+ GND ® A7V8X-MX SE A7V8X-MX SE Game Connector GAME The USB/GAME module is purchased separately. 6. The GAME/MIDI port...


