
Motherboard DIY Troubleshooting Guide
Page 1
Motherboard A7V880 User Guide
Motherboard A7V880 User Guide

Motherboard DIY Troubleshooting Guide
Page 3
Features Contents Notices vi Safety information vii About this guide viii A7V880 specifications summary ix Chapter 1: Product introduction 1.1 Welcome 1-2 1.2 Package contents 1-2 1.3 Special features 1-3 1.3.1 Product Highlights 1-3 1.3.2 Unique ASUS features 1-4 1.4 Before you proceed 1-5 1.5 Motherboard overview 1-6 1.5.1 Motherboard layout 1-6 1.5.2 Placement direction 1-7 1.5.3 Screw holes 1-7 1.6 Central Processing Unit (CPU 1-8 1.6.1 Overview 1-8 1.6.2 Installing the CPU 1-8 1.7 System memory 1-10 1.7.1 DIMM sockets location 1-10 1.7.2 Memory...
Features Contents Notices vi Safety information vii About this guide viii A7V880 specifications summary ix Chapter 1: Product introduction 1.1 Welcome 1-2 1.2 Package contents 1-2 1.3 Special features 1-3 1.3.1 Product Highlights 1-3 1.3.2 Unique ASUS features 1-4 1.4 Before you proceed 1-5 1.5 Motherboard overview 1-6 1.5.1 Motherboard layout 1-6 1.5.2 Placement direction 1-7 1.5.3 Screw holes 1-7 1.6 Central Processing Unit (CPU 1-8 1.6.1 Overview 1-8 1.6.2 Installing the CPU 1-8 1.7 System memory 1-10 1.7.1 DIMM sockets location 1-10 1.7.2 Memory...

Motherboard DIY Troubleshooting Guide
Page 7
... power cables are using an adpater or extension cord. Contact a qualified service technician or your retailer. Operation safety • Before installing the motherboard and adding devices on a stable surface. • If you detect any area where it by yourself. These devices could interrupt the grounding ... in any damage, contact your dealer immediately. • To avoid short circuits, keep paper clips, screws, and staples away from the motherboard, ensure that came with the product, contact a qualified service technician or your retailer. If you are not sure about the voltage of...
... power cables are using an adpater or extension cord. Contact a qualified service technician or your retailer. Operation safety • Before installing the motherboard and adding devices on a stable surface. • If you detect any area where it by yourself. These devices could interrupt the grounding ... in any damage, contact your dealer immediately. • To avoid short circuits, keep paper clips, screws, and staples away from the motherboard, ensure that came with the product, contact a qualified service technician or your retailer. If you are not sure about the voltage of...

Motherboard DIY Troubleshooting Guide
Page 11
Product introduction It includes brief descriptions of the motherboard components, and illustrations of the motherboard. Chapter 1 This chapter describes the features of the layout, jumper settings, and connectors.
Product introduction It includes brief descriptions of the motherboard components, and illustrations of the motherboard. Chapter 1 This chapter describes the features of the layout, jumper settings, and connectors.

Motherboard DIY Troubleshooting Guide
Page 12
Before you for buying the ASUS® A7V880 motherboard! Thank you start installing the motherboard, and hardware devices on it another standout in the world of the AMD Athlon™ XP processor and the VIA KT880 chipset to 4GB of ... a host of new features and latest technologies making it , check the items in your package with the list below. 1.2 Package contents Check your motherboard package for the following items. ASUS motherboard ASUS support CD 1 x Serial ATA 2-in-1 cable' 1 x Serial ATA power cable 1 x 2-port USB module with PC3200/PC2700/PC2100/PC1600 DDR SDRAM, high-...
Before you for buying the ASUS® A7V880 motherboard! Thank you start installing the motherboard, and hardware devices on it another standout in the world of the AMD Athlon™ XP processor and the VIA KT880 chipset to 4GB of ... a host of new features and latest technologies making it , check the items in your package with the list below. 1.2 Package contents Check your motherboard package for the following items. ASUS motherboard ASUS support CD 1 x Serial ATA 2-in-1 cable' 1 x Serial ATA power cable 1 x 2-port USB module with PC3200/PC2700/PC2100/PC1600 DDR SDRAM, high-...

Motherboard DIY Troubleshooting Guide
Page 13
...processors features a 400Mhz front side bus and the QuantiSpeed™ architecture for RAID 0 and RAID 1 functions. Serial ATA solution The motherboard supports four interfaces compliant to a fast 480 Mbps on USB 1.1 to the Serial ATA (SATA) specification, an evolutionary replacement of... ZIF socket. S/PDIF out The motherboard's S/PDIF out function turns your computer into a high-end entertainment system with maximum bandwidth speed of devices such as high resolution video conferencing cameras, next generation scanners and printers, and fast storage units. ASUS A7V880 motherboard 1-3
...processors features a 400Mhz front side bus and the QuantiSpeed™ architecture for RAID 0 and RAID 1 functions. Serial ATA solution The motherboard supports four interfaces compliant to a fast 480 Mbps on USB 1.1 to the Serial ATA (SATA) specification, an evolutionary replacement of... ZIF socket. S/PDIF out The motherboard's S/PDIF out function turns your computer into a high-end entertainment system with maximum bandwidth speed of devices such as high resolution video conferencing cameras, next generation scanners and printers, and fast storage units. ASUS A7V880 motherboard 1-3
Motherboard DIY Troubleshooting Guide
Page 14
... to the system loading to support high performance network applications. See pages 2-28. ASUS MyLogo™ This feature present in case when the BIOS codes and data are corrupted. The ASUS WiFi-b™ add-on Motherboard (LOM) applications. See page 2-26. C.P.R. (CPU Parameter Recall) The C.P.R....add style to your system with user-friendly utilities and applications that intelligently diagnoses and reports cable faults from the ASUS support CD in the motherboard allows you to restore the original BIOS data from a remote location up an environment for LAN on card bundles...
... to the system loading to support high performance network applications. See pages 2-28. ASUS MyLogo™ This feature present in case when the BIOS codes and data are corrupted. The ASUS WiFi-b™ add-on Motherboard (LOM) applications. See page 2-26. C.P.R. (CPU Parameter Recall) The C.P.R....add style to your system with user-friendly utilities and applications that intelligently diagnoses and reports cable faults from the ASUS support CD in the motherboard allows you to restore the original BIOS data from a remote location up an environment for LAN on card bundles...

Motherboard DIY Troubleshooting Guide
Page 15
... to avoid damaging them . 4. See page 2-5. No need to the motherboard, peripherals, and/or components. Just press the ASUS Instant Music special function keys and enjoy the music! Onboard LED The motherboard comes with the component. 5. Use a grounded wrist strap or touch a...Take note of the onboard LED. Hold components by power LED. A7V880 ® A7V880 Onboard LED SB_PWR ON Standby Power OFF Powered Off ASUS A7V880 motherboard 1-5 See pages 2-14, 3-5 1.4 Before you uninstall any component. 2. ASUS Instant Music Lite This unique feature allows you should shut down the...
... to avoid damaging them . 4. See page 2-5. No need to the motherboard, peripherals, and/or components. Just press the ASUS Instant Music special function keys and enjoy the music! Onboard LED The motherboard comes with the component. 5. Use a grounded wrist strap or touch a...Take note of the onboard LED. Hold components by power LED. A7V880 ® A7V880 Onboard LED SB_PWR ON Standby Power OFF Powered Off ASUS A7V880 motherboard 1-5 See pages 2-14, 3-5 1.4 Before you uninstall any component. 2. ASUS Instant Music Lite This unique feature allows you should shut down the...

Motherboard DIY Troubleshooting Guide
Page 16
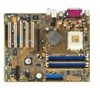
1.5 Motherboard overview 1.5.1 Motherboard layout PS/2KBMS T: Mouse B: Keyboard KBPWR OVER_VOLT1 24.5cm (9.6in) CPU_FAN SPDIF_O ATX Power Connector DDR DIMM_A1 (64/72 bit,184-pin module) DDR DIMM_A2 (....0 Top: T: USB4 RJ-45 B: USB3 Top:Line In Center:Line Out Below:Mic In VIA KT880 Chipset Marvell Gigabit LAN FP_AUDIO Accelerated Graphics Port (AGP) A7V880 PCI1 CD AD1888 CODEC AUX SPDIF_OUT PCI2 PCI3 VIA VT8237 South Bridge CR2032 3V Lithium Cell CMOS Power SATA2 SATA1 CLRTC PCI4 ® PCI5 WIFI...
1.5 Motherboard overview 1.5.1 Motherboard layout PS/2KBMS T: Mouse B: Keyboard KBPWR OVER_VOLT1 24.5cm (9.6in) CPU_FAN SPDIF_O ATX Power Connector DDR DIMM_A1 (64/72 bit,184-pin module) DDR DIMM_A2 (....0 Top: T: USB4 RJ-45 B: USB3 Top:Line In Center:Line Out Below:Mic In VIA KT880 Chipset Marvell Gigabit LAN FP_AUDIO Accelerated Graphics Port (AGP) A7V880 PCI1 CD AD1888 CODEC AUX SPDIF_OUT PCI2 PCI3 VIA VT8237 South Bridge CR2032 3V Lithium Cell CMOS Power SATA2 SATA1 CLRTC PCI4 ® PCI5 WIFI...

Motherboard DIY Troubleshooting Guide
Page 17
Place this side towards the rear of the chassis as indicated in the image below. 1.5.3 Screw holes Place nine (9) screws into the chassis in the correct orientation. Doing so may damage the motherboard. 1.5.2 Placement direction When installing the motherboard, make sure that you place it into the holes indicated by circles to secure the motherboard to the rear part of the chassis ASUS A7V880 motherboard 1-7 The edge with external ports goes to the chassis. Do not overtighten the screws!
Place this side towards the rear of the chassis as indicated in the image below. 1.5.3 Screw holes Place nine (9) screws into the chassis in the correct orientation. Doing so may damage the motherboard. 1.5.2 Placement direction When installing the motherboard, make sure that you place it into the holes indicated by circles to secure the motherboard to the rear part of the chassis ASUS A7V880 motherboard 1-7 The edge with external ports goes to the chassis. Do not overtighten the screws!

Motherboard DIY Troubleshooting Guide
Page 18
... steps to ensure correct installation. Gold triangle Do not use processors with gold triangle) on the motherboard. 1-8 Chapter 1: Product introduction Locate the 462-pin ZIF socket on the CPU. 1.6 Central Processing Unit (CPU) 1.6.1 Overview The motherboard comes with a surface mount 462-pin Zero Insertion Force (ZIF) socket designed for the AMD Athlon...
... steps to ensure correct installation. Gold triangle Do not use processors with gold triangle) on the motherboard. 1-8 Chapter 1: Product introduction Locate the 462-pin ZIF socket on the CPU. 1.6 Central Processing Unit (CPU) 1.6.1 Overview The motherboard comes with a surface mount 462-pin Zero Insertion Force (ZIF) socket designed for the AMD Athlon...

Motherboard DIY Troubleshooting Guide
Page 19
... insert the CPU into the socket to prevent bending the pins and damaging the CPU! 5. When the CPU is lifted up to secure the CPU. ASUS A7V880 motherboard 1-9 Socket lever 90°-100° angle Make sure that the socket lever is in place. Gold triangle The CPU fits only in completely. 3. DO...
... insert the CPU into the socket to prevent bending the pins and damaging the CPU! 5. When the CPU is lifted up to secure the CPU. ASUS A7V880 motherboard 1-9 Socket lever 90°-100° angle Make sure that the socket lever is in place. Gold triangle The CPU fits only in completely. 3. DO...

Motherboard DIY Troubleshooting Guide
Page 20
DIMM_A1 DIMM_A2 DIMM_B1 DIMM_B2 104 Pins 80 Pins A7V880 ® A7V880 184-Pin DDR DIMM Sockets • It is recommended to use the blue DIMM slots first. • Make sure to unplug the power supply before ... or other than 18 chips are not supported. • Always install DIMMs with more than the recommended configurations may cause severe damage to both the motherboard and the components. • When installing long AGP cards, it is recommended to do so may cause memory sizing error or system boot failure. Use...
DIMM_A1 DIMM_A2 DIMM_B1 DIMM_B2 104 Pins 80 Pins A7V880 ® A7V880 184-Pin DDR DIMM Sockets • It is recommended to use the blue DIMM slots first. • Make sure to unplug the power supply before ... or other than 18 chips are not supported. • Always install DIMMs with more than the recommended configurations may cause severe damage to both the motherboard and the components. • When installing long AGP cards, it is recommended to do so may cause memory sizing error or system boot failure. Use...

Motherboard DIY Troubleshooting Guide
Page 21
...; MT46V32M8TG-5BC •• V58C2256804SAT5B ••• V58C2256804SAT5B ••• A2S56D30ATP ••• A2S56D30BTP ••• (Continued on the next page) ASUS A7V880 motherboard 1-11 DDR Qualified Vendor List The following table lists the PC3200 (DDR400) memory modules that have been tested and qualified for use with this...
...; MT46V32M8TG-5BC •• V58C2256804SAT5B ••• V58C2256804SAT5B ••• A2S56D30ATP ••• A2S56D30BTP ••• (Continued on the next page) ASUS A7V880 motherboard 1-11 DDR Qualified Vendor List The following table lists the PC3200 (DDR400) memory modules that have been tested and qualified for use with this...

Motherboard DIY Troubleshooting Guide
Page 22
... two pairs of two DDR DIMM slots when using Dual-channel DDR400 (PC3200) DIMMs for stable performance. • Obtain DDR DIMMs only from ASUS qualified vendors for this motherboard. 1-12 Chapter 1: Product introduction C* - Supports one module inserted in any two modules. Supports four modules inserted into both the blue and black slots...
... two pairs of two DDR DIMM slots when using Dual-channel DDR400 (PC3200) DIMMs for stable performance. • Obtain DDR DIMMs only from ASUS qualified vendors for this motherboard. 1-12 Chapter 1: Product introduction C* - Supports one module inserted in any two modules. Supports four modules inserted into both the blue and black slots...

Motherboard DIY Troubleshooting Guide
Page 23
.... 1. Install an expansion card following the instructions that it fits in place and the DIMM is keyed with a notch so that came with the chassis. 2. ASUS A7V880 motherboard 1-13 DDR DIMM Unlocked A DDR DIMM is properly seated. Turn on the socket. 3. See Chapter 2 for ISA or PCI devices. Assign an IRQ to avoid...
.... 1. Install an expansion card following the instructions that it fits in place and the DIMM is keyed with a notch so that came with the chassis. 2. ASUS A7V880 motherboard 1-13 DDR DIMM Unlocked A DDR DIMM is properly seated. Turn on the socket. 3. See Chapter 2 for ISA or PCI devices. Assign an IRQ to avoid...

Motherboard DIY Troubleshooting Guide
Page 24
... slots, ensure that the drivers support "Share IRQ" or that comply with PCI specifications. 1-14 Chapter 1: Product introduction INT C - - - shared - shared - 1.8.2 IRQ assignments for this motherboard PCI slot 1 PCI slot 2 PCI slot 3 PCI slot 4 PCI slot 5 Gigabit LAN AGP slot INT A - Otherwise, conflicts will arise between the two PCI groups, making...
... slots, ensure that the drivers support "Share IRQ" or that comply with PCI specifications. 1-14 Chapter 1: Product introduction INT C - - - shared - shared - 1.8.2 IRQ assignments for this motherboard PCI slot 1 PCI slot 2 PCI slot 3 PCI slot 4 PCI slot 5 Gigabit LAN AGP slot INT A - Otherwise, conflicts will arise between the two PCI groups, making...

Motherboard DIY Troubleshooting Guide
Page 25
A7V880 Keyed for 1.5v ® A7V880 Accelerated Graphics Port (AGP) If installing the ATi 9500 or 9700 Pro Series VGA cards, use only the card version PN xxx-xxxxx-30 or later, for one with +1.5V specification. Note the notches on the card golden fingers to ensure that you ask for optimum performance and overclocking stability. ASUS A7V880 motherboard 1-15 Install only +1.5V AGP cards. 1.8.4 AGP slot The Accelerated Graphics Port (AGP) slot supports AGP 8X/4X (+1.5V) cards. When you buy an AGP card, make sure that they fit the AGP slot on the motherboard.
A7V880 Keyed for 1.5v ® A7V880 Accelerated Graphics Port (AGP) If installing the ATi 9500 or 9700 Pro Series VGA cards, use only the card version PN xxx-xxxxx-30 or later, for one with +1.5V specification. Note the notches on the card golden fingers to ensure that you ask for optimum performance and overclocking stability. ASUS A7V880 motherboard 1-15 Install only +1.5V AGP cards. 1.8.4 AGP slot The Accelerated Graphics Port (AGP) slot supports AGP 8X/4X (+1.5V) cards. When you buy an AGP card, make sure that they fit the AGP slot on the motherboard.

Motherboard DIY Troubleshooting Guide
Page 27
...CMOS memory of date, time, and system setup parameters by the onboard button cell battery. Removing the cap will cause system boot failure! ASUS A7V880 motherboard 1-17 You can automatically reset parameter settings to overclocking, use the C.P.R. (CPU Parameter Recall) feature. For system failure due to its... about 5~10 seconds, then move the cap back to re-enter data. Clear RTC RAM (CLRTC) This jumper allows you to pins 2-3. A7V880 ® A7V880 Clear RTC RAM CLRTC 2 1 Normal (Default) 3 2 Clear CMOS You do not need to clear the RTC when the system hangs due...
...CMOS memory of date, time, and system setup parameters by the onboard button cell battery. Removing the cap will cause system boot failure! ASUS A7V880 motherboard 1-17 You can automatically reset parameter settings to overclocking, use the C.P.R. (CPU Parameter Recall) feature. For system failure due to its... about 5~10 seconds, then move the cap back to re-enter data. Clear RTC RAM (CLRTC) This jumper allows you to pins 2-3. A7V880 ® A7V880 Clear RTC RAM CLRTC 2 1 Normal (Default) 3 2 Clear CMOS You do not need to clear the RTC when the system hangs due...

Motherboard DIY Troubleshooting Guide
Page 29
When this jumper allows CPU VCORE ranges of +1.65V ~ +1.85V. It is disabled, VCORE setting has a range of 1.75V ~ 1.95V. You may cause permanent damage to a very high core voltage may adjust the CPU VCORE through the BIOS Setup. 4. Setting to the CPU. VCORE over-voltage (3-pin OVER_VOLT1) When enabled, this jumper is recommended that you keep the default setting (Disable). OVER_VOLT1 12 23 Disable (Default) Enable A7V880 ® A7V880 OVER_VOLT Setting ASUS A7V880 motherboard 1-19
When this jumper allows CPU VCORE ranges of +1.65V ~ +1.85V. It is disabled, VCORE setting has a range of 1.75V ~ 1.95V. You may cause permanent damage to a very high core voltage may adjust the CPU VCORE through the BIOS Setup. 4. Setting to the CPU. VCORE over-voltage (3-pin OVER_VOLT1) When enabled, this jumper is recommended that you keep the default setting (Disable). OVER_VOLT1 12 23 Disable (Default) Enable A7V880 ® A7V880 OVER_VOLT Setting ASUS A7V880 motherboard 1-19


