Asus A7V133 Support and Manuals
Get Help and Manuals for this Asus item
Popular Asus A7V133 Manual Pages
Motherboard DIY Troubleshooting Guide - Page 38
01 01 01 01 01 01
IMPORTANT: Requires an ATX power supply with at least 720mA +5 volt standby power
WOL_CON
+5 Volt Standby PME
A7V133
A7V133 Wake-On-LAN Connector
Ground
WOR
Ring# Ground 21
A7V133
A7V133 Wake-On-Ring Connector
38
Motherboard DIY Troubleshooting Guide - Page 44

01 01 01
Power LED
Speaker Connector
+5 V PLED +5V Ground Ground Speaker
+5 V TB_LED ExtSMI# Ground
PWR Ground Reset Ground
Reset SW
Message LED
ATX Power
SMI Lead
Switch*
A7V133
* Requires an ATX power supply. A7V133 System Panel Connectors
44
A7V133 User Manual - Page 12

... 17 Wake-On-Ring Connector 13
Hardware Monitoring System Voltage Monitoring (integrated in ASUS ASIC) ....... 15 3 Fan Power and Speed Monitoring Connectors
Power ATX Power Supply Connector 5
Special Feature Onboard LED 21 Promise® Ultra DMA/100 Chip (optional 11 VRM Module 1
Form Factor ATX
12
ASUS A7V133 User's Manual Location
Processor Support
Socket A for locations.
A7V133 User Manual - Page 16
...
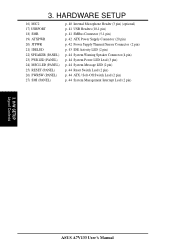
ASUS A7V133 User's Manual HARDWARE SETUP
16) MIC2 17) USBPORT 18) SMB 19) ATXPWR 20) JTPWR 21) IDELED 22) SPEAKER (PANEL) 23) PWR.LED (PANEL) 24) MSG.LED (PANEL) 25) RESET (PANEL) 26) PWRSW (PANEL) 27) SMI (PANEL)
p. 40 Internal Microphone Header (3 pin) (optional) p. 41 USB Headers (10-1 pin) p. 41 SMBus Connector (5-1 pin) p. 42 ATX Power Supply...
A7V133 User Manual - Page 17
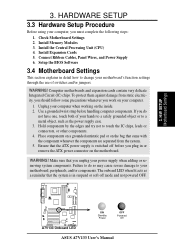
... as the power supply case. 3. Check Motherboard Settings 2. Install the Central Processing Unit (CPU) 4. Connect Ribbon Cables, Panel Wires, and Power Supply 6. Use a grounded wrist strap before you plug in suspend or soft-off mode and not powered OFF.
01 01 01
A7V133
A7V133 Onboard LED
ON
Standby Power
OFF
Powered Off
ASUS A7V133 User's Manual Computer motherboards and expansion...
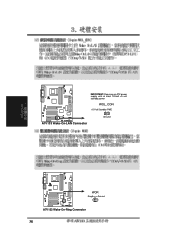
A7V133 User Manual - Page 38

...) and that your system has an ATX power supply with a Wake-On-LAN output, such as the ASUS PCI-L101 Ethernet card (see 4.4.3 Power Management) and that Wake-On-LAN features are enabled (see 7. H/W SETUP Connectors
A7V
A7V Wake-On-Ring Connector
WOR
Ring# Ground 21
38
ASUS A7V133 User's Manual
Appendix). HARDWARE SETUP
12) Wake-On-LAN Connector (3-pin...
A7V133 User Manual - Page 42

... and push down firmly making sure that your ATX power supply must supply at least 10mA on the +5-volt standby lead (+5VSB). IMPORTANT: Make sure that the pins are aligned. For WakeOn-LAN support, your ATX power supply can supply at least 720mA +5VSB.
H/W SETUP Connectors
A7V133
A7V133 Power Supply Thermal Sensor Connector
42
ASUS A7V133 User's Manual 01 01 01 01 01 01
3.
A7V133 User Manual - Page 44

...SETUP Connectors
Reset SW
Message LED
ATX Power
SMI Lead
Switch*
A7V133
* Requires an ATX power supply. This function requires an ACPI OS and driver support.
25) Reset Switch Lead (2-pin RESET) This 2-pin connector connects to turn the system off your power...speaker. 3. Wake-up the system).
44
ASUS A7V133 User's Manual The system power LED shows the status of rebooting to hear...
A7V133 User Manual - Page 45

... a power standby feature. HARDWARE SETUP
3.9 Starting Up the First Time
1. While the tests are running at a lower frequency
ASUS A7V133 User's Manual
45 3. The power LED on your system user's manual.
4. If you do not see anything within 30 seconds from the time you need to your devices in the following order: a. Connect the power cord into the power supply...
A7V133 User Manual - Page 46
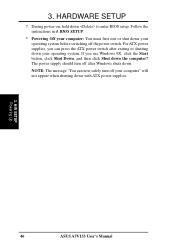
... computer: You must first exit or shut down . Follow the instructions in 4. The power supply should turn off your computer" will not appear when shutting down your operating system before switching off after exiting or shutting down with ATX power supplies.
3.
H/W SETUP Powering Up
46
ASUS A7V133 User's Manual During power-on, hold down the computer? If you can now safely...
A7V133 User Manual - Page 77
... will not work if the system is powered down by sending a wake-up frame or signal. BIOS SETUP Power Up Control
ASUS A7V133 User's Manual
77 Configuration options: [Disabled] [Enabled]
IMPORTANT: This feature requires an optional network interface card with WakeOn-LAN and an ATX power supply with at a certain time and day by selecting [Everyday] or at least...
A7V133 User Manual - Page 84
... virus protection software.
Updated or other language versions of our web sites.
(TO SEE THE FOLLOWING ITEMS, CLICK RIGHT ARROW ON THE LOWER-RIGHT CORNER OF THE MAIN MENU)
84
ASUS A7V133 User's Manual 5. SOFTWARE SETUP
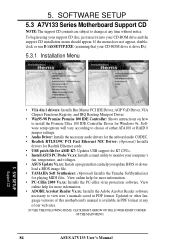
5.3 A7V133 Series Motherboard Support CD
NOTE: The support CD contents are subject to install the Promise Ultra 100 IDE Controller Driver for playing MIDI files...
A7V133 User Manual - Page 86

...S/W SETUP RAID
86
ASUS A7V133 User's Manual Read through the FastTrak100™ "Lite" firmware BIOS during the set up . Before setting up your computer. RAID 0 requires at a sustained data transfer rate double that supports only UltraATA-100/66/33, EIDE or FastATA-2 hard disks. also, RAID 1 can set up to four hard disks. (See Section 3.4.5, Hardware Setup: Motherboard Settings...
A7V133 User Manual - Page 93

... the instruction to insert your Windows CD or ASUS support CD to update driver. 7. Double click on "System" icon. 4. Select "Hardware" page and then click [Device Manager] button. 3. Double click on "System" icon.
2. Press Yes. 13. Press Next while "Upgrade Device Driver Wizard" window appears. 8. SOFTWARE SETUP
5.5 Manual Installation of IDE/RAID Drivers
The A7V133...
A7V133 User Manual - Page 102

... video-input devices installed. Click Finish to complete the environmental setting procedure.
6.4.2 CyberLink VideoLive Mail User Interface
Snapshot to setup the e-mail environment...driver for VLM 3, if there are not sure. Then the Video Configuration screen shows up. You may choose to configure the hardware and E-mail setting...ASUS A7V133 User's Manual Click Next to continue.
4.
Asus A7V133 Reviews
We have not received any reviews for Asus yet.