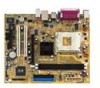
User manual for A7S8X-MX
Page 3
... Safety information vii About this guide viii Typography ix A7S8X-MX specifications summary x Chapter 1: Product introduction 1.1 Welcome 1-2 1.2 Package contents 1-2 1.3 Special features 1-3 1.3.1 Product highlights 1-3 1.3.2 Innovative ASUS features 1-4 1.4 Before you proceed 1-5 1.5 Motherboard overview 1-6 1.5.1 Placement direction 1-6 1.5.2 Screw holes 1-6 1.5.3 Motherboard layout 1-7 1.6 Central Processing Unit (CPU 1-8 1.7 System memory 1-10 1.7.1 Overview 1-10 1.7.2 Memory Configurations 1-10 1.7.3 Installing a DIMM 1-12 1.7.4 Removing a DIMM 1-12...
... Safety information vii About this guide viii Typography ix A7S8X-MX specifications summary x Chapter 1: Product introduction 1.1 Welcome 1-2 1.2 Package contents 1-2 1.3 Special features 1-3 1.3.1 Product highlights 1-3 1.3.2 Innovative ASUS features 1-4 1.4 Before you proceed 1-5 1.5 Motherboard overview 1-6 1.5.1 Placement direction 1-6 1.5.2 Screw holes 1-6 1.5.3 Motherboard layout 1-7 1.6 Central Processing Unit (CPU 1-8 1.7 System memory 1-10 1.7.1 Overview 1-10 1.7.2 Memory Configurations 1-10 1.7.3 Installing a DIMM 1-12 1.7.4 Removing a DIMM 1-12...
User manual for A7S8X-MX
Page 4
...2.1 Managing and updating your BIOS 2-2 2.1.1 Creating a bootable floppy disk 2-2 2.1.2 AwardBIOS Flash Utility 2-3 2.1.3 ASUS EZ Flash utility 2-5 2.1.4 ASUS CrashFree BIOS utility 2-6 2.1.5 ASUS Update utility 2-7 2.2 BIOS Setup program 2-10 2.2.1 BIOS menu bar 2-11 2.2.2 Legend bar 2-11 2.3 ...Main Menu 2-13 2.3.1 System Time 2-13 2.3.2 System Date 2-13 2.3.3 Legacy Diskette A 2-13 2.3.4 HDD SMART Monitoring 2-13 2.3.5 Installed Memory...
...2.1 Managing and updating your BIOS 2-2 2.1.1 Creating a bootable floppy disk 2-2 2.1.2 AwardBIOS Flash Utility 2-3 2.1.3 ASUS EZ Flash utility 2-5 2.1.4 ASUS CrashFree BIOS utility 2-6 2.1.5 ASUS Update utility 2-7 2.2 BIOS Setup program 2-10 2.2.1 BIOS menu bar 2-11 2.2.2 Legend bar 2-11 2.3 ...Main Menu 2-13 2.3.1 System Time 2-13 2.3.2 System Date 2-13 2.3.3 Legacy Diskette A 2-13 2.3.4 HDD SMART Monitoring 2-13 2.3.5 Installed Memory...
User manual for A7S8X-MX
Page 10
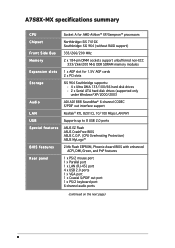
A7S8X-MX specifications summary CPU Chipset Front Side Bus Memory Expansion slots Storage Audio LAN USB Special features BIOS features Rear panel Socket A for AMD Athlon™ XP/Sempron™ processors Northbridge: SiS 741GX Southbridge: ... SoundMax® 6-channel CODEC S/PDIF out interface support Realtek® RTL 8201CL 10/100 Mbps LAN PHY Supports up to 8 USB 2.0 ports ASUS EZ Flash ASUS CrashFree BIOS ASUS C.O.P. (CPU Overheating Protection) ASUS MyLogo™ 2 Mb Flash EEPROM, Phoenix-Award BIOS with enhanced ACPI, DMI, Green, and PnP features 1 x PS/2 mouse port 1 x Parallel port...
A7S8X-MX specifications summary CPU Chipset Front Side Bus Memory Expansion slots Storage Audio LAN USB Special features BIOS features Rear panel Socket A for AMD Athlon™ XP/Sempron™ processors Northbridge: SiS 741GX Southbridge: ... SoundMax® 6-channel CODEC S/PDIF out interface support Realtek® RTL 8201CL 10/100 Mbps LAN PHY Supports up to 8 USB 2.0 ports ASUS EZ Flash ASUS CrashFree BIOS ASUS C.O.P. (CPU Overheating Protection) ASUS MyLogo™ 2 Mb Flash EEPROM, Phoenix-Award BIOS with enhanced ACPI, DMI, Green, and PnP features 1 x PS/2 mouse port 1 x Parallel port...
User manual for A7S8X-MX
Page 15
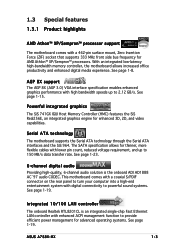
..., the motherboard allows increased office productivity and enhanced digital media experience. See page 1-15. Powerful integrated graphics The SiS 741GX IGUI Host Memory Controller (HMC) features the SiS Real256E, an integrated graphics engine for AMD Athlon™ XP/Sempron™ processors. AGP 8X support The AGP 8X (AGP 3.0) ... to powerful sound systems. See page 1-19. Integrated 10/100 LAN controller The onboard Realtek RTL8201CL is the onboard ADI AD1888 AC`97 audio CODEC. ASUS A7S8X-MX 1-3
..., the motherboard allows increased office productivity and enhanced digital media experience. See page 1-15. Powerful integrated graphics The SiS 741GX IGUI Host Memory Controller (HMC) features the SiS Real256E, an integrated graphics engine for AMD Athlon™ XP/Sempron™ processors. AGP 8X support The AGP 8X (AGP 3.0) ... to powerful sound systems. See page 1-19. Integrated 10/100 LAN controller The onboard Realtek RTL8201CL is the onboard ADI AD1888 AC`97 audio CODEC. ASUS A7S8X-MX 1-3

User manual for A7S8X-MX
Page 22
...this section. • Installing DDR DIMMs other than the recommended configurations may cause memory sizing error or system boot failure. Use any of the DDR DIMM sockets. ® A7S8X-MX 184-pin DDR DIMM sockets 1.7.2 Memory Configurations You may install 64 MB, 128 MB, 256 MB, 512 MB ... support up to 2 GB system memory using the memory configurations in the table on the next page. • Always install DIMMs with two Double Data Rate (DDR) Dual Inline Memory Module (DIMM) sockets. A7S8X-MX DIMM1 DIMM2 80 Pins 104 Pins 1.7 System memory 1.7.1 Overview The motherboard comes with the...
...this section. • Installing DDR DIMMs other than the recommended configurations may cause memory sizing error or system boot failure. Use any of the DDR DIMM sockets. ® A7S8X-MX 184-pin DDR DIMM sockets 1.7.2 Memory Configurations You may install 64 MB, 128 MB, 256 MB, 512 MB ... support up to 2 GB system memory using the memory configurations in the table on the next page. • Always install DIMMs with two Double Data Rate (DDR) Dual Inline Memory Module (DIMM) sockets. A7S8X-MX DIMM1 DIMM2 80 Pins 104 Pins 1.7 System memory 1.7.1 Overview The motherboard comes with the...
User manual for A7S8X-MX
Page 28
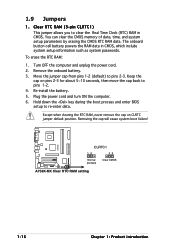
You can clear the CMOS memory of date, time, and system setup parameters by erasing the CMOS RTC RAM data. Remove the onboard battery. 3. Clear RTC RAM (3-pin CLRTC1) This jumper ... (RTC) RAM in CMOS, which include system setup information such as system passwords. Removing the cap will cause system boot failure! A7S8X-MX CLRTC1 12 23 ® Normal Clear CMOS (Default) A7S8X-MX Clear RTC RAM setting 1-16 Chapter 1: Product introduction 1.9 Jumpers 1. To erase the RTC RAM: 1. Turn OFF the computer and unplug the...
You can clear the CMOS memory of date, time, and system setup parameters by erasing the CMOS RTC RAM data. Remove the onboard battery. 3. Clear RTC RAM (3-pin CLRTC1) This jumper ... (RTC) RAM in CMOS, which include system setup information such as system passwords. Removing the cap will cause system boot failure! A7S8X-MX CLRTC1 12 23 ® Normal Clear CMOS (Default) A7S8X-MX Clear RTC RAM setting 1-16 Chapter 1: Product introduction 1.9 Jumpers 1. To erase the RTC RAM: 1. Turn OFF the computer and unplug the...
User manual for A7S8X-MX
Page 45
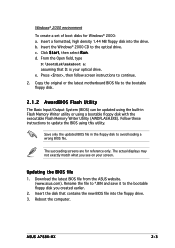
.... (www.asus.com). Save only the updated BIOS file in the floppy disk to the bootable floppy disk. 2.1.2 AwardBIOS Flash Utility The Basic Input/Output System (BIOS) can be updated using the built-in Flash Memory Writer utility or using this utility. Click S t a r t, then select R u n.... From the Open field, type D:\bootdisk\makeboot a: assuming that contains the new BIOS file into the drive. ASUS A7S8X-MX 2-3 Windows® 2000 environment To create a set ...
.... (www.asus.com). Save only the updated BIOS file in the floppy disk to the bootable floppy disk. 2.1.2 AwardBIOS Flash Utility The Basic Input/Output System (BIOS) can be updated using the built-in Flash Memory Writer utility or using this utility. Click S t a r t, then select R u n.... From the Open field, type D:\bootdisk\makeboot a: assuming that contains the new BIOS file into the drive. ASUS A7S8X-MX 2-3 Windows® 2000 environment To create a set ...
User manual for A7S8X-MX
Page 55
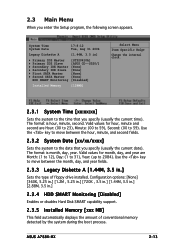
...minute, second. Use the key to move between the hour, minute, and second fields. 2.3.2 System Date [xx/xx/xxxx] Sets the system to 2084). ASUS A7S8X-MX 2-13 The format is month, day, year. Valid values for hour, minute and second are Month: (1 to 12), Day: (1 to 31), Year...Configuration options: [None] [360K, 5.25 in.] [1.2M , 5.25 in.] [720K , 3.5 in.] [1.44M, 3.5 in.] [2.88M, 3.5 in .] Sets the type of conventional memory detected by the system during the boot process. System Time System Date 17:8:12 Tue, Aug 31 2004 Legacy Diskette A [1.44M, 3.5 in] Primary IDE Master...
...minute, second. Use the key to move between the hour, minute, and second fields. 2.3.2 System Date [xx/xx/xxxx] Sets the system to 2084). ASUS A7S8X-MX 2-13 The format is month, day, year. Valid values for hour, minute and second are Month: (1 to 12), Day: (1 to 31), Year...Configuration options: [None] [360K, 5.25 in.] [1.2M , 5.25 in.] [720K , 3.5 in.] [1.44M, 3.5 in.] [2.88M, 3.5 in .] Sets the type of conventional memory detected by the system during the boot process. System Time System Date 17:8:12 Tue, Aug 31 2004 Legacy Diskette A [1.44M, 3.5 in] Primary IDE Master...

User manual for A7S8X-MX
Page 60
AGP Bridge Configuration AGP Bridge Configuration Graphics Aperture Size AGP Fast Write Support AGP Data Transfer Rate Dual Display Support Onboard Shared Memory [64MB] [Disabled] [Auto] [Disabled] [32 MB] Select Menu Item Specific Help Select AGP aperture size. 2-18 Chapter 2: BIOS setup 2.4.2 Chipset configuration The items in this ...
AGP Bridge Configuration AGP Bridge Configuration Graphics Aperture Size AGP Fast Write Support AGP Data Transfer Rate Dual Display Support Onboard Shared Memory [64MB] [Disabled] [Auto] [Disabled] [32 MB] Select Menu Item Specific Help Select AGP aperture size. 2-18 Chapter 2: BIOS setup 2.4.2 Chipset configuration The items in this ...

User manual for A7S8X-MX
Page 61
...64 MB] [128 MB] ASUS A7S8X-MX 2-19 Configuration options: [4MB] [8MB] [16MB] [32MB] [64MB] [128MB] [256MB] [512MB] AGP Fast Write Support [Disabled] Allows you to the AGP. Configuration options: [Disabled] [Enabled] Onboard Shared Memory [32 MB] This item allows you to set the memory space reserved for AGP graphic... a 3D graphics device, select at least 16MB VGA shared memory size. Graphics Aperture Size [64MB] Allows you to select the size of mapped memory for the VGA frame buffer (display memory) within the system main memory. If you to select the AGP data transfer rate. Note...
...64 MB] [128 MB] ASUS A7S8X-MX 2-19 Configuration options: [4MB] [8MB] [16MB] [32MB] [64MB] [128MB] [256MB] [512MB] AGP Fast Write Support [Disabled] Allows you to the AGP. Configuration options: [Disabled] [Enabled] Onboard Shared Memory [32 MB] This item allows you to set the memory space reserved for AGP graphic... a 3D graphics device, select at least 16MB VGA shared memory size. Graphics Aperture Size [64MB] Allows you to select the size of mapped memory for the VGA frame buffer (display memory) within the system main memory. If you to select the AGP data transfer rate. Note...


