User manual for A7S8X-MX
Page 4
... a bootable floppy disk 2-2 2.1.2 AwardBIOS Flash Utility 2-3 2.1.3 ASUS EZ Flash utility 2-5 2.1.4 ASUS CrashFree BIOS utility 2-6 2.1.5 ASUS Update utility 2-7 2.2 BIOS Setup program 2-10 2.2.1 BIOS menu bar 2-11 2.2.2 Legend bar 2-11 2.3 Main Menu 2-13 2.3.1 System Time 2-13 2.3.2 System Date 2-13 2.3.3 Legacy Diskette A 2-13 2.3.4 HDD SMART Monitoring 2-13 2.3.5 Installed Memory 2-13 2.3.6 ...
... a bootable floppy disk 2-2 2.1.2 AwardBIOS Flash Utility 2-3 2.1.3 ASUS EZ Flash utility 2-5 2.1.4 ASUS CrashFree BIOS utility 2-6 2.1.5 ASUS Update utility 2-7 2.2 BIOS Setup program 2-10 2.2.1 BIOS menu bar 2-11 2.2.2 Legend bar 2-11 2.3 Main Menu 2-13 2.3.1 System Time 2-13 2.3.2 System Date 2-13 2.3.3 Legacy Diskette A 2-13 2.3.4 HDD SMART Monitoring 2-13 2.3.5 Installed Memory 2-13 2.3.6 ...
User manual for A7S8X-MX
Page 8
... provides updated information on the motherboard. • Chapter 2: BIOS setup This chapter tells how to the ASUS contact information. 2. Refer to change system settings through the BIOS Setup menus. How this guide This user guide contains the information you have been added by your dealer.... is organized This manual contains the following sources for additional information and for product and software updates. 1. Detailed descriptions of the BIOS parameters are not part of the support CD that comes with the motherboard package. Where to find more information Refer to the ...
... provides updated information on the motherboard. • Chapter 2: BIOS setup This chapter tells how to the ASUS contact information. 2. Refer to change system settings through the BIOS Setup menus. How this guide This user guide contains the information you have been added by your dealer.... is organized This manual contains the following sources for additional information and for product and software updates. 1. Detailed descriptions of the BIOS parameters are not part of the support CD that comes with the motherboard package. Where to find more information Refer to the ...
User manual for A7S8X-MX
Page 10
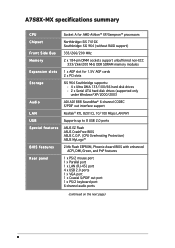
A7S8X-MX specifications summary CPU Chipset Front Side Bus Memory Expansion slots Storage Audio LAN USB Special features BIOS features Rear panel Socket A for AMD Athlon™ XP/Sempron™ processors Northbridge: SiS 741GX Southbridge: SiS 964 (without RAID ...CODEC S/PDIF out interface support Realtek® RTL 8201CL 10/100 Mbps LAN PHY Supports up to 8 USB 2.0 ports ASUS EZ Flash ASUS CrashFree BIOS ASUS C.O.P. (CPU Overheating Protection) ASUS MyLogo™ 2 Mb Flash EEPROM, Phoenix-Award BIOS with enhanced ACPI, DMI, Green, and PnP features 1 x PS/2 mouse port 1 x Parallel port 1 x ...
A7S8X-MX specifications summary CPU Chipset Front Side Bus Memory Expansion slots Storage Audio LAN USB Special features BIOS features Rear panel Socket A for AMD Athlon™ XP/Sempron™ processors Northbridge: SiS 741GX Southbridge: SiS 964 (without RAID ...CODEC S/PDIF out interface support Realtek® RTL 8201CL 10/100 Mbps LAN PHY Supports up to 8 USB 2.0 ports ASUS EZ Flash ASUS CrashFree BIOS ASUS C.O.P. (CPU Overheating Protection) ASUS MyLogo™ 2 Mb Flash EEPROM, Phoenix-Award BIOS with enhanced ACPI, DMI, Green, and PnP features 1 x PS/2 mouse port 1 x Parallel port 1 x ...
User manual for A7S8X-MX
Page 16
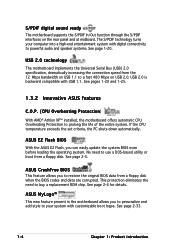
... of the entire system. No need to buy a replacement ROM chip. See page 2-5. ASUS MyLogo™ This new feature present in the motherboard allows you can easily update the system BIOS even before loading the operating system. The S/PDIF technology turns your system with customizable boot logos... the CPU temperature exceeds the set criteria, the PC shuts down automatically. ASUS EZ Flash BIOS With the ASUS EZ Flash, you to personalize and add style to powerful audio and speaker systems. See page 1-20. ASUS CrashFree BIOS This feature allows you to use a DOS-based utility or boot from...
... of the entire system. No need to buy a replacement ROM chip. See page 2-5. ASUS MyLogo™ This new feature present in the motherboard allows you can easily update the system BIOS even before loading the operating system. The S/PDIF technology turns your system with customizable boot logos... the CPU temperature exceeds the set criteria, the PC shuts down automatically. ASUS EZ Flash BIOS With the ASUS EZ Flash, you to personalize and add style to powerful audio and speaker systems. See page 1-20. ASUS CrashFree BIOS This feature allows you to use a DOS-based utility or boot from...
User manual for A7S8X-MX
Page 25
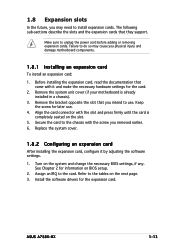
.... 2. Install the software drivers for the card. 2. Keep the screw for information on the system and change the necessary BIOS settings, if any. Assign an IRQ to do so may need to the tables on the next page. 3. Refer to install expansion cards. Replace the ... expansion card: 1. Remove the bracket opposite the slot that you intend to the chassis with the screw you removed earlier. 6. Secure the card to use . 4. ASUS A7S8X-MX 1-13 The following sub-sections describe the slots and the expansion cards that came with the slot and press firmly until the card is already...
.... 2. Install the software drivers for the card. 2. Keep the screw for information on the system and change the necessary BIOS settings, if any. Assign an IRQ to do so may need to the tables on the next page. 3. Refer to install expansion cards. Replace the ... expansion card: 1. Remove the bracket opposite the slot that you intend to the chassis with the screw you removed earlier. 6. Secure the card to use . 4. ASUS A7S8X-MX 1-13 The following sub-sections describe the slots and the expansion cards that came with the slot and press firmly until the card is already...
User manual for A7S8X-MX
Page 28
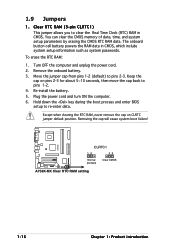
... powers the RAM data in CMOS. Re-install the battery. 5. Hold down the key during the boot process and enter BIOS setup to pins 2-3. A7S8X-MX CLRTC1 12 23 ® Normal Clear CMOS (Default) A7S8X-MX Clear RTC RAM setting 1-16 Chapter 1: Product introduction Removing the cap will cause system boot failure! Keep the cap...
... powers the RAM data in CMOS. Re-install the battery. 5. Hold down the key during the boot process and enter BIOS setup to pins 2-3. A7S8X-MX CLRTC1 12 23 ® Normal Clear CMOS (Default) A7S8X-MX Clear RTC RAM setting 1-16 Chapter 1: Product introduction Removing the cap will cause system boot failure! Keep the cap...

User manual for A7S8X-MX
Page 30
3 . Refer to the jumper settings below. 1 FSB_SEL1 FSB_SEL0 100MHZ A7S8X-MX 1 FSB_SEL1 FSB_SEL0 133MHZ 1 ® FSB_SEL1 FSB_SEL0 A7S8X-MX External frequency selection 166MHZ (Default) Make sure you to page 2-36. 1-18 Chapter 1: Product introduction Refer to set the CPU Front Side Bus (FSB) frequency. External frequency selection (3-pin FSB_SEL1, FSB_SEL0) These jumpers allow you load the BIOS setup default after changing the external frequency selection.
3 . Refer to the jumper settings below. 1 FSB_SEL1 FSB_SEL0 100MHZ A7S8X-MX 1 FSB_SEL1 FSB_SEL0 133MHZ 1 ® FSB_SEL1 FSB_SEL0 A7S8X-MX External frequency selection 166MHZ (Default) Make sure you to page 2-36. 1-18 Chapter 1: Product introduction Refer to set the CPU Front Side Bus (FSB) frequency. External frequency selection (3-pin FSB_SEL1, FSB_SEL0) These jumpers allow you load the BIOS setup default after changing the external frequency selection.

User manual for A7S8X-MX
Page 41
... • System power LED (Green 2-pin PLED) This 2-pin connector is for easy connection. Connect the chassis power LED cable to this connector. ASUS A7S8X-MX 1-29 Refer to the HDD. • Power/Soft-off the system power. The IDE LED lights up when you turn on the system power, and... blinks when the system is in SLEEP or SOFT-OFF mode depending on the BIOS settings. 13. System panel connector (10-1 pin PANEL) This connector supports several chassis-mounted functions. PLED PWRBTN PLED+ PLEDPWR GND A7S8X-MX PANEL HDLED+ HDLED-
... • System power LED (Green 2-pin PLED) This 2-pin connector is for easy connection. Connect the chassis power LED cable to this connector. ASUS A7S8X-MX 1-29 Refer to the HDD. • Power/Soft-off the system power. The IDE LED lights up when you turn on the system power, and... blinks when the system is in SLEEP or SOFT-OFF mode depending on the BIOS settings. 13. System panel connector (10-1 pin PANEL) This connector supports several chassis-mounted functions. PLED PWRBTN PLED+ PLEDPWR GND A7S8X-MX PANEL HDLED+ HDLED-
User manual for A7S8X-MX
Page 43
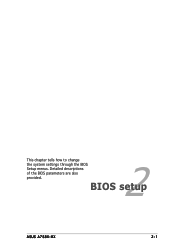
Detailed descriptions of the BIOS parameters are also provided. 2 BIOS setup ASUS A7S8X-MX 2-1 This chapter tells how to change the system settings through the BIOS Setup menus.
Detailed descriptions of the BIOS parameters are also provided. 2 BIOS setup ASUS A7S8X-MX 2-1 This chapter tells how to change the system settings through the BIOS Setup menus.

User manual for A7S8X-MX
Page 44
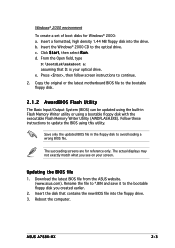
... press . b. Click S t a r t from the menu, then select F o r m a t. Click F i l e from the Windows® desktop, then select M y C o m p u t e r. 2.1 Managing and updating your BIOS The following to create a bootable floppy disk. A w a r d B I O S F l a s h U t i l i t y (Updates the BIOS using the ASUS Update utility. 2.1.1 Creating a bootable floppy disk 1. Important notes • Save a copy of the following utilities allow you need to restore...
... press . b. Click S t a r t from the menu, then select F o r m a t. Click F i l e from the Windows® desktop, then select M y C o m p u t e r. 2.1 Managing and updating your BIOS The following to create a bootable floppy disk. A w a r d B I O S F l a s h U t i l i t y (Updates the BIOS using the ASUS Update utility. 2.1.1 Creating a bootable floppy disk 1. Important notes • Save a copy of the following utilities allow you need to restore...
User manual for A7S8X-MX
Page 45
...utility or using a bootable floppy disk with the executable Flash Memory Writer Utility (AWDFLASH.EXE). Download the latest BIOS file from the ASUS website. (www.asus.com). Click S t a r t, then select R u n. ASUS A7S8X-MX 2-3 Rename the file to *.BIN and save it to the bootable floppy disk you see on your optical ...match what you created earlier. 2. Reboot the computer. b. d. From the Open field, type D:\bootdisk\makeboot a: assuming that contains the new BIOS file into the drive. Insert the disk that D: is your screen. Copy the original or the latest motherboard...
...utility or using a bootable floppy disk with the executable Flash Memory Writer Utility (AWDFLASH.EXE). Download the latest BIOS file from the ASUS website. (www.asus.com). Click S t a r t, then select R u n. ASUS A7S8X-MX 2-3 Rename the file to *.BIN and save it to the bootable floppy disk you see on your optical ...match what you created earlier. 2. Reboot the computer. b. d. From the Open field, type D:\bootdisk\makeboot a: assuming that contains the new BIOS file into the drive. Insert the disk that D: is your screen. Copy the original or the latest motherboard...
User manual for A7S8X-MX
Page 46
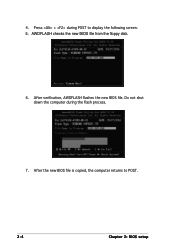
Do not shut down the computer during POST to POST. 2-4 Chapter 2: BIOS setup Press + during the flash process. 7. After verification, AWDFLASH flashes the new BIOS file. After the new BIOS file is copied, the computer returns to display the following screen. 5. AWDFLASH checks the new BIOS file from the floppy disk. 6. 4.
Do not shut down the computer during POST to POST. 2-4 Chapter 2: BIOS setup Press + during the flash process. 7. After verification, AWDFLASH flashes the new BIOS file. After the new BIOS file is copied, the computer returns to display the following screen. 5. AWDFLASH checks the new BIOS file from the floppy disk. 6. 4.
User manual for A7S8X-MX
Page 47
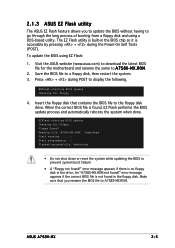
... not found ! error message appears if the correct BIOS file is found !" ASUS A7S8X-MX 2-5 Press + during the Power-On Self Tests (POST). EZFlash starting BIOS update Checking for floppy... 4. M X . R O M. 2. Reading file "A7S8X-MX.ROM". Visit the ASUS website (www.asus.com) to download the latest BIOS file for floppy... EZFlash starting BIOS update Checking for the motherboard and rename the...
... not found ! error message appears if the correct BIOS file is found !" ASUS A7S8X-MX 2-5 Press + during the Power-On Self Tests (POST). EZFlash starting BIOS update Checking for floppy... 4. M X . R O M. 2. Reading file "A7S8X-MX.ROM". Visit the ASUS website (www.asus.com) to download the latest BIOS file for floppy... EZFlash starting BIOS update Checking for the motherboard and rename the...
User manual for A7S8X-MX
Page 48
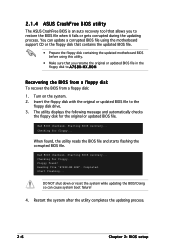
...... Restart the system after the utility completes the updating process. 2-6 Chapter 2: BIOS setup Starting BIOS recovery... You can cause system boot failure! 4. R O M. Completed. Floppy found , the utility reads the BIOS file and starts flashing the corrupted BIOS file. Bad BIOS checksum. Reading file "A7S8X-MX.ROM". The utility displays the following message and automatically checks the floppy...
...... Restart the system after the utility completes the updating process. 2-6 Chapter 2: BIOS setup Starting BIOS recovery... You can cause system boot failure! 4. R O M. Completed. Floppy found , the utility reads the BIOS file and starts flashing the corrupted BIOS file. Bad BIOS checksum. Reading file "A7S8X-MX.ROM". The utility displays the following message and automatically checks the floppy...
User manual for A7S8X-MX
Page 49
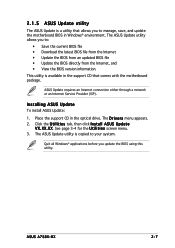
Place the support CD in the support CD that allows you update the BIOS using this utility. X X . ASUS Update requires an Internet connection either through a network or an Internet Service Provider (ISP). Installing ASUS Update To install ASUS Update: 1. The D r i v e r s menu appears. 2. X X. ASUS A7S8X-MX 2-7 Quit all Windows® applications before you to manage, save, and update the...
Place the support CD in the support CD that allows you update the BIOS using this utility. X X . ASUS Update requires an Internet connection either through a network or an Internet Service Provider (ISP). Installing ASUS Update To install ASUS Update: 1. The D r i v e r s menu appears. 2. X X. ASUS A7S8X-MX 2-7 Quit all Windows® applications before you to manage, save, and update the...
User manual for A7S8X-MX
Page 50
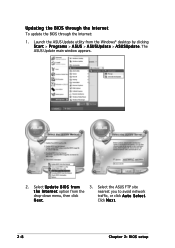
Select U p d a t e B I n t e r n e t option from the Windows® desktop by clicking S t a r t > P r o g r a m s > A S U S > A S U S U p d a t e > A S U S U p d a t e. Select the ASUS FTP site t h e I O S f r o m 3. Click N e x t. 2-8 Chapter 2: BIOS setup Updating the BIOS through the Internet To update the BIOS through the Internet: 1. Launch the ASUS Update utility from the nearest you to avoid network drop-down menu, then click traffic, or click A u t o S e l e c t. N e x t. The ASUS Update main window appears. 2.
Select U p d a t e B I n t e r n e t option from the Windows® desktop by clicking S t a r t > P r o g r a m s > A S U S > A S U S U p d a t e > A S U S U p d a t e. Select the ASUS FTP site t h e I O S f r o m 3. Click N e x t. 2-8 Chapter 2: BIOS setup Updating the BIOS through the Internet To update the BIOS through the Internet: 1. Launch the ASUS Update utility from the nearest you to avoid network drop-down menu, then click traffic, or click A u t o S e l e c t. N e x t. The ASUS Update main window appears. 2.
User manual for A7S8X-MX
Page 51
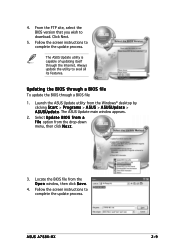
... screen instructions to complete the update process. ASUS A7S8X-MX 2-9 4. Follow the screen instructions to complete the update process. The ASUS Update main window appears. 2. Updating the BIOS through a BIOS file To update the BIOS through the Internet. The ASUS Update utility is capable of updating itself through a BIOS file: 1. Launch the ASUS Update utility from the drop-down menu...
... screen instructions to complete the update process. ASUS A7S8X-MX 2-9 4. Follow the screen instructions to complete the update process. The ASUS Update main window appears. 2. Updating the BIOS through a BIOS file To update the BIOS through the Internet. The ASUS Update utility is capable of updating itself through a BIOS file: 1. Launch the ASUS Update utility from the drop-down menu...
User manual for A7S8X-MX
Page 52
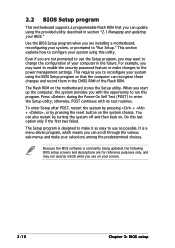
...Setup." For example, you can recognize these changes and record them in the CMOS RAM of your computer in section "2.1 Managing and updating your BIOS." otherwise, POST continues with the opportunity to change the configuration of the Flash ROM. It is a menu-driven program, which means you may...the computer, the system provides you see on the motherboard stores the Setup utility. The Setup program is constantly being updated, the following BIOS setup screens and descriptions are not prompted to use as easy to use the Setup program, you to enable the security password feature ...
...Setup." For example, you can recognize these changes and record them in the CMOS RAM of your computer in section "2.1 Managing and updating your BIOS." otherwise, POST continues with the opportunity to change the configuration of the Flash ROM. It is a menu-driven program, which means you may...the computer, the system provides you see on the motherboard stores the Setup utility. The Setup program is constantly being updated, the following BIOS setup screens and descriptions are not prompted to use as easy to use the Setup program, you to enable the security password feature ...
User manual for A7S8X-MX
Page 53
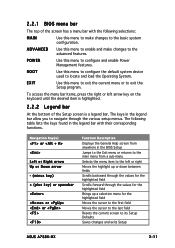
...cursor to the first field Moves the cursor to the last field Resets the current screen to its Setup Defaults Saves changes and exits Setup ASUS A7S8X-MX 2-11 POWER Use this menu to configure the default system device used to exit the Setup program. ADVANCED Use this menu to make ... or or Function Description Displays the General Help screen from anywhere in the legend bar allow you to configure and enable Power Management features. 2.2.1 BIOS menu bar The top of the Setup screen is highlighted. 2.2.2 Legend bar At the bottom of the screen has a menu bar with their ...
...cursor to the first field Moves the cursor to the last field Resets the current screen to its Setup Defaults Saves changes and exits Setup ASUS A7S8X-MX 2-11 POWER Use this menu to configure the default system device used to exit the Setup program. ADVANCED Use this menu to make ... or or Function Description Displays the General Help screen from anywhere in the legend bar allow you to configure and enable Power Management features. 2.2.1 BIOS menu bar The top of the Setup screen is highlighted. 2.2.2 Legend bar At the bottom of the screen has a menu bar with their ...
User manual for A7S8X-MX
Page 54
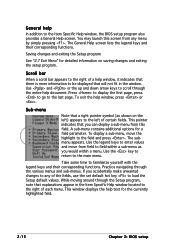
... See "2.7 Exit Menu" for detailed information on the left of the fields, use the set default hot key to the Item Specific Help window, the BIOS setup program also provides a General Help screen. Use and or the up and down arrow keys to the field and press . A sub-menu contains ...additional options for the currently highlighted field. 2-12 Chapter 2: BIOS setup This window displays the help text for a field parameter. You may launch this screen from this field. To exit the help window, press or...
... See "2.7 Exit Menu" for detailed information on the left of the fields, use the set default hot key to the Item Specific Help window, the BIOS setup program also provides a General Help screen. Use and or the up and down arrow keys to the field and press . A sub-menu contains ...additional options for the currently highlighted field. 2-12 Chapter 2: BIOS setup This window displays the help text for a field parameter. You may launch this screen from this field. To exit the help window, press or...


