
User Manual
Page 16
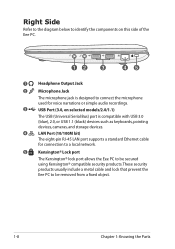
... Jack The microphone jack is designed to connect the microphone used for voice narrations or simple audio recordings. 3 USB Port (3.0, on selected models/2.0/1.1) The USB (Universal Serial Bus) port is compatible with USB 3.0 (blue), 2.0, or USB 1.1 (black) devices such as keyboards, pointing devices, cameras, and storage devices. 4 LAN Port (10/100M bit) The eight...
... Jack The microphone jack is designed to connect the microphone used for voice narrations or simple audio recordings. 3 USB Port (3.0, on selected models/2.0/1.1) The USB (Universal Serial Bus) port is compatible with USB 3.0 (blue), 2.0, or USB 1.1 (black) devices such as keyboards, pointing devices, cameras, and storage devices. 4 LAN Port (10/100M bit) The eight...
User Manual
Page 17
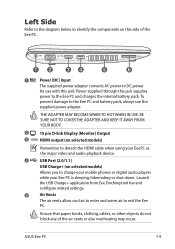
THE ADAPTER MAY BECOME WARM TO HOT WHEN IN USE. Launch the USB Charge+ application from Eee Docking tool bar and configure related settings. 5 Air Vents The air vents allow cool air to enter and warm air to ... HDMI output (on selected models) Remember to detach the HDMI cable when using your EeePC as the major video and audio playback device. 4 USB Port (2.0/1.1) USB Charge+ (on this jack. ASUS Eee PC 1-9 Ensure that paper, books, clothing, cables, or other objects do not block any of the Eee PC. 12 34 5 6 1 Power...
THE ADAPTER MAY BECOME WARM TO HOT WHEN IN USE. Launch the USB Charge+ application from Eee Docking tool bar and configure related settings. 5 Air Vents The air vents allow cool air to enter and warm air to ... HDMI output (on selected models) Remember to detach the HDMI cable when using your EeePC as the major video and audio playback device. 4 USB Port (2.0/1.1) USB Charge+ (on this jack. ASUS Eee PC 1-9 Ensure that paper, books, clothing, cables, or other objects do not block any of the Eee PC. 12 34 5 6 1 Power...
User Manual
Page 40
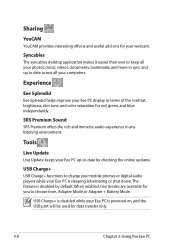
...while your photos, music, videos, documents, bookmarks, and more in sync and up -to keep all your Eee PC is powered on, and the USB port will be used for data transfer only. 3-8 Chapter 3: Using the Eee PC Syncables The syncables desktop application makes it easier than ever to ...-date by default. USB Charge+ USB Charge+ functions to choose from, Adapter Mode, or Adapter + Battery Mode. When enabled, two modes are available for you to charge your mobile ...
...while your photos, music, videos, documents, bookmarks, and more in sync and up -to keep all your Eee PC is powered on, and the USB port will be used for data transfer only. 3-8 Chapter 3: Using the Eee PC Syncables The syncables desktop application makes it easier than ever to ...-date by default. USB Charge+ USB Charge+ functions to choose from, Adapter Mode, or Adapter + Battery Mode. When enabled, two modes are available for you to charge your mobile ...

User Manual
Page 44
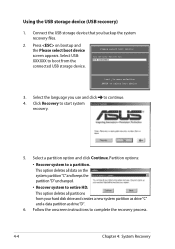
... automatically and follow the onscreen instructions to complete the recovery process. 4-2 Chapter 4: System Recovery Press during bootup. 2. Select the language you perform system recovery from USB flash disk, external optical drive or hidden partition. Ensure to connect your Eee PC to the AC power adapter before you use and click to...
... automatically and follow the onscreen instructions to complete the recovery process. 4-2 Chapter 4: System Recovery Press during bootup. 2. Select the language you perform system recovery from USB flash disk, external optical drive or hidden partition. Ensure to connect your Eee PC to the AC power adapter before you use and click to...

User Manual
Page 45
... system recovery backup to back up the recovery files 1. All the data on the selected USB storage device. Click Continue to start the recovery files backup. • The size of the connected USB storage device should be cleared. The system backup starts and click OK when done. Ensure .... 3. Back up your important data beforehand 5. You will lose all your data on the selected USB storage device will be larger than one USB storage device is connected to backup your important data. ASUS Eee PC 4-3 Repeat the step 1-2 in the Recovery System dialog box to start the backup or...
... system recovery backup to back up the recovery files 1. All the data on the selected USB storage device. Click Continue to start the recovery files backup. • The size of the connected USB storage device should be cleared. The system backup starts and click OK when done. Ensure .... 3. Back up your important data beforehand 5. You will lose all your data on the selected USB storage device will be larger than one USB storage device is connected to backup your important data. ASUS Eee PC 4-3 Repeat the step 1-2 in the Recovery System dialog box to start the backup or...
User Manual
Page 46
...to complete the recovery process. 4-4 Chapter 4: System Recovery This option deletes all partitions from the connected USB storage device. Follow the onscreen instructions to start system recovery. 5. Select USB: XXXXXX to continue. 4. Partition options: • Recover system to select boot device 3. Please ...select boot device: HDD:SM-ASUS-PHISON SSD USB:XXXXXXXX ↑ and ↓ to move selection ENTER to a partition. Connect the USB storage device that you use and click to boot from your hard disk drive and ...
...to complete the recovery process. 4-4 Chapter 4: System Recovery This option deletes all partitions from the connected USB storage device. Follow the onscreen instructions to start system recovery. 5. Select USB: XXXXXX to continue. 4. Partition options: • Recover system to select boot device 3. Please ...select boot device: HDD:SM-ASUS-PHISON SSD USB:XXXXXXXX ↑ and ↓ to move selection ENTER to a partition. Connect the USB storage device that you use and click to boot from your hard disk drive and ...
User Manual
Page 47
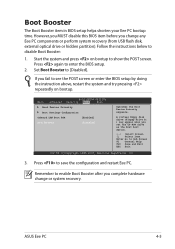
ASUS Eee PC 4-5 Boot Booster The Boot Booster item in BIOS setup helps shorten your Eee PC bootup time. Follow the instructions below to enter the BIOS setup. 2. Press again to disable Boot Booster: 1. If you complete hardware change any Eee PC components or perform system recovery (from USB flash disk, external optical...
ASUS Eee PC 4-5 Boot Booster The Boot Booster item in BIOS setup helps shorten your Eee PC bootup time. Follow the instructions below to enter the BIOS setup. 2. Press again to disable Boot Booster: 1. If you complete hardware change any Eee PC components or perform system recovery (from USB flash disk, external optical...

