
User Manual
Page 2
... Batteries vii Airplane Precautions vii Chapter 1: Knowing the Parts Top Side...1-2 Bottom Side...1-5 Front Side...1-6 Right Side...1-7 Left Side...1-9 Keyboard Usage...1-11 Special Function Keys 1-11 Touchpad Usage...1-13 Multi-finger gesture input 1-13 Chapter 2: Getting Started Powering on your Eee PC...2-2 First-time Startup...2-3 Desktop...2-4 Network Connection...2-5 Configuring a wireless network connection 2-5 Local Area Network 2-6 Browsing web pages 2-9 Chapter 3: Using the Eee PC ASUS Update...3-2 Updating the BIOS through the Internet 3-2 Updating...
... Batteries vii Airplane Precautions vii Chapter 1: Knowing the Parts Top Side...1-2 Bottom Side...1-5 Front Side...1-6 Right Side...1-7 Left Side...1-9 Keyboard Usage...1-11 Special Function Keys 1-11 Touchpad Usage...1-13 Multi-finger gesture input 1-13 Chapter 2: Getting Started Powering on your Eee PC...2-2 First-time Startup...2-3 Desktop...2-4 Network Connection...2-5 Configuring a wireless network connection 2-5 Local Area Network 2-6 Browsing web pages 2-9 Chapter 3: Using the Eee PC ASUS Update...3-2 Updating the BIOS through the Internet 3-2 Updating...
User Manual
Page 3
Chapter 4: Support DVD & System Recovery Support DVD information 4-2 Running the support DVD 4-2 Drivers menu...4-3 Utilities menu...4-3 Contact...4-3 Other information 4-3 System Recovery...4-4 Using Recovery Partition 4-4 Using the Support DVD 4-5 Boot Booster...4-6 Appendix Declarations and Safety Statements A-2 Federal Communications Commission Statement A-2 FCC Radio Frequency (RF) Exposure Caution Statement A-3 Declaration of Conformity(R&TTE directive 1999/5/EC A-4 CE Marking...A-4 IC Radiation Exposure Statement for Canada A-5 Wireless Operation Channel for ...
Chapter 4: Support DVD & System Recovery Support DVD information 4-2 Running the support DVD 4-2 Drivers menu...4-3 Utilities menu...4-3 Contact...4-3 Other information 4-3 System Recovery...4-4 Using Recovery Partition 4-4 Using the Support DVD 4-5 Boot Booster...4-6 Appendix Declarations and Safety Statements A-2 Federal Communications Commission Statement A-2 FCC Radio Frequency (RF) Exposure Caution Statement A-3 Declaration of Conformity(R&TTE directive 1999/5/EC A-4 CE Marking...A-4 IC Radiation Exposure Statement for Canada A-5 Wireless Operation Channel for ...
User Manual
Page 4
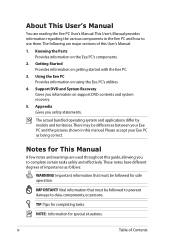
....The following are used throughout this guide, allowing you to data, components, or persons. Notes for safe operation. Vital information that must be differences between your Eee PC as follows: WARNING! About This User's Manual You are reading the Eee PC User's Manual.This User's Manual provides information regarding the various components in this manual. Support DVD and System Recovery Gives you safety statements...
....The following are used throughout this guide, allowing you to data, components, or persons. Notes for safe operation. Vital information that must be differences between your Eee PC as follows: WARNING! About This User's Manual You are reading the Eee PC User's Manual.This User's Manual provides information regarding the various components in this manual. Support DVD and System Recovery Gives you safety statements...
User Manual
Page 5
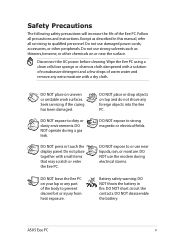
...battery in this manual, refer all precautions and instructions. Do not place together with small items that may scratch or enter the Eee PC. Follow all servicing to qualified personnel. Disconnect the AC power before cleaning. Seek servicing if the casing has been damaged. DO NOT press or touch the display panel...in fire. Except as thinners, benzene, or other peripherals. DO NOT use near the surface. DO NOT place or drop objects on uneven or unstable work surfaces. DO NOT disassemble the battery. DO NOT place on top and do not shove any foreign objects ...
...battery in this manual, refer all precautions and instructions. Do not place together with small items that may scratch or enter the Eee PC. Follow all servicing to qualified personnel. Disconnect the AC power before cleaning. Seek servicing if the casing has been damaged. DO NOT press or touch the display panel...in fire. Except as thinners, benzene, or other peripherals. DO NOT use near the surface. DO NOT place or drop objects on uneven or unstable work surfaces. DO NOT disassemble the battery. DO NOT place on top and do not shove any foreign objects ...
User Manual
Page 11
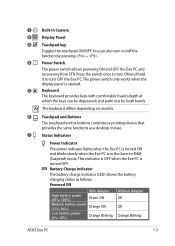
The power switch only works when the display panel is in Camera 2 Display Panel 3 Touchpad key Toggles the touchpad ON/OFF. The keyboard differs depending on /off the function by pressing + . 4 Power Switch The power switch allows powering ON and OFF the Eee PC and recovering from STR. You can be depressed) and palm rest for both hands. Press the switch once to turn ON and hold it to -RAM (Suspend) mode. Battery Charge Indicator The battery charge indicator (LED) shows...
The power switch only works when the display panel is in Camera 2 Display Panel 3 Touchpad key Toggles the touchpad ON/OFF. The keyboard differs depending on /off the function by pressing + . 4 Power Switch The power switch allows powering ON and OFF the Eee PC and recovering from STR. You can be depressed) and palm rest for both hands. Press the switch once to turn ON and hold it to -RAM (Suspend) mode. Battery Charge Indicator The battery charge indicator (LED) shows...

User Manual
Page 12
Capital Lock Indicator Indicates that capital lock [Caps Lock] is enabled, this indicator lights. When the built-in wireless LAN/ Bluetooth (on selected models). Powered OFF / Standby mode With Adapter High battery power (95%-100%) Green ON Medium battery power (11%-94%) Orange ON Low battery power (0%-10%) Orange Blinking Without Adapter Off Off Off Hard Disk Drive (HDD) Indicator The hard disk drive indicator blinks when data is only applicable on models with built-in wireless LAN/Bluetooth is activated when lighted. 1-4 Chapter 1: Knowing the Parts Wireless/Bluetooth...
Capital Lock Indicator Indicates that capital lock [Caps Lock] is enabled, this indicator lights. When the built-in wireless LAN/ Bluetooth (on selected models). Powered OFF / Standby mode With Adapter High battery power (95%-100%) Green ON Medium battery power (11%-94%) Orange ON Low battery power (0%-10%) Orange Blinking Without Adapter Off Off Off Hard Disk Drive (HDD) Indicator The hard disk drive indicator blinks when data is only applicable on models with built-in wireless LAN/Bluetooth is activated when lighted. 1-4 Chapter 1: Knowing the Parts Wireless/Bluetooth...
User Manual
Page 13
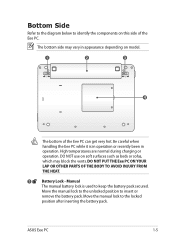
DO NOT use on soft surfaces such as beds or sofas, which may vary in operation. Move the manual lock to insert or remove the battery pack. ASUS Eee PC 1-5 DO NOT PUT THE Eee PC ON YOUR LAP OR OTHER PARTS OF THE BODY TO AVOID INJURY FROM THE HEAT. 1 Battery Lock - High temperatures are normal during charging or operation. The bottom...
DO NOT use on soft surfaces such as beds or sofas, which may vary in operation. Move the manual lock to insert or remove the battery pack. ASUS Eee PC 1-5 DO NOT PUT THE Eee PC ON YOUR LAP OR OTHER PARTS OF THE BODY TO AVOID INJURY FROM THE HEAT. 1 Battery Lock - High temperatures are normal during charging or operation. The bottom...
User Manual
Page 14
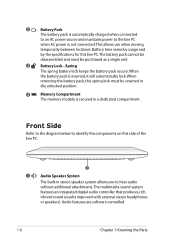
... integrated digital audio controller that produces rich, vibrant sound (results improved with external stereo headphones or speakers). Audio features are software controlled. 1-6 Chapter 1: Knowing the Parts Spring The spring battery lock keeps the battery pack secure. When the battery pack is not connected. Battery time varies by usage and by the specifications for this spring lock must be retained in the unlocked position. 4 Memory Compartment The memory module is secured...
... integrated digital audio controller that produces rich, vibrant sound (results improved with external stereo headphones or speakers). Audio features are software controlled. 1-6 Chapter 1: Knowing the Parts Spring The spring battery lock keeps the battery pack secure. When the battery pack is not connected. Battery time varies by usage and by the specifications for this spring lock must be retained in the unlocked position. 4 Memory Compartment The memory module is secured...
User Manual
Page 15
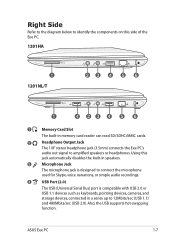
....e 4 USB Port (2.0) The USB (Universal Serial Bus) port is compatible with USB 2.0 or USB 1.1 devices such as keyboards, pointing devices, cameras, and storage devices, connected in a series up to amplified speakers or headphones. Also, the USB supports hot-swapping function. Right Side Refer to the diagram below to identify the components on this jack automatically disables the built-in speakers. Using this side of the Eee PC. 1201HA 1 1201NL/T 23 4 5 6 1 4 23 4 5 6 1 Memory Card Slot The...
....e 4 USB Port (2.0) The USB (Universal Serial Bus) port is compatible with USB 2.0 or USB 1.1 devices such as keyboards, pointing devices, cameras, and storage devices, connected in a series up to amplified speakers or headphones. Also, the USB supports hot-swapping function. Right Side Refer to the diagram below to identify the components on this jack automatically disables the built-in speakers. Using this side of the Eee PC. 1201HA 1 1201NL/T 23 4 5 6 1 4 23 4 5 6 1 Memory Card Slot The...

User Manual
Page 18
... audio and/or video monitor, such as a digital television (DTV). Ensure that paper, books, clothing, cables, or other objects do not block any of the air vents or else overheating may occur. 5 HDMI HDMI Port HDMI (High-Definition Multimedia Interface) is an uncompressed all ATSC HDTV standards and supports 8-channel digital audio, with this jack supplies power to the Eee PC and charges the internal battery...
... audio and/or video monitor, such as a digital television (DTV). Ensure that paper, books, clothing, cables, or other objects do not block any of the air vents or else overheating may occur. 5 HDMI HDMI Port HDMI (High-Definition Multimedia Interface) is an uncompressed all ATSC HDTV standards and supports 8-channel digital audio, with this jack supplies power to the Eee PC and charges the internal battery...
User Manual
Page 19
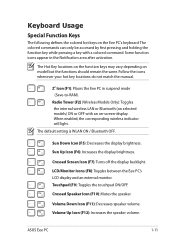
...) (Wireless Models Only):Toggles the internal wireless LAN or Bluetooth (on -screen-display. The default setting is WLAN ON / Bluetooth OFF. Sun Up Icon (F6): Increases the display brightness. The colored commands can only be accessed by first pressing and holding the function key while pressing a key with an on selected models) ON or OFF with a colored command. Follow the icons whenever your hot key locations do not match the manual. Crossed Screen...
...) (Wireless Models Only):Toggles the internal wireless LAN or Bluetooth (on -screen-display. The default setting is WLAN ON / Bluetooth OFF. Sun Up Icon (F6): Increases the display brightness. The colored commands can only be accessed by first pressing and holding the function key while pressing a key with an on selected models) ON or OFF with a colored command. Follow the icons whenever your hot key locations do not match the manual. Crossed Screen...
User Manual
Page 20
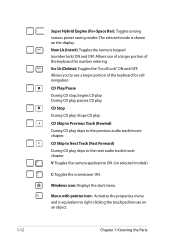
... (number lock) ON and OFF. Allows use a larger portion of the keyboard for cell navigation. During CD play, pauses CD play , skips to use of a larger portion of the keyboard for number entering. V: Toggles the camera applicaiotn ON. (on an object. 1-12 Chapter 1: Knowing the Parts Scr Lk (Delete): Toggles the "Scroll Lock" ON and OFF. Allows you to the previous audio track...
... (number lock) ON and OFF. Allows use a larger portion of the keyboard for cell navigation. During CD play, pauses CD play , skips to use of a larger portion of the keyboard for number entering. V: Toggles the camera applicaiotn ON. (on an object. 1-12 Chapter 1: Knowing the Parts Scr Lk (Delete): Toggles the "Scroll Lock" ON and OFF. Allows you to the previous audio track...
User Manual
Page 24
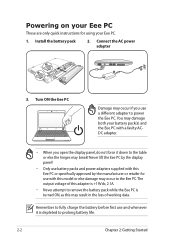
... depleted to prolong battery life. 2-2 Chapter 2: Getting Started Remember to the Eee PC. Connect the AC power adapter 3 2 1 2 1 3 110V-220V 3. Turn ON the Eee PC Damage may result in the loss of working data. You may damage both your Eee PC. 1. Install the battery pack 2. Never lift the Eee PC by the display panel! • Only use battery packs and power adapters supplied with this...
... depleted to prolong battery life. 2-2 Chapter 2: Getting Started Remember to the Eee PC. Connect the AC power adapter 3 2 1 2 1 3 110V-220V 3. Turn ON the Eee PC Damage may result in the loss of working data. You may damage both your Eee PC. 1. Install the battery pack 2. Never lift the Eee PC by the display panel! • Only use battery packs and power adapters supplied with this...
User Manual
Page 34
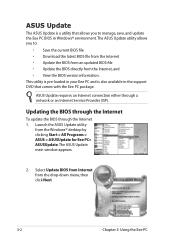
... Start > All Programs > ASUS > ASUSUpdate for Eee PC> ASUSUpdate. Launch the ASUS Update utility from the Internet, and • View the BIOS version information. Select Update BIOS from Internet from the drop‑down menu, then click Next. 3-2 Chapter 3: Using the Eee PC The ASUS Update main window appears. 2. ASUS Update requires an Internet connection either through the Internet 1. Updating the BIOS through the Internet To update the BIOS through a network or an Internet Service Provider (ISP). This utility...
... Start > All Programs > ASUS > ASUSUpdate for Eee PC> ASUSUpdate. Launch the ASUS Update utility from the Internet, and • View the BIOS version information. Select Update BIOS from Internet from the drop‑down menu, then click Next. 3-2 Chapter 3: Using the Eee PC The ASUS Update main window appears. 2. ASUS Update requires an Internet connection either through the Internet 1. Updating the BIOS through the Internet To update the BIOS through a network or an Internet Service Provider (ISP). This utility...
User Manual
Page 37
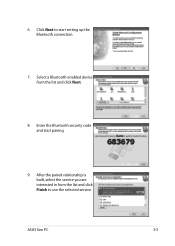
ASUS Eee PC 3-5 6. Click Next to use the selected service. After the paired relationship is built, select the service you are interested in from the list and click Next. 8. Select a Bluetooth-enabled device from the list and click Finish to start pairing. 9. Enter the Bluetooth security code and start setting up the Bluetooth connection. 7.
ASUS Eee PC 3-5 6. Click Next to use the selected service. After the paired relationship is built, select the service you are interested in from the list and click Next. 8. Select a Bluetooth-enabled device from the list and click Finish to start pairing. 9. Enter the Bluetooth security code and start setting up the Bluetooth connection. 7.
User Manual
Page 42
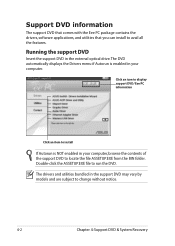
.... Running the support DVD Insert the support DVD in the external optical drive.The DVD automatically displays the Drivers menu if Autorun is NOT enabled in the support DVD may vary by models and are subject to locate the file ASSETUP.EXE from the BIN folder. Support DVD information The support DVD that comes with the Eee PC package contains the drivers, software applications, and utilities that you can install to run the...
.... Running the support DVD Insert the support DVD in the external optical drive.The DVD automatically displays the Drivers menu if Autorun is NOT enabled in the support DVD may vary by models and are subject to locate the file ASSETUP.EXE from the BIN folder. Support DVD information The support DVD that comes with the Eee PC package contains the drivers, software applications, and utilities that you can install to run the...
User Manual
Page 43
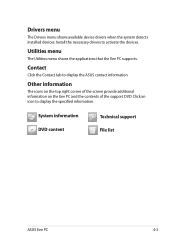
... icon to activate the devices. System information DVD content Technical support File list ASUS Eee PC 4-3 Drivers menu The Drivers menu shows available device drivers when the system detects installed devices. Other information The icons on the top right corner of the screen provide additional information on the Eee PC and the contents of the support DVD. Install the necessary drivers to display the specified information. Utilities menu The Utilities menu shows the applications...
... icon to activate the devices. System information DVD content Technical support File list ASUS Eee PC 4-3 Drivers menu The Drivers menu shows available device drivers when the system detects installed devices. Other information The icons on the top right corner of the screen provide additional information on the Eee PC and the contents of the support DVD. Install the necessary drivers to display the specified information. Utilities menu The Utilities menu shows the applications...
User Manual
Page 44
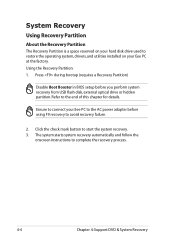
...factory. Using the Recovery Partition: 1. Press during bootup (requires a Recovery Partition) Disable Boot Booster in BIOS setup before using F9 recovery to the AC power adapter before you perform system recovery from USB flash disk, external optical drive or hidden partition. The system starts system recovery automatically and follow the onscreen instructions to restore the operating system, drivers, and utilities installed on your Eee PC to avoid recovery failure. 2. Ensure to connect your hard disk drive used to complete the recovery process. 4-4 Chapter 4: Support DVD...
...factory. Using the Recovery Partition: 1. Press during bootup (requires a Recovery Partition) Disable Boot Booster in BIOS setup before using F9 recovery to the AC power adapter before you perform system recovery from USB flash disk, external optical drive or hidden partition. The system starts system recovery automatically and follow the onscreen instructions to restore the operating system, drivers, and utilities installed on your Eee PC to avoid recovery failure. 2. Ensure to connect your hard disk drive used to complete the recovery process. 4-4 Chapter 4: Support DVD...
User Manual
Page 45
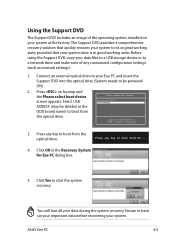
... move selection ENTER to start the system recovery. Click Yes to select boot device 3. Select USB: XXXXXX (may be powered ON). 2. You will lose all your Eee PC and insert the Support DVD into the optical drive (System needs to a network drive and make note of the operating system, installed on bootup and the Please select boot device screen appears. Ensure to its original working order. ASUS Eee PC 4-5 Using the Support DVD The Support DVD includes...
... move selection ENTER to start the system recovery. Click Yes to select boot device 3. Select USB: XXXXXX (may be powered ON). 2. You will lose all your Eee PC and insert the Support DVD into the optical drive (System needs to a network drive and make note of the operating system, installed on bootup and the Please select boot device screen appears. Ensure to its original working order. ASUS Eee PC 4-5 Using the Support DVD The Support DVD includes...
User Manual
Page 46
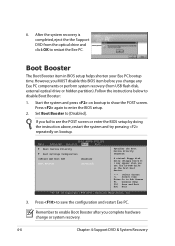
... [Disabled] Specifies the Boot Device Priority sequence. Press again to [Disabled]. However, you MUST disable this BIOS item before you complete hardware change any Eee PC components or perform system recovery (from the optical drive and click OK to show the POST screen. Start the system and press on bootup. Set Boot Booster to enter the BIOS setup. 2. 6. After the system recovery is completed, eject the the Support DVD from USB flash disk, external...
... [Disabled] Specifies the Boot Device Priority sequence. Press again to [Disabled]. However, you MUST disable this BIOS item before you complete hardware change any Eee PC components or perform system recovery (from the optical drive and click OK to show the POST screen. Start the system and press on bootup. Set Boot Booster to enter the BIOS setup. 2. 6. After the system recovery is completed, eject the the Support DVD from USB flash disk, external...


