
User Manual
Page 2
......1-7 Left Side...1-8 Keyboard Usage...1-9 Special Function Keys 1-9 Touchpad Usage...1-11 Chapter 2: Getting Started Powering on your Eee PC...2-2 First-time Startup...2-3 Desktop...2-5 Network Connection...2-6 Configuring a wireless network connection 2-6 Local Area Network 2-7 Browsing web pages 2-10 Chapter 3: Using the Eee PC ASUS Update...3-2 Updating the BIOS through the Internet 3-2 Updating the BIOS through a BIOS file 3-3 Bluetooth Connection...
......1-7 Left Side...1-8 Keyboard Usage...1-9 Special Function Keys 1-9 Touchpad Usage...1-11 Chapter 2: Getting Started Powering on your Eee PC...2-2 First-time Startup...2-3 Desktop...2-5 Network Connection...2-6 Configuring a wireless network connection 2-6 Local Area Network 2-7 Browsing web pages 2-10 Chapter 3: Using the Eee PC ASUS Update...3-2 Updating the BIOS through the Internet 3-2 Updating the BIOS through a BIOS file 3-3 Bluetooth Connection...
User Manual
Page 3
Super Hybrid Engine...3-6 Super Hybrid Engine Modes 3-6 Eee Docking...3-7 Access ...3-7 Sharing...3-8 Experience...3-8 Tools...3-8 Boingo (on selected models 3-9 Microsoft® Office Trial (on selected models 3-10 Chapter 4: System Recovery System Recovery...4-2 Boot Booster...4-5 Appendix Declarations and Safety Statements A-2 Copyright Information...A-13 Limitation of Liability...A-14 Service and Support...A-14 ASUS Eee PC iii
Super Hybrid Engine...3-6 Super Hybrid Engine Modes 3-6 Eee Docking...3-7 Access ...3-7 Sharing...3-8 Experience...3-8 Tools...3-8 Boingo (on selected models 3-9 Microsoft® Office Trial (on selected models 3-10 Chapter 4: System Recovery System Recovery...4-2 Boot Booster...4-5 Appendix Declarations and Safety Statements A-2 Copyright Information...A-13 Limitation of Liability...A-14 Service and Support...A-14 ASUS Eee PC iii

User Manual
Page 10
Top Side Refer to the diagram below to identify the components on models. 1 2 3 4 5 6 7 8 9 10 The keyboard differs for each territory. 1-2 Chapter 1: Knowing the Parts The top side may vary in appearance depending on this side of the Eee PC.
Top Side Refer to the diagram below to identify the components on models. 1 2 3 4 5 6 7 8 9 10 The keyboard differs for each territory. 1-2 Chapter 1: Knowing the Parts The top side may vary in appearance depending on this side of the Eee PC.
User Manual
Page 12
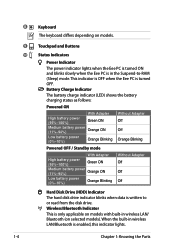
8 9 10 1-4 Keyboard The keyboard differs depending on models with built-in the Suspend-to or read from the disk drive. Touchpad and Buttons Status Indicators Power Indicator The power indicator lights when the Eee PC is turned ON and blinks slowly when the Eee PC is in wireless LAN/ Bluetooth (on selected models). Battery Charge Indicator...
8 9 10 1-4 Keyboard The keyboard differs depending on models with built-in the Suspend-to or read from the disk drive. Touchpad and Buttons Status Indicators Power Indicator The power indicator lights when the Eee PC is turned ON and blinks slowly when the Eee PC is in wireless LAN/ Bluetooth (on selected models). Battery Charge Indicator...
User Manual
Page 25
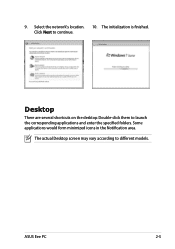
9. The initialization is finished. Some applications would form minimized icons in the Notification area. The actual Desktop screen may vary according to launch the corresponding applications and enter the specified folders. ASUS Eee PC 2-5 Desktop There are several shortcuts on the desktop. Double-click them to different models. Select the network's location. 10. Click Next to continue.
9. The initialization is finished. Some applications would form minimized icons in the Notification area. The actual Desktop screen may vary according to launch the corresponding applications and enter the specified folders. ASUS Eee PC 2-5 Desktop There are several shortcuts on the desktop. Double-click them to different models. Select the network's location. 10. Click Next to continue.
User Manual
Page 29
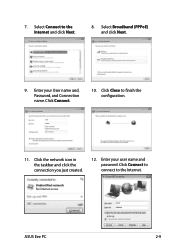
Click Close to the Internet and click Next. 8. ASUS Eee PC 2-9 Click Connect. 10. Enter your User name and, Password, and Connection name. Select Connect to finish the configuration. 11. Select Broadband (PPPoE) and click Next. 9. Click the network icon in the taskbar and click the connection you just created. 12. Click Connect to connect to the Internet. 7. Enter your user name and password.
Click Close to the Internet and click Next. 8. ASUS Eee PC 2-9 Click Connect. 10. Enter your User name and, Password, and Connection name. Select Connect to finish the configuration. 11. Select Broadband (PPPoE) and click Next. 9. Click the network icon in the taskbar and click the connection you just created. 12. Click Connect to connect to the Internet. 7. Enter your user name and password.
User Manual
Page 30
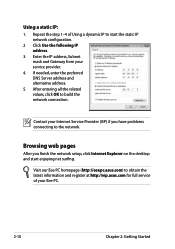
After entering all the related values, click OK to the network. Visit our Eee PC homepage (http://eeepc.asus.com) to obtain the latest information and register at http://vip.asus.com for full service of Using a dynamic IP to start enjoying net surfing. Browsing web pages After you ...static IP network configuration. 2 Click Use the following IP address. 3. Enter the IP address, Subnet mask and Gateway from your Eee PC. 2-10 Chapter 2: Getting Started Repeat the step 1-4 of your service provider. 4. If needed, enter the preferred DNS Server address and alternative address. 5.
After entering all the related values, click OK to the network. Visit our Eee PC homepage (http://eeepc.asus.com) to obtain the latest information and register at http://vip.asus.com for full service of Using a dynamic IP to start enjoying net surfing. Browsing web pages After you ...static IP network configuration. 2 Click Use the following IP address. 3. Enter the IP address, Subnet mask and Gateway from your Eee PC. 2-10 Chapter 2: Getting Started Repeat the step 1-4 of your service provider. 4. If needed, enter the preferred DNS Server address and alternative address. 5.

User Manual
Page 40
Ensure that your product key and follow the onscreen instructions to select a desired application. 3-10 Chapter 3: Using the Eee PC Enter your product key and click the link. 5. If you want to use other applications in the Microsoft Office Suite, click Start and point to ...All Programs > Microsoft Office to finish the activation process before starting the free trial. click Microsoft Office 60 Day Trial - Eee PC users can enjoy Microsoft Office Suite free trial for 60 days. Online on the desktop. 2. Copy your E-mail address and click SUBMIT. 4. Enter your...
Ensure that your product key and follow the onscreen instructions to select a desired application. 3-10 Chapter 3: Using the Eee PC Enter your product key and click the link. 5. If you want to use other applications in the Microsoft Office Suite, click Start and point to ...All Programs > Microsoft Office to finish the activation process before starting the free trial. click Microsoft Office 60 Day Trial - Eee PC users can enjoy Microsoft Office Suite free trial for 60 days. Online on the desktop. 2. Copy your E-mail address and click SUBMIT. 4. Enter your...

User Manual
Page 53
... on public property is not permitted. The worst case maximum authorized power indoors are few possibilities for frequencies between 2446.5 MHz and 2483.5 MHz Channels 10 through Ch13 France Restricted Wireless Frequency Bands Some areas of 100mW in the 2446.5-2483.5 MHz band. In the departments listed below, for Different Domains... et Loire 45 Loiret 50 Manche 58 Nièvre 59 Nord 61 Orne 63 Puy du Dôme 66 Pyrénées Orientales ASUS Eee PC A-7
... on public property is not permitted. The worst case maximum authorized power indoors are few possibilities for frequencies between 2446.5 MHz and 2483.5 MHz Channels 10 through Ch13 France Restricted Wireless Frequency Bands Some areas of 100mW in the 2446.5-2483.5 MHz band. In the departments listed below, for Different Domains... et Loire 45 Loiret 50 Manche 58 Nièvre 59 Nord 61 Orne 63 Puy du Dôme 66 Pyrénées Orientales ASUS Eee PC A-7


