User Manual
Page 2
... the Parts Top Side...1-2 Bottom Side...1-5 Front Side...1-6 Right Side...1-7 Left Side...1-8 Keyboard Usage...1-9 Special Function Keys 1-9 Touchpad Usage...1-11 Multi-finger gesture input (on selected models 1-11 Chapter 2: Getting Started Powering on your Eee PC...2-2 First-time Startup...2-3 Desktop...2-5 Network Connection...2-6 Configuring a wireless network connection 2-6 Local Area Network 2-7 Browsing web pages 2-10 Chapter 3: Using the Eee PC ASUS Update...3-2 Updating the BIOS through the Internet 3-2 Updating the BIOS through a BIOS file 3-3 Bluetooth...
... the Parts Top Side...1-2 Bottom Side...1-5 Front Side...1-6 Right Side...1-7 Left Side...1-8 Keyboard Usage...1-9 Special Function Keys 1-9 Touchpad Usage...1-11 Multi-finger gesture input (on selected models 1-11 Chapter 2: Getting Started Powering on your Eee PC...2-2 First-time Startup...2-3 Desktop...2-5 Network Connection...2-6 Configuring a wireless network connection 2-6 Local Area Network 2-7 Browsing web pages 2-10 Chapter 3: Using the Eee PC ASUS Update...3-2 Updating the BIOS through the Internet 3-2 Updating the BIOS through a BIOS file 3-3 Bluetooth...
User Manual
Page 3
......3-8 Eee Tools...3-9 Boingo (on selected models 3-9 Microsoft® Office Trial...3-10 Digital Zoom Control...3-11 Function keys...3-11 Chapter 4: Support DVD & System Recovery Support DVD information 4-2 Running the support DVD 4-2 Drivers menu...4-3 Utilities menu...4-3 Contact...4-3 Other information 4-3 System Recovery...4-4 Using Recovery Partition (F9 Recovery 4-4 Using the Support DVD 4-4 Boot Booster...4-6 Appendix Declarations and Safety Statements A-2 Copyright Information...A-12 Limitation of Liability...A-13 Service and Support...A-13 ASUS Eee PC iii
......3-8 Eee Tools...3-9 Boingo (on selected models 3-9 Microsoft® Office Trial...3-10 Digital Zoom Control...3-11 Function keys...3-11 Chapter 4: Support DVD & System Recovery Support DVD information 4-2 Running the support DVD 4-2 Drivers menu...4-3 Utilities menu...4-3 Contact...4-3 Other information 4-3 System Recovery...4-4 Using Recovery Partition (F9 Recovery 4-4 Using the Support DVD 4-4 Boot Booster...4-6 Appendix Declarations and Safety Statements A-2 Copyright Information...A-12 Limitation of Liability...A-13 Service and Support...A-13 ASUS Eee PC iii
User Manual
Page 4
... are reading the Eee PC User's Manual.This User's Manual provides information regarding the various components in this manual. Knowing the Parts Provides information on support DVD contents and system recovery. 5. Getting Started Provides information on using the Eee PC's utilities. 4. TIP: Tips for special situations. There may be followed to prevent damage to complete certain tasks safely and effectively.These notes have...
... are reading the Eee PC User's Manual.This User's Manual provides information regarding the various components in this manual. Knowing the Parts Provides information on support DVD contents and system recovery. 5. Getting Started Provides information on using the Eee PC's utilities. 4. TIP: Tips for special situations. There may be followed to prevent damage to complete certain tasks safely and effectively.These notes have...
User Manual
Page 5
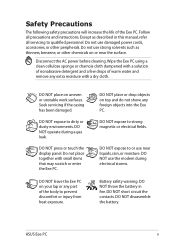
...precautions will increase the life of warm water and remove any extra moisture with a dry cloth. Do not use strong solvents such as described in fire. Disconnect the AC power before cleaning. DO NOT expose to strong magnetic or...manual, refer all precautions and instructions. DO NOT place or drop objects on uneven or unstable work surfaces. DO NOT expose to qualified personnel. DO NOT disassemble the battery. Wipe the Eee PC using a clean cellulose sponge or chamois cloth dampened with small items that may scratch or enter the Eee PC. DO NOT press or touch the display panel...
...precautions will increase the life of warm water and remove any extra moisture with a dry cloth. Do not use strong solvents such as described in fire. Disconnect the AC power before cleaning. DO NOT expose to strong magnetic or...manual, refer all precautions and instructions. DO NOT place or drop objects on uneven or unstable work surfaces. DO NOT expose to qualified personnel. DO NOT disassemble the battery. Wipe the Eee PC using a clean cellulose sponge or chamois cloth dampened with small items that may scratch or enter the Eee PC. DO NOT press or touch the display panel...

User Manual
Page 11
... Button / Super Hybrid Power button (on models. Power Indicator The power indicator lights when the Eee PC is turned ON and blinks slowly when the Eee PC is turned off, pressing this button functions as the Super Hybrid Power button. The keyboard differs depending on selected models) When the Eee PC is in Camera 3 Display Panel The display resolution supports up to the Internet and key applications without entering the Windows® OS. Press the switch once to turn...
... Button / Super Hybrid Power button (on models. Power Indicator The power indicator lights when the Eee PC is turned ON and blinks slowly when the Eee PC is turned off, pressing this button functions as the Super Hybrid Power button. The keyboard differs depending on selected models) When the Eee PC is in Camera 3 Display Panel The display resolution supports up to the Internet and key applications without entering the Windows® OS. Press the switch once to turn...
User Manual
Page 12
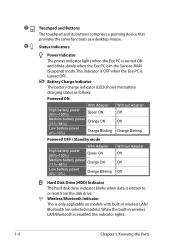
... LAN/ Bluetooth (on models with built-in wireless LAN/Bluetooth is enabled, this indicator lights. 1-4 Chapter 1: Knowing the Parts Wireless/Bluetooth Indicator This is only applicable on selected models). 7 Touchpad and Buttons The touchpad and its buttons comprises a pointing device that provides the same functions as follows: Powered ON With Adapter High battery power (95%-100%) Green ON Medium battery power (11%-94%) Orange ON Low battery power (0%-10%) Orange Blinking Without Adapter Off Off Orange Blinking Powered OFF / Standby mode With Adapter High battery power...
... LAN/ Bluetooth (on models with built-in wireless LAN/Bluetooth is enabled, this indicator lights. 1-4 Chapter 1: Knowing the Parts Wireless/Bluetooth Indicator This is only applicable on selected models). 7 Touchpad and Buttons The touchpad and its buttons comprises a pointing device that provides the same functions as follows: Powered ON With Adapter High battery power (95%-100%) Green ON Medium battery power (11%-94%) Orange ON Low battery power (0%-10%) Orange Blinking Without Adapter Off Off Orange Blinking Powered OFF / Standby mode With Adapter High battery power...
User Manual
Page 14
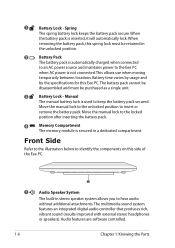
... The memory module is not connected. Move the manual lock to the unlocked position to identify the components on this Eee PC.The battery pack cannot be disassembled and must be purchased as a single unit. 3 Battery Lock - The multimedia sound system features an integrated digital audio controller that produces rich, vibrant sound (results improved with external stereo headphones or speakers). Audio features are software controlled. 1-6 Chapter 1: Knowing the Parts...
... The memory module is not connected. Move the manual lock to the unlocked position to identify the components on this Eee PC.The battery pack cannot be disassembled and must be purchased as a single unit. 3 Battery Lock - The multimedia sound system features an integrated digital audio controller that produces rich, vibrant sound (results improved with external stereo headphones or speakers). Audio features are software controlled. 1-6 Chapter 1: Knowing the Parts...
User Manual
Page 15
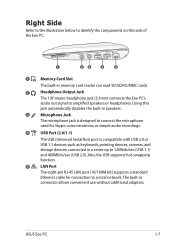
... memory card reader can read SD/SDHC/MMC cards. 2 Headphone Output Jack The 1/8" stereo headphone jack (3.5mm) connects the Eee PC's audio out signal to 12Mbits/sec (USB 1.1) and 480Mbits/sec (USB 2.0). Also, the USB supports hot-swapping function. 5 LAN Port The eight-pin RJ-45 LAN port (10/100M bit) supports a standard Ethernet cable for Skype, voice narrations, or simple audio recordings. 4 USB Port (2.0/1.1) The USB (Universal Serial Bus) port is designed to connect the microphone used for connection...
... memory card reader can read SD/SDHC/MMC cards. 2 Headphone Output Jack The 1/8" stereo headphone jack (3.5mm) connects the Eee PC's audio out signal to 12Mbits/sec (USB 1.1) and 480Mbits/sec (USB 2.0). Also, the USB supports hot-swapping function. 5 LAN Port The eight-pin RJ-45 LAN port (10/100M bit) supports a standard Ethernet cable for Skype, voice narrations, or simple audio recordings. 4 USB Port (2.0/1.1) The USB (Universal Serial Bus) port is designed to connect the microphone used for connection...
User Manual
Page 16
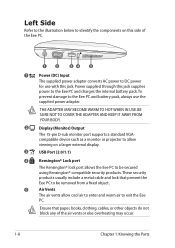
... monitor port supports a standard VGAcompatible device such as a monitor or projector to allow viewing on this side of the air vents or else overheating may occur. 1-8 Chapter 1: Knowing the Parts Power supplied through this jack. THE ADAPTER MAY BECOME WARM TO HOT WHEN IN USE. Left Side Refer to the illustration below to identify the components on a larger external display. 3 USB Port (2.0/1.1) 4 Kensington® Lock port The...
... monitor port supports a standard VGAcompatible device such as a monitor or projector to allow viewing on this side of the air vents or else overheating may occur. 1-8 Chapter 1: Knowing the Parts Power supplied through this jack. THE ADAPTER MAY BECOME WARM TO HOT WHEN IN USE. Left Side Refer to the illustration below to identify the components on a larger external display. 3 USB Port (2.0/1.1) 4 Kensington® Lock port The...
User Manual
Page 17
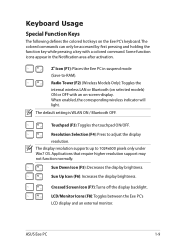
...) (Wireless Models Only):Toggles the internal wireless LAN or Bluetooth (on selected models) ON or OFF with a colored command. Crossed Screen Icon (F7): Turns off the display backlight. ASUS Eee PC 1-9 When enabled, the corresponding wireless indicator will light. Resolution Selection (F4): Press to -RAM). Sun Up Icon (F6): Increases the display brightness. Keyboard Usage Special Function Keys The following defines the colored hot keys on -screen-display. Touchpad (F3): Toggles the touchpad ON/OFF. The display resolution supports...
...) (Wireless Models Only):Toggles the internal wireless LAN or Bluetooth (on selected models) ON or OFF with a colored command. Crossed Screen Icon (F7): Turns off the display backlight. ASUS Eee PC 1-9 When enabled, the corresponding wireless indicator will light. Resolution Selection (F4): Press to -RAM). Sun Up Icon (F6): Increases the display brightness. Keyboard Usage Special Function Keys The following defines the colored hot keys on -screen-display. Touchpad (F3): Toggles the touchpad ON/OFF. The display resolution supports...
User Manual
Page 22
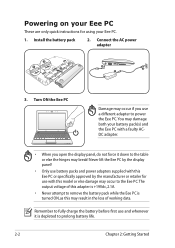
... +19Vdc, 2.1A. • Never attempt to power the Eee PC. Install the battery pack 2. Remember to fully charge the battery before first use and whenever it down to prolong battery life. 2-2 Chapter 2: Getting Started Never lift the Eee PC by the display panel! • Only use battery packs and power adapters supplied with this Eee PC or specifically approved by the manufacturer or retailer for...
... +19Vdc, 2.1A. • Never attempt to power the Eee PC. Install the battery pack 2. Remember to fully charge the battery before first use and whenever it down to prolong battery life. 2-2 Chapter 2: Getting Started Never lift the Eee PC by the display panel! • Only use battery packs and power adapters supplied with this Eee PC or specifically approved by the manufacturer or retailer for...
User Manual
Page 32
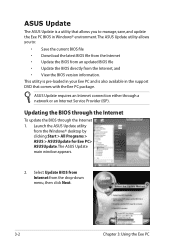
... Internet 1. The ASUS Update main window appears. 2. The ASUS Update utility allows you to : • Save the current BIOS file • Download the latest BIOS file from the Internet • Update the BIOS from an updated BIOS file • Update the BIOS directly from the Internet, and • View the BIOS version information. Updating the BIOS through the Internet To update the BIOS through a network or an Internet Service Provider (ISP). ASUS Update The ASUS Update is also available in the support DVD...
... Internet 1. The ASUS Update main window appears. 2. The ASUS Update utility allows you to : • Save the current BIOS file • Download the latest BIOS file from the Internet • Update the BIOS from an updated BIOS file • Update the BIOS directly from the Internet, and • View the BIOS version information. Updating the BIOS through the Internet To update the BIOS through a network or an Internet Service Provider (ISP). ASUS Update The ASUS Update is also available in the support DVD...
User Manual
Page 34
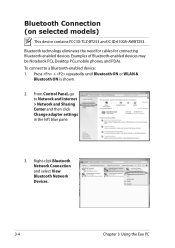
... connect to Network and Internet > Network and Sharing Center and then click Change adapter settings in the left blue pane. 3. From Control Panel, go to a Bluetooth-enabled device: 1. Examples of Bluetooth-enabled devices may be Notebook PCs, Desktop PCs, mobile phones, and PDAs. Bluetooth technology eliminates the need for cables for connecting Bluetooth-enabled devices. Press + repeatedly until Bluetooth ON or WLAN & Bluetooth ON is shown. 2. Right-click Bluetooth Network Connection and select View Bluetooth Network Devices. 3-4 Chapter 3: Using the Eee PC Bluetooth Connection...
... connect to Network and Internet > Network and Sharing Center and then click Change adapter settings in the left blue pane. 3. From Control Panel, go to a Bluetooth-enabled device: 1. Examples of Bluetooth-enabled devices may be Notebook PCs, Desktop PCs, mobile phones, and PDAs. Bluetooth technology eliminates the need for cables for connecting Bluetooth-enabled devices. Press + repeatedly until Bluetooth ON or WLAN & Bluetooth ON is shown. 2. Right-click Bluetooth Network Connection and select View Bluetooth Network Devices. 3-4 Chapter 3: Using the Eee PC Bluetooth Connection...
User Manual
Page 36
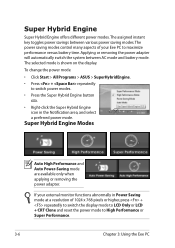
... modes control many aspects of 1024 x 768 pixels or higher, press + repeatedly to switch the display mode to LCD Only or LCD + CRT Clone and reset the power mode to High Performance or Super Performance. 3-6 Chapter 3: Using the Eee PC The assigned instant key toggles power savings between AC mode and battery mod3e. The selected mode is shown on the display. To change the power mode • Click Start > All Programs > ASUS...
... modes control many aspects of 1024 x 768 pixels or higher, press + repeatedly to switch the display mode to LCD Only or LCD + CRT Clone and reset the power mode to High Performance or Super Performance. 3-6 Chapter 3: Using the Eee PC The assigned instant key toggles power savings between AC mode and battery mod3e. The selected mode is shown on the display. To change the power mode • Click Start > All Programs > ASUS...
User Manual
Page 39
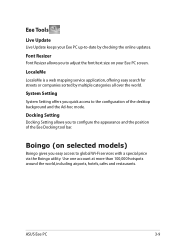
Docking Setting Docking Setting allows you quick access to global Wi-Fi services with a special price via the Boingo utility. Font Resizer Font Resizer allows you to adjust the font/text size on selected models) Boingo gives you easy access to the configuration of the Eee Docking tool bar. LocaleMe LocaleMe is a web mapping service application, offering easy search for streets or...
Docking Setting Docking Setting allows you quick access to global Wi-Fi services with a special price via the Boingo utility. Font Resizer Font Resizer allows you to adjust the font/text size on selected models) Boingo gives you easy access to the configuration of the Eee Docking tool bar. LocaleMe LocaleMe is a web mapping service application, offering easy search for streets or...
User Manual
Page 41
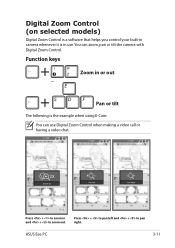
Function keys Zoom in or out Pan or tilt The following is in and + to pan right. Press + to zoom in use Digital Zoom Control when making a video call or having a video chat. Digital Zoom Control (on selected models) Digital Zoom Control is a software that helps you control your built-in camera whenever it is the example when using E-Cam: You can zoom, pan or tilt the camera with Digital Zoom Control. You can use . Press + to pan left and + to zoom out. ASUS Eee PC 3-11
Function keys Zoom in or out Pan or tilt The following is in and + to pan right. Press + to zoom in use Digital Zoom Control when making a video call or having a video chat. Digital Zoom Control (on selected models) Digital Zoom Control is a software that helps you control your built-in camera whenever it is the example when using E-Cam: You can zoom, pan or tilt the camera with Digital Zoom Control. You can use . Press + to pan left and + to zoom out. ASUS Eee PC 3-11
User Manual
Page 45
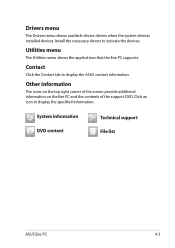
... of the screen provide additional information on the Eee PC and the contents of the support DVD. System information DVD content Technical support File list ASUS Eee PC 4-3 Drivers menu The Drivers menu shows available device drivers when the system detects installed devices. Contact Click the Contact tab to activate the devices. Install the necessary drivers to display the ASUS contact information. Click an icon to display the specified information. Utilities menu The Utilities menu shows...
... of the screen provide additional information on the Eee PC and the contents of the support DVD. System information DVD content Technical support File list ASUS Eee PC 4-3 Drivers menu The Drivers menu shows available device drivers when the system detects installed devices. Contact Click the Contact tab to activate the devices. Install the necessary drivers to display the ASUS contact information. Click an icon to display the specified information. Utilities menu The Utilities menu shows...
User Manual
Page 46
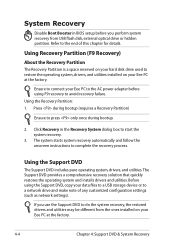
... factory. Using the Recovery Partition: 1. Before using the Support DVD, copy your Eee PC to the AC power adapter before you use the Support DVD to do the system recovery, the restored drivers and utilities may be different from USB flash disk, external optical drive or hidden partition. Ensure to connect your data files to a USB storage device or to a network drive and make note of this chapter for details. Click Recovery in BIOS setup before using F9 recovery to avoid recovery failure. System Recovery Disable Boot...
... factory. Using the Recovery Partition: 1. Before using the Support DVD, copy your Eee PC to the AC power adapter before you use the Support DVD to do the system recovery, the restored drivers and utilities may be different from USB flash disk, external optical drive or hidden partition. Ensure to connect your data files to a USB storage device or to a network drive and make note of this chapter for details. Click Recovery in BIOS setup before using F9 recovery to avoid recovery failure. System Recovery Disable Boot...

User Manual
Page 47
... your hard disk drive and restore the operating system. Therefore, we highly recommend that you select Recover system to boot from your data during the system recovery. Set up your Eee PC and insert the Support DVD into the optical drive (System needs to complete the recovery process. If you make a backup of it on bootup and the Please select boot device screen appears. Follow the onscreen instructions to be powered...
... your hard disk drive and restore the operating system. Therefore, we highly recommend that you select Recover system to boot from your data during the system recovery. Set up your Eee PC and insert the Support DVD into the optical drive (System needs to complete the recovery process. If you make a backup of it on bootup and the Please select boot device screen appears. Follow the onscreen instructions to be powered...
User Manual
Page 48
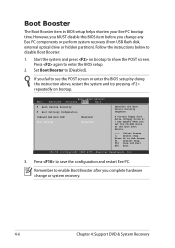
...Main BIOS SETUP UTILITY Advanced Security Boot Exit Boot Device Priority Boot Settings Configuration OnBoard LAN Boot ROM [Enabled] Boot Booster [Disabled] Specifies the Boot Device Priority sequence. A virtual floppy disk drive (Floppy Drive B: ) may appear when you set the CD-ROM drive as the first boot device. ←→ Select Screen ↑↓ Select Item Enter Go to enable Boot Booster after you change or system recovery. 4-6 Chapter 4: Support DVD & System Recovery Press to disable Boot Booster: 1. Follow the instructions below to save the configuration and...
...Main BIOS SETUP UTILITY Advanced Security Boot Exit Boot Device Priority Boot Settings Configuration OnBoard LAN Boot ROM [Enabled] Boot Booster [Disabled] Specifies the Boot Device Priority sequence. A virtual floppy disk drive (Floppy Drive B: ) may appear when you set the CD-ROM drive as the first boot device. ←→ Select Screen ↑↓ Select Item Enter Go to enable Boot Booster after you change or system recovery. 4-6 Chapter 4: Support DVD & System Recovery Press to disable Boot Booster: 1. Follow the instructions below to save the configuration and...


