Manual
Page 5
Contents Chapter 1: Ready, Set Up, Go 9 What's in the Box 9 Setting Up Your MacBook 15 Putting Your MacBook to Sleep or Shutting It Down Chapter 2: Life with Your MacBook 18 Basic Features of Your MacBook 20 Keyboard Features of Your MacBook 22 Ports on Your MacBook 24 Using the Multi-Touch Trackpad 28 Using the MacBook Battery 29 Getting Answers Chapter 3: Boost Your MacBook 34 Removing and Replacing the Battery 38 Replacing the Hard Disk Drive 42 Installing Additional Memory Chapter 4: Problem, Meet Solution 52 Problems That Prevent You from Using Your MacBook Contents 5
Contents Chapter 1: Ready, Set Up, Go 9 What's in the Box 9 Setting Up Your MacBook 15 Putting Your MacBook to Sleep or Shutting It Down Chapter 2: Life with Your MacBook 18 Basic Features of Your MacBook 20 Keyboard Features of Your MacBook 22 Ports on Your MacBook 24 Using the Multi-Touch Trackpad 28 Using the MacBook Battery 29 Getting Answers Chapter 3: Boost Your MacBook 34 Removing and Replacing the Battery 38 Replacing the Hard Disk Drive 42 Installing Additional Memory Chapter 4: Problem, Meet Solution 52 Problems That Prevent You from Using Your MacBook Contents 5
Manual
Page 10
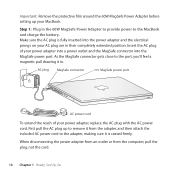
... firmly. Insert the AC plug of your MacBook. When disconnecting the power adapter from an outlet or from the adapter, and then attach the included AC power cord to the adapter, making sure it in. First pull the AC plug up your power adapter, replace the AC plug with the AC power... the port, you'll feel a magnetic pull drawing it is fully inserted into the MagSafe power port. As the MagSafe connector gets close to the MacBook and charge the battery.
... firmly. Insert the AC plug of your MacBook. When disconnecting the power adapter from an outlet or from the adapter, and then attach the included AC power cord to the adapter, making sure it in. First pull the AC plug up your power adapter, replace the AC plug with the AC power... the port, you'll feel a magnetic pull drawing it is fully inserted into the MagSafe power port. As the MagSafe connector gets close to the MacBook and charge the battery.

Manual
Page 28
..., depending on the left . For more information about battery conservation and performance tips, go to www.apple.com/batteries/notebooks.html. 28 Chapter 2 Life with Your MacBook Press the button next to the lights, and the lights glow briefly to let the battery recharge, or replace the drained battery with the applications, peripheral devices, and system settings...
..., depending on the left . For more information about battery conservation and performance tips, go to www.apple.com/batteries/notebooks.html. 28 Chapter 2 Life with Your MacBook Press the button next to the lights, and the lights glow briefly to let the battery recharge, or replace the drained battery with the applications, peripheral devices, and system settings...
Manual
Page 34
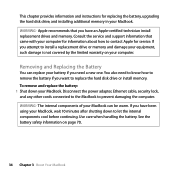
... know how to remove the battery if you attempt to replace the hard disk drive or install memory. Removing and Replacing the Battery You can be warm. If you have an Apple-certified technician install replacement drives and memory. Use care when handling the battery. WARNING: The internal components of your MacBook can replace your computer. Disconnect the power...
... know how to remove the battery if you attempt to replace the hard disk drive or install memory. Removing and Replacing the Battery You can be warm. If you have an Apple-certified technician install replacement drives and memory. Use care when handling the battery. WARNING: The internal components of your MacBook can replace your computer. Disconnect the power...
Manual
Page 35
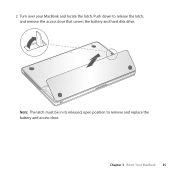
Push down to remove and replace the battery and access door. Note: The latch must be in its released, open position to release the latch, and remove the access door that covers the battery and hard disk drive. 2 Turn over your MacBook and locate the latch. Chapter 3 Boost Your MacBook 35
Push down to remove and replace the battery and access door. Note: The latch must be in its released, open position to release the latch, and remove the access door that covers the battery and hard disk drive. 2 Turn over your MacBook and locate the latch. Chapter 3 Boost Your MacBook 35
Manual
Page 36
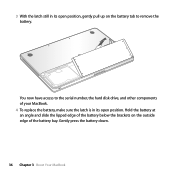
You now have access to the serial number, the hard disk drive, and other components of your MacBook. 4 To replace the battery, make sure the latch is in its open position, gently pull up on the outside edge of the battery below the brackets on the battery tab to remove the battery. Hold the battery at an angle and slide the lipped edge of the battery bay. Gently press the battery down. 36 Chapter 3 Boost Your MacBook 3 With the latch still in its open position.
You now have access to the serial number, the hard disk drive, and other components of your MacBook. 4 To replace the battery, make sure the latch is in its open position, gently pull up on the outside edge of the battery below the brackets on the battery tab to remove the battery. Hold the battery at an angle and slide the lipped edge of the battery bay. Gently press the battery down. 36 Chapter 3 Boost Your MacBook 3 With the latch still in its open position.
Manual
Page 38
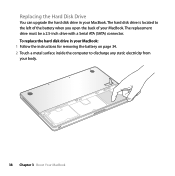
The hard disk drive is located to discharge any static electricity from your body. 38 Chapter 3 Boost Your MacBook To replace the hard disk drive in your MacBook. The replacement drive must be a 2.5-inch drive with a Serial ATA (SATA) connector. Replacing the Hard Disk Drive You can upgrade the hard disk drive in your MacBook: 1 Follow the instructions for removing the battery on page 34. 2 Touch a metal surface inside the computer to the left of the battery when you open the back of your MacBook.
The hard disk drive is located to discharge any static electricity from your body. 38 Chapter 3 Boost Your MacBook To replace the hard disk drive in your MacBook. The replacement drive must be a 2.5-inch drive with a Serial ATA (SATA) connector. Replacing the Hard Disk Drive You can upgrade the hard disk drive in your MacBook: 1 Follow the instructions for removing the battery on page 34. 2 Touch a metal surface inside the computer to the left of the battery when you open the back of your MacBook.

Manual
Page 41
For information about installing Mac OS X and bundled applications, see "Reinstalling the Software That Came with Your MacBook" on page 36. Chapter 3 Boost Your MacBook 41 7 Insert the replacement drive at an angle, making sure the mounting screws are seated properly. 8 Replace the bracket and tighten the screw. 9 Follow the instructions for replacing the battery on page 61.
For information about installing Mac OS X and bundled applications, see "Reinstalling the Software That Came with Your MacBook" on page 36. Chapter 3 Boost Your MacBook 41 7 Insert the replacement drive at an angle, making sure the mounting screws are seated properly. 8 Replace the bracket and tighten the screw. 9 Follow the instructions for replacing the battery on page 61.
Manual
Page 48
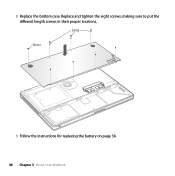
Replace and tighten the eight screws, making sure to put the different length screws in their proper locations. 8 Replace the bottom case. Long Short 9 Follow the instructions for replacing the battery on page 36. 48 Chapter 3 Boost Your MacBook
Replace and tighten the eight screws, making sure to put the different length screws in their proper locations. 8 Replace the bottom case. Long Short 9 Follow the instructions for replacing the battery on page 36. 48 Chapter 3 Boost Your MacBook
Manual
Page 56
Using Apple Hardware Test If you suspect a problem with the MacBook hardware, you press the battery button, and all other accounts. 1 Insert the Mac OS X Install DVD. If you can reset your administrator password and passwords for all battery indicator lights flash five times quickly Your battery needs... to be using the disc and try again. If you have trouble ejecting a disc Quit any applications that might be replaced. Then restart your password You can use the Apple Hardware Test application ...
Using Apple Hardware Test If you suspect a problem with the MacBook hardware, you press the battery button, and all other accounts. 1 Insert the Mac OS X Install DVD. If you can reset your administrator password and passwords for all battery indicator lights flash five times quickly Your battery needs... to be using the disc and try again. If you have trouble ejecting a disc Quit any applications that might be replaced. Then restart your password You can use the Apple Hardware Test application ...
Manual
Page 84
See memory reinstalling Mac OS X 62 removing the battery 34 replacing the battery 36 resetting your password 56 Rewind key 21 right click 25 rotating objects using trackpad 26 S safety general safety instructions 68 power adapter 69 screen ... using trackpad 27 password, resetting 56 Photo Booth 19 pinching to zoom 26 Play/pause key 21 plug, AC 10 ports Mini DisplayPort 23 on MacBook 23 power adapter plugging in 69 port 23 using 10 power button 12, 19 problems computer freezes 53 computer won't turn on 54 pointer won...
See memory reinstalling Mac OS X 62 removing the battery 34 replacing the battery 36 resetting your password 56 Rewind key 21 right click 25 rotating objects using trackpad 26 S safety general safety instructions 68 power adapter 69 screen ... using trackpad 27 password, resetting 56 Photo Booth 19 pinching to zoom 26 Play/pause key 21 plug, AC 10 ports Mini DisplayPort 23 on MacBook 23 power adapter plugging in 69 port 23 using 10 power button 12, 19 problems computer freezes 53 computer won't turn on 54 pointer won...


