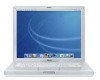

User Guide
Page 2
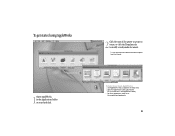
Once you've set up your iBook: 2 Features 4 Basics 6 Internet and email 14 Music and desktop video 20 Productivity 22 Learning more information to the Internet, what's next? In this booklet you get the most out of your iBook and followed the onscreen guide to connect to help you 'll find more and solving problems 28 Installing memory and an AirPort Card 32 Ergonomics and safety 1
Once you've set up your iBook: 2 Features 4 Basics 6 Internet and email 14 Music and desktop video 20 Productivity 22 Learning more information to the Internet, what's next? In this booklet you get the most out of your iBook and followed the onscreen guide to connect to help you 'll find more and solving problems 28 Installing memory and an AirPort Card 32 Ergonomics and safety 1

User Guide
Page 3
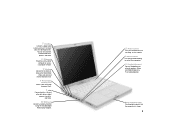
...-in microphone Record sound or control your Web browser, email application, or other favorite application or document automatically. Battery level indicator (underneath) When you press the button on the keyboard to music, movies, games, and multimedia. 2 Built-in features: Optional AirPort wireless Internet and networking Using the optional AirPort Card, you down. Programmable function keys Set the keyboard function keys to music CDs. Optical disc drive Install and run software, or listen to open the drive.
...-in microphone Record sound or control your Web browser, email application, or other favorite application or document automatically. Battery level indicator (underneath) When you press the button on the keyboard to music, movies, games, and multimedia. 2 Built-in features: Optional AirPort wireless Internet and networking Using the optional AirPort Card, you down. Programmable function keys Set the keyboard function keys to music CDs. Optical disc drive Install and run software, or listen to open the drive.
User Guide
Page 4
... a lock and cable to the Internet, browse the World Wide Web, and send and receive electronic mail. FireWire Connect a digital video camera and use it to create your iBook display on , put it to sleep, or shut it down. Mirror your own desktop movies. RGB port Connect an external monitor (using the included Apple RGB Display Adapter). ® Power button Turn your computer. USB Connect printers, Zip and other disk drives, digital cameras, joysticks, and more . Sleep indicator light Pulsating light indicates...
... a lock and cable to the Internet, browse the World Wide Web, and send and receive electronic mail. FireWire Connect a digital video camera and use it to create your iBook display on , put it to sleep, or shut it down. Mirror your own desktop movies. RGB port Connect an external monitor (using the included Apple RGB Display Adapter). ® Power button Turn your computer. USB Connect printers, Zip and other disk drives, digital cameras, joysticks, and more . Sleep indicator light Pulsating light indicates...

User Guide
Page 5
... a quick tutorial on the keyboard. What are the basics? To eject a disc, press the eject key ( ) on mouse and desktop skills, choose Mac Tutorials from the Help menu. To see what's on the disc. Apple menu Use this to select often-used settings. 4 Remote Access Use this for convenient access to see the menu, click the apple () in the disc drive. Disc This appears when a CD or DVD is your starting...
... a quick tutorial on the keyboard. What are the basics? To eject a disc, press the eject key ( ) on mouse and desktop skills, choose Mac Tutorials from the Help menu. To see what's on the disc. Apple menu Use this to select often-used settings. 4 Remote Access Use this for convenient access to see the menu, click the apple () in the disc drive. Disc This appears when a CD or DVD is your starting...
User Guide
Page 11
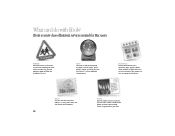
...access to more . Email Get your page on the Internet. KidSafe Make the Internet a safer place for Mac users. Share photos, movies, and other files over the Internet. Now anyone can I do with your iDisk. 10 Purchase additional storage space. Choose a ready-made photo, or create a personalized iCards using photos on Apple's Internet... your kids. iDisk Your own 20 MB of Internet services created for your resumé, and more than 100,000 educator-approved Web sites and blocks the rest. iTools is a new class of free storage on your favorite email programs. iCards Send an...
...access to more . Email Get your page on the Internet. KidSafe Make the Internet a safer place for Mac users. Share photos, movies, and other files over the Internet. Now anyone can I do with your iDisk. 10 Purchase additional storage space. Choose a ready-made photo, or create a personalized iCards using photos on Apple's Internet... your kids. iDisk Your own 20 MB of Internet services created for your resumé, and more than 100,000 educator-approved Web sites and blocks the rest. iTools is a new class of free storage on your favorite email programs. iCards Send an...
User Guide
Page 18
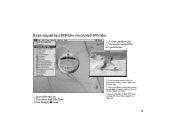
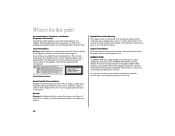
If your iBook to a television using the optional Apple AV Cable to watch the movie, choose Present Video on TV (see Mac Help to learn more ). . To use the whole screen to play the movie or see Apple DVD Player Help, available in the Help menu. 17 Connect your computer has a DVD drive, you can watch DVD video. 2 Use the controller to watch a DVD on Screen from the Apple (K) menu. . To learn more about the Apple DVD Player, see the DVD's special features. 1Insert a DVD video disc. Then choose Apple DVD Player from the Video menu. .
If your iBook to a television using the optional Apple AV Cable to watch the movie, choose Present Video on TV (see Mac Help to learn more ). . To use the whole screen to play the movie or see Apple DVD Player Help, available in the Help menu. 17 Connect your computer has a DVD drive, you can watch DVD video. 2 Use the controller to watch a DVD on Screen from the Apple (K) menu. . To learn more about the Apple DVD Player, see the DVD's special features. 1Insert a DVD video disc. Then choose Apple DVD Player from the Video menu. .

User Guide
Page 20
... camera. Shelf To make clips part of video. Click the Clips button to use the entire screen. Click the Play Full Screen button to see the shelf. 19 Viewers Click the clip viewer (eye tab) to switch between importing from a DV camera and editing. Mode switch Use this to select sections of your movie or view video directly from the shelf to open panels for adjusting and selecting sounds, video...
... camera. Shelf To make clips part of video. Click the Clips button to use the entire screen. Click the Play Full Screen button to see the shelf. 19 Viewers Click the clip viewer (eye tab) to switch between importing from a DV camera and editing. Mode switch Use this to select sections of your movie or view video directly from the shelf to open panels for adjusting and selecting sounds, video...

User Guide
Page 21
... scanned photos. Painting Create art from over 100 built-in functions, then use formatting options to send form letters. Merge mailing information with AppleWorks? Customizable templates Choose from a wide range of predesigned documents and modify them as needed. What can I do with the word processor to make it stand out. Use AppleWorks for writing, drawing, making presentations, and more...
... scanned photos. Painting Create art from over 100 built-in functions, then use formatting options to send form letters. Merge mailing information with AppleWorks? Customizable templates Choose from a wide range of predesigned documents and modify them as needed. What can I do with the word processor to make it stand out. Use AppleWorks for writing, drawing, making presentations, and more...
User Guide
Page 22
To get started using AppleWorks: 1Open AppleWorks, in the AppleWorks folder) m go to modify a ready-made document. . Click the Web tab to download more about AppleWorks: m see AppleWorks Help, available in the Help menu m open the AppleWorks Getting Started file (on your hard disk in the Applications folder on your hard disk. 2 Click the type of document you want to create, or click the Templates tab to the AppleWorks Web site at www.apple.com/appleworks 21 To learn more templates from the Internet.
To get started using AppleWorks: 1Open AppleWorks, in the AppleWorks folder) m go to modify a ready-made document. . Click the Web tab to download more about AppleWorks: m see AppleWorks Help, available in the Help menu m open the AppleWorks Getting Started file (on your hard disk in the Applications folder on your hard disk. 2 Click the type of document you want to create, or click the Templates tab to the AppleWorks Web site at www.apple.com/appleworks 21 To learn more templates from the Internet.
User Guide
Page 27
... computer using the Date & Time control panel) after you see the troubleshooting information in Mac Help or look for the system software installation program on how to prevent and solve problems. You may need to restart it . m If that doesn't work , hold down the Control and Command (x) keys and then press the Power button. m Choose Mac Help from the Help menu. m If that doesn't work , start...
... computer using the Date & Time control panel) after you see the troubleshooting information in Mac Help or look for the system software installation program on how to prevent and solve problems. You may need to restart it . m If that doesn't work , hold down the Control and Command (x) keys and then press the Power button. m Choose Mac Help from the Help menu. m If that doesn't work , start...
User Guide
Page 28
... computer starts up : Make sure the power adapter is plugged into the computer and into the small hole above the audio/video port, wait a few seconds, and then press the Power button. There you want to connect an older device, see www.apple.com/support/bundledsw If you have a problem using files on contacting Apple for instructions and troubleshooting information. m If you can 't eject a CD: Make sure the disc is...
... computer starts up : Make sure the power adapter is plugged into the computer and into the small hole above the audio/video port, wait a few seconds, and then press the Power button. There you want to connect an older device, see www.apple.com/support/bundledsw If you have a problem using files on contacting Apple for instructions and troubleshooting information. m If you can 't eject a CD: Make sure the disc is...
User Guide
Page 29
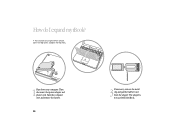
Turn the computer over and remove the battery. 28 3 If necessary, remove the metal clip and pull the AirPort Card from the adapter. How do I expand my iBook? . The adapter is not used with the iBook. For instructions on using the AirPort software, look in the Help Center, available in the Help menu. 1Shut down your computer. Then disconnect the power adapter and phone cord.
Turn the computer over and remove the battery. 28 3 If necessary, remove the metal clip and pull the AirPort Card from the adapter. How do I expand my iBook? . The adapter is not used with the iBook. For instructions on using the AirPort software, look in the Help Center, available in the Help menu. 1Shut down your computer. Then disconnect the power adapter and phone cord.

User Guide
Page 30
Touch a metal surface inside the computer. 5 Slide the AirPort Card (with the AirPort ID and barcode facing up the wire bracket and connect the end of the antenna to the AirPort Card. You may need to reset the date and time (using the Date & Time control panel) after installing the AirPort Card. 29 Then replace the keyboard and battery. . 4 Flip up ) under the wire bracket and into the slot. 6 Press the wire bracket down to secure the card.
Touch a metal surface inside the computer. 5 Slide the AirPort Card (with the AirPort ID and barcode facing up the wire bracket and connect the end of the antenna to the AirPort Card. You may need to reset the date and time (using the Date & Time control panel) after installing the AirPort Card. 29 Then replace the keyboard and battery. . 4 Flip up ) under the wire bracket and into the slot. 6 Press the wire bracket down to secure the card.

User Guide
Page 31
Your iBook has one expansion slot that accepts a 1.25-inch (or shorter), PC-100 compliant, SO-DIMM memory module. Touch a metal surface inside the computer. 30 For more information on the palm rests and trackpad. Turn the computer over and remove the battery. 2 Release the keyboard by sliding the two plastic tabs away from the display. 3 Lift up the keyboard, flip it over, and lay it on installing memory, look in Mac Help, available in the Help menu. 1Shut down your computer. Then disconnect the power adapter and phone cord. Add additional memory. .
Your iBook has one expansion slot that accepts a 1.25-inch (or shorter), PC-100 compliant, SO-DIMM memory module. Touch a metal surface inside the computer. 30 For more information on the palm rests and trackpad. Turn the computer over and remove the battery. 2 Release the keyboard by sliding the two plastic tabs away from the display. 3 Lift up the keyboard, flip it over, and lay it on installing memory, look in Mac Help, available in the Help menu. 1Shut down your computer. Then disconnect the power adapter and phone cord. Add additional memory. .

User Guide
Page 32
You may need to lock it in place. Replace the RAM shield, AirPort Card (if necessary), keyboard, and battery. . To prevent scratching, place a soft cloth between the AirPort Card and the iBook case. 5 Remove the two screws that secure the RAM shield, then carefully lift it out. 6 Insert the RAM into the slot at an angle and press down to reset the date and time (using the Date & Time control panel) after you install memory. 31 4 If necessary, remove the AirPort Card. .
You may need to lock it in place. Replace the RAM shield, AirPort Card (if necessary), keyboard, and battery. . To prevent scratching, place a soft cloth between the AirPort Card and the iBook case. 5 Remove the two screws that secure the RAM shield, then carefully lift it out. 6 Insert the RAM into the slot at an angle and press down to reset the date and time (using the Date & Time control panel) after you install memory. 31 4 If necessary, remove the AirPort Card. .

User Guide
Page 33
... This Not this Change hand positions often to develop chronic pain or discomfort in your hands and fingers relaxed. If you use the keyboard and trackpad, your palms. This Not this work comfortably? Use a light touch when typing or using the trackpad and keep your hands, wrists, or arms, consult a qualified health specialist. 32 Some computer users may develop discomfort...
... This Not this Change hand positions often to develop chronic pain or discomfort in your hands and fingers relaxed. If you use the keyboard and trackpad, your palms. This Not this work comfortably? Use a light touch when typing or using the trackpad and keep your hands, wrists, or arms, consult a qualified health specialist. 32 Some computer users may develop discomfort...
User Guide
Page 34
Or you take the computer from overhead lights and windows. You can adjust the brightness of the chair should support your feet. The back of the screen when you can use a footrest with a keyboard tray that provides firm, comfortable support is to use an external mouse, position the mouse at the same height as your feet flat on the floor. You may have to...
Or you take the computer from overhead lights and windows. You can adjust the brightness of the chair should support your feet. The back of the screen when you can use a footrest with a keyboard tray that provides firm, comfortable support is to use an external mouse, position the mouse at the same height as your feet flat on the floor. You may have to...
User Guide
Page 35
... the installation instructions carefully before opening the computer to insert the plug into a wall socket. If you are in a location where airflow around your computer. m Always disconnect the power adapter, phone line, and any other electronic devices may look similar, but they may damage your power adapter. m When using your computer, remember the following: m Read all of its internal and external parts are...
... the installation instructions carefully before opening the computer to insert the plug into a wall socket. If you are in a location where airflow around your computer. m Always disconnect the power adapter, phone line, and any other electronic devices may look similar, but they may damage your power adapter. m When using your computer, remember the following: m Read all of its internal and external parts are...

User Guide
Page 36
... Apple-authorized service provider or Apple for additional information about this or any kind into the case m your iBook looking its best. Operation of this process to handle any other warranty question. For your own safety and that only an Apple-certified technician install additional RAM or an AirPort Card. Warning Do not use products made specifically for instructions on your computer, Apple...
... Apple-authorized service provider or Apple for additional information about this or any kind into the case m your iBook looking its best. Operation of this process to handle any other warranty question. For your own safety and that only an Apple-certified technician install additional RAM or an AirPort Card. Warning Do not use products made specifically for instructions on your computer, Apple...
User Guide
Page 37
... your equipment's manual may not be opened for any reason, even when the computer is replaced by eliminating wasted energy. Battery Warning Risk of the computer system could lead to your Apple-authorized dealer or service provider. Laser Information Warning Making adjustments or performing procedures other uses where the failure of explosion if battery is turned off. If your computer needs service, contact...
... your equipment's manual may not be opened for any reason, even when the computer is replaced by eliminating wasted energy. Battery Warning Risk of the computer system could lead to your Apple-authorized dealer or service provider. Laser Information Warning Making adjustments or performing procedures other uses where the failure of explosion if battery is turned off. If your computer needs service, contact...

