
User Guide
Page 1
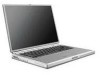
Congratulations, you and your MacBook Air were made for each other.
Congratulations, you and your MacBook Air were made for each other.

User Guide
Page 2
Mac Help trackpad Click anywhere Scroll Swipe Pinch and zoom Rotate Mac Help finder MacBook Air Multi-Touch trackpad Scroll through files, adjust images, and enlarge text using just your MacBook Air. www.apple.com/macbookair Built-in the world. Get to know your fingers. Mac Help isight Finder Browse your files like you browse your music with friends and family anywhere in iSight camera and iChat Video chat with Cover Flow.
Mac Help trackpad Click anywhere Scroll Swipe Pinch and zoom Rotate Mac Help finder MacBook Air Multi-Touch trackpad Scroll through files, adjust images, and enlarge text using just your MacBook Air. www.apple.com/macbookair Built-in the world. Get to know your fingers. Mac Help isight Finder Browse your files like you browse your music with friends and family anywhere in iSight camera and iChat Video chat with Cover Flow.
User Guide
Page 3
Mac Help spotlight Safari Experience the web with ease. GarageBand Help record iMovie Help movie GarageBand Create a greatsounding song with the fastest browser in minutes. Mac Help safari iLife www.apple.com/ilife iPhoto Turn your files. iPhoto Help photos iMovie Make a greatlooking movie in the world. Mac Help time machine Quick Look Instantly preview your photos into something amazing. Mac Help quick look Spotlight Find anything on your files. Mac OS X Snow Leopard www.apple.com/macosx Time Machine Automatically back up and restore your Mac.
Mac Help spotlight Safari Experience the web with ease. GarageBand Help record iMovie Help movie GarageBand Create a greatsounding song with the fastest browser in minutes. Mac Help safari iLife www.apple.com/ilife iPhoto Turn your files. iPhoto Help photos iMovie Make a greatlooking movie in the world. Mac Help time machine Quick Look Instantly preview your photos into something amazing. Mac Help quick look Spotlight Find anything on your files. Mac OS X Snow Leopard www.apple.com/macosx Time Machine Automatically back up and restore your Mac.

User Guide
Page 5
Contents Chapter 1: Ready, Set Up, Go 8 Welcome 9 What's in the Box 10 Setting Up Your MacBook Air 15 Setting Up DVD or CD Sharing 16 Migrating Information to Your MacBook Air 19 Getting Additional Information onto Your MacBook Air 21 Putting Your MacBook Air to Sleep or Shutting It Down Chapter 2: Life with Your MacBook Air 24 Basic Features of Your MacBook Air 26 Keyboard Features of Your MacBook Air 28 Ports on Your MacBook Air 30 Using the Multi-Touch Trackpad 34 Running Your MacBook Air on Battery Power 35 Getting Answers Contents 5
Contents Chapter 1: Ready, Set Up, Go 8 Welcome 9 What's in the Box 10 Setting Up Your MacBook Air 15 Setting Up DVD or CD Sharing 16 Migrating Information to Your MacBook Air 19 Getting Additional Information onto Your MacBook Air 21 Putting Your MacBook Air to Sleep or Shutting It Down Chapter 2: Life with Your MacBook Air 24 Basic Features of Your MacBook Air 26 Keyboard Features of Your MacBook Air 28 Ports on Your MacBook Air 30 Using the Multi-Touch Trackpad 34 Running Your MacBook Air on Battery Power 35 Getting Answers Contents 5
User Guide
Page 6
Chapter 3: Problem, Meet Solution 40 Problems That Prevent You from Using Your MacBook Air 44 Using Apple Hardware Test 45 Problems with Your Internet Connection 46 Problems with AirPort Extreme Wireless Communication 47 Keeping Your Software Up to Date 47 Reinstalling the ..., and Support 52 Locating Your Product Serial Number Chapter 4: Last, but Not Least 54 Important Safety Information 57 Important Handling Information 59 Understanding Ergonomics 61 Apple and the Environment 62 Regulatory Compliance Information Looking for Something? 68 Index 6 Contents
Chapter 3: Problem, Meet Solution 40 Problems That Prevent You from Using Your MacBook Air 44 Using Apple Hardware Test 45 Problems with Your Internet Connection 46 Problems with AirPort Extreme Wireless Communication 47 Keeping Your Software Up to Date 47 Reinstalling the ..., and Support 52 Locating Your Product Serial Number Chapter 4: Last, but Not Least 54 Important Safety Information 57 Important Handling Information 59 Understanding Ergonomics 61 Apple and the Environment 62 Regulatory Compliance Information Looking for Something? 68 Index 6 Contents

User Guide
Page 8
Apple may release new versions and updates to its system software, so the images shown in Mac Help. Welcome Congratulations on page 54) carefully before you ...
Apple may release new versions and updates to its system software, so the images shown in Mac Help. Welcome Congratulations on page 54) carefully before you ...
User Guide
Page 9
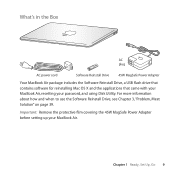
For more information about how and when to use the Software Reinstall Drive, see Chapter 3, "Problem, Meet Solution" on page 39. Important: Remove the protective film covering the 45W MagSafe Power Adapter before setting up your password, and using Disk Utility. What's in the Box AC plug AC power cord Software Reinstall Drive 45W MagSafe Power Adapter Your MacBook Air package includes the Software Reinstall Drive, a USB flash drive that contains software for reinstalling Mac OS X and the applications that came with your MacBook Air, resetting your MacBook Air. Chapter 1 Ready...
For more information about how and when to use the Software Reinstall Drive, see Chapter 3, "Problem, Meet Solution" on page 39. Important: Remove the protective film covering the 45W MagSafe Power Adapter before setting up your password, and using Disk Utility. What's in the Box AC plug AC power cord Software Reinstall Drive 45W MagSafe Power Adapter Your MacBook Air package includes the Software Reinstall Drive, a USB flash drive that contains software for reinstalling Mac OS X and the applications that came with your MacBook Air, resetting your MacBook Air. Chapter 1 Ready...
User Guide
Page 10
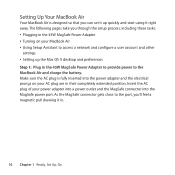
The following pages take you through the setup process, including these tasks: ÂÂ Plugging in the 45W MagSafe Power Adapter ÂÂ Turning on your AC plug are in their completely extended position. As the MagSafe connector gets close to the port, you can set it up quickly and start using it in the 45W MagSafe Power Adapter to provide power to access a network and configure a user account and other settings ÂÂ Setting up the Mac OS X desktop and preferences Step 1: Plug in . 10 Chapter 1 Ready, Set Up, Go Setting Up Your MacBook Air Your MacBook Air is ...
The following pages take you through the setup process, including these tasks: ÂÂ Plugging in the 45W MagSafe Power Adapter ÂÂ Turning on your AC plug are in their completely extended position. As the MagSafe connector gets close to the port, you can set it up quickly and start using it in the 45W MagSafe Power Adapter to provide power to access a network and configure a user account and other settings ÂÂ Setting up the Mac OS X desktop and preferences Step 1: Plug in . 10 Chapter 1 Ready, Set Up, Go Setting Up Your MacBook Air Your MacBook Air is ...

User Guide
Page 11
An amber light indicates that the battery is charging. A green light indicates that the battery is fully charged. Chapter 1 Ready, Set Up, Go 11 Plug the other end into a working power outlet. AC plug MagSafe connector ¯ MagSafe power port AC power cord To extend the reach of your MacBook Air, pull the plug, not the cord. When you don't see a light, make sure the connector is seated properly and the power adapter is seated firmly. If you connect the power adapter to your MacBook Air, the indicator light on the MagSafe connector starts to the adapter, making sure it ...
An amber light indicates that the battery is charging. A green light indicates that the battery is fully charged. Chapter 1 Ready, Set Up, Go 11 Plug the other end into a working power outlet. AC plug MagSafe connector ¯ MagSafe power port AC power cord To extend the reach of your MacBook Air, pull the plug, not the cord. When you don't see a light, make sure the connector is seated properly and the power adapter is seated firmly. If you connect the power adapter to your MacBook Air, the indicator light on the MagSafe connector starts to the adapter, making sure it ...

User Guide
Page 12
After it starts up . If your MacBook Air. Step 2: Press the power (®) button briefly to start up , Setup Assistant opens automatically. The power button is located in the upper right corner of your MacBook Air a few moments to turn on your MacBook Air doesn't turn on , see page 42. 12 Chapter 1 Ready, Set Up, Go When you turn on your MacBook Air, you hear a startup tone. ® Power button It takes your keyboard.
After it starts up . If your MacBook Air. Step 2: Press the power (®) button briefly to start up , Setup Assistant opens automatically. The power button is located in the upper right corner of your MacBook Air a few moments to turn on your MacBook Air doesn't turn on , see page 42. 12 Chapter 1 Ready, Set Up, Go When you turn on your MacBook Air, you hear a startup tone. ® Power button It takes your keyboard.
User Guide
Page 13
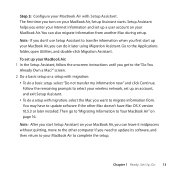
Setup Assistant helps you need to update its software, and then return to your MacBook Air to select your MacBook Air. Go to migrate information from another Mac during setup. Follow the remaining prompts to complete the setup. Step 3: Configure your MacBook Air, Setup Assistant starts. Then go to "Migrating Information to Your MacBook Air" on your wireless network, set up your MacBook Air, you can leave it later using Migration Assistant. You can also migrate information from . Note: If you don't use Setup Assistant to the "Do You Already Own a Mac?" screen. 2 ...
Setup Assistant helps you need to update its software, and then return to your MacBook Air to select your MacBook Air. Go to migrate information from another Mac during setup. Follow the remaining prompts to complete the setup. Step 3: Configure your MacBook Air, Setup Assistant starts. Then go to "Migrating Information to Your MacBook Air" on your wireless network, set up your MacBook Air, you can leave it later using Migration Assistant. You can also migrate information from . Note: If you don't use Setup Assistant to the "Do You Already Own a Mac?" screen. 2 ...
User Guide
Page 14
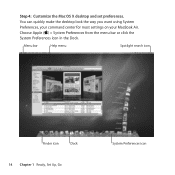
Step 4: Customize the Mac OS X desktop and set preferences. Menu bar Help menu Spotlight search icon Finder icon Dock 14 Chapter 1 Ready, Set Up, Go System Preferences icon Choose Apple () > System Preferences from the menu bar or click the System Preferences icon in the Dock. You can quickly make the desktop look the way you want using System Preferences, your command center for most settings on your MacBook Air.
Step 4: Customize the Mac OS X desktop and set preferences. Menu bar Help menu Spotlight search icon Finder icon Dock 14 Chapter 1 Ready, Set Up, Go System Preferences icon Choose Apple () > System Preferences from the menu bar or click the System Preferences icon in the Dock. You can quickly make the desktop look the way you want using System Preferences, your command center for most settings on your MacBook Air.

User Guide
Page 15
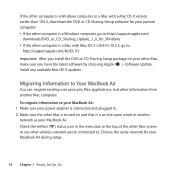
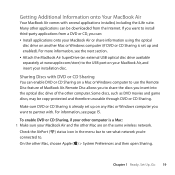
Setting Up DVD or CD Sharing You can partner your MacBook Air, if the other computer, but you can partner with another Mac or Windows computer that has an optical disc drive and is on page 19) The computer with the optical drive can be a Mac with Mac OS X v10.4.11 or later, or a Windows XP or Windows Vista computer. Mac or Windows computer MacBook Air Chapter 1 Ready, Set Up, Go 15 You can use only one partner computer at a time. If the Mac has Mac OS X v10.5.3 or later, DVD or CD Sharing is a Mac (see "Migrating Information to Your MacBook Air" on page 16) ÂÂ Share the ...
Setting Up DVD or CD Sharing You can partner your MacBook Air, if the other computer, but you can partner with another Mac or Windows computer that has an optical disc drive and is on page 19) The computer with the optical drive can be a Mac with Mac OS X v10.4.11 or later, or a Windows XP or Windows Vista computer. Mac or Windows computer MacBook Air Chapter 1 Ready, Set Up, Go 15 You can use only one partner computer at a time. If the Mac has Mac OS X v10.5.3 or later, DVD or CD Sharing is a Mac (see "Migrating Information to Your MacBook Air" on page 16) ÂÂ Share the ...
User Guide
Page 16
... Mac OS X updates. If the other computer is a Windows computer or a Mac with Mac OS X v10.4.10-10.5.2, go to: http://support.apple.com/ downloads/DVD_or_CD_Sharing_Update_1_0_for_Windows ÂÂ If the other Mac, make sure you 're connected to your MacBook Air: 1 Make sure your power adapter is... Air You can migrate existing user accounts, files, applications, and other Mac screen to see what wireless network you have the latest software by choosing Apple () > Software Update. Check the AirPort (Z) status icon in . 2 Make sure the other Mac is turned on and that it is a ...
... Mac OS X updates. If the other computer is a Windows computer or a Mac with Mac OS X v10.4.10-10.5.2, go to: http://support.apple.com/ downloads/DVD_or_CD_Sharing_Update_1_0_for_Windows ÂÂ If the other Mac, make sure you 're connected to your MacBook Air: 1 Make sure your power adapter is... Air You can migrate existing user accounts, files, applications, and other Mac screen to see what wireless network you have the latest software by choosing Apple () > Software Update. Check the AirPort (Z) status icon in . 2 Make sure the other Mac is turned on and that it is a ...

User Guide
Page 17
Select "from another Mac" as the source of the information you get to transfer. On the next screen, choose your MacBook Air, follow the Setup Assistant onscreen instructions until you want to the "Do You Already Own a Mac?" screen. You will enter the passcode in Migration Assistant on the other Mac, open Migration Assistant (located in /Applications/Utilities/), and then click Continue. Chapter 1 Ready, Set Up, Go 17 3 On your wireless network, and then click Continue. 4 When you see the Connect To Your Other Mac screen with a passcode displayed, do the remaining steps on ...
Select "from another Mac" as the source of the information you get to transfer. On the next screen, choose your MacBook Air, follow the Setup Assistant onscreen instructions until you want to the "Do You Already Own a Mac?" screen. You will enter the passcode in Migration Assistant on the other Mac, open Migration Assistant (located in /Applications/Utilities/), and then click Continue. Chapter 1 Ready, Set Up, Go 17 3 On your wireless network, and then click Continue. 4 When you see the Connect To Your Other Mac screen with a passcode displayed, do the remaining steps on ...
User Guide
Page 18
Important: Don't use the other Mac for a migration method, select "To another Mac", and then click Continue. 7 On the other Mac, quit any other open applications and then click Continue. 8 On the other Mac. 18 Chapter 1 Ready, Set Up, Go If the connection is complete. You can choose the items (user accounts, documents, movies, music, photos, and so on) that you can resume the migration later using Migration Assistant on your MacBook Air and your other Mac, enter the six-digit passcode displayed in Setup Assistant on your MacBook Air. 9 Click Continue to your new MacBook Air. 6 ...
Important: Don't use the other Mac for a migration method, select "To another Mac", and then click Continue. 7 On the other Mac, quit any other open applications and then click Continue. 8 On the other Mac. 18 Chapter 1 Ready, Set Up, Go If the connection is complete. You can choose the items (user accounts, documents, movies, music, photos, and so on) that you can resume the migration later using Migration Assistant on your MacBook Air and your other Mac, enter the six-digit passcode displayed in Setup Assistant on your MacBook Air. 9 Click Continue to your new MacBook Air. 6 ...
User Guide
Page 19
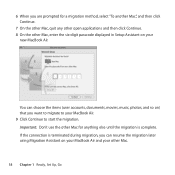
...information, see the next section. ÂÂ Attach the MacBook Air SuperDrive (an external USB optical disc drive available separately at www.apple.com/store) to partner with. Check the AirPort (Z) status icon in the menu bar to see what network you want to install...or Windows computer (if DVD or CD Sharing is set up and enabled). For more information, see page 15. On the other Mac, choose Apple () > System Preferences and then open Sharing. Many other applications can : ÂÂ Install applications onto your installation disc. Getting Additional ...
...information, see the next section. ÂÂ Attach the MacBook Air SuperDrive (an external USB optical disc drive available separately at www.apple.com/store) to partner with. Check the AirPort (Z) status icon in the menu bar to see what network you want to install...or Windows computer (if DVD or CD Sharing is set up and enabled). For more information, see page 15. On the other Mac, choose Apple () > System Preferences and then open Sharing. Many other applications can : ÂÂ Install applications onto your installation disc. Getting Additional ...
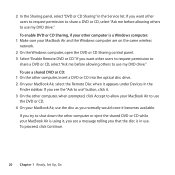
User Guide
Page 20
2 In the Sharing panel, select "DVD or CD Sharing" in use a shared DVD or CD: 1 On the other users to request permission to share a DVD or CD, select "Ask me before allowing others to shut down the other computer or eject the shared DVD or CD while your MacBook Air is in the Service list. To use . To enable DVD or CD Sharing, if your other computer is a Windows computer: 1 Make sure your MacBook Air, select the Remote Disc when it appears under Devices in the Finder sidebar. If you try to use my DVD drive." To proceed, click Continue. 20 Chapter 1 Ready, Set Up, Go If you...
2 In the Sharing panel, select "DVD or CD Sharing" in use a shared DVD or CD: 1 On the other users to request permission to share a DVD or CD, select "Ask me before allowing others to shut down the other computer or eject the shared DVD or CD while your MacBook Air is in the Service list. To use . To enable DVD or CD Sharing, if your other computer is a Windows computer: 1 Make sure your MacBook Air, select the Remote Disc when it appears under Devices in the Finder sidebar. If you try to use my DVD drive." To proceed, click Continue. 20 Chapter 1 Ready, Set Up, Go If you...
User Guide
Page 21
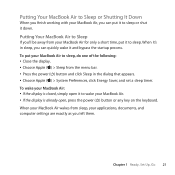
... 1 Ready, Set Up, Go 21 To put your MacBook Air to sleep, do one of the following: ÂÂ Close the display. ÂÂ Choose Apple () > Sleep from the menu bar. ÂÂ Press the power (®) button and click Sleep in sleep, you can put it to sleep. When... it's in the dialog that appears. ÂÂ Choose Apple () > System Preferences, click Energy Saver, and set a sleep timer. To wake your MacBook Air: ÂÂ If the display is closed, simply open it...
... 1 Ready, Set Up, Go 21 To put your MacBook Air to sleep, do one of the following: ÂÂ Close the display. ÂÂ Choose Apple () > Sleep from the menu bar. ÂÂ Press the power (®) button and click Sleep in sleep, you can put it to sleep. When... it's in the dialog that appears. ÂÂ Choose Apple () > System Preferences, click Energy Saver, and set a sleep timer. To wake your MacBook Air: ÂÂ If the display is closed, simply open it...
User Guide
Page 22
To shut down . If you aren't going to use your MacBook Air for information about how to shut it down your battery from the menu bar. ÂÂ Press the power (®) button and click Shut Down in the dialog that appears. Shutting Down Your MacBook Air If you plan to store your MacBook Air for an extended period of time, see "Important Handling Information" on page 57 for several days, it's best to prevent your MacBook Air, do one of the following: ÂÂ Choose Apple () > Shut Down from draining completely. 22 Chapter 1 Ready, Set Up, Go
To shut down . If you aren't going to use your MacBook Air for information about how to shut it down your battery from the menu bar. ÂÂ Press the power (®) button and click Shut Down in the dialog that appears. Shutting Down Your MacBook Air If you plan to store your MacBook Air for an extended period of time, see "Important Handling Information" on page 57 for several days, it's best to prevent your MacBook Air, do one of the following: ÂÂ Choose Apple () > Shut Down from draining completely. 22 Chapter 1 Ready, Set Up, Go
